Grizzly
Industrial, Inc.
G1023SL Series
10" LEFT-TILTING TABLE SAW
OWNER'S MANUAL
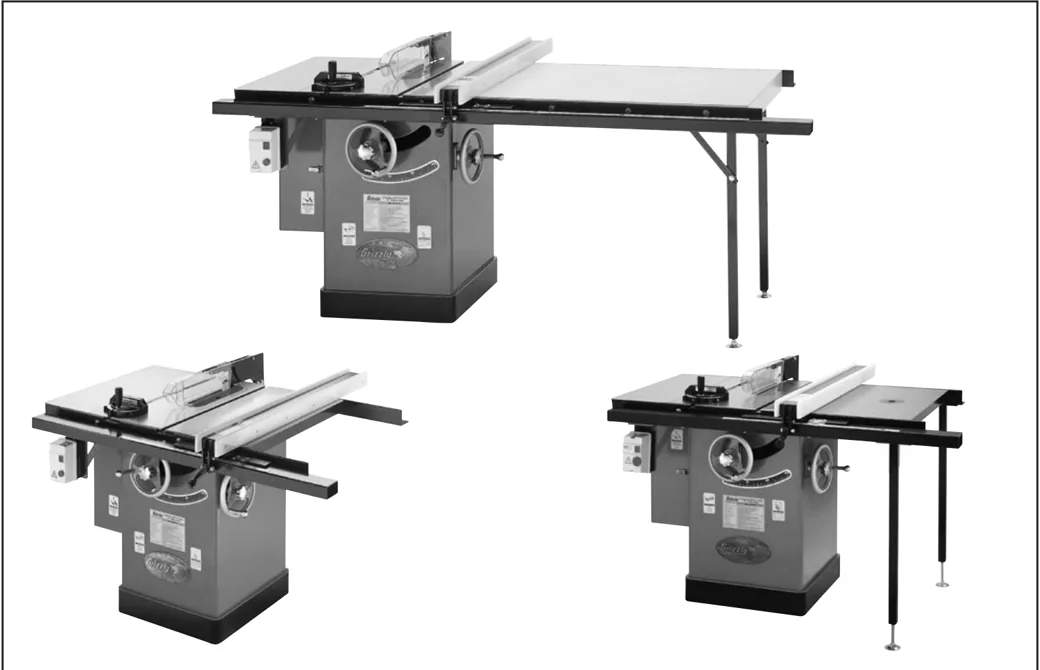
COVERS G1023SL, G1023SLX, G1023SLW, G1023SLWX, G1023SLWX3

COPYRIGHT © MARCH, 2006 BY GRIZZLY INDUSTRIAL, INC. WARNING: NO PORTION OF THIS MANUAL MAY BE REPRODUCED IN ANY SHAPE OR FORM WITHOUT THE WRITTEN APPROVAL OF GRIZZLY INDUSTRIAL, INC. #TR8016 PRINTED IN TAIWAN
WARNING!
This manual provides critical safety instructions on the proper setup, operation, maintenance and service of this machine/equipment.
Failure to read, understand and follow the instructions given in this manual may result in serious personal injury, including amputation, electrocution or death.
The owner of this machine/equipment is solely responsible for its safe use. This responsibility includes but is not limited to proper installation in a safe environment, personnel training and usage authorization, proper inspection and maintenance, manual availability and comprehension, application of safety devices, blade/cutter integrity, and the usage of personal protective equipment.
The manufacturer will not be held liable for injury or property damage from negligence, improper training, machine modifications or misuse.
WARNING!
Some dust created by power sanding, sawing, grinding, drilling, and other construction activities contains chemicals known to the State of California to cause cancer, birth defects or other reproductive harm. Some examples of these chemicals are:
- Lead from lead-based paints.
- Crystalline silica from bricks, cement and other masonry products.
- Arsenic and chromium from chemically-treated lumber.
Your risk from these exposures varies, depending on how often you do this type of work. To reduce your exposure to these chemicals: Work in a well ventilated area, and work with approved safety equipment, such as those dust masks that are specially designed to filter out microscopic particles.


Table of Contents
- INTRODUCTION ........ 3
- Foreword ........ 3
- Contact Info ........ 3
- Machine Data Sheet ........ 4
- Identification ........ 5
- SECTION 1: SAFETY ........ 6
- Safety Instructions for Machinery ........ 6
- Additional Safety Instructions for Table Saws ........ 8
- Preventing Kickback ........ 9
- Protecting Yourself From Kickback ........ 9
- Glossary of Terms ........ 10
- SECTION 2: CIRCUIT REQUIREMENTS ........ 11
- Operation ........ 11
- Grounding ........ 12
- Extension Cords ........ 12
- SECTION 3: SET UP ........ 13
- Set Up Safety ........ 13
- Items Needed for Set Up ........ 13
- Unpacking ........ 13
- Hardware Recognition Chart ........ 14
- Machine Inventory ........ 15
- Fence Inventory ........ 16
- G1023SL, W, WX, WX3 ........ 16
- Fence Inventory ........ 16
- G1023SLX ........ 16
- Router Table Inventory ........ 17
- Clean Up ........ 17
- Site Considerations ........ 18
- Motor Brace ........ 18
- Tables ........ 19
- Switch ........ 20
- Fence ........ 20
- Router Table & Legs G1023SLW, WX, WX3 ........ 20
- Extension Table & Legs G1023SLX ........ 21
- Motor Cover ........ 22
- Dust Port ........ 22
- Handwheel Lock Knob & Handle ........ 22
- Table Insert ........ 23
- Saw Blade ........ 23
- Guard Bracket ........ 24
- Blade Guard/Splitter ........ 24
- Pre-Run Check ........ 27
- Test Run ........ 27
- SECTION 4: OPERATIONS ........ 28
- Basic Controls ........ 28
- Mounting Router ........ 29
- G1023SLW, WX, WX3 ........ 29
- Blade Selection ........ 29
- Non-Through and Through Cuts ........ 31
- Ripping ........ 31
- Crosscutting ........ 32
- Miter Cuts ........ 33
- Blade Tilt/Bevel Cuts ........ 33
- Dado Cutting ........ 34
- Rabbet Cutting ........ 36
- Resawing ........ 38
- SECTION 5: ACCESSORIES ........ 41
- SECTION 6: MAINTENANCE ........ 45
- Schedule ........ 45
- Cleaning ........ 45
- Lubrication ........ 45
- SECTION 7: SERVICE ........ 46
- Troubleshooting ........ 46
- Blade Tilt Stops ........ 48
- Miter Slot to Blade ........ 49
- Blade Alignment ........ 51
- Adjusting Fence ........ 52
- Miter Gauge ........ 52
- G1023SL, SLX, SLW Wiring ........ 53
- G1023SLWX Wiring ........ 54
- G1023SLWX3 Wiring ........ 55
- G1023SL (All) Main Parts ........ 56
- G1023SL (All) Main Parts ........ 57
- G1023SL (All) Arbor/Motor Parts ........ 58
- G1023SL (All) Arbor/Motor Parts ........ 59
- G1023SL (All) Miter Gauge & Blade Guard ........ 60
- G1023SL (All) Miter Gauge & Blade Guard ........ 61
- G1023SL (All) Fence ........ 62
- G1023SL, W, WX, WX3 Fence Rails ........ 63
- G1023SLX Fence Rails ........ 64
- G1023SLW, X, X3 Router Table & Legs Parts ........ 65
- WARRANTY AND RETURNS ........ 66
INTRODUCTION
Foreword
We are proud to offer the G1023SL Series table saws. These machines are part of a growing Grizzly family of fine woodworking machinery. When used according to the guidelines set forth in this manual, you can expect years of trouble-free, enjoyable operation and proof of Grizzly’s commitment to customer satisfaction.
We are pleased to provide this manual. It was written to guide you through assembly, review safety considerations, and cover general operating procedures. It represents our effort to produce the best documentation possible.
The specifications, drawings, and photographs illustrated in this manual represent the G1023SL Series table saws as supplied when the manual was prepared. However, owing to Grizzly’s policy of continuous improvement, changes may be made at any time with no obligation on the part of Grizzly. For your convenience, we always keep current Grizzly manuals available on our website at www.grizzly.com. Any updates to your machine will be reflected in these manuals as soon as they are complete. Visit our site often to check for the latest updates to this manual!
Contact Info
If you have any comments regarding this manual, please write to us at the address below:
Grizzly Industrial, Inc. c/o Technical Documentation Manager P.O. Box 2069 Bellingham, WA 98227-2069
We stand behind our machines. If you have any service questions or parts requests, please call or write us at the location listed below.
Grizzly Industrial, Inc. 1203 Lycoming Mall Circle Muncy, PA 17756 Phone: (570) 546-9663 Fax: (800) 438-5901 E-Mail: techsupport@grizzly.com Web Site: http://www.grizzly.com
G1023SL Series Table Saw -3-
Grizzly Industrial, Inc. MACHINE DATA SHEET
Customer Service #: (570) 546-9663 • To Order Call: (800) 523-4777 • Fax #: (800) 438-5901
MODEL G1023SL Series
10" LEFT-TILTING TABLE SAWS
| Model Number | G1023SL | G1023SLX | G1023SLW | G1023SLWX | G1023SLWX3 |
|---|---|---|---|---|---|
| Motor | 3 HP | 3 HP | 3 HP | 5 HP | 5 HP |
| Voltage | 220V | 220V | 220V | 220V | 220V/440V |
| Phase | Single-Phase | Single-Phase | Single-Phase | Single-Phase | 3-Phase |
| Amps | 18 | 18 | 18 | 25 | 15/7.5 |
| Speed | 3450 RPM | 3450 RPM | 3450 RPM | 3450 RPM | 3450 RPM |
| Table Size (full assembly) | 40-1/8" x 27" | 84-1/8" x 27" | 48" x 27" | 48" x 27" | 48" x 27" |
| Table Height | 34" | 34" | 34" | 34" | 34" |
| Overall Machine Size | 56"L x 34"W | 84"L x 34"W | 56"L x 34"W | 56"L x 34"W | 56"L x 34"W |
| Footprint Size | 20-1/2"L x 20-1/2"W | 20-1/2"L x 20-1/2"W | 20-1/2"L x 20-1/2"W | 20-1/2"L x 20-1/2"W | 20-1/2"L x 20-1/2"W |
| Weight | 410 lbs. | 500 lbs. | 430 lbs. | 430 lbs. | 430 lbs. |
| Fence | Shop Fox Classic | Shop Fox Classic | Shop Fox Classic | Shop Fox Classic | Shop Fox Classic |
| Router Table Ext Wing | No | No | Yes | Yes | Yes |
| Maximum Rip Right of Blade | 26" | 52" | 26" | 26" | 26" |
| Maximum Rip Left of Blade | 8" | 8" | 8" | 8" | 8" |
| Maximum Depth of Cut at 90° | 3" | 3" | 3" | 3" | 3" |
| Maximum Depth of Cut at 45° | 2-1/8" | 2-1/8" | 2-1/8" | 2-1/8" | 2-1/8" |
| Maximum Blade Diameter | 10" | 10" | 10" | 10" | 10" |
| Arbor Size | 5/8" | 5/8" | 5/8" | 5/8" | 5/8" |
| Arbor Speed | 4200 RPM | 4200 RPM | 4200 RPM | 4200 RPM | 4200 RPM |
| Rim Speed | 11,000 FPM | 11,000 FPM | 11,000 FPM | 11,000 FPM | 11,000 FPM |
| Blade Tilt (Left) | 0° – 45° | 0° – 45° | 0° – 45° | 0° – 45° | 0° – 45° |
| Maximum Dado Width | □□/□□" | □□/□□" | □□/□□" | □□/□□" | □□/□□" |
| Miter Slot Size | 3/4"W x 3/8"H | 3/4"W x 3/8"H | 3/4"W x 3/8"H | 3/4"W x 3/8"H | 3/4"W x 3/8"H |
| Dust Port Size | 4" | 4" | 4" | 4" | 4" |
| Country of Origin | Taiwan | Taiwan | Taiwan | Taiwan | Taiwan |
| Assembly Time (approx.) | 60 Minutes | 90 Minutes | 75 Minutes | 75 Minutes | 75 Minutes |
| Warranty | 1 Year | 1 Year | 1 Year | 1 Year | 1 Year |
REVISED □/□□□□
-4- G1023SL Series Table Saw

Identification
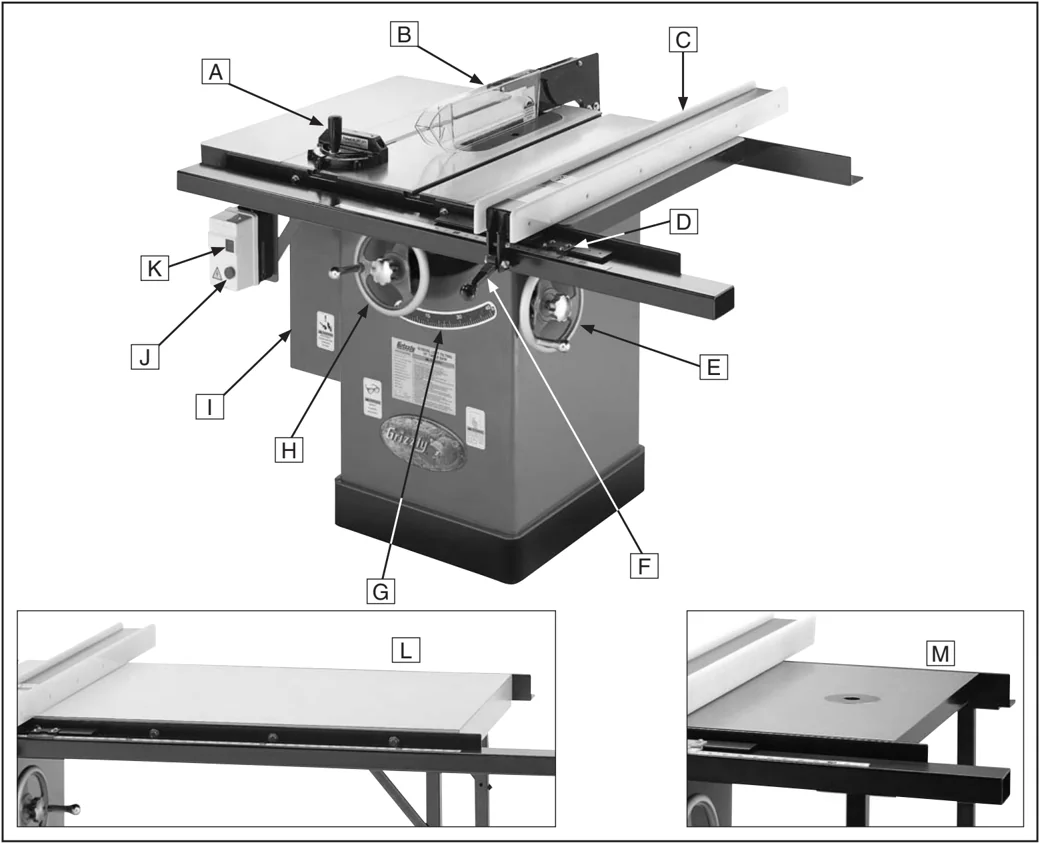
A. Miter Gauge B. Blade Guard and Splitter C. Rip Fence (Shop Fox Classic) D. Fence Scale Indicator E. Blade Tilt Handwheel & Lock F. Fence Lock Handle G. Blade Tilt Scale H. Blade Height Handwheel I. Motor Cover J. STOP Button K. ON Button L. Extension Table & Rails (G1023SLX only) M. Router Table Extension Wing (G1023SLW models only)
SECTION 1: SAFETY
⚠WARNING
For Your Own Safety, Read Instruction Manual Before Operating this Machine
The purpose of safety symbols is to attract your attention to possible hazardous conditions. This manual uses a series of symbols and signal words which are intended to convey the level of importance of the safety messages. The progression of symbols is described below. Remember that safety messages by themselves do not eliminate danger and are not a substitute for proper accident prevention measures.
⚠DANGER Indicates an imminently hazardous situation which, if not avoided, WILL result in death or serious injury.
⚠WARNING Indicates a potentially hazardous situation which, if not avoided, COULD result in death or serious injury.
⚠CAUTION Indicates a potentially hazardous situation which, if not avoided, MAY result in minor or moderate injury. It may also be used to alert against unsafe practices.
NOTICE This symbol is used to alert the user to useful information about proper operation of the machine.
⚠WARNING
Safety Instructions for Machinery
- READ THROUGH THE ENTIRE MANUAL BEFORE STARTING MACHINERY. Machinery presents serious injury hazards to untrained users.
- ALWAYS USE ANSI APPROVED SAFETY GLASSES WHEN OPERATING MACHINERY. Everyday eyeglasses only have impact resistant lenses—they are NOT safety glasses.
- ALWAYS WEAR A NIOSH APPROVED RESPIRATOR WHEN OPERATING MACHINERY THAT PRODUCES DUST. Wood dust is a carcinogen and can cause cancer and severe respiratory illnesses.
- ALWAYS USE HEARING PROTECTION WHEN OPERATING MACHINERY. Machinery noise can cause permanent hearing damage.
- WEAR PROPER APPAREL. DO NOT wear loose clothing, gloves, neckties, rings, or jewelry which may get caught in moving parts. Wear protective hair covering to contain long hair and wear non-slip footwear.
- NEVER OPERATE MACHINERY WHEN TIRED, OR UNDER THE INFLUENCE OF DRUGS OR ALCOHOL. Be mentally alert at all times when running machinery.
-6- G1023SL Series Table Saw

⚠WARNING
Safety Instructions for Machinery
7. ONLY ALLOW TRAINED AND PROPERLY SUPERVISED PERSONNEL TO OPERATE MACHINERY. Make sure operation instructions are safe and clearly understood.
8. KEEP CHILDREN AND VISITORS AWAY. Keep all children and visitors a safe distance from the work area.
9. MAKE WORKSHOP CHILD PROOF. Use padlocks, master switches, and remove start switch keys.
10. NEVER LEAVE WHEN MACHINE IS RUNNING. Turn power OFF and allow all moving parts to come to a complete stop before leaving machine unattended.
11. DO NOT USE IN DANGEROUS ENVIRONMENTS. DO NOT use machinery in damp, wet locations, or where any flammable or noxious fumes may exist.
12. KEEP WORK AREA CLEAN AND WELL LIT. Clutter and dark shadows may cause accidents.
13. USE A GROUNDED EXTENSION CORD RATED FOR THE MACHINE AMPERAGE. Undersized cords overheat and lose power. Replace extension cords if they become damaged. DO NOT use extension cords for 220V machinery.
14. ALWAYS DISCONNECT FROM POWER SOURCE BEFORE SERVICING MACHINERY. Make sure switch is in OFF position before reconnecting.
15. MAINTAIN MACHINERY WITH CARE. Keep blades sharp and clean for best and safest performance. Follow instructions for lubricating and changing accessories.
16. MAKE SURE GUARDS ARE IN PLACE AND WORK CORRECTLY BEFORE USING MACHINERY.
17. REMOVE ADJUSTING KEYS AND WRENCHES. Make a habit of checking for keys and adjusting wrenches before turning machinery ON.
18. CHECK FOR DAMAGED PARTS BEFORE USING MACHINERY. Check for binding and alignment of parts, broken parts, part mounting, loose bolts, and any other conditions that may affect machine operation. Repair or replace damaged parts.
19. USE RECOMMENDED ACCESSORIES. Refer to the instruction manual for recommended accessories. The use of improper accessories may cause risk of injury.
20. DO NOT FORCE MACHINERY. Work at the speed for which the machine or accessory was designed.
21. SECURE WORKPIECE. Use clamps or a vise to hold the workpiece when practical. A secured workpiece protects your hands and frees both hands to operate the machine.
22. DO NOT OVERREACH. Keep proper footing and balance at all times.
23. MANY MACHINES WILL EJECT THE WORKPIECETOWARDTHEOPERATOR. Know and avoid conditions that cause the workpiece to "kickback."
24. ALWAYS LOCK MOBILE BASES (IF USED) BEFORE OPERATING MACHINERY.
25. BE AWARE THAT CERTAIN DUST MAY BE HAZARDOUS to the respiratory systems of people and animals, especially fine dust. Make sure you know the hazards associated with the type of dust you will be exposed to and always wear a respirator approved for that type of dust.
G1023SL Series Table Saw -7-
⚠WARNING
Additional Safety Instructions for Table Saws
- THROUGH SAWING. Always use blade guard, splitter and anti-kickback fingers on all "through-sawing" operations. Through-sawing operations are those when the blade cuts completely through the workpiece as in ripping or crosscutting.
- KICKBACK. Kickback is a dangerous event in which a workpiece is thrown back from the saw at a high rate of speed. If you do not have a complete understanding of how kickback occurs, or how to prevent it, DO NOT operate this table saw.
- WORKPIECE CONTROL. Always hold the work firmly against the fence/miter gauge AND the table when cutting.
- NARROW STOCK. Always use a push-stick for ripping narrow stock.
- FREE HAND CUTS. Never perform any operation "free-hand" which means using only your hands to support or guide the workpiece. Always use the fence/miter gauge to support and guide the work.
- DANGER ZONE. Never stand or have any part of your body in line with the path of the saw blade.
- REACHING AROUND BLADE. Never reach behind or over the blade with either hand while the saw is running. If kickback occurs, that hand may be pulled into the spinning blade.
- MITER GAUGE. Never use the miter gauge and rip fence at the same time or you will greatly increase chance of kickback.
- STALLLED BLADE. Turn the saw OFF before trying to free a stalled blade.
- WORKPIECE SUPPORT. Provide adequate support to the rear and sides of the saw table for wide or long workpieces.
- AWKWARD OPERATIONS. Avoid awkward operations or positions that could cause your hand to slip into the blade.
- EXPERIENCING DIFFICULTIES. If at any time you are experiencing difficulties performing the intended operation, stop using the machine! Then ask a qualified expert how the operation should be performed.
- BLADE HEIGHT. Avoid cutting with the blade more than 1/4" higher than the thickness of the workpiece.
- DAMAGED BLADE. Damaged or dropped blades may throw a tooth or fly apart. Promptly replace blades in this condition.
- DADO AND RABBET OPERATIONS. These cuts present specific danger because they must be performed with the blade guard removed. Be especially aware of your personal safety whenever operating saw with the guard removed, and always immediately replace the blade guard after these operations are complete.
⚠WARNING
Like all power tools, there is danger associated with table saws. Accidents are frequently caused by lack of familiarity or failure to pay attention. Use this tool with respect and caution to lessen the possibility of operator injury. If normal safety precautions are overlooked or ignored, serious personal injury may occur.
⚠CAUTION
No list of safety guidelines can be complete. Operating this machinery may require additional safety precautions specific to your shop environment. Failure to use reasonable caution while operating this machine could result in serious personal injury.
-8- G1023SL Series Table Saw
WARNING
Statistics show that most common accidents among table saw users can be linked to kickback. Kickback is typically defined as the high-speed expulsion of stock from the table saw toward its operator. In addition to the danger of the operator or others in the area being struck by the flying stock, it is often the case that the operator's hands are pulled into the blade during the kickback.
Preventing Kickback
Below are tips to avoid the most common causes of kickback:
- Only cut workpieces with at least one smooth and straight edge. DO NOT cut warped, cupped or twisted wood.
- Never attempt freehand cuts. If the workpiece is not fed parallel with the blade, a kickback will likely occur. Always use the rip fence or crosscut fence to support the workpiece.
- Make sure the splitter is aligned with the blade. A misaligned splitter can cause the workpiece to catch or bind, resulting in an increased chance of kickback. If you think that your splitter is not aligned with the blade, check it immediately!
- Take the time to check and adjust the rip fence parallel with the blade; otherwise, the chances of kickback are extreme.
- Use the splitter for all "through cuts." The splitter maintains the kerf in the workpiece, reducing the chance of kickback.
- Feed cuts through to completion. Anytime you stop feeding a workpiece in the middle of a cut, the chance of binding, resulting in kickback, is greatly increased.
Protecting Yourself From Kickback
Even if you know how to prevent kickback, it may still happen. Here are some tips to protect yourself if kickback DOES occur:
- Stand to the side of the blade during every cut. If a kickback does occur, the thrown workpiece usually travels directly in front of the blade.
- Wear safety glasses or a face shield. In the event of a kickback, your eyes and face are the most vulnerable part of your body.
- Never, for any reason, place your hand behind the blade. Should kickback occur, your hand will be pulled into the blade.
- Use a push stick to keep your hands farther away from the moving blade. If a kickback occurs, the push stick will most likely take the damage that your hand would have received.
- Use featherboards or anti-kickback devices to prevent or slow down kickback.
G1023SL Series Table Saw -9-

Glossary of Terms
The following is a list of common definitions, terms and phrases used throughout this manual as they relate to this table saw and woodworking in general. Become familiar with these terms before assembling, adjusting or operating this machine. Your safety is VERY important to us at Grizzly!
Arbor: Metal shaft extending from the drive mechanism, to which saw blade is mounted.
Bevel Edge Cut: Tilting the arbor and saw blade to an angle between 0° and 45° to cut a beveled edge onto a workpiece.
Blade Guard: Metal or plastic safety device that mounts over the saw blade. Its function is to prevent the operator from coming into contact with the saw blade.
Crosscut: Cutting operation in which the cross-cut fence is used to cut across the grain, or across the shortest width of the workpiece.
Dado Blade: Blade or set of blades that are used to cut grooves and rabbets.
Dado Cut: Cutting operation that uses a dado blade to cut a flat bottomed groove into the face of the workpiece.
Featherboard: Safety device used to keep the workpiece against the rip fence and against the table surface.
Kerf: The resulting cut or gap in the workpiece after the saw blade passes through during a cutting operation.
Kickback: An event in which the workpiece is propelled back towards the operator at a high rate of speed.
Parallel: Being an equal distance apart at every point along two given lines or planes. I.e. the rip fence face is parallel to the face of the saw blade.
Non-Through Cut: A sawing operation that requires the removal of the blade guard and splitter. Dado and rabbet cuts are considered Non-Through Cuts because the blade does not protrude above the top face of the wood stock. Always remember to re-install the blade guard and splitter after performing a non-through cut.
Perpendicular: Lines or planes that intersect and form right angles. I.e. the blade is perpendicular to the table surface.
Push Stick: Safety device used to push the workpiece through a cutting operation. Used most often when rip cutting thin workpieces.
Rabbet: Cutting operation that creates an L-shaped channel along the edge of the workpiece.
Splitter: Metal plate located behind the blade. It maintains the kerf opening in the wood when performing a cutting operation.
Straightedge: A tool used to check the flatness, parallelism, or consistency of a surface.
Through Cut: A sawing operation in which the workpiece is completely sawn through.
Rip Cut: Cutting operation in which the rip fence is used to cut with the grain, or across the widest width of the workpiece.
SECTION 2: CIRCUIT REQUIREMENTS
Operation
WARNING
Serious personal injury could occur if you connect the machine to the power source before you have completed the set up process. DO NOT connect the machine to the power source until instructed to do so.
Amperage Draw
The motor for your machine may draw the following amps at maximum load.
- G1023SL, SLX, SLW ........ 18 Amps
- G1023SLWX ........ 25 Amps
- G1023SLWX3 @ 220V ........ 15 Amps
- G1023SLWX3 @ 440V* ........ 7.5 Amps
Circuit Requirements
You MUST connect your machine to a grounded circuit that is rated for the amperage given below. Never replace a circuit breaker on an existing circuit with one of higher amperage without consulting a qualified electrician to ensure compliance with wiring codes. If you are unsure about the wiring codes in your area or you plan to connect your machine to a shared circuit, consult a qualified electrician.
- G1023SL, SLX, SLW ........ 20 Amps
- G1023SLWX ........ 30 Amps
- G1023SLWX3 @ 220V ........ 20 Amps
- G1023SLWX3 @ 440V* ........ 15 Amps
To run on 440V, you must rewire the motor and replace the 220V magnetic switch assembly with the 440V magnetic switch assembly (Part #P1023SLWX3087S). Refer to the wiring diagram on Page 55 for wiring details.
Plug Type
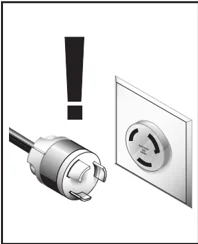
The cord set enclosed does not have a plug as the style of plug you require will depend upon the type of service you currently have or plan to install. We recommend using the following plugs for your machine on a dedicated circuit only (see Figures 1–4 for examples):
- G1023SL, SLX, SLW ........ L6-20
- G1023SLWX ........ L6-30
- G1023SLWX3 @ 220V ........ L15-20
- G1023SLWX3 @ 440V ... Power Shut-Off Switch
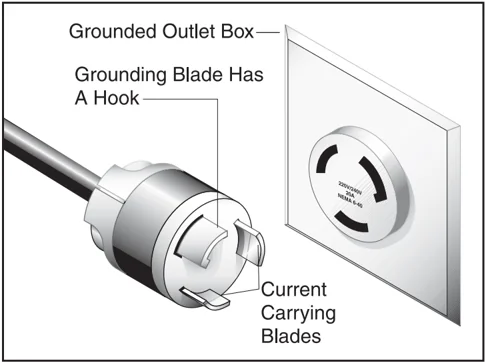
Figure 1. NEMA L6-20 plug and receptacle.
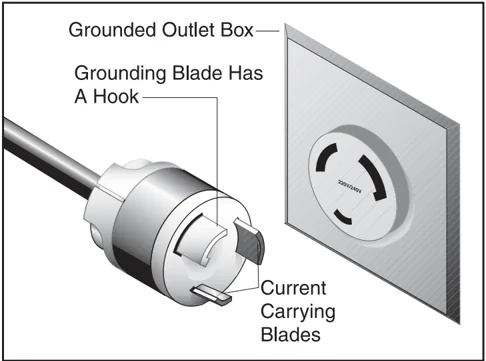
Figure 2. NEMA L6-30 plug and receptacle.
Grounding
In the event of an electrical short, grounding reduces the risk of electric shock. The grounding wire in the power cord must be properly connected to the grounding prong on the plug; likewise, the outlet must be properly installed and grounded. All electrical connections must be made in accordance with local codes and ordinances.
Extension Cords
We do not recommend the use of extension cords. Instead, arrange the placement of your equipment and the installed wiring to eliminate the need for extension cords.
If you find it absolutely necessary to use an extension cord with your machine, the extension cord must also contain a ground wire and plug pin.
220V Operation
Use at least a 10 gauge cord that does not exceed 50 feet in length!
440V Operation
Do not use an extension cord with 440V!
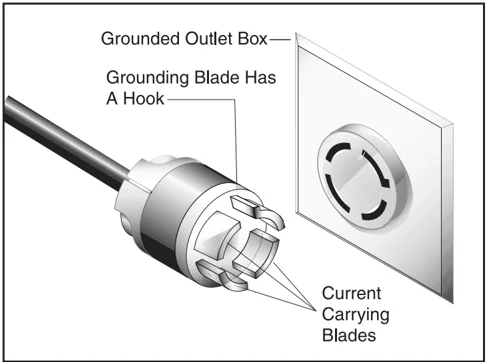
Figure 3. NEMA L15-20 plug and receptacle.
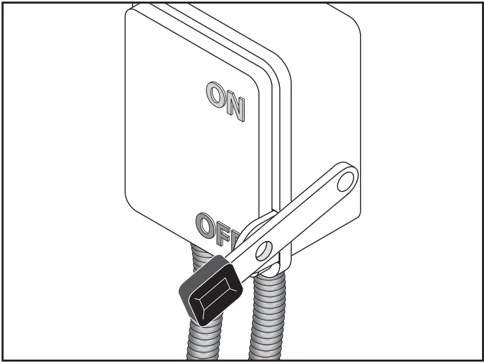
Figure 4. Power shut-off switch.
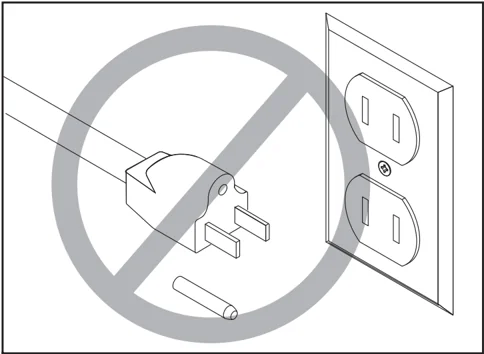
CAUTION
This machine must have a ground prong in the plug to help ensure that it is grounded. DO NOT remove ground prong from plug to fit into a two-pronged outlet! If the plug will not fit the outlet, have the proper outlet installed by a qualified electrician.
SECTION 3: SET UP
Set Up Safety
WARNING
This machine presents serious injury hazards to untrained users. Read through this entire manual to become familiar with the controls and operations before starting the machine!
WARNING
Wear safety glasses during the entire set up process!
WARNING
The G1023SL Series is a heavy machine. DO NOT over-exert yourself while unpacking or moving your machine—get assistance.
Items Needed for Set Up
The following items are needed to complete the set up process, but are not included with your machine:
| Description | Qty |
|---|---|
| Safety Glasses (for each person) | 1 |
| Degreaser or Solvent | Varies |
| Phillips Head Screwdriver | 1 |
| Wrench/Socket 8mm | 1 |
| Wrench/Socket 10mm | 1 |
| Wrench/Socket 12mm | 1 |
| Wrench/Socket 14mm | 1 |
| Wrench/Socket 9/16" | 1 |
| Wrench/Socket 3/4" | 1 |
| Utility Knife or Razor Blade | 1 |
| Masking Tape | Varies |
| Straightedge | 1 |
| High Quality Square | 1 |
| Hammer | 1 |
Unpacking
The G1023SL Series was carefully packed when it left our warehouse. If you discover the machine is damaged after you have signed for delivery, please immediately call Customer Service at (570) 546-9663 for advice.
Save the containers and all packing materials for possible inspection by the carrier or its agent. Otherwise, filing a freight claim can be difficult.
When you are completely satisfied with the condition of your shipment, you should inventory the contents.

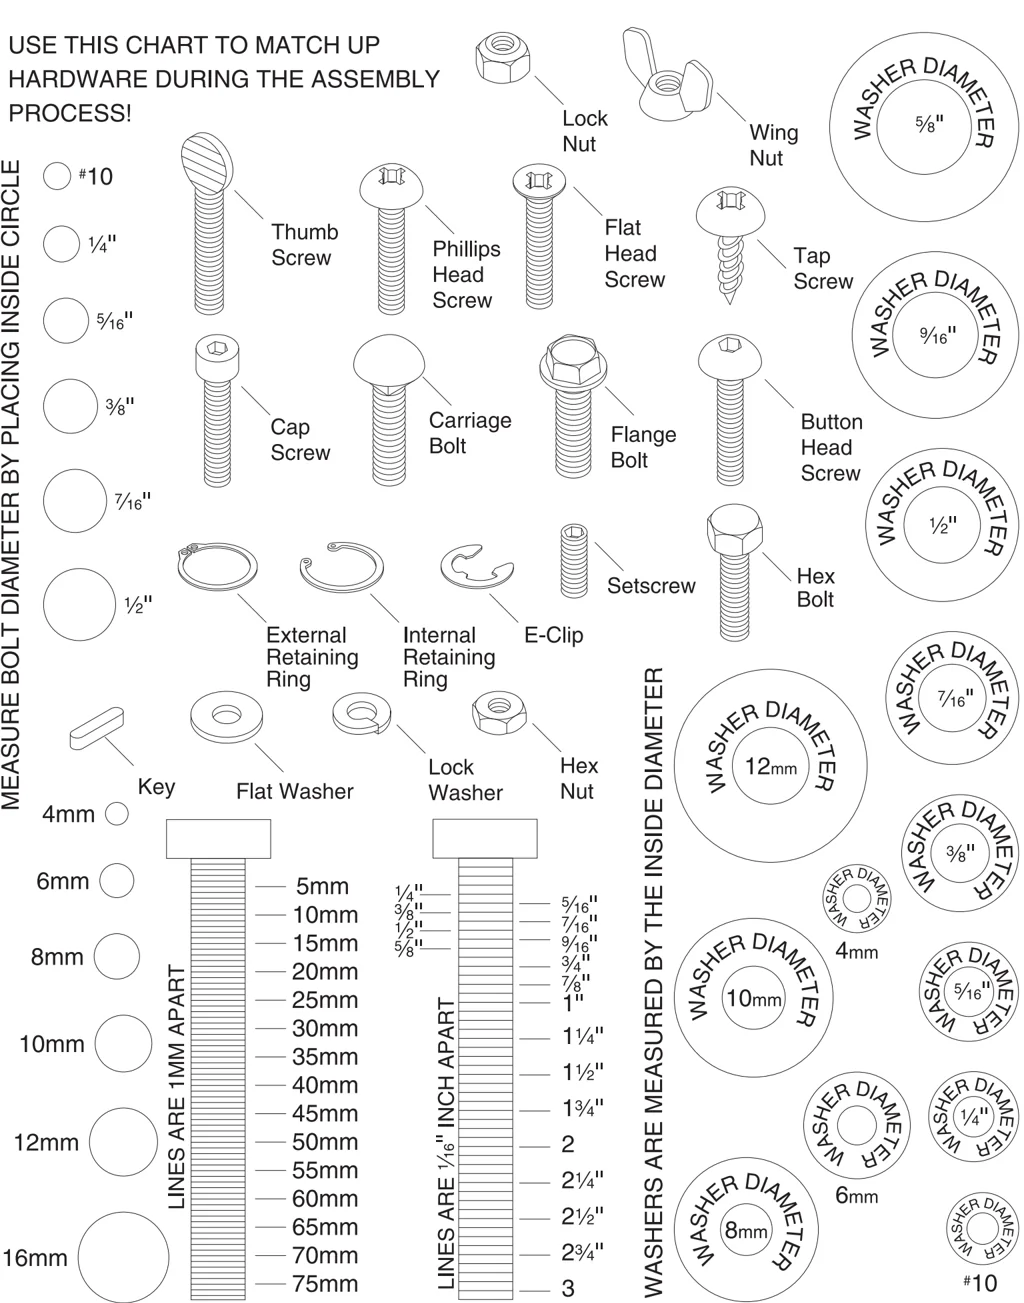
Hardware Recognition Chart
USE THIS CHART TO MATCH UP HARDWARE DURING THE ASSEMBLY PROCESS!
MEASURE BOLT DIAMETER BY PLACING INSIDE CIRCLE
- #10
- 1/4"
- 5/16"
- 3/8"
- 7/16"
- 1/2"
- 4mm
- 6mm
- 8mm
- 10mm
- 12mm
- 16mm
LINES ARE 1MM APART
- 5mm
- 10mm
- 15mm
- 20mm
- 25mm
- 30mm
- 35mm
- 40mm
- 45mm
- 50mm
- 55mm
- 60mm
- 65mm
- 70mm
- 75mm
LINES ARE 1/16" INCH APART
- 1/4"
- 3/8"
- 1/2"
- 5/8"
- 5/16"
- 7/16"
- 9/16"
- 3/4"
- 7/8"
- 1"
- 1 1/4"
- 1 1/2"
- 1 3/4"
- 2
- 2 1/4"
- 2 1/2"
- 2 3/4"
- 3
WASHERS ARE MEASURED BY THE INSIDE DIAMETER

- WASHER DIAMETER 5/8"
- WASHER DIAMETER 9/16"
- WASHER DIAMETER 1/2"
- WASHER DIAMETER 7/16"
- WASHER DIAMETER 12mm
- WASHER DIAMETER 3/8"
- WASHER DIAMETER 10mm
- WASHER DIAMETER 4mm
- WASHER DIAMETER 5/16"
- WASHER DIAMETER 8mm
- WASHER DIAMETER 6mm
- WASHER DIAMETER 1/4"
- WASHER DIAMETER #10
Machine Inventory
The following components are included with each G1023SL Series model. After all the parts have been removed from their packaging, you should have:
Box Contents (Figures 5 & 6)
- A. Table Saw Unit ........ 1
- B. Splitter/Guard Assembly ........ 1
- C. Cabinet Cover ........ 1
- D. Extension Wing ........ 1*
- E. Miter Gauge ........ 1
- F. Arbor Wrench ........ 1
- G. Switch Brace ........ 1
- H. Dust Port ........ 1
- I. Support Shaft ........ 1
- J. Support Shaft Bracket (2 pc) ........ 1
- K. Standard Table Insert ........ 1
- L. Dado Table Insert ........ 1
- M. Handwheel Lock Knob ........ 1
- N. Handwheel Handle ........ 1
- The Model G1023SL comes with two extension wings.
 Figure 5. G1023SL basic table saw unit.
 Figure 6. G1023SL component inventory.
Hardware Bags:
- Flat Head Screw 5/16"-18 x 1" (Switch) ........ 1
- Flat Washer 5/16" (Switch) ........ 1
- Hex Nut 5/16"-18 (Switch) ........ 1
- Tap Screws #10 x 3/8" (Dust Port) ........ 4
- Latch (Motor Cover) ........ 1
- Phillips Head Screw #8-32 x 3/8" (Latch) ........ 2
- Hex Nut #8-32 (Latch) ........ 2
- Hinge Pins (Motor Cover) ........ 2
- Set Screw 5/16"-18 x 3/8" (Bracket/Shaft)... 2
- Hex Bolt 5/16"-18 x 1-1/2" (Shaft Brackets)... 2
- Flat Washers 5/16" (Shaft Brackets) ........ 4
- Lock Washers 5/16" (Shaft Brackets) ........ 2
- Hex Nuts 5/16"-18 (Shaft Brackets) ........ 2
- Hex Bolt 5/16"-18 x 1" (Bracket/Splitter)... 2
- Flat Washers 5/16" (Bracket/Splitter) ........ 2
- Hex Wrenches 3, 4, 8mm ........ 1 Each
- Wrench 9/16" ........ 1
- Open-End Wrench 22mm ........ 1
In the event that any nonproprietary parts are missing (e.g. a nut or a washer), we would be glad to replace them; or for the sake of expediency, replacements can be obtained at your local hardware store.
NOTICE
Some hardware/fasteners on the inventory list may arrive pre-installed on the machine or related components. Check these locations before assuming that any items from the inventory list are missing.
G1023SL Series Table Saw -15-
Fence Inventory
G1023SL, W, WX, WX3
The Shop Fox Classic fence includes extra hardware for mounting it to other brands of table saws. Only the hardware needed to mount the fence to your Grizzly saw is listed in this inventory and shown in Figure 7. To avoid confusion, we suggest removing any items not listed here from your immediate work area.
Inventory Needed for Your Saw:
- A. Fence Assembly ........ 1
- B. Front Rail 46-1/2" ........ 1
- C. Back Rail 46-1/2" ........ 1
- D. Front Rail Rectangular Tube 54" ........ 1
- E. Scale ........ 1
Rail Mounting Hardware:
- Hex Bolt 1/4-20 x 3/4" (Rail/Tube) ........ 4
- Flat Washer 1/4" (Rail/Tube) ........ 4
- Hex Bolt 3/8-16 x 1" (Rail/Table) ........ 4
- Flat Washer 3/8" (Rail/Table) ........ 4
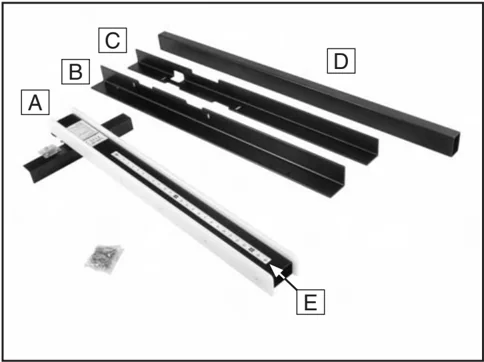
Figure 7. Inventory needed to install the fence on the Model G1023SL/W/WX/WX3.
Fence Inventory
G1023SLX
The Shop Fox Classic fence with 7' long rails includes extra hardware and two extra legs. Only the hardware needed to mount the fence to your Grizzly saw is listed in this inventory and shown in Figure 8. To avoid confusion, we suggest removing any items not listed here from your immediate work area.
Inventory Needed for Your Saw:
- A. Front Rail Rectangular Tube 84" ........ 1
- B. Extension Table ........ 1
- C. Legs ........ 2
- D. Feet ........ 2
- E. Front Rail 72" ........ 1
- F. Back Rail 72" ........ 1
- G. Fence Assembly ........ 1
- H. Leg Braces ........ 2
- I. Scale ........ 1
Rail/Table Mounting Hardware:
- Hex Bolt 3/8-16 x 1" (Rail/Main Table) ........ 4
- Flat Washer 3/8" (Rail/Main Table) ........ 4
- Hex Bolt 3/8"-16 x 1-3/4" (Rail/Ext Table) ... 8
- Flat Washer 3/8" (Rail/Ext Table) ........ 16
- Hex Nut 3/8"-16 (Rail/Ext Table) ........ 8
- Wood Screw #8 x 5/8" (Leg/Ext Table) ........ 12
- Hex Bolt 3/8"-16 x 3/4" (Brace/Leg) ........ 2
- Flat Washer 3/8" (Brace/Leg) ........ 2
- Wood Screw 1/4" x 3/4" (Brace/Ext Table) .. 2
- Flat Washer 1/4" (Brace/Ext Table) ........ 2
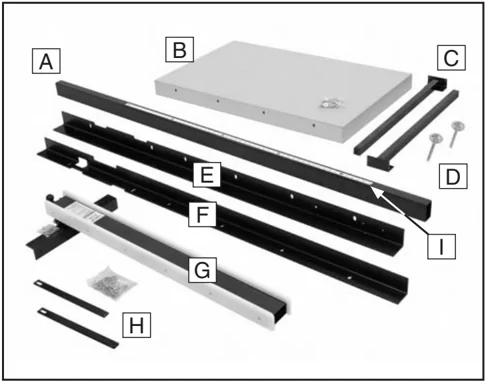
Figure 8. Inventory needed to install the fence on the Model G1023SLX.
Router Table Inventory
Components:
| Qty | Item |
|---|---|
| 1 | A. Table |
| 4 | B. Clamp Assemblies |
| 1 | C. Table Insert 29mm |
| 1 | D. Table Insert 60mm |
| 2 | E. Legs |
| 2 | F. Feet |
Hardware:
- Hex Bolts 3/8"-16 x 1-1/4" (Rtr/Main Table) ........ 3
- Lock Washers 3/8" (Rtr/Main Table) ........ 3
- Flat Washers 3/8" (Rtr/Main Table) ........ 3
- Hex Bolts 3/8"-16 x 1-1/4" (Rtr Table/Rail) ........ 2
- Lock Washers 3/8" (Rtr Table/Rail) ........ 2
- Flat Washers 3/8" (Rtr Table/Rail) ........ 2
- Hex Nuts 3/8"-16 (Rtr Table/Rail) ........ 2
- Flat Head Screws 1/4"-20 x 3/4" (Rail/Leg) ... 4
- Flat Washers 1/4" (Rail/Leg) ........ 2
- Hex Nuts 1/4"-20 (Rail/Leg) ........ 2
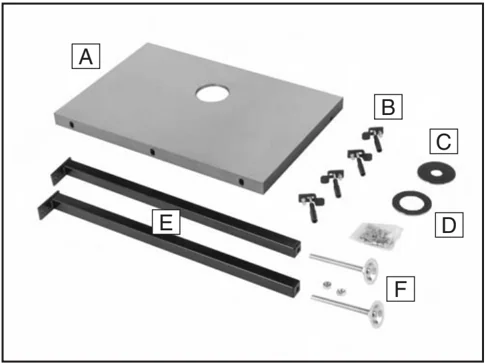
Figure 9. Router table extension wing inventory.
Clean Up
The unpainted surfaces are coated with a waxy oil to protect them from corrosion during shipment. Remove this protective coating with a solvent cleaner or citrus-based degreaser such as Grizzly’s G7895 Degreaser. To clean thoroughly, some parts may need to be removed. For optimum performance from your machine, make sure you clean all moving parts or mating surfaces that are coated. Avoid chlorine-based solvents, such as acetone or brake parts cleaner, as they may damage painted surfaces should they come in contact. Always follow the manufacturer’s instructions when using any type of cleaning product.
WARNING
Gasoline and petroleum products have low flash points and could cause an explosion or fire if used to clean machinery. DO NOT use gasoline or petroleum products to clean the machinery.
CAUTION
Many of the solvents commonly used to clean machinery can be toxic when inhaled or ingested. Lack of ventilation while using these solvents could cause serious personal health risks or fire. Take precautions from this hazard by only using cleaning solvents in a well ventilated area.
Site Considerations
Consider existing and anticipated needs, size of material to be processed through each machine, and space for auxiliary stands, work tables or other machinery when establishing a location for your new machine.
See Figures 10–12 for the overall size of each machine.
CAUTION
Lock all entrances to the shop when you are away and DO NOT allow unsupervised children or visitors in your shop at any time!
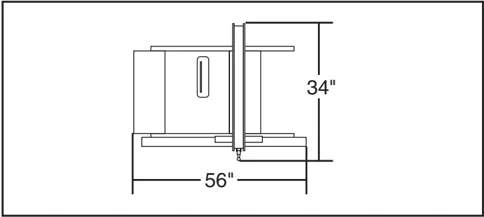
Figure 10. G1023SL overall size.
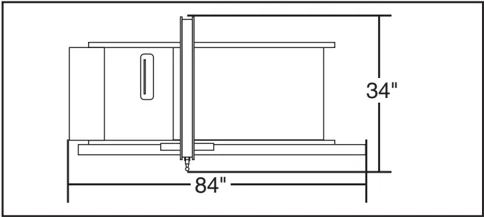
Figure 11. G1023SLX overall size.
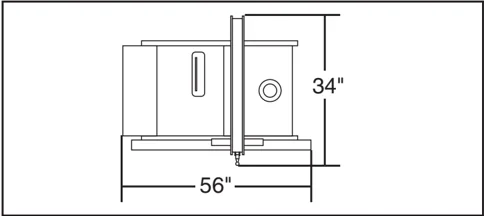
Figure 12. G1023SLW/WX/WX3 overall size.
Motor Brace
The motor brace shown in Figure 13 has been installed for shipping purposes. Please remove this brace before starting the assembly. The bolts that secure the brace should be threaded back into the locations from which they came.
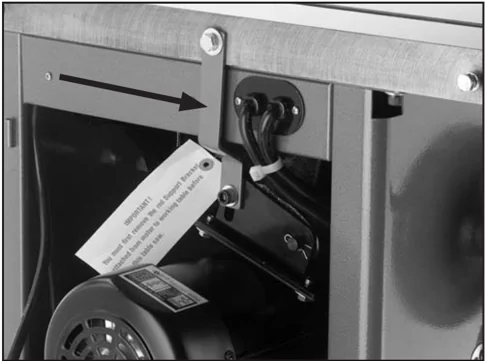
Figure 13. Motor Brace.
Tables
Inspect the extension wings for burrs or foreign material that may inhibit assembly. The mating edges of the wings and the table must be clean, smooth, and flat. Use a wire brush or file if necessary to clean up the edges.
For all G1023SL Series models: Mount a standard extension wing to the left-hand side of the table.
For Model G1023SL: Mount the other extension wing on the right-hand side of the table.
For Model G1023SLW, G1023SLWX, and G1023SLWX3: Wait until after the fence rails are installed to mount the router table extension wing to the right-hand side of the table.
For Model G1023SLX: Wait until after the fence rails are installed to mount the extension table on the right-hand side of the saw.
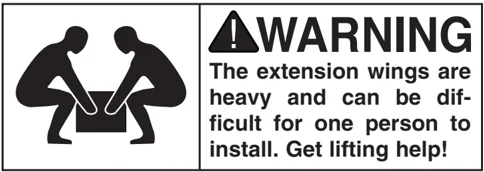
!WARNING The extension wings are heavy and can be difficult for one person to install. Get lifting help!
To install an extension wing:
-
Remove the three bolts and washers from the end of the table.
-
Have another person hold the extension wing in place and mount it to the main table with the three bolts and washers you removed in Step 1.
-
Use a straightedge as a gauge and adjust the extension wing up/down until it is flush with the main table above each bolt, then completely tighten the bolts.
-
Place the straightedge across the extension wing and main table to make sure that the combined table surface is flat.
— If the outside end of the extension wing tilts down, use a strip of masking tape along the bottom edge of the main table to shim the extension wing up (Figure 14).
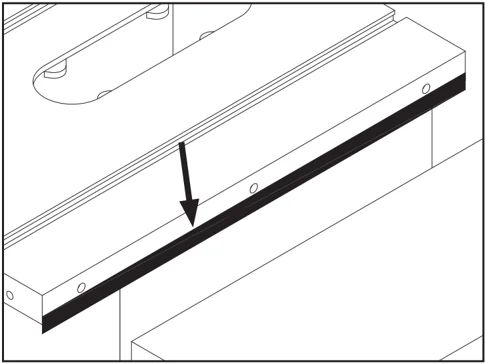
Figure 14. Masking tape location for tilting the extension table up.
— If the outside end of the extension wing tilts up, use a strip of masking tape along the top edge of the main table to shim the extension wing down (Figure 15).
Note: After reinstalling wings, remove all excess masking tape with a razor blade.
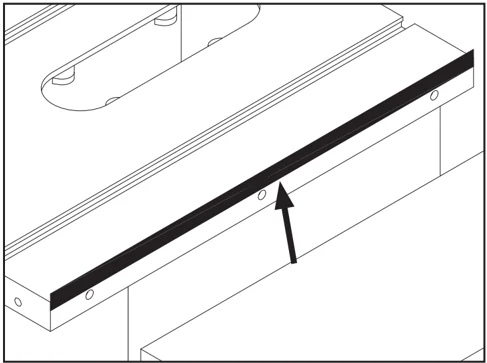
Figure 15. Masking tape location for adjusting the extension wing down.
Switch
To mount the switch:
- Attach the switch to the extension wing with a 5/16"-18 x 1 flat head screw in front, as shown in Figure 16, and a 5/16" flat washer and 5/16" hex nut in back.
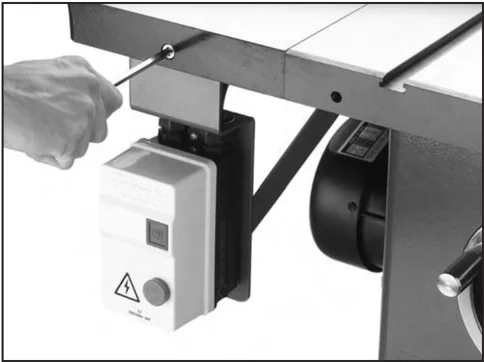
Figure 16. Installing switch.
- Mount the switch brace, as shown in Figure 17, using the table mounting fasteners on the top end and the switch mounting fasteners on the bottom end.
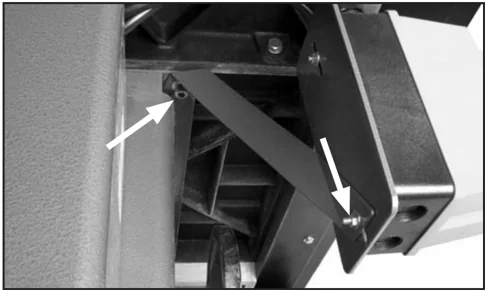
Figure 17. Installing switch bracket.
Fence
Install your fence now, using the instructions provided with the fence.
Router Table & Legs
G1023SLW, WX, WX3
To install the router table and extension legs:
-
Use (3) 3/8"-16 x 1 1/4" hex bolts, (3) 3/8" lock washers, and (3) 3/8" flat washers to secure the router table to the main table, making sure the tables are flush.
-
Place a straightedge across the router table and the main table to make sure that the combined table surface is flat.
—If the router table tilts up/down, shim it in the same manner as described in the Tables setup instructions.
-
Use (2) 3/8"-16 x 1 1/4" hex bolts, (2) 3/8" lock washers, (2) 3/8" 3/8" flat washers, and 3/8" hex nuts to secure the router table to the front/ back fence rails.
-
Thread the feet into the legs so the leg/foot assembly is shorter than the rail height.
-
Use (4) 1/4"-20 x 3/4" flat head screws, (4) 1/4" flat washers, and (4) 1/4" hex nuts to secure the legs to the fence rails.
-
Adjust the feet to the ground, then tighten the hex nut on the foot against the leg to lock the foot height in place. Figure 18 shows the router table extension wing installed on the saw.
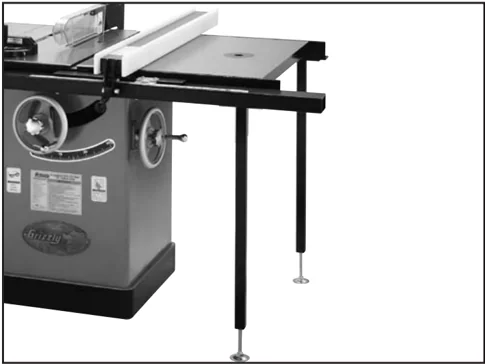
Figure 18. Router table and legs installed.
-20- G1023SL Series Table Saw
Extension Table & Legs G1023SLX
To install the extension table:
- Use the (8) 3/8"-16 x 1-3/4" hex bolts, (16) 3/8" flat washers, and (8) 3/8" hex nuts to secure the extension table to the rails, as shown in Figure 19.
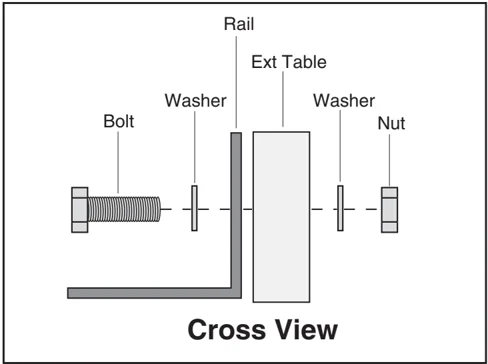
Figure 19. Attaching extension table to the rails.
- Thread the feet into the legs, place the legs under the table, and thread the feet out until the top of the leg is against the underside corner of the table.
- Use the (12) #8 x 5/8" wood screws to fasten the legs to the underside corners of the extension table.
- Use the (2) 3/8"-16 x 3/4" hex bolts and (2) 3/8" flat washers to loosely attach the brace to the legs.
- Use the (2) 1/4" x 3/4" wood screws and (2) 1/4" flat washers to attach the brace to the extension table, as shown in Figure 20.
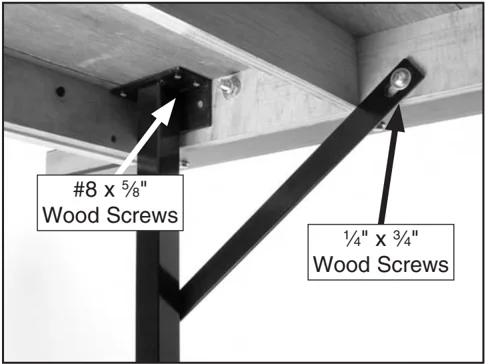
Figure 20. Legs and leg braces mounted to the underside of the extension table.
- Tighten the bolts that hold the brace to the leg.
- Adjust the extension table so it is flat (both flush and parallel) with the main table. This can be done by loosening the mounting bolts and adjusting the feet up/down as needed. Figure 21 shows the extension table installed on the saw.
- Tighten the extension table mounting bolts and tighten the hex nuts on the feet up against the legs so they will not move.
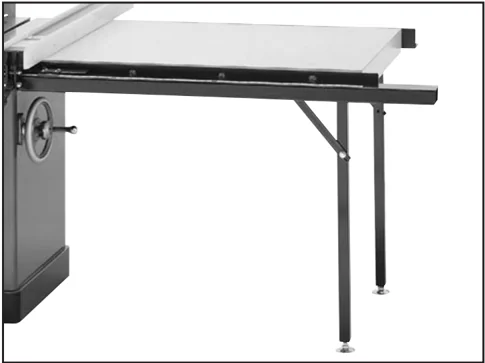
Figure 21. Extension table installed.
Motor Cover
To install the motor cover:
- Attach the latch to the motor cover with the (2) #8-32 x 3/8" Phillips head screws and (2) #8-32 hex nuts.
- Place the motor cover on the stand, line up the hinges, and tap the hinge pins into the hinges with a hammer.
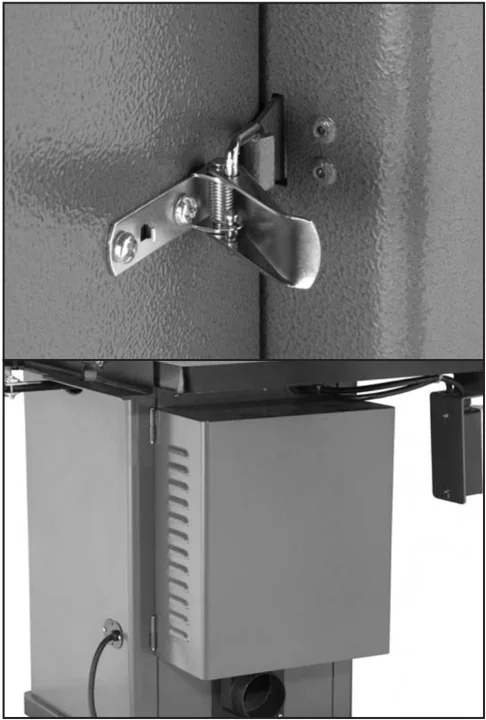
Figure 22. Motor cover installed on stand.
Dust Port
Mount the dust port onto the stand with the (4) #10 x 3/8" tap screws, as shown in Figure 23.
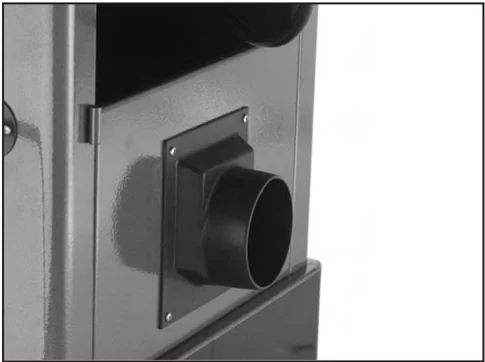
Figure 23. Dust port installed on cabinet.
Handwheel Lock Knob & Handle
To install, place the handwheel over the threads and screw the lock knob into the center.
Next insert the handwheel handle into the handwheel and tighten it.
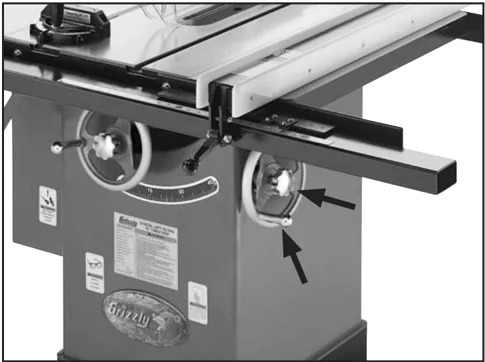
Figure 24. Handle and lock knob installed on handwheel.
Table Insert
The table insert provides access to the blade and the arbor when removed, and it provides support for the materials being cut when installed.
To install and adjust the table insert:
- DISCONNECT POWER TO THE SAW!
- Ensure that all four set screws are firmly in contact with the table casting.
- Using a 3mm hex wrench, raise or lower each of the four set screws shown in Figure 25 until the insert is flush with the table top. Use a straightedge to make sure the table insert is flush with the top of the table.
NOTICE The table insert must be flush with the table top or the workpiece will hit the edge of the table insert at the beginning of the cut.
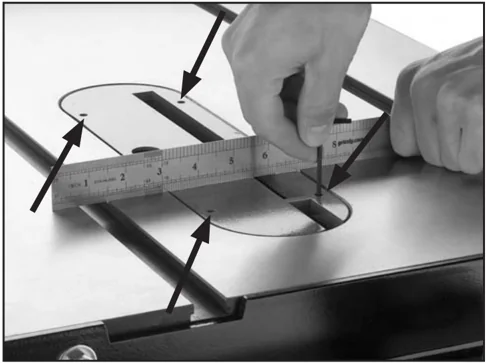
Figure 25. Adjusting set screws on each corner of insert.
Saw Blade
WARNING The saw blade is extremely sharp. Use extra care when handling the blade or working near it. Serious injury is possible.
WARNING Disconnect power to the machine when performing any maintenance, assembly or adjustments. Failure to do this may result in serious personal injury.
Review this section even if your saw blade came pre-installed.
To install the blade:
- Remove the table insert to gain access to the arbor.
- Remove the nut and the outer arbor flange from the arbor.
- Place the blade on the arbor, making sure that it seats firmly against the inner arbor flange. Ensure that the top blade teeth are facing the front of the saw.
- Replace the outer arbor flange and thread the arbor nut onto the arbor.
- Hand tighten the nut and snug with the wrench included with the saw. DO NOT overtighten.
IMPORTANT: Make sure the blade is installed with the teeth facing the front of the saw.
- Make sure the blade will not contact the table insert when raised to the maximum height and rotated by hand at 90° and 45° angles. Wear leather gloves while rotating the blade to prevent being cut.
G1023SL Series Table Saw -23-
Guard Bracket
To install the guard support shaft:
- Thread the shaft into the tilt assembly through the hole in the back of the saw, and tighten it with a screwdriver shaft, as shown in Figure 26.
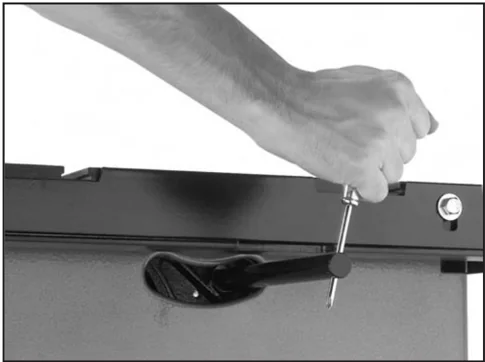
Figure 26. Attaching guard support shaft.
-
Slide the lower half of the bracket onto the splitter shaft and temporarily secure it with the (2) 5/16"-18 x 3/8" set screws.
-
Place the upper bracket half on the lower half and secure both halves with the (2) 5/16"-18 x 1-1/2" hex bolts, (4) 5/16" flat washers, (2) 5/16" lock washers and (2) 5/16" hex nuts as shown in Figure 27. Do not fully tighten the nuts at this moment.
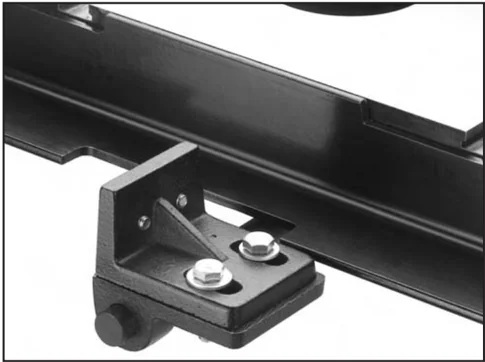
Figure 27. Splitter bracket installed.
Blade Guard/Splitter
To install the blade guard/splitter:
- Use the (2) 5/16"-18 x 1" hex bolts and (2) 5/16" flat washers to secure the splitter to the mounting bracket assembly, as shown in Figure 28.
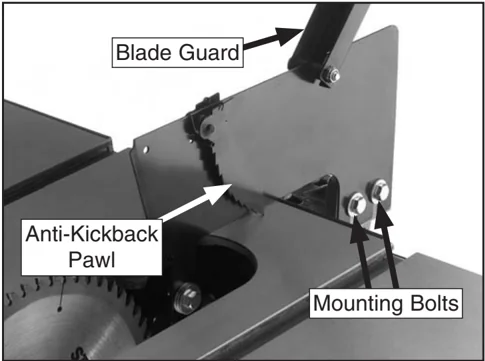
Figure 28. Blade guard and splitter in place.
- Set a machinist's square against the face of the blade splitter. Slightly rotate the rear bracket to adjust the face of the blade splitter perpendicular to the table top, as shown in Figure 29.
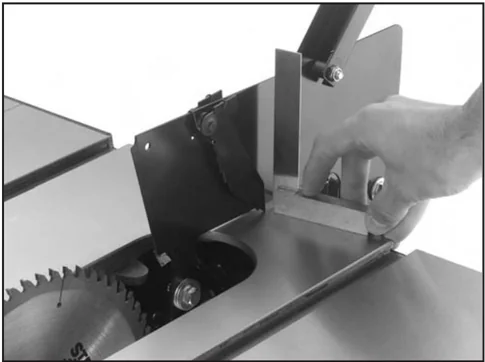
Figure 29. Blade splitter square to table.
WARNING
The saw blade is extremely sharp. Use extra care when handling the blade or working near it. Serious injury is possible.
- Next, set a straightedge against the face of the saw blade and the blade splitter as shown in Figure 30.
—If the blade splitter is properly aligned, then no further adjustments are necessary; otherwise, continue with the next step.
—If the blade splitter is to the right of the blade as shown in Figure 31, add washers between the splitter and the front mounting bracket, and adjust the rear splitter support as shown in Figure 32.
 Figure 30. Guard in line with blade.
 Adjust here to move back of splitter left or right.
Table Surface
Splitter
Add washers here to move front of splitter to the left.
Blade
Figure 31. Improper splitter/blade alignment.
 Adjusted rear splitter
Front Support Bracket
Adjustment Screws
Added washers
Proper Alignment
Figure 32. Proper splitter/blade alignment.
G1023SL Series Table Saw -25-
- Recheck the splitter alignment to the blade and to the table top. Adjust as necessary and tighten all the bolts before use.
—If the blade guard is properly aligned, skip ahead to Step 10; otherwise, continue with the next step.
—If the splitter is positioned to the left of the blade, alignment cannot be achieved by washer placement. Adjustment of the front support bracket is required. See Figure 32 for adjustment details. Loosen the (2) adjustment screws and move left or right.
—If this adjustment does not allow enough movement of the splitter, remove the table and wings, and set them to one side.
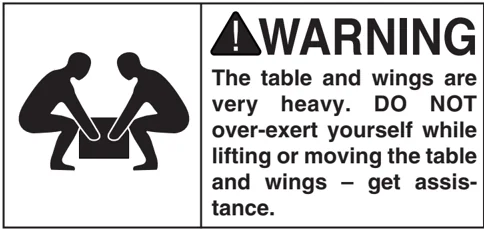
!WARNING The table and wings are very heavy. DO NOT over-exert yourself while lifting or moving the table and wings – get assistance.**
- The arbor bracket and motor pulley needs adjusting. Loosen the adjustment bolt shown in Figure 33, and slowly slide the arbor bracket towards the end of the shaft.
Note: Only move the arbor bracket a distance equal to the amount of misalignment between the blade and the splitter, or a little more. You can always adjust the splitter back to the left with washers. Tighten the adjustment bolt securely.
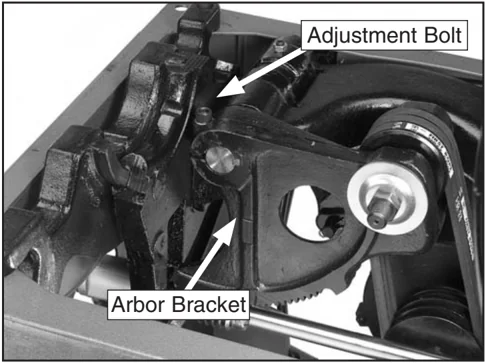
Figure 33. Arbor bracket adjustment locations.
-
Moving the arbor bracket moves the V-belts and pulleys out of alignment, so adjustment of the motor pulley is required. Simply loosen the set screw in the middle groove of the pulley, and slowly slide the pulley toward the end of the motor shaft. Once the V-belts are back in alignment, tighten the set screw securely.
-
Recheck the guard alignment to the blade and to the table top. Adjust as necessary and tighten down all the bolts before use. If the blade guard is properly aligned, re-attach the table, making sure there is adequate blade clearance through all blade adjustments.
-
Adjust the blade to 45°. Raise and lower it through the full range. Re-adjust the blade to 90°, then raise and lower it through the full range. There should be no contact between the blade, the base, the table insert, or any other part of the saw. If there is contact, repeat Steps 7-9.
Pre-Run Check
Before you do the Test Run, review the following questions to reduce your risk of an injury or accident:
- Have you read all the warnings and directions regarding the operation of this machine?
- Are all the fasteners tight?
- Is the blade mounted correctly?
- Is the cabinet stable?
- Is the fence parallel with the blade?
- Is your electrical system properly configured and wired correctly?
- Are the V-belts properly tensioned and the pulleys properly aligned?
- Is the guard assembly installed, aligned with the blade, and functional?
- Have you checked the saw blade clearance when it is adjusted to varying angles and depths?
- Have you checked your workpiece for obvious defects?
Test Run
- Connect the table saw to the power source.
- Face the table saw and stand to the left of the blade path.
- With one finger on the START button and one finger on the STOP button, turn the saw on. Be ready to turn the saw off in case of a mishap.
- Watch and listen to the saw. Note whether there are any unusual sounds or excessive vibrations.
- If anything appears abnormal, immediately turn off the saw, unplug it, and fix the problem. If a problem exists that is beyond the scope of this manual, call our service department.
- If the saw is behaving normally, turn it off and prepare to make a cut according to the instructions outlined in SECTION 4: OPERATIONS.
G1023SL Series Table Saw -27-