Grizzly
Industrial, Inc.
6" X 47" HEAVY-DUTY JOINTER
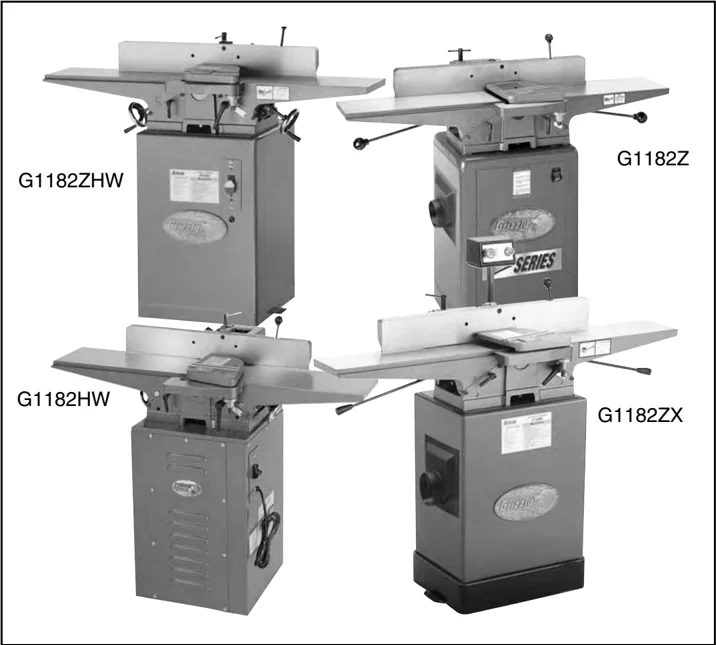
MODEL G1182HW / G1182ZHW / G1182Z / G1182ZX
INSTRUCTION MANUAL

G1182ZHW G1182Z G1182HW G1182ZX
COPYRIGHT ©2000 BY GRIZZLY INDUSTRIAL, INC. WARNING: NO PORTION OF THIS MANUAL MAY BE REPRODUCED IN ANY SHAPE OR FORM WITHOUT THE WRITTEN APPROVAL OF GRIZZLY INDUSTRIAL, INC. JANUARY, 2002 PRINTED IN TAIWAN.
WARNING
Some dust created by power sanding, sawing, grinding, drilling, and other construction activities contains chemicals known to the State of California to cause cancer, birth defects or other reproductive harm. Some examples of these chemicals are:
• Lead from lead-based paints.
• Crystalline silica from bricks, cement, and other masonry products.
• Arsenic and chromium from chemically treated lumber.
Your risk from these exposures varies, depending on how often you do this type of work. To reduce your exposure to these chemicals: work in a well ventilated area, and work with approved safety equipment, such as those dust masks that are specially designed to filter out microscopic particles.
G1182 Series Jointers
| Description | G1182HW | G1182ZHW | G1182Z | G1182ZX |
|---|---|---|---|---|
| Stand | Steel Stand | Cabinet | Cabinet | Heavy-Duty Cabinet |
| Switch | Toggle On / Off | Toggle On / Off | Toggle On / Off | Magnetic w/ Light |
| Table Adjustment | Hand Wheels | Hand Wheels | Levers | Levers |
| Motor | 1 H.P. | 1 H.P. | 1 H.P. | 1 H.P. |
| Dust Collection | Chip Chute | Chip Chute | Chip Chute With Dust Hood | Chip Chute With Dust Hood |
| Weight | 215 lbs. | 215 lbs. | 225 lbs. | 235 lbs. |
Terms and Definitions
Infeed Table: The infeed table is the table where the cutting operation begins. When facing the front of the jointer, it is on the right hand side. The wood travels right to left; from the infeed table, across the cutterhead, and onto the outfeed table.
Outfeed Table: The outfeed table is the table where the cutting operation ends. When facing the front of the jointer, it is on the left hand side.
Cutterhead: The cutterhead is the cylindrical assembly that holds each of the three jointer knives. It spins on a horizontal axis between the infeed and outfeed table, and is covered by the cutterhead guard when the jointer is not in use.
Fence: The jointer fence is the adjustable cast iron surface that the wood stock runs along when jointing and surface planing. The fence is adjustable from 45° to 90° to the infeed and outfeed tables.
Adjustment Levers and Handwheels: Controls the height of the infeed and outfeed tables.
Table Lock Handles: The threaded handles that must be loosened before the height of the tables can be adjusted. They are then tightened after the height is properly set.
Rabbet Cut: A rabbet cut is a groove cut along the long edge of the wood stock. This cut is typically used in carcass construction. The cutterhead guard must be removed for this operation so great care is needed for safe operation.
Surface Planing: Surface planing is running the face of the wood stock over the jointer. This provides one flat side that is ready to be run through a dedicated planing machine.
Edge Jointing: Edge jointing is running the long edge of the wood stock over the jointer. This provides one flat edge that is ready to be run against the table saw rip fence or edge glued.
Cutterhead Guard: The metal guard that covers the cutterhead when wood stock is not passing over the jointer.
Table Of Contents
| PAGE |
|---|
| 1. SAFETY |
| WARNINGS ..................................................................................................................3 |
| SAFETY RULES FOR ALL TOOLS ...................................................................................4 |
| ADDITIONAL SAFETY INSTRUCTIONS FOR JOINTERS .................................................5 |
| 2. CIRCUIT REQUIREMENTS |
| 110V OPERATION ............................................................................................................6 |
| GROUNDING ....................................................................................................................6 |
| EXTENSION CORDS ........................................................................................................6 |
| 3. INTRODUCTION |
| COMMENTARY ..................................................................................................................7 |
| UNPACKING .....................................................................................................................8 |
| PIECE INVENTORY ...........................................................................................................8-9 |
| CLEAN UP .......................................................................................................................10 |
| SITE CONSIDERATIONS ..................................................................................................10 |
| 4. ASSEMBLY |
| BEGINNING ASSEMBLY ..................................................................................................11 |
| STAND ............................................................................................................................11-13 |
| JOINTER TO STAND ........................................................................................................13 |
| V-BELT ............................................................................................................................14 |
| FENCE .............................................................................................................................14 |
| CUTTERHEAD GUARD ...................................................................................................15 |
| BELT GUARD ...................................................................................................................15 |
| KNIFE SETTING GAUGE ................................................................................................16 |
| PEDESTAL SWITCH ........................................................................................................16 |
| 5. ADJUSTMENTS |
| TABLE GIBS .....................................................................................................................17 |
| KNIVES ...........................................................................................................................17-19 |
| OUTFEED TABLE ............................................................................................................19-20 |
| INFEED TABLE ................................................................................................................20 |
| 90° FENCE STOP ............................................................................................................21 |
| 45° FENCE STOP ............................................................................................................21-22 |
| 6. OPERATIONS |
| TEST RUN .......................................................................................................................23 |
| STOCK INSPECTION .......................................................................................................23 |
| EDGE JOINTING ..............................................................................................................24 |
| BEVELING .......................................................................................................................24 |
| SURFACE PLANING ........................................................................................................25 |
| RABBETING ....................................................................................................................25 |
| 7. MAINTENANCE |
| GENERAL ........................................................................................................................26 |
| TABLES ...........................................................................................................................26 |
| LUBRICATION .................................................................................................................26 |
| V-BELT ............................................................................................................................26 |
| 8. CLOSURE ....................................................................................................................27 |
| MACHINE DATA ..............................................................................................................28 |
| PARTS BREAKDOWN AND PARTS LISTS .....................................................................29-36 |
| TROUBLESHOOTING GUIDE ..........................................................................................37 |
| WARRANTY AND RETURNS ...........................................................................................38 |
-2- G1182 6" Series Jointers
SECTION 1: SAFETY
⚠WARNING
For Your Own Safety Read Instruction Manual Before Operating This Equipment
The purpose of safety symbols is to attract your attention to possible hazardous conditions. This manual uses a series of symbols and signal words which are intended to convey the level of importance of the safety messages. The progression of symbols is described below. Remember that safety messages by themselves do not eliminate danger and are not a substitute for proper accident prevention measures.
⚠DANGER Indicates an imminently hazardous situation which, if not avoided, WILL result in death or serious injury.
⚠WARNING Indicates a potentially hazardous situation which, if not avoided, COULD result in death or serious injury.
⚠CAUTION Indicates a potentially hazardous situation which, if not avoided, MAY result in minor or moderate injury. It may also be used to alert against unsafe practices.
NOTICE This symbol is used to alert the user to useful information about proper operation of the equipment.
⚠WARNING
Safety Instructions For Power Tools
- KEEP GUARDS IN PLACE and in working order.
- REMOVE ADJUSTING KEYS AND WRENCHES. Form habit of checking to see that keys and adjusting wrenches are removed from tool before turning on.
- KEEP WORK AREA CLEAN. Cluttered areas and benches invite accidents.
- DO NOT USE IN DANGEROUS ENVIRONMENT. Do not use power tools in damp or wet locations, or where any flammable or noxious fumes may exist. Keep work area well lighted.
- KEEP CHILDREN AND VISITORS AWAY. All children and visitors should be kept a safe distance from work area.
- MAKE WORKSHOP CHILD PROOF with padlocks, master switches, or by removing starter keys.
- DO NOT FORCE TOOL. It will do the job better and safer at the rate for which it was designed.
- USE RIGHT TOOL. Do not force tool or attachment to do a job for which it was not designed.


WARNING
Safety Instructions For Power Tools
- USE PROPER EXTENSION CORD. Make sure your extension cord is in good condition. Conductor size should be in accordance with the chart below. The amperage rating should be listed on the motor or tool nameplate. An undersized cord will cause a drop in line voltage resulting in loss of power and overheating. Your extension cord must also contain a ground wire and plug pin. Always repair or replace extension cords if they become damaged.
Minimum Gauge for Extension Cords
| AMP RATING | LENGTH | ||
|---|---|---|---|
| 25ft | 50ft | 100ft | |
| 0-6 | 18 | 16 | 16 |
| 7-10 | 18 | 16 | 14 |
| 11-12 | 16 | 16 | 14 |
| 13-16 | 14 | 12 | 12 |
| 17-20 | 12 | 12 | 10 |
| 21-30 | 10 | 10 | No |
-
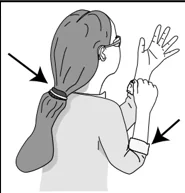
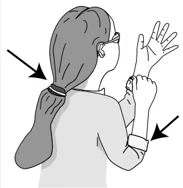
WEAR PROPER APPAREL. Do not wear loose clothing, gloves, neckties, rings, bracelets, or other jewelry which may get caught in moving parts. Non-slip footwear is recommended. Wear protective hair covering to contain long hair.
-
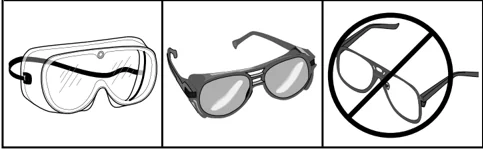
ALWAYS USE SAFETY GLASSES. Also use face or dust mask if cutting operation is dusty. Everyday eyeglasses only have impact resistant lenses, they are NOT safety glasses.
-
SECURE WORK. Use clamps or a vise to hold work when practical. It’s safer than using your hand and frees both hands to operate tool.
-
DO NOT OVERREACH. Keep proper footing and balance at all times.
-
MAINTAIN TOOLS WITH CARE. Keep tools sharp and clean for best and safest performance. Follow instructions for lubricating and changing accessories.
-
USE RECOMMENDED ACCESSORIES. Consult the owner’s manual for recommended accessories. The use of improper accessories may cause risk of injury.
-
REDUCE THE RISK OF UNINTENTIONAL STARTING. On machines with magnetic contact starting switches there is a risk of starting if the machine is bumped or jarred. Always disconnect from power source before adjusting or servicing. Make sure switch is in OFF position before reconnecting.
-
MANY WOODWORKING TOOLS CAN “KICKBACK” THE WORKPIECE toward the operator if not handled properly. If you do not understand what kickback is, or how to prevent it, Do Not operate this machine.
-
CHECK DAMAGED PARTS. Before further use of the tool, a guard or other part that is damaged should be carefully checked to determine that it will operate properly and perform its intended function. Check for alignment of moving parts, binding of moving parts, breakage of parts, mounting, and any other conditions that may affect its operation. A guard or other part that is damaged should be properly repaired or replaced.
-
NEVER LEAVE TOOL RUNNING UNATTENDED. TURN POWER OFF. Do not leave tool until it comes to a complete stop.
-
NEVER OPERATE A MACHINE WHEN TIRED, OR UNDER THE INFLUENCE OF DRUGS OR ALCOHOL. Full mental alertness is required at all times when running a machine.
-
NEVER ALLOW UNSUPERVISED OR INEXPERIENCED PERSONNEL TO OPERATE THE MACHINE. Make sure any instructions you give in regards to machine operation are approved, correct, safe, and clearly understood.
-
IF AT ANY TIME YOU ARE EXPERIENCING DIFFICULTIES performing the intended operation, stop using the machine! Then contact our service department or ask a qualified expert how the operation should be performed.
-4- G1182 6" Series Jointers
⚠WARNING
Additional Safety Instructions For Jointers
- JOINTING SAFETY BEGINS with your lumber. Inspect your stock carefully before you feed it over the cutterhead. If you have any doubts about the stability or structural integrity of your stock, DO NOT JOINT IT!
- MAINTAIN PROPER RELATIONSHIPS of infeed and outfeed table surfaces and cutterhead knife path.
- ALWAYS USE A PUSH BLOCK when jointing. Never place your hands directly over the cutterhead.
- SUPPORT THE WORKPIECE adequately at all times during operation, maintain control over the work at all times.
- WHEN JOINTING, do not stand directly at the end of either table. Position yourself just to the side of the infeed table to avoid possible kickbacks.
- NEVER MAKE JOINTING CUTS deeper than 1/8".
- NEVER JOINT A BOARD that has loose knots. All defects should be cut out of the board before it is planed or jointed.
- NEVER JOINT end grain.
- JOINT WITH THE GRAIN. Jointing against the grain is dangerous and could produce chatter or excessive chip out.
- WITH THE EXCEPTION OF RABBETING, all operations must be performed with the guard in place. After rabbeting, be sure to replace the guard.
- NEVER BACK THE WORK toward the infeed table.
- HABITS – GOOD AND BAD – are hard to break. Develop good habits in your shop and safety will become second-nature to you.
- “KICKBACK” is when the workpiece is thrown off the jointer table by the force of the cutterheads. Always use pushblocks and safety glasses to reduce the likelihood of injury from “kickback.” If you do not understand what kickback is, or how it occurs, Do Not operate this machine.
- BE AWARE THAT CERTAIN WOODS MAY CAUSE AN ALLERGIC REACTION in people and animals, especially when exposed to fine dust. Make sure you know what type of wood dust you will be exposed to and always wear an approved respirator.

⚠CAUTION
No list of safety guidelines can be complete. Every shop environment is different. Always consider safety first, as it applies to your individual working conditions. Use this and other machinery with caution and respect. Failure to do so could result in serious personal injury, damage to equipment or poor work results.
SECTION 2: CIRCUIT REQUIREMENTS
110V Operation
The Model G1182 Jointer Series is wired for 110/120V, single- phase operation. The 1 H.P. motor is dual voltage; however, we do not recommend converting to 220V because the magnetic switch is only rated for 110V. The motor will safely draw 14 amps at 110V. If you operate this machine on any circuit that is already close to its capacity, it might blow a fuse or trip a circuit breaker. However, if an unusual load does not exist and a power failure still occurs, contact a qualified electrician or our service department.
A 15 amp fuse or circuit breaker should be used when fusing this (tool description). Circuit breakers rated any higher may not be adequate to protect the circuit from power surges.
Extension Cords
If you find it necessary to use an extension cord with the Model G1182 series of jointers, make sure the cord is rated Hard Service (grade S) or better. Refer to the chart in the standard safety instructions to determine the minimum gauge for the extension cord. The extension cord must also contain a ground wire and plug pin. Always repair or replace extension cords when they become worn or damaged.
Grounding
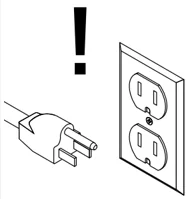
In the event of an electrical short, grounding reduces the risk of electric shock by providing electric current a path of least resistance. This tool is equipped with a power cord having an equipment-grounding conductor. See Figure 1. The outlet must be properly installed and grounded in accordance with all local codes and ordinances.
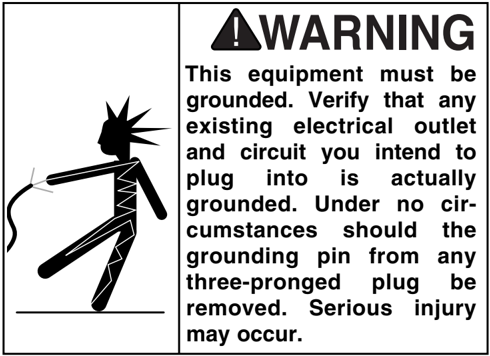
WARNING This equipment must be grounded. Verify that any existing electrical outlet and circuit you intend to plug into is actually grounded. Under no circumstances should the grounding pin from any three-pronged plug be removed. Serious injury may occur.
 Figure 1A. Do not remove grounding pin.
Grounded Outlet Box
Grounding Blade Is Longest Of the Three Blades
Current Carrying Prongs
 Figure 1. Typical 110V 3-prong plug and outlet.
SECTION 3: INTRODUCTION
Commentary
We are proud to offer these four models of the Model G1182 6" Jointer. These machines are part of a growing Grizzly family of fine woodworking machinery. When used according to the guidelines set forth in this manual, you can expect years of trouble-free, enjoyable operation and proof of Grizzly's commitment to customer satisfaction.
The Model G1182 Jointer Series all feature 1 H.P. TEFC motors driving a three-knife cutterhead at 5000 R.P.M. The knives are high speed steel, resharpenable, and are adjusted by means of jack screws or springs, making blade setting quick and easy. The infeed and outfeed tables are ground cast iron and are mounted on dovetailed ways with adjustable gibs.
Depending upon the model you selected, table height is adjustable by means of levers or handwheels. The operator controls on the Model G1182ZX are conveniently mounted on a pedestal above the tables. The Z-Series models incorporate a one piece cabinet style stand and a dust hood for easy connection to a dust collection system.
We are also pleased to provide this universal manual covering all of the G1182 models. It was written to guide you through assembly, review safety considerations, and cover general operating procedures. It represents our effort to produce the best documentation possible. If you have any comments regarding this manual, please write to us at the address below:
Grizzly Industrial, Inc. c/o Technical Documentation P.O. Box 2069 Bellingham, WA 98227-2069
Most importantly, we stand behind our machines. If you have any service questions or parts requests, please call or write us at the location listed below.
Grizzly Industrial, Inc. 1203 Lycoming Mall Circle Muncy, PA 17756 Phone: (570) 546-9663 Fax: (800) 438-5901 E-Mail: techsupport@grizzly.com Web Site: http://www.grizzly.com
The specifications, drawings, and photographs illustrated in this manual represent the Model G1182 series jointers as supplied when the manual was prepared. However, owing to Grizzly's policy of continuous improvement, changes may be made at any time with no obligation on the part of Grizzly. Whenever possible, though, we send manual updates to all owners of a particular tool or machine. Should you receive one, we urge you to insert the new information with the old and keep it for reference.
WARNING
Read the manual before assembly and operation. Become familiar with the machine and its operation before beginning any work. Serious personal injury may result if safety or operational information is not understood or followed.

Unpacking
The Model G1182 series is shipped from the manufacturer in a carefully packed carton. If you discover the machine is damaged after you’ve signed for delivery, immediately call Customer Service for advice.
When you are completely satisfied with the condition of your shipment, you should inventory its parts.
!WARNING If moving this machine up or down stairs, the machine must be dismantled and moved in smaller pieces. Make sure floor and stair structures are capable of supporting the combined weight of the machine parts and the people moving them.
!WARNING The G1182 series is a heavy machine, 235 lbs. shipping weight. DO NOT over-exert yourself while unpacking or moving your machine – you will need assistance. Serious personal injury may occur if safe moving methods are not followed.
NOTICE
A full parts list and breakdown can be found toward the end of this manual. For easier assembly, or to identify specific parts, please refer to the detailed illustrations at the end of the manual.
Piece Inventory
Model G1182HW (Figure2A)
- Jointer Assembly
- Fence Assembly
- Stand Assembly
- Hardware
- -Hex Bolts 3/8" - 16 x 3/4" 3
- -Lock Washers 3/8" 3
- -Allen® Wrench 3mm 1
- -V-Belt 1
- -Knife Setting Jig 1
- -Hand Wheels 2
- -Knob 1
- -Locking Screw 1
- -Flat Washer 1/2" 1
- -Special Nut 1
 Figure 2A. G1182HW layout.
Model G1182HW (Figure 2B) Same as above except the stand assembly is replaced by a one piece cabinet stand.
 Figure 2B. G1182HW layout.

Model G1182Z (Figure 2C)
- Jointer Assembly
- Fence Assembly
- Stand Assembly
- Dust Hood
- Hardware
- -Hex Bolts 3/8" - 16 x 3/4" 3
- -Lock Washers 3/8" 3
- -Allen® Wrench 3mm 1
- -V-Belt 1
- -Knife Setting Jig 1
- -Tilt Lever 1
- -Knob 1
- -Locking Screw 1
- -Flat Washer 1/2" 1
- -Special Nut 1
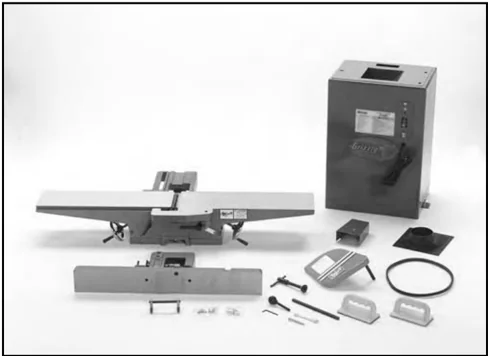
Figure 2C. G1182Z layout.
Model G1182ZX (Figure 2D) Same as G1182Z above except the on/off switch is replaced by a pedestal mounted electrical switch assembly.
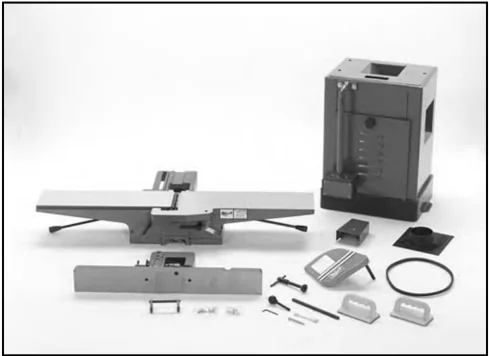
Figure 2D. G1182ZX layout.
In the event that any non-proprietary parts are missing (e.g. a nut or a washer), we would be glad to replace them, or, for the sake of expediency, replacements can be obtained at your local hardware store.
Clean Up
The unpainted surfaces are coated with a waxy oil to protect it from corrosion during shipment. Remove this protective coating with a solvent cleaner or citrus-based degreaser such as Grizzly’s G7895 Degreaser. Avoid chlorine-based solvents as they may damage painted surfaces should they come in contact. Always follow the usage instructions on the product you choose for clean up.

CAUTION
Many of the solvents commonly used to clean machinery can be toxic when inhaled or ingested. Always work in well-ventilated areas far from potential ignition sources when dealing with solvents. Use care when disposing of waste rags and towels to be sure they do not create fire or environmental hazards. Keep children and animals safely away when cleaning and assembling this machine.

Site Considerations
FLOOR LOAD
Your Model G1182 series jointer represents a moderate weight load in a small footprint. Most commercial or home shop floors should be sufficient to carry the weight. If you question the strength of your floor, you may wish to check with an architect or structural engineer in your area to make certain it can handle the load.
WORKING CLEARANCES
Working clearances can be thought of as the distances between machines and obstacles that allow safe operation of every machine without limitation. Consider existing and anticipated machine needs, size of material to be processed through each machine, and space for auxiliary stands and/or work tables. Also consider the relative position of each machine to one another for efficient material handling. Be sure to allow yourself sufficient room to safely run your machines in any foreseeable operation.
LIGHTING AND OUTLETS
Lighting should be bright enough to eliminate shadow and prevent eye strain. Electrical circuits should be dedicated or large enough to handle combined motor amp loads. Outlets should be located near each machine so power or extension cords are not obstructing high-traffic areas. Be sure to observe local electrical codes for proper installation of new lighting, outlets, or circuits.


SECTION 4: ASSEMBLY
Beginning Assembly
!WARNING All die-cut metal parts have a sharp edge (called "flashing") on them after they are formed. This is removed at the factory. Sometimes, though, a bit of flashing might escape inspection. Please examine the edges of all die-cut metal parts before handling them or serious injury may occur.
!WARNING Disconnect power to the machine when performing any maintenance, assembly or adjustments. Failure to do this may result in serious personal injury.
!WARNING Keep loose clothing rolled up and out of the way of machinery and keep hair pulled back.
!WARNING Wear safety glasses during the entire assembly process. Failure to comply may result in serious personal injury.
Most of your Model G1182 6" Jointer has been assembled at the factory, but some parts must be assembled or installed after delivery. We have organized the assembly process into steps. Please follow along in the order presented here.
TOOLS REQUIRED: You will need a high quality square, a long straightedge, 10mm, 12mm and 14mm open end wrenches, and a 3mm Allen® wrench.
Stand (G1182HW)
For reference, assemble the stand so the dust chute end is on your left when facing the stand, and the power switch is on your right.
- Begin by attaching the two ends to the front panel with the machine screws and washers provided. See Figure 3.
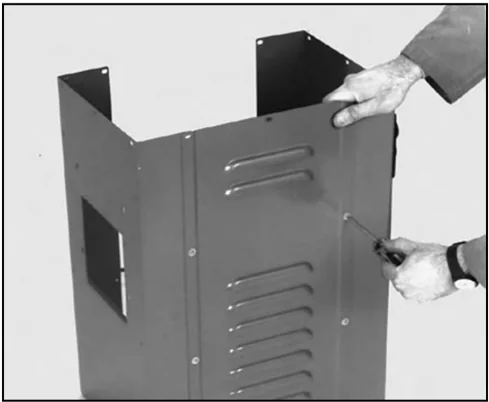
Figure 3. Attachment of the two end panels.
- Mount the two dust chute sides to the dust chute end as shown in Figure 4. Note that the flanges are pointed away from the inside of the chute. Do not fully tighten the screws yet.
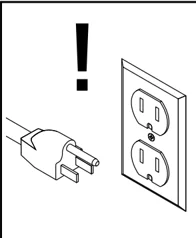
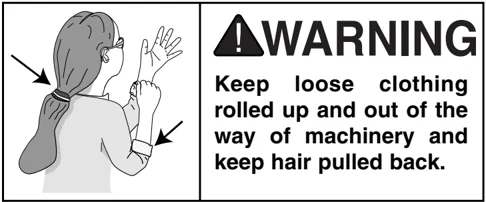


Figure 4. Attaching the dust chute.
- Position the dust chute base between the dust chute sides (flanges up), carefully aligning the screw holes in the base and the sides. See Figure 4 and 5. The flanges should be inside the chute.
NOTICE Make sure the slots in the motor support are toward the top of the stand.
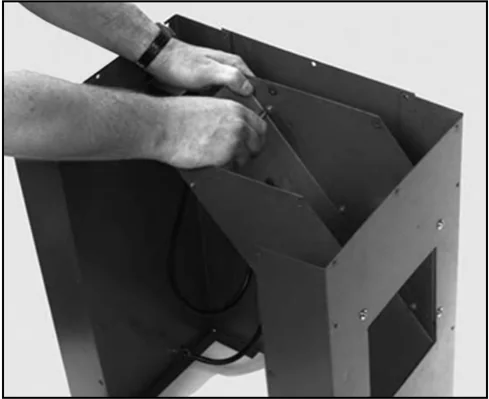
Figure 5. Attaching the dust chute base.
- Attach the top of the stand to the sides and dust chute. Note that the flanges for the top are inside the stand (the flanges for the dust chute opening should be outside the dust chute, however) and that the opening for the drive belt is at the rear of the stand. See Figure 6.
-12-
Figure 6. Attaching the top of the stand.
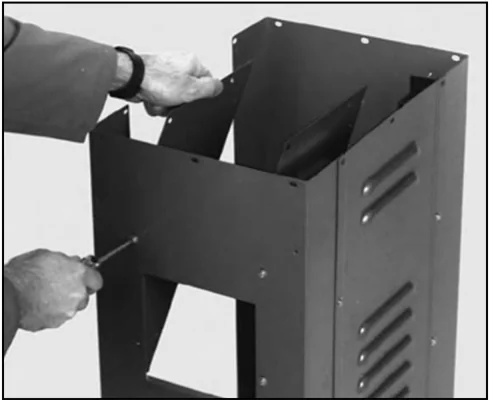
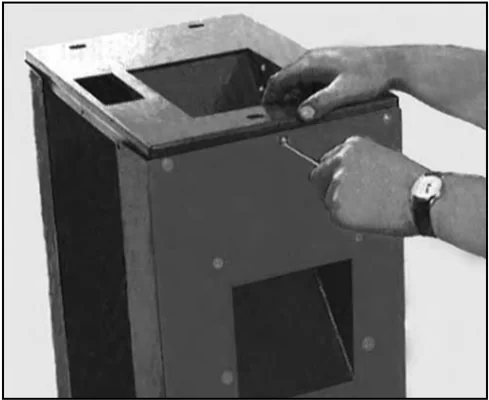
- Turn the stand upside down to mount the motor to the underside of the dust chute. Mount the motor on the chute using the four 5/16" - 18 x 3/4" hex head bolts, flat washers and nuts provided. Be sure to position the motor pulley to the rear (open end) of the stand as shown in Figure 7. Leave the motor mount bolts finger-tight for now.
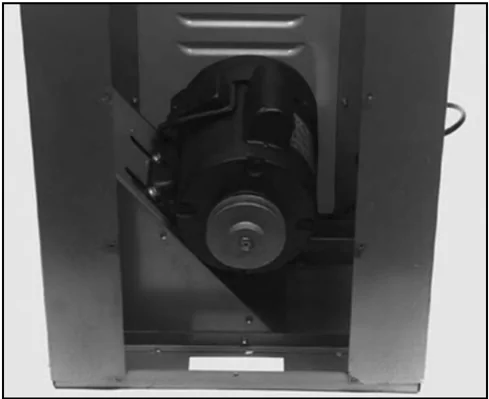
Figure 7. Attaching the motor.
-
The power switch is already installed on the right hand panel of the stand. To complete the wiring, it is first necessary to remove the switch assembly from the stand. Remove the two Phillips® head screws holding the metal mounting plate to the stand. The entire switch can then be pulled out of the stand.
-
Turn the stand upright and securely tighten all fasteners on the stand and dust chute.
Stand (G1182Z, ZX & ZHW)
The stand for the Z-Series models are pre-assembled.
Jointer to Stand
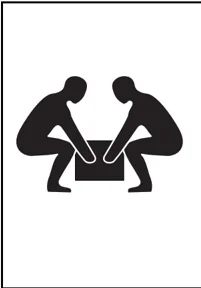
This step will require at least two people. To mount the jointer to the stand:
-
Lift the main unit onto the stand, making sure to position the cutterhead pulley over the slot in the top of the stand.
-
Carefully align the mounting holes in the stand with the threaded holes in the base of the jointer. Secure the jointer to the stand using the three 3/8" - 16 x 3/4" hex bolts and 3/8" flat washers provided. Be sure not to overtighten
! WARNING The jointer main unit is very heavy – you will need assistance when lifting it onto the stand. Serious personal injury may occur if safe moving methods are not followed.


V-Belt
- Loosen the motor mount bolts located inside the dust chute and slide the motor up until you can attach the V-Belt to the pulleys. See Figure 8.
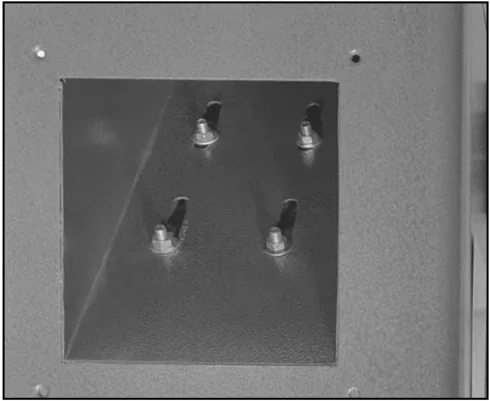
Figure 8. Motor mounts inside dust chute.
-
Allow the weight of the motor to rest against the V-Belt and lightly tighten one motor mount bolt. For the time being, this will be adequate belt tension.
-
Align the motor and cutterhead pulleys with each other using a plumb bob or straight-edge. Move the motor until the face of the motor pulley is aligned with the cutterhead pulley and tighten the motor mount bolts. Pulley alignment can be fine tuned by loosening the motor pulley setscrews and moving the pulley in or out as necessary. See Figure 9.
-
Check belt tension by pinching the belt halfway between the pulleys with moderate pressure. The amount of flex between the pinched portions of the belt should be approximately 1". Loosen the motor mount bolts slightly and adjust the motor down to increase belt tension. Tighten motor mount bolts and recheck tension and pulley alignment.
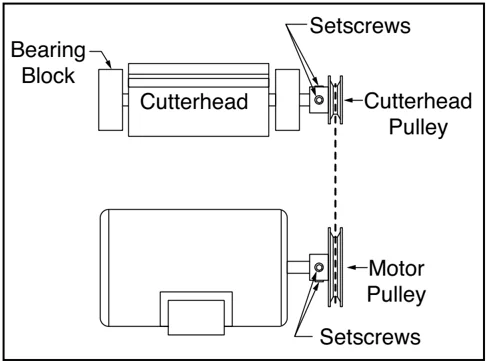
Figure 9. Pulley and V-belt alignment.
Fence
Place the fence body on the fence support, making sure that it fits over the key. See Figure 10. Insert the locking screw and thread on the special nut provided. The flange on the special nut should protrude upward when installed correctly.
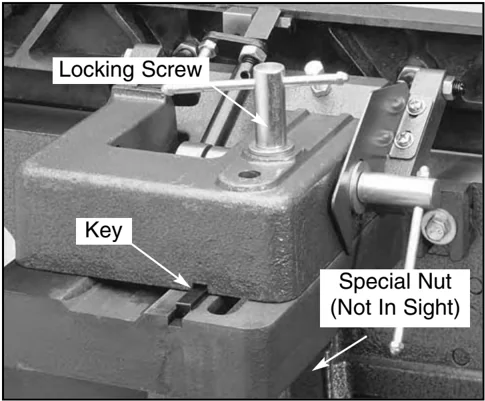
Figure 10. Fence support mechanism.
NOTICE
DO NOT slide the fence across the outfeed table. Scratching will result.


Cutter Guard
- The cutterhead guard pivot shaft is slotted on the end. This slot fits over the tang at the end of a spring located in the spring housing. See Figure 11. Look down the pivot hole to get an idea where this tang is located.
- Remove the setscrew from the slotted end of the pivot shaft. Rotate the spring housing counter-clockwise approximately 1 turn. Insert the guard shaft into the pivot hole, lining up the slot with the tang.
- The cutterhead guard shaft should fit all the way inside the pivot hole when properly engaged with the spring tang and should hold the guard against the fence.
- The cutterhead guard should be held firmly against the fence, completely cover the cutterhead, and move back into position when released. If this has not been achieved, repeat Steps 2-3, increasing the number of turns on the spring housing to 1-1/2. Re-install the setscrew into the end of the pivot shaft.
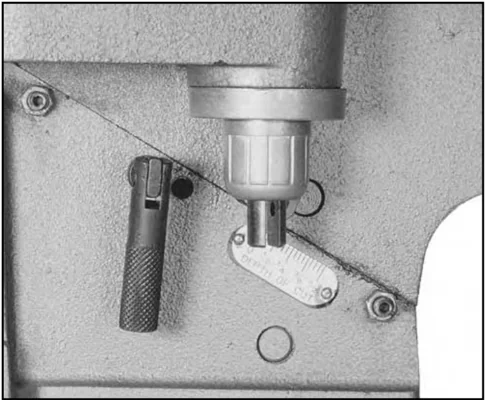
Figure 11. Spring housing.
Belt Guard
Insert the 5/16" - 18 x 2-1/2" mounting bolt through the belt guard and attach to the jointer base casting. Do not over tighten. See Figure 12.
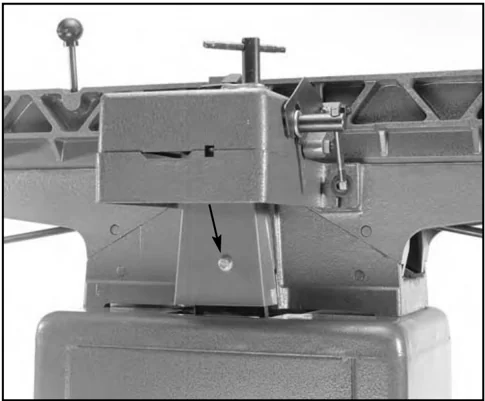
Figure 12. Belt guard attachment.
WARNING
DO NOT attempt any step of assembly, adjustments, or maintenance while your Model G1182 is running. Ensure that the switch is off, power is disconnected and moving parts have stopped before making adjustments. Failure to comply may result in serious personal injury.
Knife Setting Gauge
- Insert the steel rod through the hole in each adjuster arm until the notches for the E-clips extend past the adjustment arms on both sides.
- Attach the E-clips to the notches to lock adjustment arms onto the steel rod. The adjustment arms are symmetrical, so the placement is not a concern. See Figure 13.
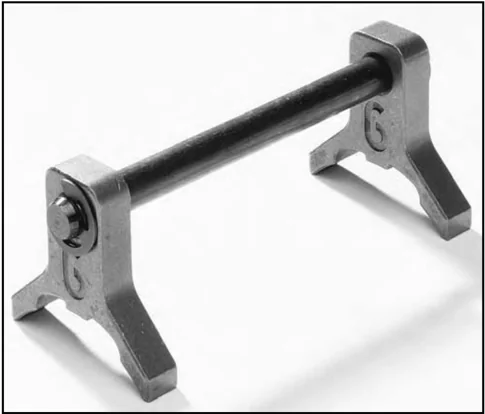
Figure 13. Knife setting gauge.
Pedestal Switch
G1182ZX Only
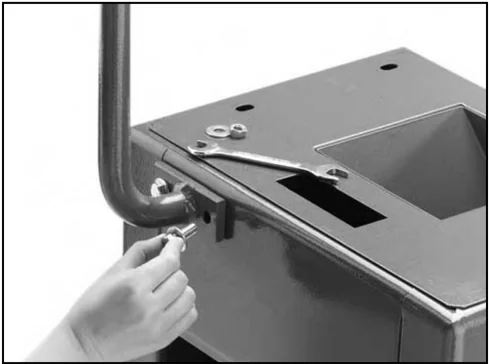
Your jointer comes with a pedestal mounted magnetic switch for safety and convenience. Simply bolt the pedestal to the two mounting holes on the back side of the stand with the supplied washers and bolts. See Figure 13A.

Figure 13A. Mounting pedestal switch to stand.
-16- G1182 6" Series Jointers
SECTION 5: ADJUSTMENTS
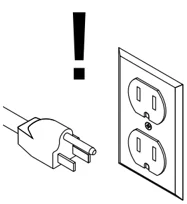
!WARNING Disconnect power to the machine when performing any maintenance, assembly or adjustments. Failure to do this may result in serious personal injury.
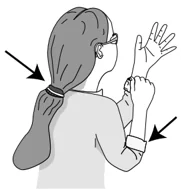
!WARNING Keep loose clothing rolled up and out of the way of machinery and keep hair pulled back.
!WARNING Wear safety glasses during the entire adjustment process. Failure to comply may result in serious personal injury.
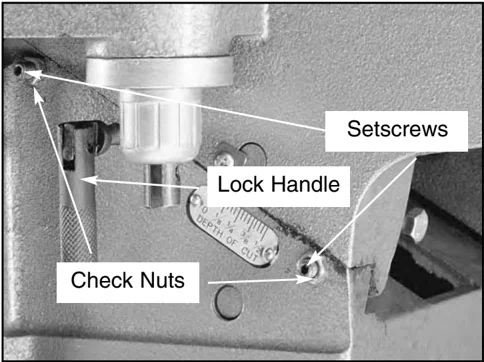
Setscrews Lock Handle Check Nuts Figure 14. Location of check nuts.
upper and lower gib setscrews until table movement is smooth and controlled.
Table Gibs
!WARNING Always lock the table with the table lock before using the jointer. If this step is not observed, the table could slide down while the jointer is operating. Serious personal injury may occur.
The function of the gibs are to allow precise adjustment of the table movement along the dovetail ways. Adjustment of the gib will dictate how easy it will be to move the tables up and down with the levers or handwheels. To adjust gibs:
- Unscrew the upper and lower check nuts on the infeed table several turns, leaving the lock handle tight. See Figure 14.
- With one hand securely on the lever bar, loosen the table lock handle and adjust the G1182 6" Series Jointers
- Once the gib has been properly adjusted, tighten check nuts and repeat Steps 1-2 for the outfeed table.
- Make sure there is no side-to-side movement of the tables once the check nuts have been tightened. If there is, repeat Steps 1-4.
Knives
!WARNING These knives are extremely sharp. Never grab the cutterhead directly to rotate it. Always use the drive pulley. Always be sure the jointer is disconnected from its power source before you make any adjustments. Serious personal injury may occur.
KNIFE INSPECTION
The knives of your jointer must be periodically replaced or adjusted. Adjustments should be as precise as possible with tolerances within .002"- .003" to prolong the sharpness of the knife edges. Improperly adjusted knives can unbalance the cutterhead and shorten bearing life, as well as produce substandard jointing or planing results. The knives are set at the factory using jack screws

before shipping. Springs are also included in the cutterhead supplied with your machine. They may be used instead of the jack screws depending on your preference. Now is a good time to double-check the knife settings. To inspect and adjust knife set:
1. Unplug the jointer!
2. Remove the upper cover or cutterhead guard to expose the top of the cutterhead.
3. Carefully turn the cutterhead (using the pulley) until the first knife is at top dead center.
4. Using the knife setting gauge, check the knife height. The jig should sit solidly with both feet on the cutterhead. See Figure 15. If the knife is adjusted properly, the contact point at the center of each adjuster should just touch the tip of the knife. If the knife does not make contact, or if the knife causes the adjuster's legs to not seat on the cutterhead, the knives need to be adjusted.
CAUTION
Remember, jointer knives are extremely sharp. Use care when handling during removing or installing.
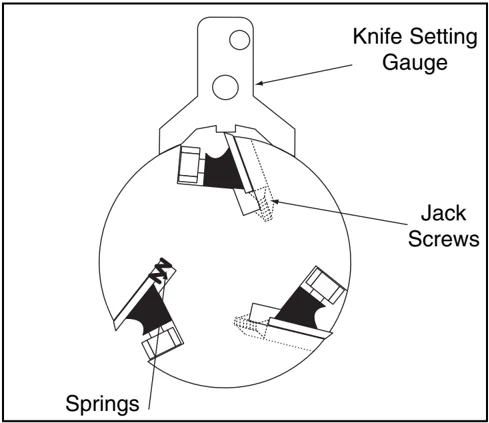
Figure 15 shows the location of the springs should you decide to use them instead of jack screws.
ADJUSTMENTS USING JACK SCREWS
When using jack screws, it is not necessary to install the springs. The knives are locked into the cutterhead with wedge-type gibs and gib bolts. Jack screws under the knives allow fine tuning to help in the setting process. To realign the knives:
1. Unplug the jointer!
2. Loosen the gib bolts until the knife is loose in the slot. The gib bolts turn clockwise to loosen and counterclockwise to tighten (when facing the head of the bolt). See Figure 16 and 16B.
3. Place the knife setting gauge on the cutterhead as described previously, so the feet are securely planted on the cutterhead.
4. Adjust the screws below each end of the knife until both feet of the gauge rest evenly on the cutterhead and the knife is just touching the bottom of the middle foot of the gauge. The gauge will set the knives at a uniform protrusion of approximately .070" above the cutterhead. The knife height should vary no more than .002"-.003" across the length of the cutterhead.
5. Maintain a constant pressure on the gauge while retightening the gib bolts.
6. Repeat the same procedure on the remaining knives. As mentioned before, the standard knife setting gauge is satisfactory for reasonably accurate knife setting tasks.
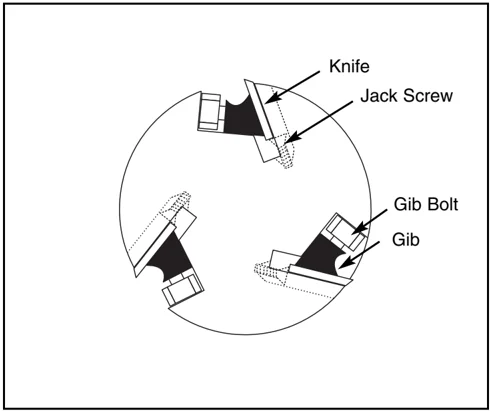
Figure 16 shows the parts of the cutterhead.
ADJUSTMENTS USING SPRINGS. The knives are locked into the cutterhead with wedge-type gibs and gib bolts. Jack screws under the knives may be substituted with springs to help in the setting process. When using springs, it is advised that the jack screws be removed. To realign the knives:
1. Unplug the jointer!
2. Loosen the gib bolts until the knife is loose in the slot. The gib bolts turn clockwise to loosen and counterclockwise to tighten (when facing the head of the bolt). Remove the knife and jack screws. Place 1 spring in each of the two holes in bottom of the knife slot. See Figure 16A and 16B.
3. Place the knife setting gauge on the cutterhead as described previously, so the feet are securely planted on the cutterhead. Make sure the gauge extension rod is parallel to the cutterhead to maintain accuracy.
4. The downward pressure provided by the gauge will set the knives at a uniform protrusion of approximately .070" above the cutterhead. The knife height should vary no more than .002"-003" across the length of the cutterhead.
5. Maintain a constant pressure on the gauge while retightening the gib bolts.
6. Repeat the same procedure on the remaining knives. As mentioned before, the standard knife setting gauge is satisfactory for reasonably accurate knife setting tasks.
 Figure 16A shows the location of the springs.
G1182 6" Series Jointers
 Figure 16B. Tightening the gib bolts.
Outfeed Table
NOTICE Model G1182HW uses handwheels for out-feed and infeed table adjustments.
Facing the fence, the outfeed table is located to the left of the cutterhead. The outfeed table must be aligned to the highest point of the arc of the blades. If it is set too high, the board will hit the front edge of the table and be impossible to feed over the jointer. If the table is set too low, the back end of the board will fall into the cutterhead and snipe will occur.
1. Loosen the table stop bolt jam nut under the outfeed table. Turn the table stop bolt counter-clockwise several times so that it will not interfere when setting the correct table height. See Figure 17.
2. Rotate the cutterhead by turning the motor pulley. DO NOT grab the cutterhead itself. Bring one blade to the approximate apex of its arc.
3. Position a steel straightedge on the outfeed table. Extend the straightedge over the middle of the cutterhead. See Figure 18.

 Figure 17. Table stop bolt and check nut.
 Figure 18. Illustrates the use of a straightedge to ensure proper outfeed adjustment.
-
Loosen the table lock handle and raise or lower the table with the lever until the straightedge barely touches one of the knives. Rock the cutterhead to ensure that the blade is at the highest point of its arc. Check the other two blades in the same manner. If they do not all touch the straightedge evenly, they are not at the same height. You must reset the knives. Be sure to test the height at both ends of the cutter knives. The knives must be parallel to the table surface.
-
Adjust the stop bolt until it touches the cast base. Tighten the table lock handle.
-
Tighten the checknut, loosen the table lock handle, and move the table down with the lever – then up against the stop. Check the accuracy of the stop setting with a straightedge over the cutterhead and fine tune if necessary.
I nfeed Table
-
Loosen the jam nut and unscrew the table stop bolt out 3 or 4 turns. See Figure 19.
-
Place a straightedge on the outfeed table so it hangs over the infeed table. Turn the cutterhead so that the knives are NOT touching the straightedge.
-
Loosen the infeed table lock handle. Raise the infeed table until it just touches the straightedge. Tighten the table lock handle.
-
Turn the stop bolt until it makes contact with the base casting.
-
Tighten the jam nut, loosen the table lock handle, and move the table up and down to check your settings. Align the depth of cut scale to read zero.
 Figure 19. Location of the infeed table stop bolt and jam nut.

90° Fence Stop
- Place a square on the outfeed table fairly close to the cutterhead. See Figure 20.
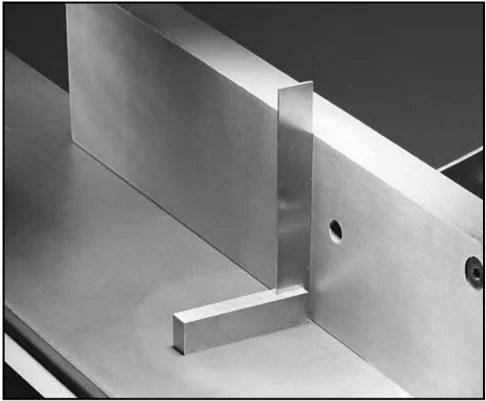
Figure 20. Use of square to align fence.
-
Loosen the fence lock handle and the checknut on the positive stop bolt. Turn the bolt against the tab until the fence contacts the edge of the square evenly.
-
Tighten the checknut on the stop bolt and tilt the fence forward, then back against the stop. See Figure 21.
-
Re-check with the square. Tightening the checknut will move the stop bolt slightly, so some trial-and-error may be necessary to perfect your settings.
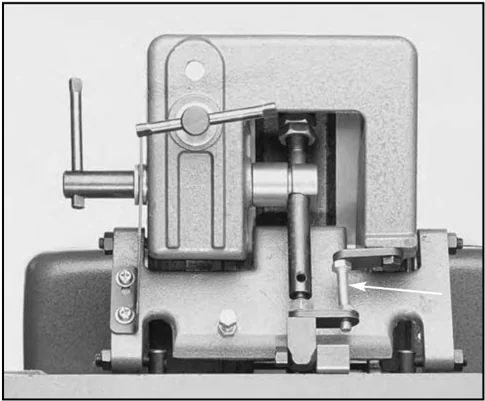
Figure 21. Location of the fence's positive stop bolt.
G1182 6" Series Jointers
⚠WARNING
DO NOT attempt any adjustments while your Model G1182 is running. Ensure that the switch is off, power is disconnected and moving parts have stopped before making adjustments. Serious personal injury may occur.
45° Fence Stop
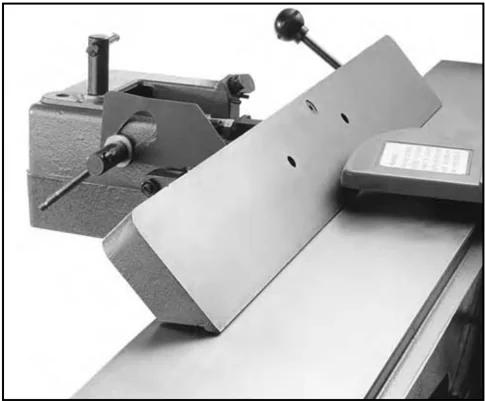
The fence can be tilted to 45° by loosening the lock handle, lifting up the 90° positive stop tab, and moving the fence in the desired direction. To set the 45° tab stop:
-
Loosen checknut and lower fence until it rests on the stop bolt. See Figure 22.
-
Using a bevel gauge set to 45°, place the heel of the bevel on the outfeed table and the blade against the fence.
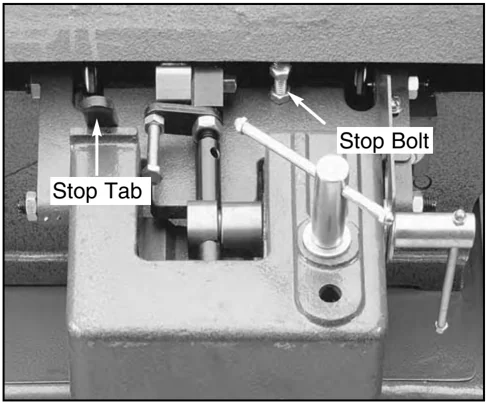
Figure 22. Location of stop bolt and stop tab.

Figure 23. Jointer fence in 45° stop position.
-
If there is a gap between the bevel's blade and the face of the fence, turn the stop bolt until the gap is gone.
-
Tighten jam nut. Move your fence forward, then back against the stop. Recheck the stop bolt.
WARNING Jointer knives are dangerously sharp. Use extreme caution when handling knives or working near them. Serious personal injury may occur.
-22- G1182 6" Series Jointers
SECTION 6: OPERATIONS
Test Run
WARNING Disconnect power to the machine when performing any maintenance, assembly or adjustments. Failure to do this may result in serious personal injury.
WARNING Keep loose clothing rolled up and out of the way of machinery and keep hair pulled back.
WARNING Wear safety glasses during the entire operation process. Failure to comply may result in serious personal injury.
Once assembly is complete and adjustments are done to your satisfaction, you are ready to test run the machine.
Turn on the power supply at the main panel. Press the START button. Make sure that your finger is poised on the STOP button, just in case there's a problem. The jointer should run smoothly, with little or no vibration or rubbing noises. Strange or unnatural noises should be investigated and corrected before operating the machine further.
If you cannot easily locate the source of an unusual noise or vibration, contact our service department for help.
Stock Inspection
If the stock has large or loose knots, consider finding another workpiece. Knots in a workpiece can be dangerous to the operator, as well as destructive to equipment.
When jointing, always cut with the grain rather than against it. Cutting against the grain (going against the pattern of the wood's growth rings) chips the wood instead of cutting it, making the workpiece rough and irregular. Look at the side of your board. If the direction of the grain structure facing the cutterhead runs toward the cutterhead as it sits on the infeed table, your cut will be with the grain. See Figure 24.
Occasionally, you will find woods that defy all rules. In those rare cases, it is best to feed the workpiece slowly and take several shallow cuts. A few extra passes will hurt much less than a ruined workpiece.
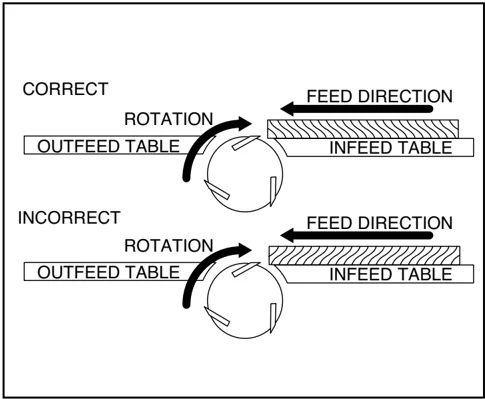
Figure 24. Correct and incorrect grain alignment to cutterhead.



Edge Joining
The purpose of edge jointing is to produce a finished, flat-edged surface that is suitable for joinery or finishing. It is also a necessary step prior to ripping stock to width on a table saw or radial arm saw.
- Make sure the fence is set to 90°. Double check it now with a try square or machinist's square.
- Inspect stock for soundness and grain direction.
- If the board is bowed (curved), place the concave edge down on the infeed table.
- Holding the stock firmly against the fence and table, feed the stock slowly and evenly over the cutterhead. See Figure 25.
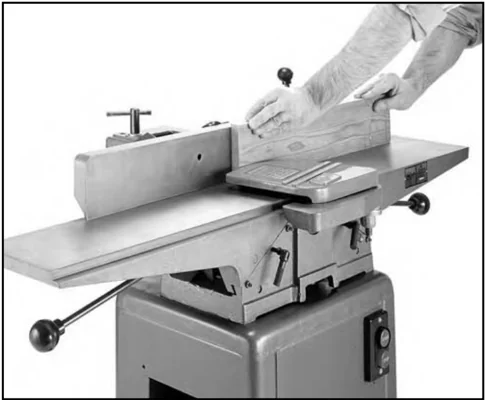
Figure 25. Operator position for edge jointing.
Beveling
Beveling an edge is essentially the same operation as edge jointing, except that the fence is tilted to a specified angle. Use extra care to ensure that the edge makes solid contact with the infeed and outfeed tables at all times.
- Use a bevel gauge to determine the desired angle. Then use the bevel to transfer this angle to the fence.
- Tilt the fence by loosening the lock handle and moving the fence to the desired angle.
- Inspect stock for soundness and grain direction.
- Slowly and evenly feed stock through the cutterhead. Make sure the face of the stock is completely flat against the fence and the edge is making solid contact on the infeed and outfeed tables. See Figure 26.
- Achieving the full bevel will probably take several passes. Remember not to take more than 1/16" in one pass.
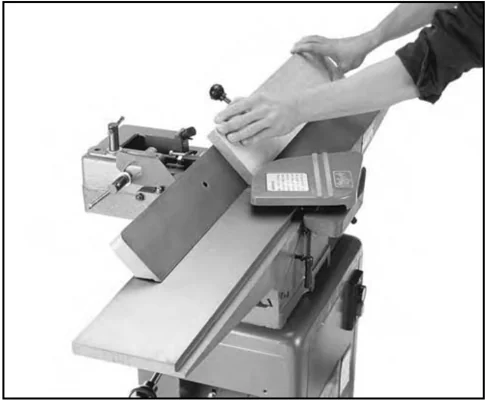
Figure 26. Fence position for bevel jointing.
-24- G1182 6" Series Jointers


Surface Planing
The purpose of planing on a jointer is to produce one flat surface. The theory behind this is that once you have one flat surface on a board, it can then more readily be milled to precise, final dimensions on a thickness planer. It is nearly impossible to surface plane both sides of a board effectively because the two surfaced sides will not be parallel to each other.
- Inspect your lumber for soundness and grain direction.
- If the stock is cupped (warped), place the concave side down and slowly feed it over the cutterhead. See Figure 27.
WARNING Always use push paddles when planing the surface of a board. Failure to comply may result in serious personal injury.
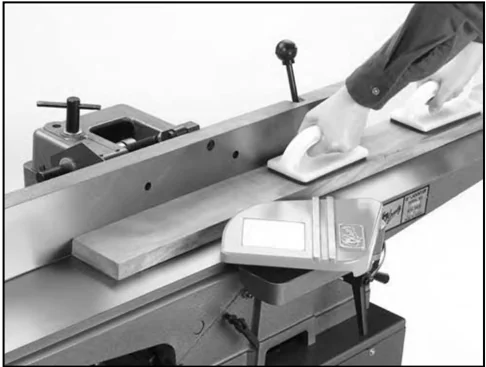
Figure 27. Correct method for surface planing.
- Inspect your results. Most likely, many passes will be necessary before your lumber has a flat surface.
- If the stock has large or loose knots, consider finding another workpiece. Knots in a workpiece can be dangerous to the operator, as well as destructive to equipment.
Rabbet Cuts
A rabbet is a groove cut along the edge of a board. It is usually made to accept another board to form a strong, simple joint. Note: The maximum rabbet depth is 1/2".
- Unplug the jointer and remove the cutter-head guard.
- Loosen the fence and slide it to the rabbeting edge. Set the fence to the desired width of the rabbet and lock down. For small rabbets, remove the fence sliding locking lever and reinsert it in the rear fence hole on the fence base.
- Inspect stock for soundness and grain direction.
- Place stock on the infeed table and rabbet table with the edge to be rabbeted firmly against the fence.
- Slowly and evenly feed stock through the cutterhead. Using the 1/16" rule, it will take six passes to achieve a common 3/8" rabbet. See Figure 28.
- Replace the guard when finished with rabbeting operations.
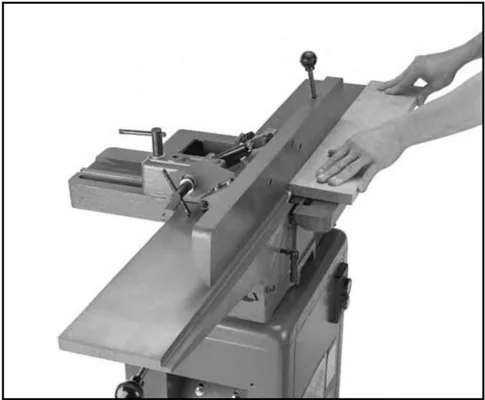
Figure 28. Correct operator position for rabbet cutting.
SECTION 7: MAINTENANCE
!WARNING Disconnect power to the machine when performing any maintenance, assembly or adjustments. Failure to do this may result in serious personal injury.
!WARNING Keep loose clothing rolled up and out of the way of machinery and keep hair pulled back.
!WARNING Wear safety glasses during the entire maintenance process. Failure to comply may result in serious personal injury.
General
Regular periodic maintenance on your Model G1182 Jointer will ensure its optimum performance. Make a habit of inspecting your jointer each time you use it. Check for the following conditions and repair or replace when necessary.
- Loose mounting bolts.
- Worn switch.
- Worn or damaged cords and plugs.
- Damaged V-belt.
- Any other condition that could hamper the safe operation of this machine.
Tables
The table and other non-painted surfaces on the Model G1182 should be protected against rust and pitting. Wiping the jointer clean after every use ensures that wood dust isn’t allowed to trap moisture against bare metal surfaces.
Some woodworkers recommend using automotive paste wax on exposed steel and cast iron surfaces. The wax provides a layer of protection, as well as reducing friction between lumber and the table, making cuts faster and smoother. Avoid waxes that contain silicone or other synthetic ingredients. These materials can find their way into lumber that’s being worked, and can make staining and finishing difficult. If you use paste wax, make sure that it’s 100% Carnauba wax.
Lubrication
Since all bearings are shielded and permanently lubricated, simply leave them alone until they need to be replaced. Do not lubricate them.
Table ways and the fence assembly should not be lubricated. If the tables appear to be stuck, disassemble and clean any foreign materials from the ways. Re-assemble and reset the gibs.
V-Belt
Inspect regularly for tension and wear; replace when necessary with a size A-36 belt. Check pulleys to ensure that they are properly aligned. See pulley/V-belt sections for proper tension and pulley alignment procedures.

SECTION 8: CLOSURE
The following pages contain general machine data, parts diagrams/lists, troubleshooting guide and Warranty/Return information for your Model G1182.
If you need parts or help in assembling your machine, or if you need operational information, we encourage you to call our Service Department. Our trained service technicians will be glad to help you.
If you have comments dealing specifically with this manual, please write to our Bellingham, Washington location using the address in Section 3 Introduction.
We have included some important safety mea-sures that are essential to this machine's opera-tion. While most safety measures are generally universal, Grizzly reminds you that each work-shop is different and safety rules should be con-sidered as they apply to your specific situation.
WARNING Operating this equipment has the potential for flying debris to cause eye injury. Always wear safety glasses or goggles when oper-ating equipment. Everyday glasses or read-ing glasses only have impact resistant lens-es, they are not safety glasses. Be certain the safety glasses you wear meet the appro-priate standards of the American National Standards Institute (ANSI).
We recommend you keep a copy of our current catalog for complete information regarding Grizzly's warranty and return policy. If you need additional technical information relating to this machine, or if you need general assistance or replacement parts, please contact the Service Department listed in Section 3 Introduction.
Additional information sources are necessary to realize the full potential of this machine. Trade journals, woodworking magazines, and your local library are good places to start.
WARNING The Model G1182 was specifically designed for jointing operation. DO NOT MODIFY AND/OR USE THIS MACHINE FOR ANY OTHER PURPOSE. Modifications or improper use of this tool will void the war-ranty. If you are confused about any aspect of this machine, DO NOT use it until all your questions have been answered. Serious personal injury may occur.
WARNING Like all power tools, there is danger asso-ciated with the Model G1182. Accidents are frequently caused by lack of familiarity or failure to pay attention. Use this tool with respect and caution to lessen the possibil-ity of operator injury. If normal safety pre-cautions are overlooked or ignored, seri-ous personal injury may occur.
MACHINE DATA SHEET
Grizzly Industrial, Inc.®
Customer Service #: (570) 546-9663 • To Order Call: (800) 523-4777 • Fax #: (800) 438-5901
JOINTER MODELS G1182HW / G1182ZHW / G1182Z / G1182ZX
- Design Type ........ Floor Model
Capacities:
- Maximum Depth of Cut ........ 1/2"
- Maximum Width of Cut ........ 6"
- Cutterhead Speed ........ 5000 R.P.M.
- Cuts Per Minute ........ 15000
Overall Dimensions:
- Table Size ........ 6" W x 47" L
- Height G1182HW / G1182ZHW (from floor to Table) ........ 30-1/2"
- Height G1182Z / G1182ZX ........ 31-1/4"
- Overall Length ........ 47"
- Overall Width ........ 20"
- Net Weight G1182HW / G1182ZHW ........ 205 lbs.
- Net Weight G1182Z ........ 215 lbs.
- Net Weight G1182ZX ........ 225 lbs.
Construction:
- Table ........ Cast Iron
- Fence Assembly ........ Cast Iron
- Body Assembly ........ Cast Iron
- Base ........ Sheet Metal Stand Assembly
- Cutterhead ........ 3 Knife Slots w/ Shielded Ball Bearings
- Guard ........ Die Cast Metal
- Knives ........ Jack-screw Adjustable
Motor:
- Type ........ TEFC Capacitor Start Induction
- Horsepower ........ 1 H.P.
- Phase Type/Voltage ........ Single Phase; 110V/200V
- Amps ........ 14/7
- Cycle/R.P.M. ........ 60 Hertz/3450 R.P.M.
- Switch G1182HW / G1182ZHW / G1182Z ........ Toggle Safety Switch
- Switch G1182ZX ........ Magnetic Contactor - 110V Only
- Power Transfer ........ Belt Drive
- Bearings ........ Shielded & Permanently Lubricated Ball
Features:
- Fence ........ Positive Stops at 45° and 90°
- Table Movement G1182Z / G1182ZX ........ Lever Action
- Table Movement G1182HW / G1182ZHW ........ Hand Wheels
- Infeed & Outfeed Tables ........ Rabbeting Capacity Built-In
Specifications, while deemed accurate, are not guaranteed.
-28- G1182 6" Series Jointers

MAIN TABLES
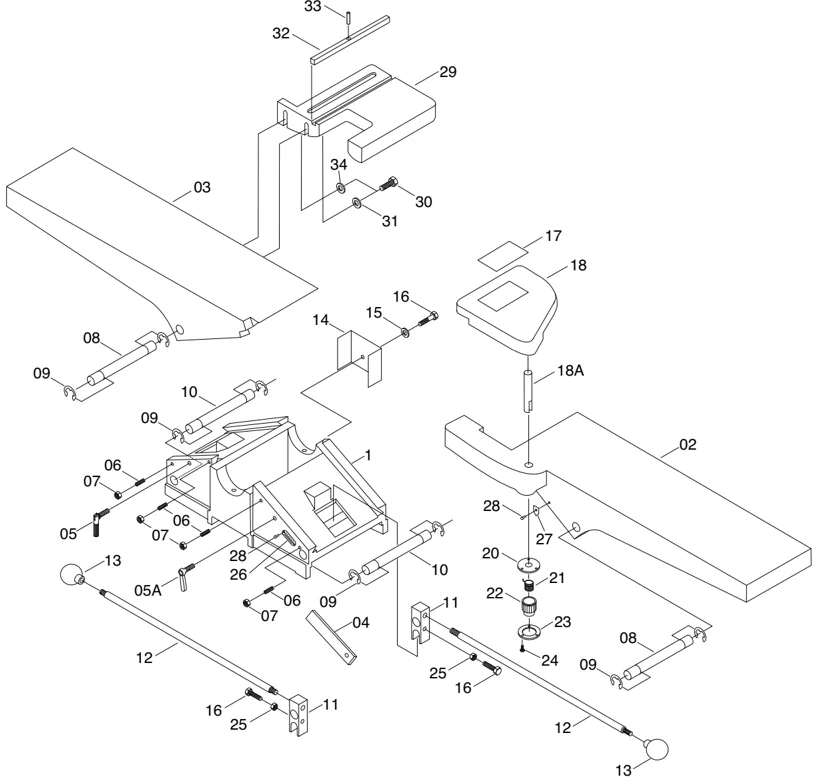
| REF | PART # | DESCRIPTION |
|---|---|---|
| 01 | PG1182001 | BASE |
| 01 | PG1182HW001 | BASE (TYPE HW) |
| 02 | PG1182002 | INFEED TABLE |
| 02 | PG1182HW002 | INFEED TABLE (TYPE HW) |
| 03 | PG1182003 | OUTFEED TABLE |
| 03 | PG1182HW003 | OUTFEED TABLE (TYPE HW) |
| 04 | PG1182004 | GIB |
| 05 | PG1182005 | TABLE LOCK HANDLE |
| 05A | P102603A | LOCK HANDLE 5/16" |
| 06 | PSS12 | SETSCREW 1/4"-20 x 1" |
| 07 | PN05 | HEX NUT 1/4"-20 |
| 08 | PG1182008 | TABLE ADJUST ROD |
| 08 | PG1182HW008 | TABLE ADJUST ROD (TYPE HW) |
| 09 | PEC04M | E-CLIP 13mm |
| 10 | PG1182010 | BASE ROD |
| 11 | PG1182011 | TABLE ADJUST BLOCK |
| 12 | PG1182012 | TABLE ADJUST LEVER |
| 13 | PG1182013 | KNOB |
| 14 | PG1182014 | BELT GUARD |
| 15 | PW07 | FLAT WASHER 5/16" |
| 16 | PB23 | HEX BOLT 5/16"-18 x □-□/□" |
| 17 | PG1182017 | WARNING LABEL |
| REF | PART # | DESCRIPTION |
|---|---|---|
| 18 | PG1182018 | CUTTERHEAD GUARD |
| 18A | PG1182018A | STUD |
| 20 | PG1182020 | SPRING PLATE |
| 21 | PG1182021 | SPRING |
| 22 | PG1182022 | SPRING HOUSING |
| 23 | PG1182023 | HOUSING MOUNT |
| 24 | PS29 | PHLP SCREW 6-32 x 5/8" |
| 25 | PN02 | HEX NUT 5/16"-18 |
| 26 | PG1182026 | SCALE |
| 27 | PG1182027 | POINTER |
| 28 | PG1182028 | RIVET |
| 29 | PG1182029 | FENCE SUPPORT |
| 30 | PB24 | HEX BOLT 3/8"-16 x □-□/□" |
| 31 | PG1182031 | SPECIAL WASHER |
| 32 | PG1182032 | KEY |
| 33 | PRP18M | ROLL PIN 4 x 12mm |
| 34 | PW02 | FLAT WASHER 3/8" |
STAND FOR JOINTER MODEL G1182Z & G1182ZHW
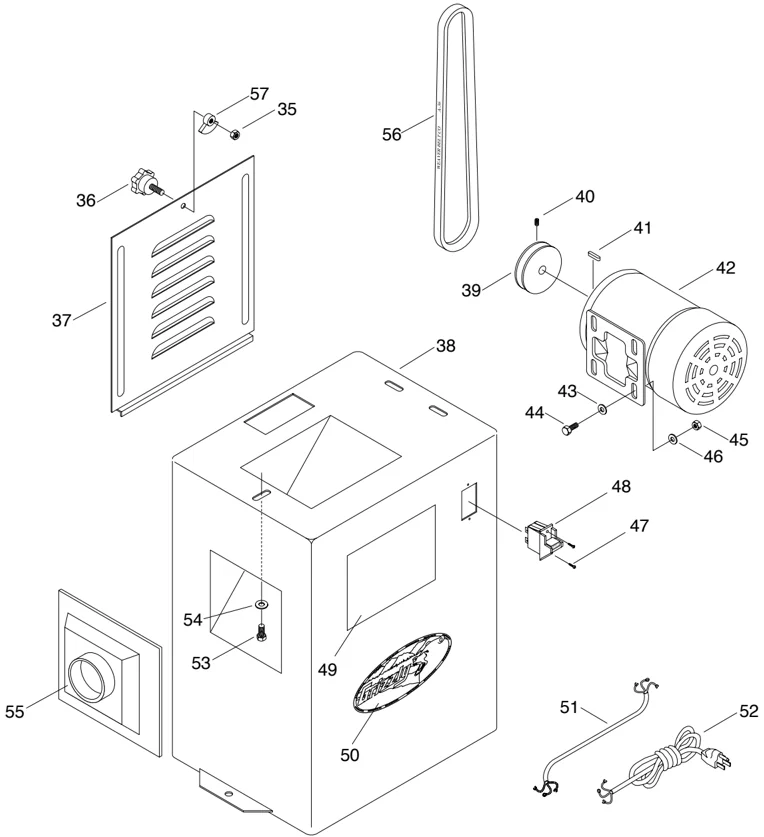
| REF | PART # | DESCRIPTION |
|---|---|---|
| 35 | PN03 | HEX NUT 3/8"-16 |
| 36 | PG1182333 | KNOB |
| 37 | PG1182332 | CABINET DOOR |
| 38 | PG1182331 | CABINET STAND |
| 39 | PG1182317 | MOTOR PULLEY |
| 40 | PSS03 | SET SCREW 1/4"-20 x 3/8" |
| 41 | PK23M | KEY 5 x 5 x 25mm |
| 42 | PG1182320 | MOTOR |
| 43 | PW07 | FLAT WASHER 5/16" |
| 44 | PB07 | HEX BOLT 5/16"-18 x 3/4" |
| 45 | PN02 | HEX NUT 5/16"-18 |
| 46 | PW07 | FLAT WASHER 5/16" |
| 47 | PS30 | PHLP HD SCREW 8-32 x 1" |
| REF | PART # | DESCRIPTION |
|---|---|---|
| 48 | G8988 | SWITCH |
| 49 | PG1182Z049 | WARNING LABEL |
| 50 | G8588 | SMALL CAST LOGO |
| 51 | PG1182330 | MOTOR CORD |
| 52 | PG1182325 | POWER CORD |
| 53 | PB21 | HEX BOLT 3/8"-16 x 3/4" |
| 54 | PLW04 | LOCK WASHER 3/8" |
| 55 | PG1182Z055 | DUST COVER |
| 56 | PVA36 | V-BELT |
| 57 | PG1182334 | LATCH |
-30- G1182 □" Series Jointers
FENCE
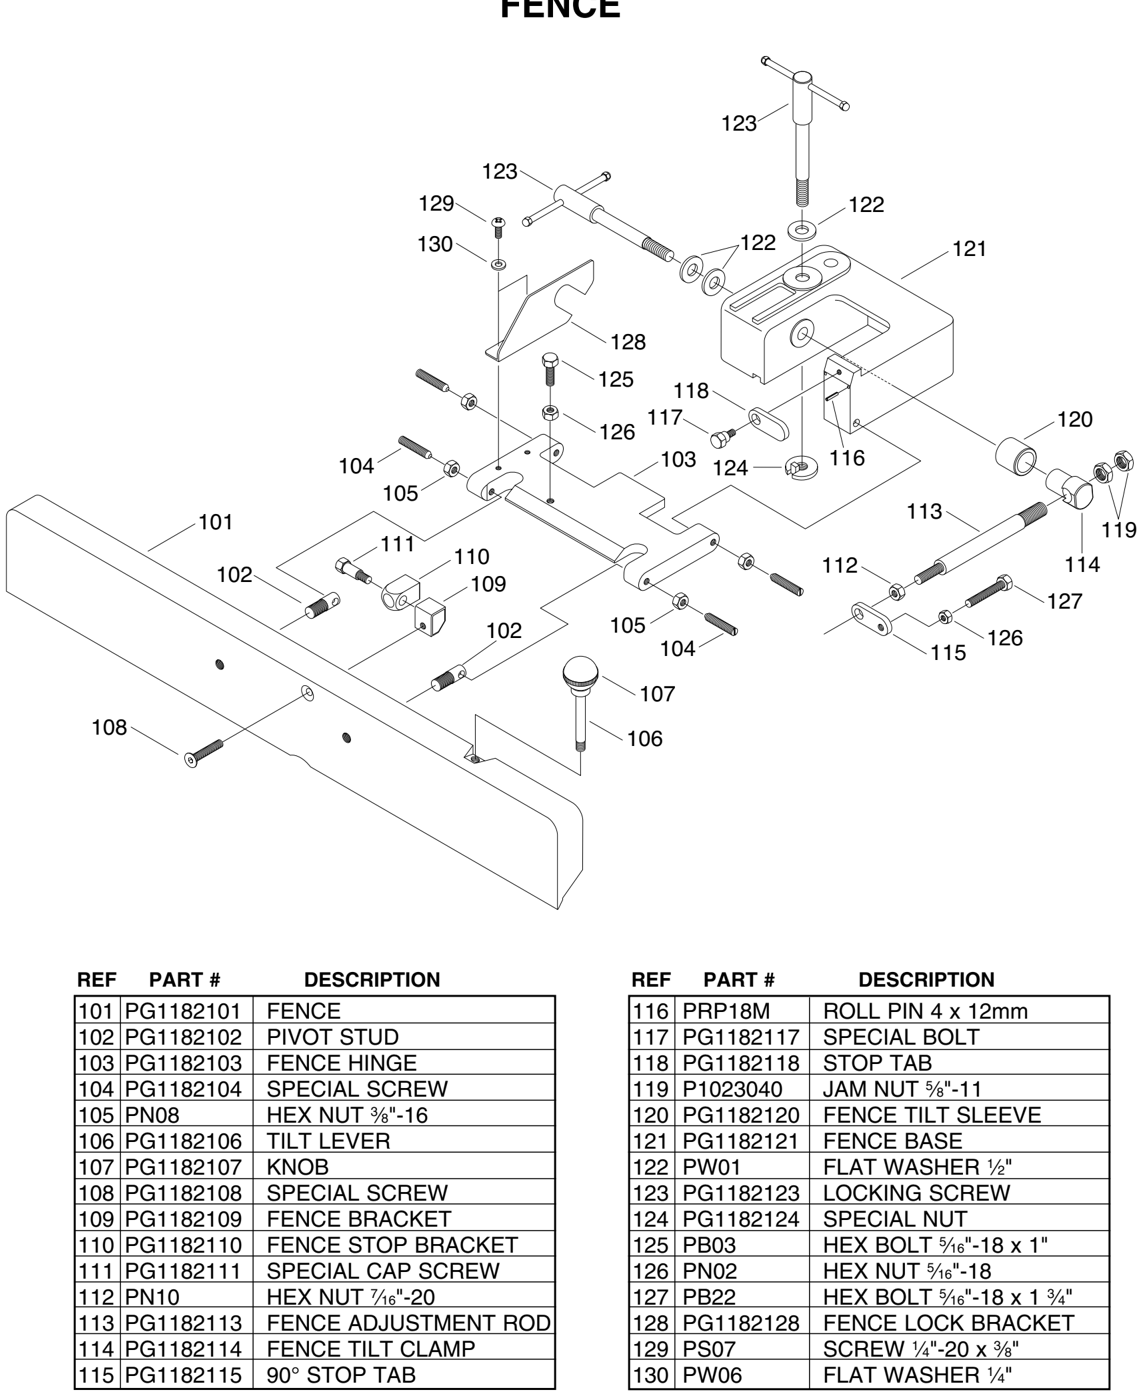
| REF | PART # | DESCRIPTION |
|---|---|---|
| 101 | PG1182101 | FENCE |
| 102 | PG1182102 | PIVOT STUD |
| 103 | PG1182103 | FENCE HINGE |
| 104 | PG1182104 | SPECIAL SCREW |
| 105 | PN08 | HEX NUT 3/8"-16 |
| 106 | PG1182106 | TILT LEVER |
| 107 | PG1182107 | KNOB |
| 108 | PG1182108 | SPECIAL SCREW |
| 109 | PG1182109 | FENCE BRACKET |
| 110 | PG1182110 | FENCE STOP BRACKET |
| 111 | PG1182111 | SPECIAL CAP SCREW |
| 112 | PN10 | HEX NUT 7/16"-20 |
| 113 | PG1182113 | FENCE ADJUSTMENT ROD |
| 114 | PG1182114 | FENCE TILT CLAMP |
| 115 | PG1182115 | 90° STOP TAB |
| REF | PART # | DESCRIPTION |
|---|---|---|
| 116 | PRP18M | ROLL PIN 4 x 12mm |
| 117 | PG1182117 | SPECIAL BOLT |
| 118 | PG1182118 | STOP TAB |
| 119 | P1023040 | JAM NUT 5/8"-11 |
| 120 | PG1182120 | FENCE TILT SLEEVE |
| 121 | PG1182121 | FENCE BASE |
| 122 | PW01 | FLAT WASHER 1/2" |
| 123 | PG1182123 | LOCKING SCREW |
| 124 | PG1182124 | SPECIAL NUT |
| 125 | PB03 | HEX BOLT 5/16"-18 x 1" |
| 126 | PN02 | HEX NUT 5/16"-18 |
| 127 | PB22 | HEX BOLT 5/16"-18 x 1-3/4" |
| 128 | PG1182128 | FENCE LOCK BRACKET |
| 129 | PS07 | SCREW 1/4"-20 x 3/8" |
| 130 | PW06 | FLAT WASHER 1/4" |
CUTTERHEAD
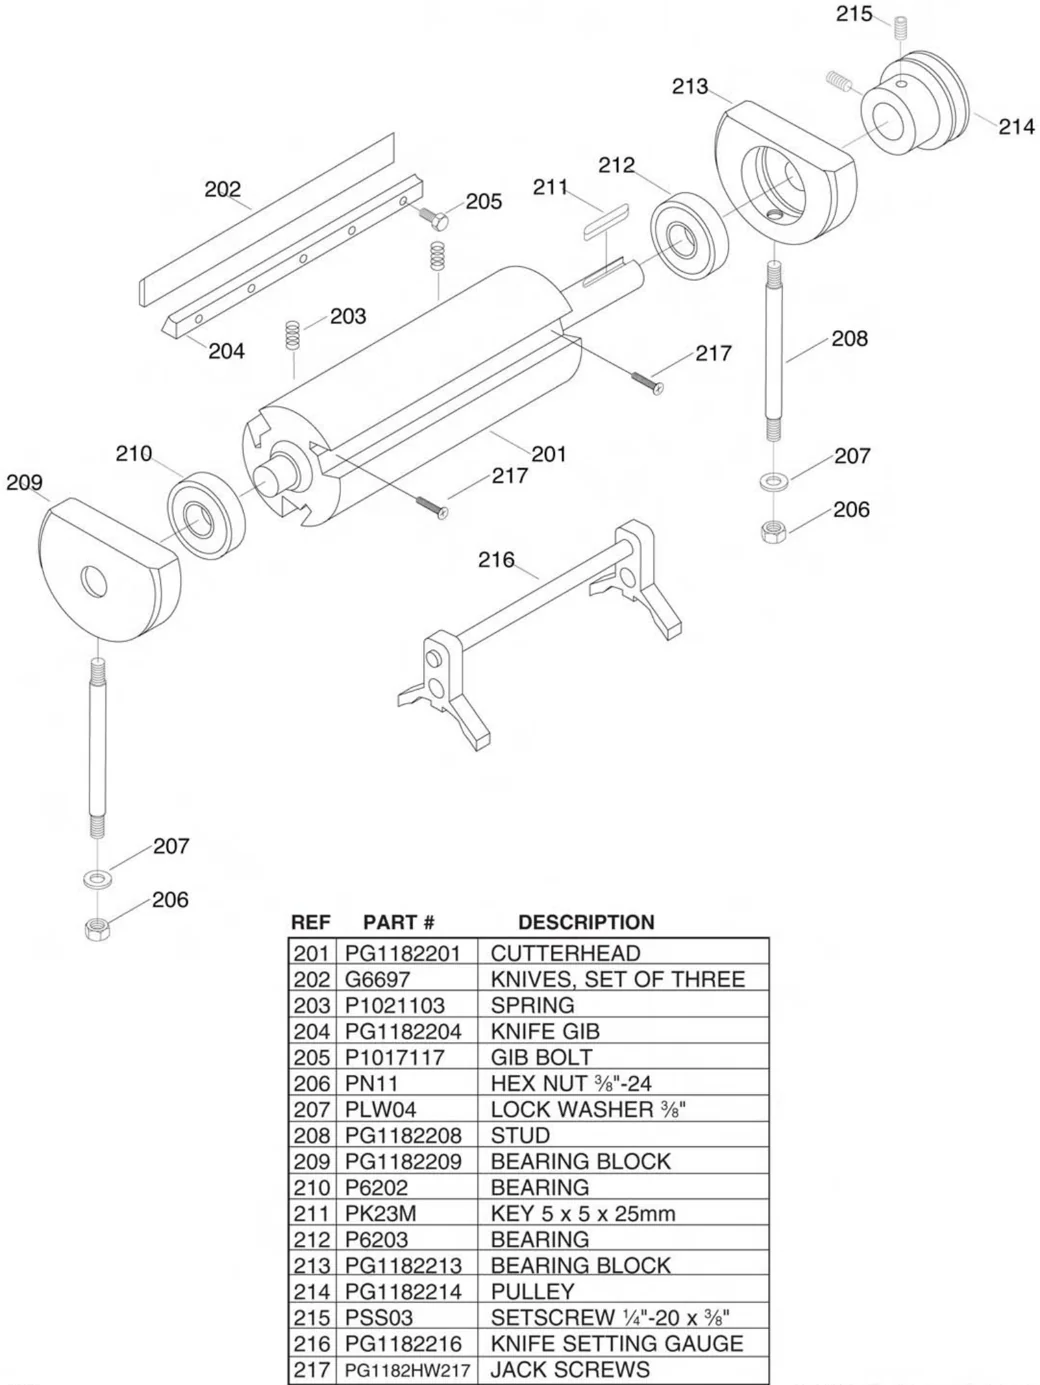
| REF | PART # | DESCRIPTION |
|---|---|---|
| 201 | PG1182201 | CUTTERHEAD |
| 202 | G6697 | KNIVES, SET OF THREE |
| 203 | P1021103 | SPRING |
| 204 | PG1182204 | KNIFE GIB |
| 205 | P1017117 | GIB BOLT |
| 206 | PN11 | HEX NUT 3/8"-24 |
| 207 | PLW04 | LOCK WASHER 3/8" |
| 208 | PG1182208 | STUD |
| 209 | PG1182209 | BEARING BLOCK |
| 210 | P6202 | BEARING |
| 211 | PK23M | KEY 5 x 5 x 25mm |
| 212 | P6203 | BEARING |
| 213 | PG1182213 | BEARING BLOCK |
| 214 | PG1182214 | PULLEY |
| 215 | PSS03 | SETSCREW 1/4"-20 x 3/8" |
| 216 | PG1182216 | KNIFE SETTING GAUGE |
| 217 | PG1182HW217 | JACK SCREWS |
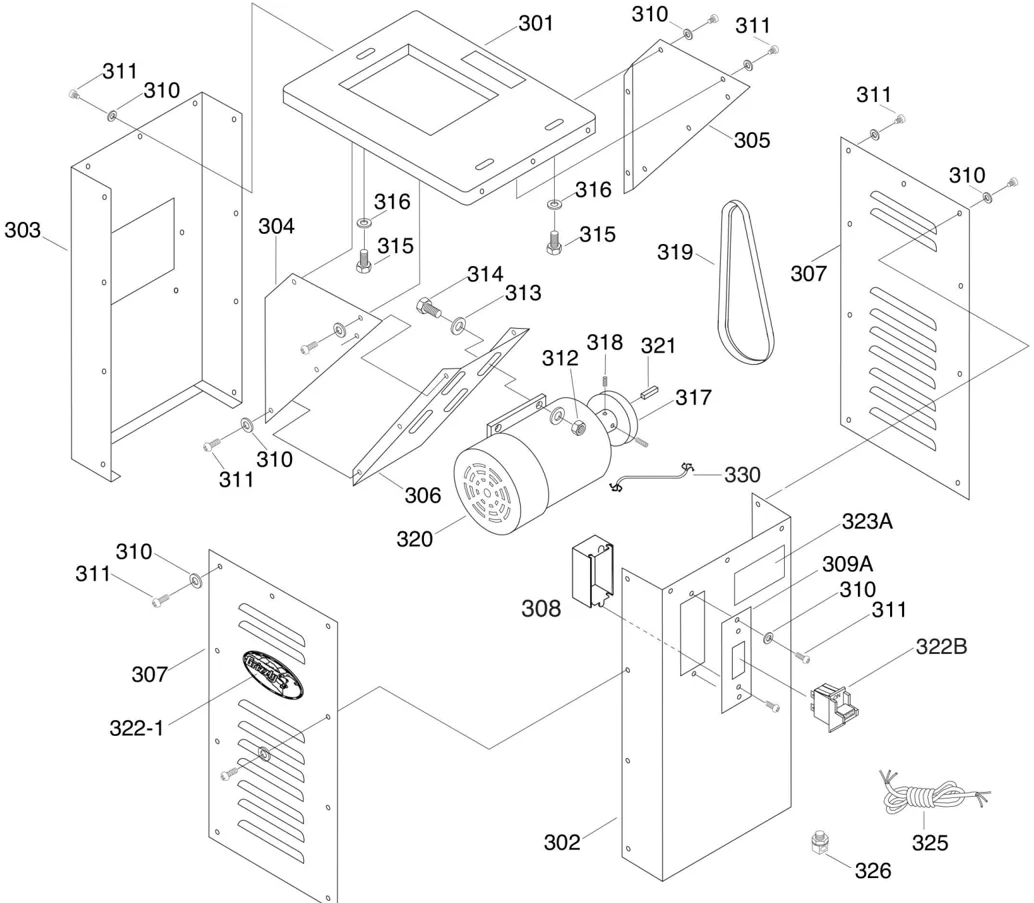
STAND FOR JOINTER MODEL G1182HW
| REF | PART # | DESCRIPTION |
|---|---|---|
| 301 | PG1182301 | BASE PANEL |
| 302 | PG1182302 | RIGHT STAND SUPPORT |
| 303 | PG1182303 | LEFT STAND SUPPORT |
| 304 | PG1182304 | LEFT DUST CHUTE |
| 305 | PG1182305 | RIGHT DUST CHUTE |
| 306 | PG1182306 | MOTOR SUPPORT |
| 307 | PG1182307 | FRONT PANEL |
| 308 | PG1182308 | SWITCH COVER |
| 309A | PG1182309A | SWITCH MOUNT FOR PSW06 |
| 310 | PW03 | FLAT WASHER 3/16" |
| 311 | PS06 | SCREW #10 - 24 x 3/8" |
| 312 | PN02 | HEX NUT 5/16" - 18 |
| REF | PART # | DESCRIPTION |
|---|---|---|
| 313 | PW07 | FLAT WASHER 5/16" |
| 314 | PB07 | HEX BOLT 5/16" - 18 x 3/4" |
| 315 | PB21 | HEX BOLT 3/8" - 16 x 3/4" |
| 316 | PLW04 | LOCK WASHER 3/8" |
| 317 | PG1182317 | MOTOR PULLEY |
| 318 | PSS03 | SETSCREW 1/4" - 20 x 3/8" |
| 319 | PVA36 | V-BELT |
| 320 | PG1182320 | MOTOR, 1HP |
| 321 | PK23M | KEY 5 x 5 x 25mm |
| 322-1 | G8588 | SMALL CAST LOGO |
| 322B | G8988 | SWITCH |
| 323A | PG11823HW23A | WARNING LABEL |
| 325 | PG1182325 | POWER CORD |
| 326 | PG1182326 | STRAIN RELIEF |
| 330 | PG1182330 | MOTOR CORD |
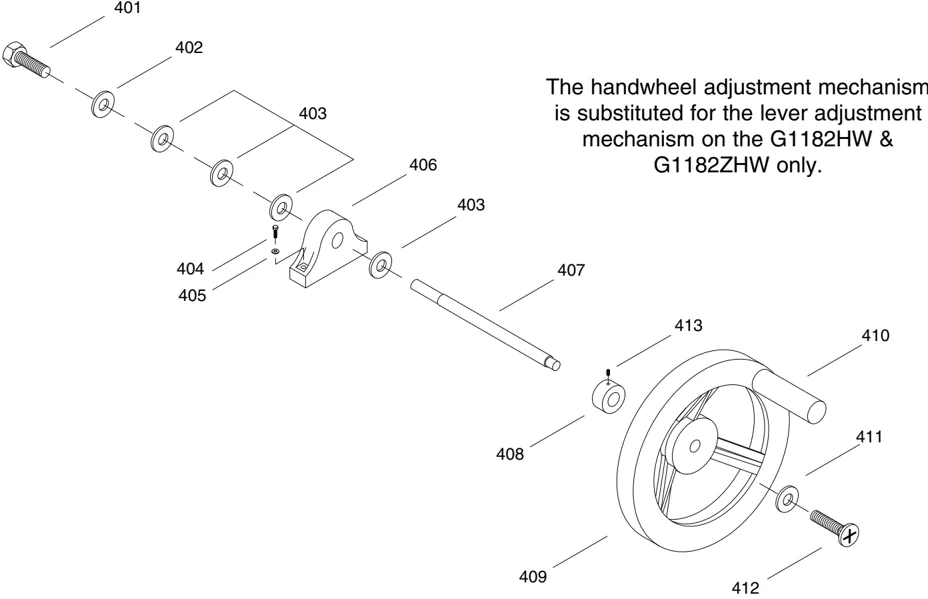
HANDWHEEL ASSEMBLY FOR MODEL G1182HW & G1182ZHW
The handwheel adjustment mechanism is substituted for the lever adjustment mechanism on the G1182HW & G1182ZHW only.
| REF | PART # | DESCRIPTION |
|---|---|---|
| 401 | PB19 | HEX BOLT 1/4"-20 X 1/2" |
| 402 | PW06 | FLAT WASHER 1/4" |
| 403 | PG1182HW403 | BRONZE FLAT WASHER 1/2" |
| 404 | PB03 | HEX BOLT 5/16"-18 X 1" |
| 405 | PW07 | FLAT WASHER 5/16" |
| 406 | PG1182HW406 | LEAD SCREW BRACKET |
| 407 | PG1182HW407 | LEAD SCREW |
| 408 | PG1182HW408 | LOCK COLLAR |
| 409 | PG1182HW409 | HANDWHEEL |
| 411 | PW03 | FLAT WASHER 10 |
| 412 | PS01 | PHLP HD SCR 10-24 X 1/2" |
| 413 | PSS11 | SET SCREW 1/4"-20 X 1/4" |
-34- G1182 6" Series Jointers
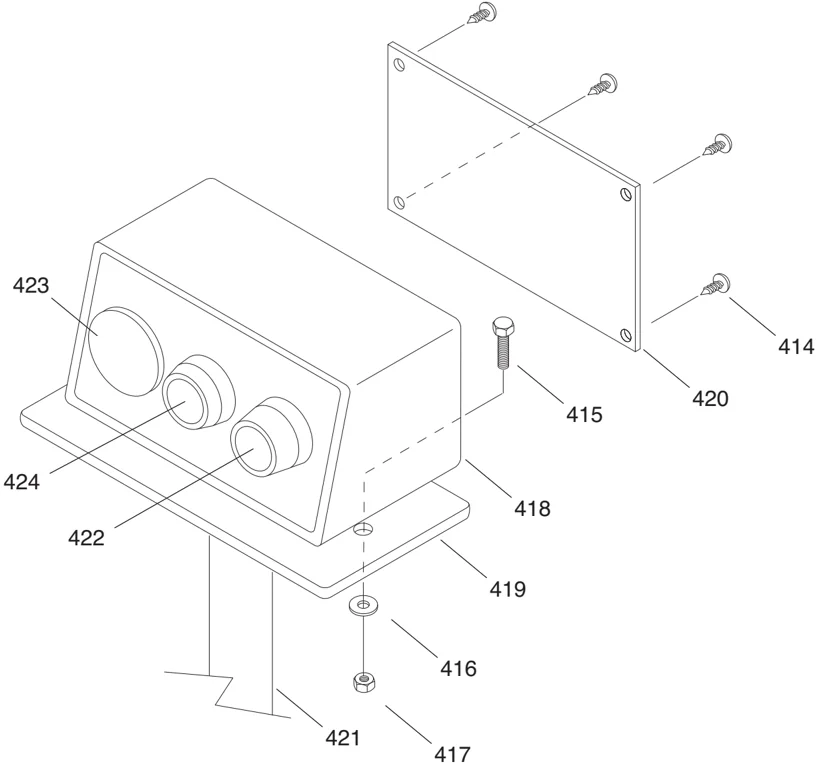
PEDESTAL MOUNTED SWITCH FOR JOINTER MODEL G1182ZX
| REF | PART # | DESCRIPTION |
|---|---|---|
| 414 | PG1182ZX414 | SELF TAPPING SCREW |
| 415 | PB02 | HEX BOLT 1/4-20 X 5/8" |
| 416 | PW06 | FLAT WASHER 1/4" |
| 417 | PN05 | 1/4"-20 NUT |
| 418 | PG1182ZX418 | SWITCH HOUSING |
| 419 | PG1182ZX419 | PEDESTAL |
| 420 | PG1182ZX420 | BACK SWITCH PLATE |
| 421 | PG1182ZX421 | PEDESTAL MOUNT |
| 422 | PG1182ZX422 | “ON” SWITCH ASSEMBLY |
| 423 | PG1182ZX423 | “OFF” SWITCH ASSEMBLY |
| 424 | PG1182ZX424 | LIGHT INDICATOR ASSEMBLY |
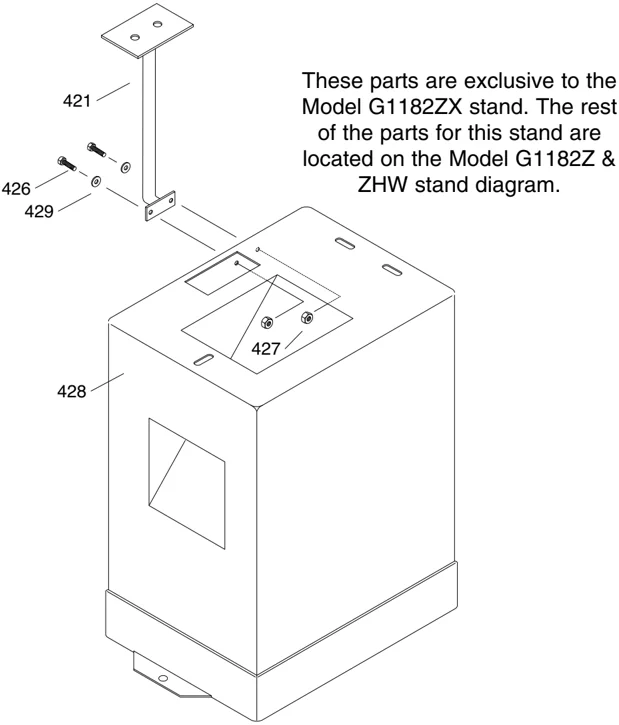
STAND FOR JOINTER MODEL G1182ZX
These parts are exclusive to the Model G1182ZX stand. The rest of the parts for this stand are located on the Model G1182Z & ZHW stand diagram.
| REF | PART # | DESCRIPTION |
|---|---|---|
| 426 | PB22 | HEX BOLT 3/8"-16 x 1" |
| 427 | PN03 | HEX NUT 3/8"-16 |
| 428 | PG1182ZX428 | HEAVY-DUTY CABINET STAND |
| 429 | PW02 | FLAT WASHER 3/8" |
-36- G1182 6" Series Jointers
TROUBLESHOOTING
| SYMPTOM | POSSIBLE CAUSE | CORRECTIVE ACTION |
|---|---|---|
| Motor will not start. | 1. Low voltage.2. Open circuit in motor or loose connections. | 1. Check power line for proper voltage.2. Inspect all lead connections on motor for loose or open connections. |
| Motor will not start; fuses or circuit breakers blow. | 1. Short circuit in line cord or plug.2. Short circuit in motor or loose connections.3. Incorrect fuses or circuit breakers in power line. | 1. Inspect cord or plug for damaged insulation and shorted wires.2. Inspect all connections on motor for loose or shorted terminals or worn insulation.3. Install correct fuses or circuit breakers. |
| Motor overheats. | 1. Motor overloaded.2. Air circulation through the motor restricted. | 1. Reduce load on motor.2. Clean out motor to provide normal air circulation. |
| Motor stalls (resulting in blown fuses or tripped circuit). | 1. Short circuit in motor or loose connections.2. Low voltage.3. Incorrect fuses or circuit breakers in power line.4. Motor overloaded. | 1. Inspect connections on motor for loose or shorted terminals or worn insulation.2. Correct the low voltage conditions.3. Install correct fuses or circuit breakers.4. Reduce load on motor. |
| Machine slows when operating. | 1. Feed rate too high.2. Depth of cut too great. | 1. Feed workpiece slower.2. Reduce depth of cut. |
| Loud, repetitious noise coming from machine | 1. Pulley setscrews or keys are missing or loose.2. Motor fan is hitting the cover.3. V-belt is defective | 1. Inspect keys and setscrews. Replace or tighten if necessary.2. Tighten fan or shim cover.3. Replace V-belt. See Maintenance. |
| Machine is loud when cutting. Overheats or bogs down in the cut. | 1. Excessive depth of cut.2. Knives are dull. | 1. Decrease depth of cut.2. Sharpen knives. |
WARNING
DO NOT make adjustments while the jointer is running. Ensure that the switch is off, power is disconnected and moving parts have stopped before making adjustments. Failure to comply may result in serious personal injury.

WARRANTY AND RETURNS
Grizzly Industrial, Inc. warrants every product it sells for a period of 1 year to the original purchaser from the date of purchase. This warranty does not apply to defects due directly or indirectly to misuse, abuse, negligence, accidents, repairs or alterations or lack of maintenance. This is Grizzly's sole written warranty and any and all warranties that may be implied by law, including any merchantability or fitness, for any particular purpose, are hereby limited to the duration of this written warranty. We do not warrant or represent that the merchandise complies with the provisions of any law or acts unless the manufacturer so warrants. In no event shall Grizzly's liability under this warranty exceed the purchase price paid for the product and any legal actions brought against Grizzly shall be tried in the State of Washington, County of Whatcom.
We shall in no event be liable for death, injuries to persons or property or for incidental, contingent, special, or consequential damages arising from the use of our products.
To take advantage of this warranty, contact us by mail or phone and give us all the details. We will then issue you a "Return Number," which must be clearly posted on the outside as well as the inside of the carton. We will not accept any item back without this number. Proof of purchase must accompany the merchandise.
The manufacturers reserve the right to change specifications at any time because they constantly strive to achieve better quality equipment. We make every effort to ensure that our products meet high quality and durability standards and we hope you never need to use this warranty.
Please feel free to write or call us if you have any questions about the machine or the manual.
Thank you again for your business and continued support. We hope to serve you again soon.
-38- G1182 6" Series Jointers
WARRANTY CARD
Name _________________________________________________________________________________ Street ________________________________________________________________________________ City ______________________________________________________ State________ Zip________ Phone Number_________________________________ E-Mail_____________________________ FAX________________ MODEL #_____________________________________ Order #______________________________
The following information is given on a voluntary basis. It will be used for marketing purposes to help us develop better products and services. Of course, all information is strictly confidential.
-
How did you learn about us? Advertisement Friend Catalog Card Deck World Wide Web Other__________________________________________
-
Which of the following magazines do you subscribe to. ___American Woodworker ___Practical Homeowner ___Cabinetmaker Shop Notes Family Handyman Today's Homeowner Fine Homebuilding WOOD Fine Woodworking Wooden Boat Home Handyman Woodshop News Journal of Light Construction Woodsmith Old House Journal Woodwork Popular Mechanics Woodworker Popular Science Woodworker's Journal Popular Woodworking Workbench Other
-
Which of the following woodworking/remodeling shows do you watch? Backyard America The New Yankee Workshop Home Time This Old House The American Woodworker Woodwright's Shop Other_______________________________________
-
What is your annual household income? ___$20,000-$29,999 ___$60,000-$69,999 ___$30,000-$39,999 ___$70,000-$79,999 ___$40,000-$49,999 ___$80,000-$89,999 ___$50,000-$59,999 ___$90,000 +
-
What is your age group? ___20-29 ___50-59 ___30-39 ___60-69 ___40-49 ___70 +
-
How long have you been a woodworker? ___0 - 2 Years ___8 - 20 Years ___2 - 8 Years ___20+ Years
-
How would you rank your woodworking skills? ___Simple ___Advanced ___Intermediate ___Master Craftsman
-
What stationary woodworking tools do you own? Check all that apply. Air Compressor Panel Saw Band Saw Planer Drill Press Power Feeder Drum Sander Radial Arm Saw Dust Collector Shaper Horizontal Boring Machine Spindle Sander Jointer Table Saw Lathe Vacuum Veneer Press Mortiser Wide Belt Sander Other___
-
How many of your woodworking machines are Grizzly? ____________________
CUT ALONG DOTTED LINE
-
Which benchtop tools do you own? Check all that apply. 1" x 42" Belt Sander 6" - 8" Grinder 5" - 8" Drill Press Mini Lathe 8" Table Saw 10" - 12" Thickness Planer 8" - 10" Bandsaw Scroll Saw Disc/Belt Sander Spindle/Belt Sander Mini Jointer Other________________________
-
How many of the machines checked above are Grizzly? ____________________
-
Which portable/hand held power tools do you own? Check all that apply. Belt Sander Orbital Sander Biscuit Joiner Palm Sander Circular Saw Portable Planer Detail Sander Saber Saw Drill/Driver Reciprocating Saw Miter Saw Router Other_____________________
-
What machines/supplies would you like Grizzly Industrial to carry?
-
What new accessories would you like Grizzly Industrial to carry?
-
What other companies do you purchase your tools and supplies from?
-
Do you think your purchase represents good value? ___Yes ___No
-
Would you recommend Grizzly Industrial to a friend? ___Yes ___No
-
Would you allow us to use your name as a reference for Grizzly customers in your area? Note: We never use names more than three times. ___Yes ___No
-
Comments:____________________________________________________________
FOLD ALONG DOTTED LINE
Place Stamp Here

GRIZZLY INDUSTRIAL, INC. P.O. BOX 2069 BELLINGHAM, WA 98227-2069
FOLD ALONG DOTTED LINE
Send a Grizzly Catalog to a friend:
Name________________________________________ Street_______________________________________ City_________________State_________Zip_________
TAPE ALONG EDGES--PLEASE DO NOT STAPLE
-42- G1182 6" Series Jointers