Grizzly
Industrial, Inc.
MODEL G1071/G1071Z
1 HP OSCILLATING
SPINDLE SANDER
OWNER'S MANUAL
(For models manufactured since 03/26)

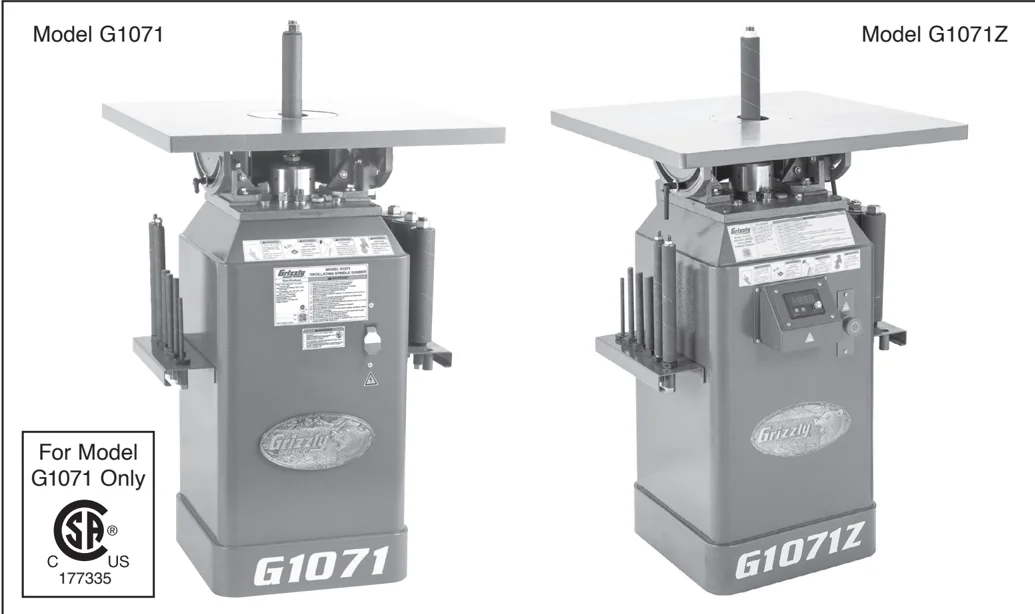
Model G1071 Model G1071Z
For Model G1071 Only C US 177335
COPYRIGHT © 1995 BY GRIZZLY INDUSTRIAL, INC., REVISED FEBRUARY, 2026 (JP) WARNING: NO PORTION OF THIS MANUAL MAY BE REPRODUCED IN ANY SHAPE OR FORM WITHOUT THE WRITTEN APPROVAL OF GRIZZLY INDUSTRIAL, INC. #JB11261 PRINTED IN TAIWAN V4.02.26
Keep for Future Reference
WARNING!
This manual provides critical safety instructions on the proper setup, operation, maintenance, and service of this machine/tool. Save this document, refer to it often, and use it to instruct other operators.
Failure to read, understand and follow the instructions in this manual may result in fire or serious personal injury—including amputation, electrocution, or death.
The owner of this machine/tool is solely responsible for its safe use. This responsibility includes but is not limited to proper installation in a safe environment, personnel training and usage authorization, proper inspection and maintenance, manual availability and comprehension, application of safety devices, cutting/sanding/grinding tool integrity, and the usage of personal protective equipment.
The manufacturer will not be held liable for injury or property damage from negligence, improper training, machine modifications or misuse.
WARNING!
Some dust created by power sanding, sawing, grinding, drilling, and other construction activities contains chemicals known to the State of California to cause cancer, birth defects or other reproductive harm. Some examples of these chemicals are:
- Lead from lead-based paints.
- Crystalline silica from bricks, cement and other masonry products.
- Arsenic and chromium from chemically-treated lumber.
Your risk from these exposures varies, depending on how often you do this type of work. To reduce your exposure to these chemicals: Work in a well ventilated area, and work with approved safety equipment, such as those dust masks that are specially designed to filter out microscopic particles.


Table of Contents
-
INTRODUCTION ........ 2
-
Manual Accuracy ........ 2
-
Contact Info ........ 2
-
Machine Differences ........ 2
-
Identification ........ 3
-
Controls & Components ........ 4
-
G1071 Machine Data Sheet ........ 5
-
G1071Z Machine Data Sheet ........ 7
-
SECTION 1: SAFETY ........ 9
-
Safety Instructions for Machinery ........ 9
-
Additional Safety for Spindle Sanders ........ 11
-
SECTION 2: POWER SUPPLY ........ 12
-
Converting to 240V (G1071 Only) ........ 14
-
SECTION 3: SETUP ........ 15
-
Needed for Setup ........ 15
-
Unpacking ........ 15
-
Inventory ........ 16
-
Site Considerations ........ 18
-
Assembly ........ 19
-
Check Gearbox Oil ........ 20
-
Dust Collection ........ 21 Correcting Phase Polarity (G1071Z Only)... 21
-
Test Run ........ 22
-
SECTION 4: OPERATIONS ........ 24
-
Disabling Switch (G1071) ........ 24
-
Stock Inspection ........ 25
-
Sanding Tips ........ 25
-
Choosing Sanding Sleeves ........ 25
-
Installing/Removing Sanding Spindles ........ 26
-
Changing Sanding Sleeves ........ 27
-
Installing Table Insert ........ 28
-
Sanding ........ 28
-
SECTION 5: ACCESSORIES ........ 30
-
SECTION 6: MAINTENANCE ........ 32
-
Schedule ........ 32
-
Cleaning & Protecting ........ 32
-
Lubrication ........ 32
-
Cleaning Sanding Sleeves ........ 33
-
Changing Gearbox Oil ........ 33
-
SECTION 7: SERVICE ........ 34
-
Troubleshooting ........ 34
-
SECTION 8: WIRING ........ 37
-
Wiring Safety Instructions ........ 37
-
G1071 Wiring Diagram ........ 38
-
G1071Z Wiring Diagram ........ 39
-
G1071Z Electrical Components ........ 40
-
SECTION 9: PARTS ........ 41
-
G1071 Main ........ 41
-
G1071 Spindles & Storage ........ 43
-
G1071 Labels & Cosmetics ........ 44
-
G1071Z Main ........ 45
-
G1071Z Labels & Cosmetics ........ 47
-
WARRANTY & RETURNS ........ 49
INTRODUCTION
Manual Accuracy
We are proud to provide a high-quality owner’s manual with your new machine!
We made every effort to be exact with the instructions, specifications, drawings, and photographs in this manual. Sometimes we make mistakes, but our policy of continuous improvement also means that sometimes the machine you receive is slightly different than shown in the manual.
If you find this to be the case, and the difference between the manual and machine leaves you confused or unsure about something, check our website for an updated version. We post current manuals and manual updates for free on our website at www.grizzly.com.
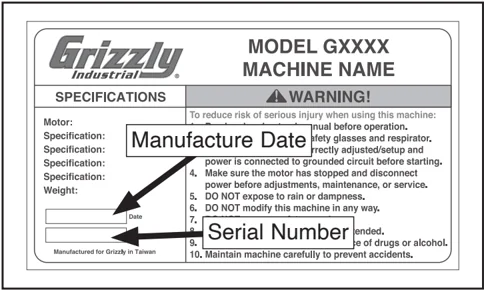
Alternatively, you can call our Technical Support for help. Before calling, make sure you write down the manufacture date and serial number from the machine ID label (see below). This information is required for us to provide proper tech support, and it helps us determine if updated documentation is available for your machine.
Contact Info
We stand behind our machines! If you have questions or need help, contact us with the information below. Before contacting, make sure you get the serial number and manufacture date from the machine ID label. This will help us help you faster.
Grizzly Technical Support 1815 W. Battlefield Springfield, MO 65807 Phone: (570) 546-9663 Email: techsupport@grizzly.com
We want your feedback on this manual. What did you like about it? Where could it be improved? Please take a few minutes to give us feedback.
Grizzly Documentation Manager P.O. Box 2069 Bellingham, WA 98227-2069 Email: manuals@grizzly.com
Machine Differences
G1071 is a dual-voltage (120V/240V) oscillating spindle sander featuring an ON/OFF toggle switch with a disabling safety key.
G1071Z is a 120V oscillating spindle sander featuring variable-speed control, a digital RPM readout, and an emergency stop button.
Identification
Become familiar with the names and locations of the controls and features shown below to better understand the instructions in this manual.
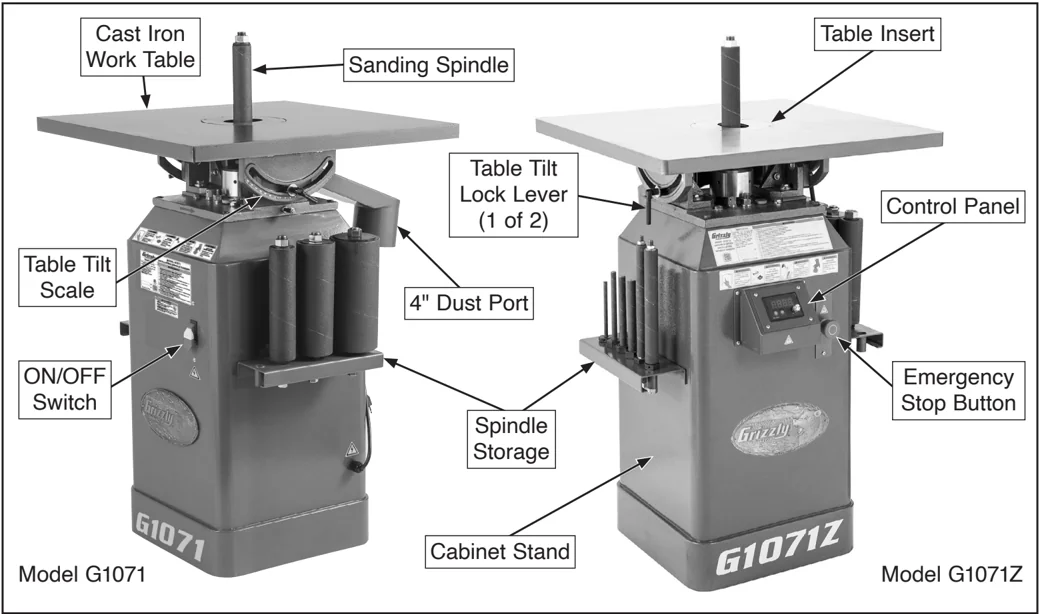
Model G1071
- Cast Iron Work Table
- Sanding Spindle
- Table Tilt Scale
- ON/OFF Switch
- Table Tilt Lock Lever (1 of 2)
- 4" Dust Port
- Spindle Storage
- Cabinet Stand
Model G1071Z
- Table Insert
- Control Panel
- Emergency Stop Button
!WARNING Like all machinery there is potential danger when operating this machine. Accidents are frequently caused by lack of familiarity or failure to pay attention. Use this machine with respect and caution to decrease the risk of operator injury. If normal safety precautions are overlooked or ignored, serious personal injury may occur.
!CAUTION No list of safety guidelines can be complete. Every shop environment is different. Always consider safety first, as it applies to your individual working conditions. Use this and other machinery with caution and respect. Failure to do so could result in serious personal injury, damage to equipment, or poor work results.
Controls & Components
WARNING To reduce your risk of serious injury, read this entire manual BEFORE using machine.
Refer to the following figures and descriptions to become familiar with the basic controls and components of this machine. Understanding these items and how they work will help you understand the rest of the manual and minimize your risk of injury when operating this machine.
G1071 ON/OFF Switch
 Figure 1. G1071 ON/OFF switch.
A. ON/OFF Toggle Switch: Turns machine ON and OFF. Remove key to disable switch.
G1071Z Control Panel
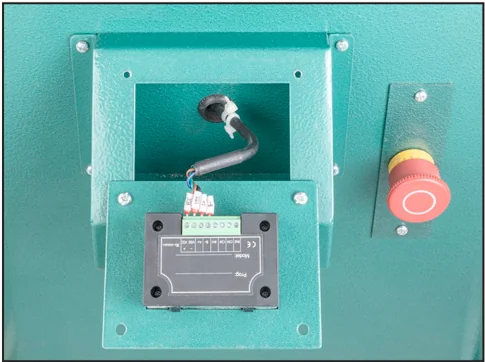
 Figure 2. G1071Z control panel.
B. Spindle Speed Digital Readout: Shows spindle speed in RPM. C. Emergency Stop Button: Stops spindle and disables machine. Pull out to reset. D. Spindle Speed Dial: Adjusts spindle speed between 900–1800 RPM. E. OFF Button: Turns machine OFF. F. ON Button: Turns machine ON.
Table Tilt Components
 Figure 3. Main table tilt components.
G. Trunnion w/Table Tilt Scale: Tilts table for setting bevel angles from 45° (front) to 20° (back). H. Table Tilt Lock Lever (1 of 2): Secures table tilt position.
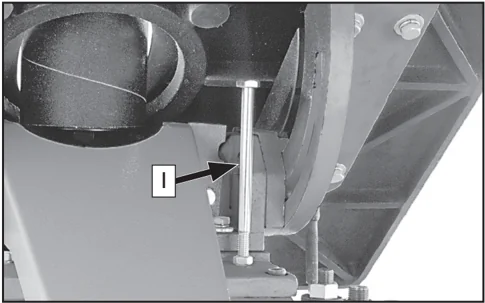
 Figure 4. Table tilt stop.
I. Table Stop Bolt w/Jam Nut: Stops table at 0° tilt. Adjust table stop bolt to allow backward tilt or set for repeated angle positions.
-4- Model G1071/G1071Z (Mfd. Since 03/26)
MACHINE DATA SHEET
Grizzly Industrial, Inc.®
Customer Service #: (570) 546-9663 · To Order Call: (800) 523-4777 · Fax #: (800) 438-5901
MODEL G1071 1 HP OSCILLATING SPINDLE SANDER
Product Dimensions:
- Weight ........ 296 lbs.
- Width (side-to-side) x Depth (front-to-back) x Height ........ 25-1/2 x 28-1/2 x 45 in.
- Footprint (Length x Width) ........ 16 x 16 in.
Shipping Dimensions:
- Type ........ Wood Crate
- Content ........ Machine
- Weight ........ 344 lbs.
- Length x Width x Height ........ 29 x 29 x 42 in.
- Must Ship Upright ........ Yes
Electrical:
- Power Requirement ........ 120V or 240V, Single-Phase, 60 Hz
- Prewired Voltage ........ 120V
- Full-Load Current Rating ........ 12A at 120V, 6A at 240V
- Minimum Circuit Size ........ 15A at 120V, 15A at 240V
- Connection Type ........ Cord & Plug
- Power Cord Included ........ Yes
- Power Cord Length ........ 72 in.
- Power Cord Gauge ........ 16 AWG
- Plug Included ........ Yes
- Included Plug Type ........ 5-15 for 120V
- Recommended Plug Type ........ 6-15 for 240V
- Switch Type ........ Paddle Safety Switch w/Removable Key
Motors:
Main
- Horsepower ........ 1 HP
- Phase ........ Single-Phase
- Amps ........ 12A/6A
- Speed ........ 1725 RPM
- Type ........ TEFC Capacitor-Start Induction
- Power Transfer ........ Direct Drive
- Bearings ........ Shielded & Permanently Lubricated
- Centrifugal Switch/Contacts Type ........ External

Main Specifications:
Spindle Sander Info
- Sanding Drum Diameters ........ 1/4, 3/8, 1/2, 5/8, 3/4, 1, 1-1/2, 2, 3, 4 in.
- Sanding Drum Length ........ 5, 6, 9 in.
- Spindle Speed ........ 1725 RPM
- Spindle Oscillation ........ 72 OPM
- Stroke Length ........ 1-1/2 in.
- Table Length ........ 25-1/8 in.
- Table Width ........ 25-1/8 in.
- Table Thickness ........ 1-1/8 in.
- Table-to-Floor Height ........ 35-1/2 in.
- Number of Table Inserts ........ 3
- Included Sanding Sleeve Grit Size ........ 100
- Table Tilt ........ Front 45, Back 20 deg.
Construction Materials
- Base ........ Formed Steel
- Stand ........ Formed Steel
- Table ........ Ground Cast Iron
- Frame ........ Sheet Metal
- Paint Type/Finish ........ Powder Coated
Other Related Info
- Number of Dust Ports ........ 1
- Dust Port Size ........ 4 in.
- Compatible Mobile Base ........ D2260A
Other Specifications:
- Country of Origin ........ Taiwan
- Warranty ........ 1 Year
- Approximate Assembly & Setup Time ........ 45 Minutes
- Serial Number Location ........ ID Label on Center of Stand
- ISO 9001 Factory ........ Yes
- Certified by a Nationally Recognized Testing Laboratory (NRTL) ........ Yes
- Awards ........ Wood Magazine Top Value 1999
Features: Features Ground Steel Table Inserts Includes Formed and Welded Steel Stand 100 Grit Sleeve Included for Each Spindle Cast-Iron Table Table Tilts 45 deg.
-6- Model G1071/G1071Z (Mfd. Since 03/26)
Grizzly
Industrial, Inc.
MACHINE DATA SHEET
Customer Service #: (570) 546-9663 · To Order Call: (800) 523-4777 · Fax #: (800) 438-5901
MODEL G1071Z 1 HP VARIABLE-SPEED OSCILLATING SPINDLE SANDER
Product Dimensions:
- Weight ........ 301 lbs.
- Width (side-to-side) x Depth (front-to-back) x Height ........ 25-1/2 x 28-1/2 x 45 in.
- Footprint (Length x Width) ........ 16 x 16 in.
Shipping Dimensions:
- Type ........ Wood Crate
- Content ........ Machine
- Weight ........ 350 lbs.
- Length x Width x Height ........ 29 x 26 x 37 in.
- Must Ship Upright ........ Yes
Electrical:
- Power Requirement ........ 120V, Single-Phase, 60 Hz
- Full-Load Current Rating ........ 15.5A
- Minimum Circuit Size ........ 20A
- Connection Type ........ Cord & Plug
- Power Cord Included ........ Yes
- Power Cord Length ........ 72 in.
- Power Cord Gauge ........ 14 AWG
- Plug Included ........ Yes
- Included Plug Type ........ 5-15
- Switch Type ........ ON/OFF Buttons
- Inverter (VFD) Type ........ TAI-CHUAN TA11D5
- Inverter (VFD) Size ........ 1 HP
Motors: Main
- Horsepower ........ 1 HP
- Phase ........ 3-Phase
- Amps ........ 3A
- Speed ........ 1725 RPM
- Type ........ TEFC Induction
- Power Transfer ........ Direct
- Bearings ........ Shielded & Permanently Lubricated

Main Specifications:
Spindle Sander Info
- Sanding Drum Diameters ........ 1/4, 3/8, 1/2, 5/8, 3/4, 1, 1-1/2, 2, 3, 4 in.
- Sanding Drum Length ........ 5, 6, 9 in.
- Spindle Speed ........ 900 - 1800 RPM
- Spindle Oscillation ........ 72 OPM
- Stroke Length ........ 1-1/2 in.
- Table Length ........ 25-1/8 in.
- Table Width ........ 25-1/8 in.
- Table Thickness ........ 1-1/8 in.
- Table-to-Floor Height ........ 35-3/4 in.
- Number of Table Inserts ........ 3
- Included Sanding Sleeve Grit Size ........ 100
- Table Tilt ........ Front 45, Back 20 deg.
Construction Materials
- Base ........ Formed Steel
- Stand ........ Formed Steel
- Table ........ Precision-Ground Cast Iron
- Frame ........ Steel
- Paint Type/Finish ........ Powder Coated
Other Related Info
- Number of Dust Ports ........ 1
- Dust Port Size ........ 4 in.
- Compatible Mobile Base ........ T28922
Other Specifications:
- Country of Origin ........ Taiwan
- Warranty ........ 1 Year
- Approximate Assembly & Setup Time ........ 45 Minutes
- Serial Number Location ........ Machine ID Label
- ISO 9001 Factory ........ Yes
Features: Three Precision-Ground Steel Table Inserts Formed & Welded Steel Stand Precision-Ground Heavy-Duty Cast Iron Table Table Tilts 45 Deg. Forward, 20 Deg. Back Variable Spindle Speed Digital Readout Ten Sanding Drums in a Variety of Diameters & Lengths
-8- Model G1071/G1071Z (Mfd. Since 03/26)
SECTION 1: SAFETY
For Your Own Safety, Read Instruction Manual Before Operating This Machine
The purpose of safety symbols is to attract your attention to possible hazardous conditions. This manual uses a series of symbols and signal words intended to convey the level of importance of the safety messages. The progression of symbols is described below. Remember that safety messages by themselves do not eliminate danger and are not a substitute for proper accident prevention measures. Always use common sense and good judgment.
DANGER Indicates an imminently hazardous situation which, if not avoided, WILL result in death or serious injury.
WARNING Indicates a potentially hazardous situation which, if not avoided, COULD result in death or serious injury.
CAUTION Indicates a potentially hazardous situation which, if not avoided, MAY result in minor or moderate injury. It may also be used to alert against unsafe practices.
NOTICE Alerts the user to useful information about proper operation of the machine to avoid machine damage.
Safety Instructions for Machinery
WARNING
OWNER’S MANUAL. Read and understand this owner’s manual BEFORE using machine.
TRAINED OPERATORS ONLY. Untrained operators have a higher risk of being hurt or killed. Only allow trained/supervised people to use this machine. When machine is not being used, disconnect power, remove switch keys, or lock-out machine to prevent unauthorized use—especially around children. Make your workshop kid proof!
DANGEROUS ENVIRONMENTS. Do not use machinery in areas that are wet, cluttered, or have poor lighting. Operating machinery in these areas greatly increases the risk of accidents and injury.
MENTAL ALERTNESS REQUIRED. Full mental alertness is required for safe operation of machinery. Never operate under the influence of drugs or alcohol, when tired, or when distracted.
ELECTRICAL EQUIPMENT INJURY RISKS. You can be shocked, burned, or killed by touching live electrical components or improperly grounded machinery. To reduce this risk, only allow qualified service personnel to do electrical installation or repair work, and always disconnect power before accessing or exposing electrical equipment.
DISCONNECT POWER FIRST. Always disconnect machine from power supply BEFORE making adjustments, changing tooling, or servicing machine. This prevents an injury risk from unintended startup or contact with live electrical components.
EYE PROTECTION. Always wear ANSI-approved safety glasses or a face shield when operating or observing machinery to reduce the risk of eye injury or blindness from flying particles. Everyday eyeglasses are NOT approved safety glasses.
WARNING
WEARING PROPER APPAREL. Do not wear loose clothing, gloves, neckties, or jewelry that can become entangled in moving parts. Always tie back or cover long hair. Wear non-slip footwear to reduce risk of slipping and losing control or accidentally contacting cutting tool or moving parts.
HAZARDOUS DUST. Dust created by machinery operations may cause cancer, birth defects, or long-term respiratory damage. Be aware of dust hazards associated with each workpiece material. Always wear a NIOSH-approved respirator to reduce your risk.
HEARING PROTECTION. Always wear hearing protection when operating or observing loud machinery. Extended exposure to this noise without hearing protection can cause permanent hearing loss.
REMOVE ADJUSTING TOOLS. Tools left on machinery can become dangerous projectiles upon startup. Never leave chuck keys, wrenches, or any other tools on machine. Always verify removal before starting!
USE CORRECT TOOL FOR THE JOB. Only use this tool for its intended purpose—do not force it or an attachment to do a job for which it was not designed. Never make unapproved modifications—modifying tool or using it differently than intended may result in malfunction or mechanical failure that can lead to personal injury or death!
AWKWARD POSITIONS. Keep proper footing and balance at all times when operating machine. Do not overreach! Avoid awkward hand positions that make workpiece control difficult or increase the risk of accidental injury.
CHILDREN & BYSTANDERS. Keep children and bystanders at a safe distance from the work area. Stop using machine if they become a distraction.
GUARDS & COVERS. Guards and covers reduce accidental contact with moving parts or flying debris. Make sure they are properly installed, undamaged, and working correctly BEFORE operating machine.
FORCING MACHINERY. Do not force machine. It will do the job safer and better at the rate for which it was designed.
NEVER STAND ON MACHINE. Serious injury may occur if machine is tipped or if the cutting tool is unintentionally contacted.
STABLE MACHINE. Unexpected movement during operation greatly increases risk of injury or loss of control. Before starting, verify machine is stable and mobile base (if used) is locked.
USE RECOMMENDED ACCESSORIES. Consult this owner’s manual or the manufacturer for recommended accessories. Using improper accessories will increase the risk of serious injury.
UNATTENDED OPERATION. To reduce the risk of accidental injury, turn machine OFF and ensure all moving parts completely stop before walking away. Never leave machine running while unattended.
MAINTAIN WITH CARE. Follow all maintenance instructions and lubrication schedules to keep machine in good working condition. A machine that is improperly maintained could malfunction, leading to serious personal injury or death.
DAMAGED PARTS. Regularly inspect machine for damaged, loose, or mis-adjusted parts—or any condition that could affect safe operation. Immediately repair/replace BEFORE operating machine. For your own safety, DO NOT operate machine with damaged parts!
MAINTAIN POWER CORDS. When disconnecting cord-connected machines from power, grab and pull the plug—NOT the cord. Pulling the cord may damage the wires inside. Do not handle cord/plug with wet hands. Avoid cord damage by keeping it away from heated surfaces, high traffic areas, harsh chemicals, and wet/damp locations.
EXPERIENCING DIFFICULTIES. If at any time you experience difficulties performing the intended operation, stop using the machine! Contact our Technical Support at (570) 546-9663.

Additional Safety for Spindle Sanders
⚠WARNING
Serious injury or death can occur from fingers, clothing, jewelry or hair getting entangled in rotating spindle or other moving components. Abrasion injuries can occur from touching rotating sanding drum with bare skin. Workpieces thrown by drum can strike operator or bystanders with moderate force, causing impact injuries. Long-term respiratory damage can occur from using sander without proper use of a respirator. To reduce the risk of these hazards, operator and bystanders MUST completely heed the hazards and warnings below.
HAND PLACEMENT. Rotating sanding drums can remove a large amount of flesh in a few seconds. Always keep hands away from drum during operation. Never touch moving drum on purpose. Use a brush to clean table of sawdust and chips.
FEEDING WORKPIECE. Forcefully jamming workpiece into sanding surface could cause workpiece to eject back at operator or damage machine. Always allow spindle to reach full speed. Firmly hold workpiece with both hands and ease it against spindle using light pressure.
DRUM DIRECTION. Feeding workpiece incorrectly can cause it to be thrown from machine, allowing your hands to slip into the rotating drum or striking yourself or bystanders. To reduce these risks, feed workpiece against direction of rotation, and never sand tapered or pointed stock with point facing feed direction.
SANDING SLEEVE CONDITION. Worn or damaged sanding sleeves can tear apart and become entangled in spindle, resulting in subsequent injuries from operator loss of workpiece control. Replace worn or damaged sanding sleeves promptly.
SANDING DUST. Sanding creates large amounts of dust and flying chips that can lead to eye injury or serious respiratory illness. Reduce your risk by always wearing approved eye and respiratory protection when using sander. Never operate without adequate dust collection system in place and running. However, dust collection is not a substitute for using a respirator.
AVOIDING ENTANGLEMENT. DO NOT wear loose clothing, gloves, or jewelry, and tie back long hair. Keep all guards in place and secure.
WORKPIECE INSPECTION. Nails, staples, knots, or other imperfections in workpiece can be dislodged and thrown from sander at high rate of speed into operator or bystanders, or cause damage to sanding sleeves or drum. Never sand stock that has embedded foreign objects or questionable imperfections.
TABLE INSERTS. A pinch point for fingers and workpieces exists in the gap between table and oscillating drum. Always use table insert that fits closest to diameter of installed drum to keep this gap as small as possible and reduce risk of injury.
POWER DISCONNECT. An accidental startup while changing sleeves can result in entanglement or abrasion injuries. Always disconnect machine from power source before changing sanding sleeve to avoid this risk.
WORKPIECE INTEGRITY. Sanding fragile workpieces can result in loss of control, resulting in entanglement, impact injuries, or damage to the sanding sleeve or drum. Only sand solid workpieces that can withstand power sanding forces. Make sure shape of workpiece is properly supported; avoid sanding workpieces without flat bottom surfaces unless some type of jig is used to maintain support and control when sanding force is applied.
SECTION 2: POWER SUPPLY
Availability
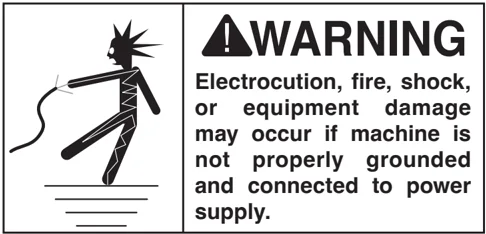
Before installing the machine, consider the availability and proximity of the required power supply circuit. If an existing circuit does not meet the requirements for this machine, a new circuit must be installed. To minimize the risk of electrocution, fire, or equipment damage, installation work and electrical wiring must be done by an electrician or qualified service personnel in accordance with all applicable codes and standards.
Full-Load Current Rating
The full-load current rating is the amperage a machine draws at 100% of the rated output power. On machines with multiple motors, this is the amperage drawn by the largest motor or sum of all motors and electrical devices that might operate at one time during normal operations.
G1071 Full-Load Current Rating at 120V ..12A
- G1071 Full-Load Current Rating at 240V ........ 6A G1071Z Full-Load Current Rating at 120V...15.5A
The full-load current is not the maximum amount of amps that the machine will draw. If the machine is overloaded, it will draw additional amps beyond the full-load rating.
If the machine is overloaded for a sufficient length of time, damage, overheating, or fire may result—especially if connected to an undersized circuit. To reduce the risk of these hazards, avoid overloading the machine during operation and make sure it is connected to a power supply circuit that meets the specified circuit requirements.
Circuit Information
A power supply circuit includes all electrical equipment between the breaker box or fuse panel in the building and the machine. The power supply circuit used for this machine must be sized to safely handle the full-load current drawn from the machine for an extended period of time. (If this machine is connected to a circuit protected by fuses, use a time delay fuse marked D.)
CAUTION
For your own safety and protection of property, consult an electrician if you are unsure about wiring practices or electrical codes in your area.
Note: Circuit requirements in this manual apply to a dedicated circuit—where only one machine will be running on the circuit at a time. If machine will be connected to a shared circuit where multiple machines may be running at the same time, consult an electrician or qualified service personnel to ensure circuit is properly sized for safe operation.
Circuit Requirements for 120V
This machine is prewired to operate on a power supply circuit that has a verified ground and meets the following requirements:
- Nominal Voltage ........ 110V, 115V, 120V
- Cycle ........ 60 Hz
- Phase ........ Single-Phase
- Power Supply Circuit ........ 15 Amps
- Plug/Receptacle ........ NEMA 5-15
Model G1071
Circuit Requirements for 240V
This machine can be converted to operate on a power supply circuit that has a verified ground and meets the requirements listed below. (Refer to Voltage Conversion instructions for details.)
- Nominal Voltage ........ 208V, 220V, 230V, 240V
- Cycle ........ 60 Hz
- Phase ........ Single-Phase
- Power Supply Circuit ........ 15 Amps
- Plug/Receptacle ........ NEMA 6-15

Grounding Requirements for 120V
This machine MUST be grounded. In the event of certain malfunctions or breakdowns, grounding reduces the risk of electric shock by providing a path of least resistance for electric current.
For 120V operation: This machine is equipped with a power cord that has an equipment-grounding wire and a grounding plug (see following figure). The plug must only be inserted into a matching receptacle (outlet) that is properly installed and grounded in accordance with all local codes and ordinances.
 Figure 5. Typical 5-15 plug and receptacle.
CAUTION
SHOCK HAZARD!
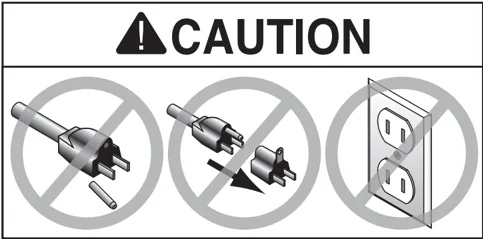
Two-prong outlets do not meet the grounding requirements for this machine. Do not modify or use an adapter on the plug provided—if it will not fit the outlet, have a qualified electrician install the proper outlet with a verified ground.
Model G1071
Grounding Requirements for 240V
For 240V operation: The plug specified under "Circuit Requirements for 240V" on the previous page has a grounding prong that must be attached to the equipment-grounding wire on the included power cord. The plug must only be inserted into a matching receptacle (see following figure) that is properly installed and grounded in accordance with all local codes and ordinances.
 Figure 6. Typical 6-15 plug and receptacle.
Improper connection of the equipment-grounding wire can result in a risk of electric shock. The wire with green insulation (with or without yellow stripes) is the equipment-grounding wire. If repair or replacement of the power cord or plug is necessary, do not connect the equipment-grounding wire to a live (current carrying) terminal.
Check with a qualified electrician or service personnel if you do not understand these grounding requirements, or if you are in doubt about whether the machine is properly grounded. If you ever notice that a cord or plug is damaged or worn, disconnect it from power, and immediately replace it with a new one.
Extension Cords
We do not recommend using an extension cord with this machine. If you must use an extension cord, only use it if absolutely necessary and only on a temporary basis.
Extension cords cause voltage drop, which can damage electrical components and shorten motor life. Voltage drop increases as the extension cord size gets longer and the gauge size gets smaller (higher gauge numbers indicate smaller sizes).
Any extension cord used with this machine must be in good condition and contain a ground wire and matching plug/receptacle. Additionally, it must meet the following size requirements:
- G1071 Minimum Gauge Size ........ 14 AWG
- G1071Z Minimum Gauge Size ........ 12 AWG
- Maximum Length (Shorter is Better) ........ 50 ft.
Converting to 240V (G1071 Only)
The voltage conversion MUST be performed by an electrician or qualified service personnel.
The voltage conversion procedure consists of rewiring the motor and installing the correct plug. A wiring diagram is provided on Page 38 for your reference.
IMPORTANT: If the diagram included on the motor conflicts with the one on Page 38, the motor may have changed since the manual was printed. Use the diagram provided on the motor junction box instead.
Items Needed
- Phillips Head Screwdriver #2 ........ 1
- Electrical Tape ........ As Needed
- Wire Nut (16 AWG x 3) ........ 1
- 6-15 Plug ........ 1
- Wire Cutters/Stripper ........ 1
To convert Model G1071 to 240V:
- DISCONNECT MACHINE FROM POWER!
- Cut off existing 5-15 plug.
- Open motor junction box, remove two wire nuts indicated in Figure 7, then disconnect wires.
 Figure 7. Inside motor junction box (motor pre-wired to 120V).
- Use wire nuts to connect wires as indicated in Figure 8. Twist wire nuts onto their respective wires and wrap them with electrical tape so they will not come loose.
 Figure 8. Motor rewired to 240V.
- Close and secure motor junction box.
- Install a 6-15 plug according to manufacturer's instructions. If plug manufacturer's instructions are not available, NEMA standard 6-15 plug wiring is provided on Page 38.
SECTION 3: SETUP
Needed for Setup
The following are needed to complete the setup process, but are not included with your machine.
| Description | Qty |
|---|---|
| Additional Person | 1 |
| Safety Glasses (for each person) | 1 |
| Solvent/Cleaner | As Needed |
| Shop Rags | As Needed |
| Disposable Gloves | As Needed |
| Sockets or Wrenches 9/16" | 2 |
| Phillips Head Screwdriver #2 | 1 |
| Square | 1 |
| Dust Hose 4" | 1 |
| Hose Clamp 4" | 1 |
| Dust Collection System | 1 |
Unpacking
This machine was carefully packaged for safe transport. When unpacking, separate all enclosed items from packaging materials and inspect them for shipping damage. If items are damaged, please call us immediately at (570) 546-9663.
IMPORTANT: Save all packaging materials until you are completely satisfied with the machine and have resolved any issues between Grizzly or the shipping agent. You MUST have the original packaging to file a freight claim. It is also extremely helpful if you need to return your machine later.
WARNING
This machine presents serious injury hazards to untrained users. Read through this entire manual to become familiar with the controls and operations before starting the machine!
WARNING
Wear safety glasses during the entire setup process!
WARNING
This machine and its components are very heavy. Get lifting help or use power lifting equipment such as a forklift to move heavy items.


Inventory
The following is a list of items shipped with your machine. Before beginning setup, lay these items out and inventory them.
If any non-proprietary parts are missing (e.g. a nut or a washer), we will gladly replace them; or for the sake of expediency, replacements can be obtained at your local hardware store.
Crate (Figure 9) Qty
- A. Spindle Sander (Not Shown) ........ 1
- B. Sanding Spindle 1/4" x 5" ........ 1
- C. Sanding Spindle 3/8" x 6" ........ 1
- D. Sanding Spindle 1/2" x 6" ........ 1
- E. Sanding Spindle 5/8" x 6" ........ 1
- F. Sanding Spindle 3/4" x 9" ........ 1
- G. Sanding Spindle 1" x 9" ........ 1
- H. Sanding Spindle 1-1/2" x 9" ........ 1
- I. Sanding Spindle 2" x 9" ........ 1
- J. Sanding Spindle 3" x 9" ........ 1
- K. Sanding Spindle 4" x 9" ........ 1
Box (Figure 9) Qty
- L. Dust Chute ........ 1
- M. Combo Flat Wrench Closed-Ends 1" x 3/4" ........ 1 N. Combo Flat Wrench Open-Ends 7/8" x 1-1/4"... 1
- O. Flat Wrench Open-End 1-1/8" ........ 1
- P. Table Insert 1-3/4" ........ 1
- Q. Table Insert 2-3/16" ........ 1
- R. Table Insert 4-1/4" ........ 1
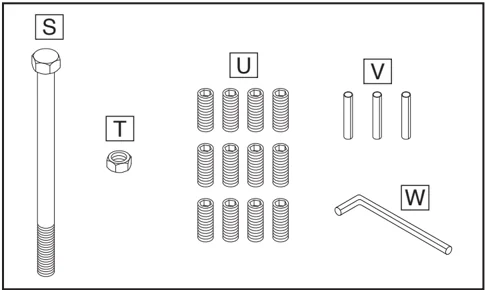
Hardware Bag (Figure 10) Qty
- S. Hex Bolt 3/8"-16 x 6-1/2" (P1071054/P1071Z054) ........ 1
- T. Hex Nut 3/8"-16 (P1071089/P1071Z089) ........ 1
- U. Set Screws 1/4"-20 x ⁵⁄" (P1071083) ........ 12
- V. Roll Pins 5 x 28mm (P1071084V2) ........ 3
- W. Hex Wrench 5/4" ........ 1
NOTICE
If you cannot find an item on this list, carefully check around/inside the machine and packaging materials. Often, these items get lost in packaging materials while unpacking or they are pre-installed at the factory.
 Figure 9. Crate and box 1 inventory.
Figure 10. Hardware bag inventory.
-16- Model G1071/G1071Z (Mfd. Since 03/26)
Cleanup
The unpainted surfaces of your machine are coated with a heavy-duty rust preventative that prevents corrosion during shipment and storage. This rust preventative works extremely well, but it will take a little time to clean.
Be patient and do a thorough job cleaning your machine. The time you spend doing this now will give you a better appreciation for the proper care of your machine's unpainted surfaces.
There are many ways to remove this rust preventative, but the following steps work well in a wide variety of situations. Always follow the manufacturer's instructions with any cleaning product you use and make sure you work in a well-ventilated area to minimize exposure to toxic fumes.
Before cleaning, gather the following:
- Disposable rags
- Cleaner/degreaser (WD•40 works well)
- Safety glasses & disposable gloves
- Plastic paint scraper (optional)
Basic steps for removing rust preventative:
- Put on safety glasses.
- Coat the rust preventative with a liberal amount of cleaner/degreaser, then let it soak for 5–10 minutes.
- Wipe off the surfaces. If your cleaner/degreaser is effective, the rust preventative will wipe off easily. If you have a plastic paint scraper, scrape off as much as you can first, then wipe off the rest with the rag.
- Repeat Steps 2–3 as necessary until clean, then coat all unpainted surfaces with a quality metal protectant to prevent rust.
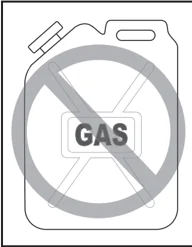
WARNING Gasoline and petroleum products have low flash points and can explode or cause fire if used to clean machinery. Avoid using these products to clean machinery.
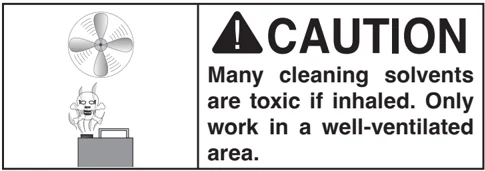
CAUTION Many cleaning solvents are toxic if inhaled. Only work in a well-ventilated area.
NOTICE Avoid harsh solvents like acetone or brake parts cleaner that may damage painted surfaces. Always test on a small, inconspicuous location first.
T23692—Orange Power Degreaser A great product for removing the waxy shipping grease from the non-painted parts of the machine during clean up.

Figure 11. T23692 Orange Power Degreaser.
Site Considerations
Weight Load
Refer to the Machine Data Sheet for the weight of your machine. Make sure that the surface upon which the machine is placed will bear the weight of the machine, additional equipment that may be installed on the machine, and the heaviest workpiece that will be used. Additionally, consider the weight of the operator and any dynamic loading that may occur when operating the machine.
Space Allocation
Consider the largest size of workpiece that will be processed through this machine and provide enough space around the machine for adequate operator material handling or the installation of auxiliary equipment. With permanent installations, leave enough space around the machine to open or remove doors/covers as required by the maintenance and service described in this manual. See below for required space allocation.
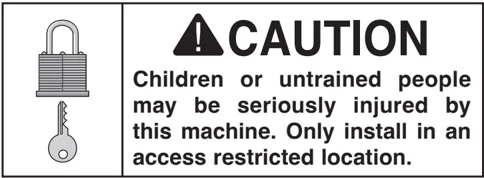
Children or untrained people may be seriously injured by this machine. Only install in an access restricted location.
Physical Environment
The physical environment where the machine is operated is important for safe operation and longevity of machine components. For best results, operate this machine in a dry environment that is free from excessive moisture, hazardous chemicals, airborne abrasives, or extreme conditions. Extreme conditions for this type of machinery are generally those where the ambient temperature range exceeds 41°–104°F; the relative humidity range exceeds 20%–95% (non-condensing); or the environment is subject to vibration, shocks, or bumps.
Electrical Installation
Place this machine near an existing power source. Make sure all power cords are protected from traffic, material handling, moisture, chemicals, or other hazards. Make sure to leave enough space around machine to disconnect power supply or apply a lockout/tagout device, if required.
Lighting
Lighting around the machine must be adequate enough that operations can be performed safely. Shadows, glare, or strobe effects that may distract or impede the operator must be eliminated.
 Figure 12. Minimum working clearances.
-18- Model G1071/G1071Z (Mfd. Since 03/26)
Assembly
The machine must be fully assembled before it can be operated. Before beginning the assembly process, refer to Needed for Setup and gather all listed items. To ensure the assembly process goes smoothly, first clean any parts that are covered or coated in heavy-duty rust preventative (if applicable).
To assemble machine:
- Secure dust chute to trunnion assembly with pre-installed hex bolts, lock washers, and hex nuts (see Figure 13).
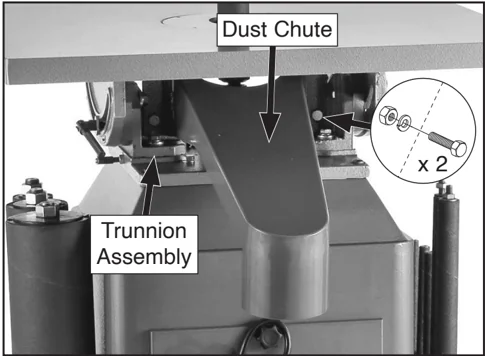
Figure 13. Dust chute installed.
-
Loosen both table lock levers (see Figure 14) and tilt table to 45°, then tighten levers.
-
Thread 3/8"-16 hex nut (jam nut) onto 3/8"-16 x 6-1/2" hex bolt (stop bolt), then thread bolt into sander base, as shown in Figure 14.
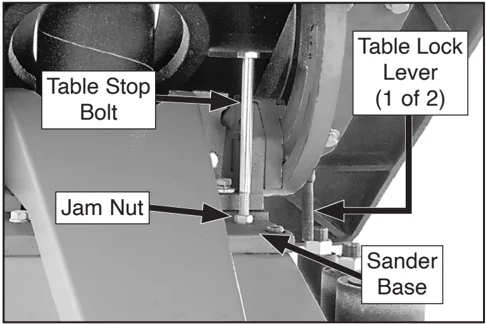
Figure 14. Table stop bolt installed.
-
Loosen table lock levers and lower table to rest on stop bolt.
-
Holding square flat against table, adjust table stop bolt until table surface is square to spindle surface (see Figure 15).
Note: To achieve table square to spindle, it may be necessary to thread table stop bolt further into base.
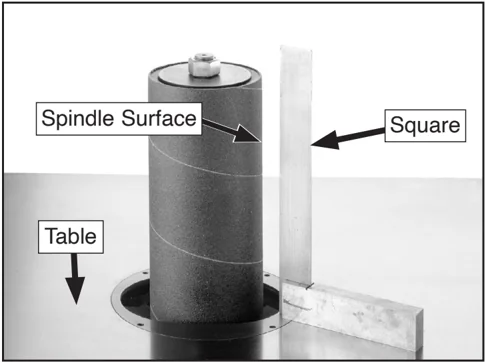
Figure 15. Checking table for square.
-
Move square to various points around table to ensure table is square to spindle on all sides. Adjust stop bolt as necessary until table rests on bolt and is square with spindle, then tighten table lock levers.
-
With stop bolt head against bottom of table, tighten jam nut against sander base (see Figure 16).
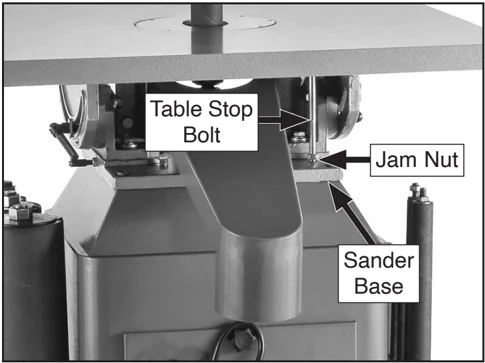
Figure 16. Table stop bolt adjusted to stop table at 0°.
- Loosen Phillips head screw securing scale pointer (see Figure 17) and adjust pointer to 0°, then tighten screw.
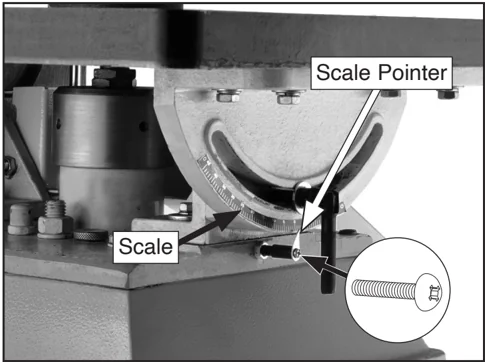
Figure 17. Scale components.
-
Thread (4) 1/4"-20 x 5/8" set screws into threaded holes of each table insert, as shown in Figure 18.
-
Insert (1) 5 x 28 roll pin into non-threaded hole of each table insert, as shown in Figure 18.
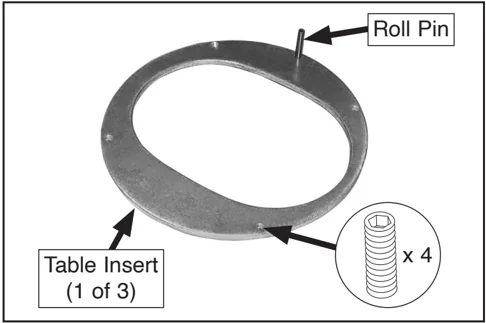
Figure 18. Set screws and roll pin installed in table insert.
IMPORTANT: Roll pins and set screws must not protrude beyond top surface of table insert or they will interfere with sanding operations.
When fully assembled, set screws and roll pin should protrude from bottom of table insert, as illustrated in Figure 19.
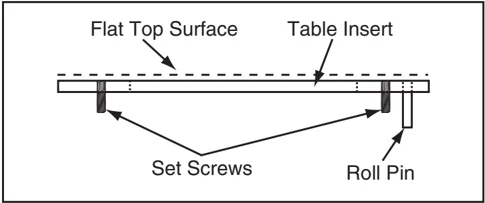
Figure 19. Proper table insert assembly.
Check Gearbox Oil

It is critical that you make sure there is oil in the gearbox before proceeding with the test run. Remove the spindle gearbox oil fill cap and use the dipstick to make sure the oil level is full. When full, the oil will read on the knurled portion of the dipstick.
Refer to Changing Gearbox Oil on Page 33 for more information.
NOTICE
Gearbox oil must be changed after first two hours of initial operation. This is a normal break-in procedure and will help maximize the service life of the machine. Refer to Changing Gearbox Oil on Page 33 for instructions.
Dust Collection
CAUTION DO NOT operate the Model G1071/G1071Z without an adequate dust collection system. This sander creates substantial amounts of wood dust while operating. Failure to use a dust collection system can result in short and long-term respiratory illness.
Minimum CFM at Dust Port: 400 CFM Do not confuse this CFM recommendation with the rating of the dust collector. To determine the CFM at the dust port, you must consider these variables: (1) CFM rating of the dust collector, (2) hose type and length between the dust collector and the machine, (3) number of branches or wyes, and (4) amount of other open lines throughout the system. Explaining how to calculate these variables is beyond the scope of this manual. Consult an expert or purchase a good dust collection "how-to" book.
To connect a dust collection hose:
- Fit a 4" dust hose over dust port, as shown in Figure 20, and secure in place with a hose clamp.
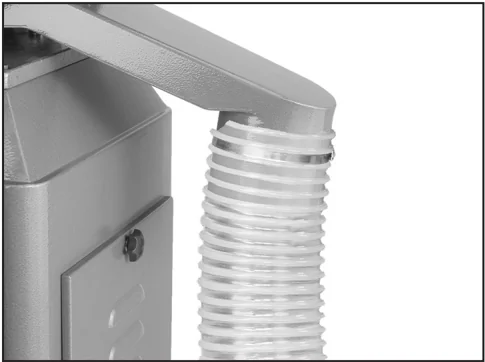
Figure 20. Dust hose attached to dust port.
- Tug hose to make sure it does not come off.
Note: A tight fit is necessary for proper performance.
Test Run
Once assembly is complete, test run the machine to ensure it is properly connected to power and safety components are functioning correctly.
If you find an unusual problem during the test run, immediately stop the machine, disconnect it from power, and fix the problem BEFORE operating the machine again. The Troubleshooting table in the SERVICE section of this manual can help.
⚠WARNING
Serious injury or death can result from using this machine BEFORE understanding its controls and related safety information. DO NOT operate, or allow others to operate, machine until the information is understood.
⚠WARNING
DO NOT start machine until all preceding setup instructions have been performed. Operating an improperly set up machine may result in malfunction or unexpected results that can lead to serious injury, death, or machine/property damage.
The Model G1071 Test Run consists of verifying the following: 1) the motor powers up and runs correctly, and 2) the switch disabling key disables the machine properly.
The Model G1071Z Test Run consists of verifying the following: 1) the motor powers up and runs correctly, and 2) the Emergency Stop button safety feature disables the machine properly (see Page 23).
Test Running Model G1071
- Clear all setup tools away from machine.
- Connect machine to power supply.
- Turn machine ON, verify motor operation, and then turn machine OFF. — Motor should run smoothly and without unusual problems or noises.
- Remove switch disabling key, as shown in Figure 21.
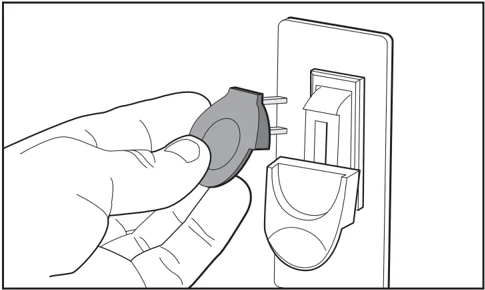
Figure 21. Removing switch key from paddle switch.
- Try to start machine with paddle switch. Machine should not start. — If machine does not start, switch disabling feature is working correctly. Congratulations! Test run is complete. — If machine does start, immediately turn machine OFF and disconnect from power. Switch disabling feature is not working correctly. This safety feature must work properly before proceeding with regular operations. Call Tech Support for help.

Test Running Model G1071Z
- Clear all setup tools away from machine.
- Press Emergency Stop button in (see Figure 22).
- Turn spindle speed dial all the way counter-clockwise (see Figure 22).
- Connect machine to power supply. Spindle speed digital readout (see Figure 22) will illuminate.
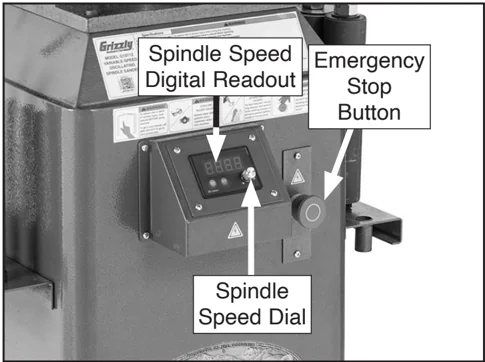
Figure 22. Location of Emergency Stop button, spindle speed dial, and spindle speed digital readout.
- Pull Emergency Stop button out.
- Press ON button (see Figure 23) to turn machine ON. Verify motor starts up and runs smoothly without any unusual problems or noises.
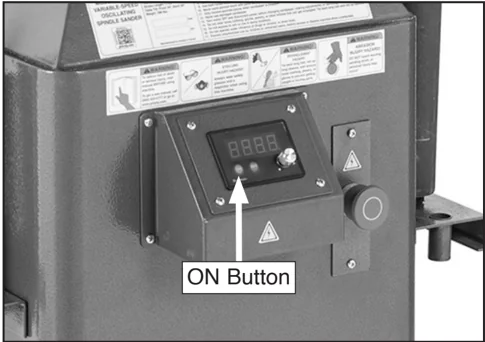
Figure 23. Location of ON button.
-
Verify speed controls by slowly turning spindle speed dial clockwise. Rotate dial back and forth to test variable-speed function.
-
Press Emergency Stop button to turn machine OFF.
-
WITHOUT resetting Emergency Stop button, try to start machine by pressing ON button. Machine should not start.
— If machine does not start, safety feature of Emergency Stop button is working correctly. Congratulations! Test Run is complete.
— If machine does start, immediately turn machine OFF and disconnect from power. Safety feature of Emergency Stop button is not working correctly. This safety feature must work properly before proceeding with regular operations. Call Tech Support for help.
SECTION 4: OPERATIONS
The purpose of this overview is to provide the novice machine operator with a basic understanding of how the machine is used during operation, so the machine controls/components discussed later in this manual are easier to understand.
Due to the generic nature of this overview, it is not intended to be an instructional guide. To learn more about specific operations, read this entire manual, seek additional training from experienced machine operators, and do additional research outside of this manual by reading "how-to" books, trade magazines, or websites.
()_
⚠WARNING
To reduce your risk of serious injury, read this entire manual BEFORE using machine.
⚠WARNING
To reduce risk of eye injury from flying chips or lung damage from breathing dust, always wear safety glasses and a respirator when operating this machine.
NOTICE
If you are not experienced with this type of machine, WE STRONGLY RECOMMEND that you seek additional training outside of this manual. Read books/magazines or get formal training before beginning any projects. Regardless of the content in this section, Grizzly Industrial will not be held liable for accidents caused by lack of training.
Disabling Switch (G1071)
The switch can be disabled by removing the key, as shown below. Disabling the switch in this manner can prevent unauthorized operation of the machine, which is important if it is not kept inside an access-restricted building or in a location where children may be present.
IMPORTANT: Disabling the switch only restricts its function. It is not a substitute for disconnecting machine from power when adjusting or servicing.
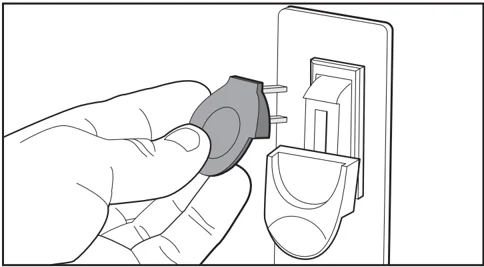
Figure 24. Disabling switch by removing key.
⚠WARNING
Children or untrained people can be seriously injured by this machine. This risk increases with unsupervised operation. To help prevent unsupervised operation, always disable switch before leaving machine unattended. Make sure to place key in a well-hidden or secure location!


Stock Inspection
Some workpieces are not safe to sand, or they may require further preparation before they can be safely sanded without increasing risk of injury to the operator or damaging the sanding sleeve or the sander.
Before sanding, inspect all workpieces for the following:
- Material Type: This machine is intended for sanding only natural wood fiber. This machine is NOT designed to sand glass, stone, tile, plastics, drywall, cementitious backer board, metal, etc.
Sanding metal increases fire risk. Sanding improper materials produces fine dust that poses severe respiratory risks to everyone nearby, even with a dust collector. Additionally, these materials can immediately damage the machine, sanding sleeves and spindle.
-
Foreign Objects: Tramp metal, nails, staples, dirt, rocks and other foreign objects are often embedded in wood. While sanding, these objects can become dislodged and tear the sandpaper. Always visually inspect your workpiece for these items. If they can't be removed, DO NOT sand the workpiece.
-
Knots: DO NOT sand stock that contains large or loose knots. Personal injury or machine damage can occur if a knot becomes dislodged during sanding.
-
Wet or "Green" Stock: Sanding wood with a moisture content over 20% causes unnecessary clogging and wear on the sandpaper, increases the risk of kickback, and yields poor results.
Sanding Tips
- Replace the sanding sleeve with a higher grit to achieve a finer finish. Avoid skipping grits, as this will leave scratches in the wood.
- Extend the life of the sanding sleeve by regularly using a PRO-STIK® sanding pad (see ACCESSORIES on Page 30).
- When bevel sanding, make any necessary guide lines on the longer side of the board so they are visible during sanding.
- Keep your workpiece moving across the sanding sleeve to prevent burns, grooves or ruts in the workpiece.
Choosing Sanding Sleeves
The Model G1071/G1071Z allows you to place a different grit sanding sleeve on each spindle. The type of wood you use and your stage of finish will determine the best grit types to install.
There are many types of sanding sleeves to choose from. We recommend aluminum oxide for general workshop environments. Below is a chart that groups abrasives into different classes, and shows which grits fall into each class.
\begin{tabular}{|l|l|l|} \hline Grit & Class & Usage \ \hline 36 & Extra Coarse & Rough sawn boards, thickness sanding, and glue removal. \ \hline 60 & Coarse & Thickness sanding and glue removal. \ \hline 80–100 & Medium & Removing planer marks and initial finish sanding. \ \hline 120–180 & Fine & Finish sanding. \ \hline \end{tabular}
The general rule of thumb is to sand a workpiece with progressively higher grit numbers, with no single grit increase of more than 50. Avoid skipping grits; the larger the grit increase, the harder it will be to remove the scratches from the previous grit.
Installing/Removing Sanding Spindles
The Model G1071/G1071Z is supplied with ten rubber sanding spindles. Use the larger diameter spindles for sanding large sweeping curves and the smaller spindles for sanding more intricate curves.
When not in use, the spindles are stored on racks located on each side of the machine base, as shown in Figure 25. Each spindle is secured to the rack with a hex nut.
 Figure 25. Sanding spindles.
Hex Nut
Installing Sanding Spindle
- DISCONNECT MACHINE FROM POWER!
- Determine spindle size needed.
- Lubricate threads and shaft shown in Figure 26 with light oil.
 Figure 26. Spindle threads.
Lubricate
- Insert threaded end of spindle shaft into spindle mounting hole, then rotate clockwise and tighten by hand, as shown in Figure 27.
 Figure 27. Mounting spindle.
NOTICE DO NOT tighten sanding spindle with a wrench! Sanding action will further tighten spindle. Using a wrench could make removal difficult.
Removing Sanding Spindle
- DISCONNECT MACHINE FROM POWER!
- Use included wrenches to hold jam nut stationary (see Figure 28) while loosening spindle retainer nut, then rotate spindle counterclockwise to remove.
 Figure 28. Spindle removal (table removed for clarity).
Spindle Retainer Nut Wrench Wrench Jam Nut
Tip: If spindle has not been removed for some time and is stuck, run machine until spindle housing heats up, then retry.
Changing Sanding Sleeves
The Model G1071/G1071Z sanding sleeves are mounted over rubber drums that expand to hold the sleeve securely during operation. Over time, sleeves become worn or clogged, reducing sanding efficiency and surface quality, or you may need to change to a different grit.
Changing Sanding Sleeves on Spindles Larger Than 5/8"
- DISCONNECT MACHINE FROM POWER!
- Loosen hex nut located on top of spindle as shown in Figure 29. Hex nut and flange disk DO NOT need to be removed.
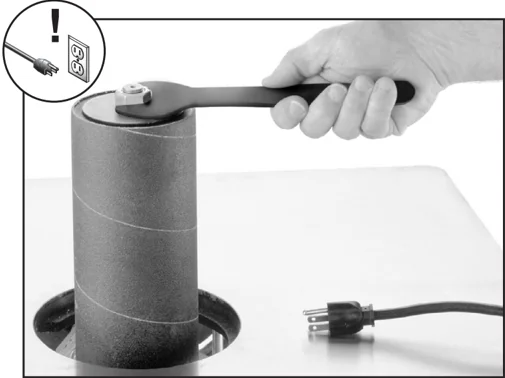
Figure 29. Removing sanding sleeve.
- Remove sanding sleeve from spindle.
- Reverse Steps 1–2 to install sanding sleeve.
Changing Sanding Sleeves on Spindles 5/8" and Smaller
- DISCONNECT MACHINE FROM POWER!
- Loosen set screw located in retainer nut (see Figure 30).
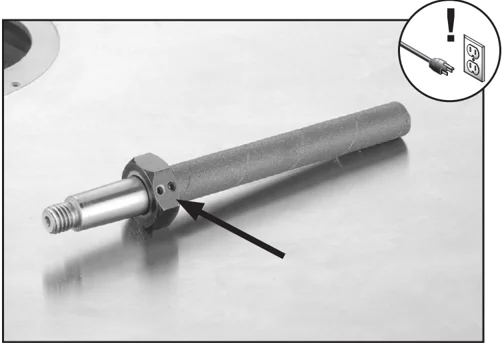
Figure 30. Retainer nut set screw.
- Remove sanding sleeve from spindle.
- Reverse Steps 1–2 to install sanding sleeve.
NOTICE
Monitor wear on sanding sleeves. Upper portion of sanding sleeve often gets very little use. If this is the case, flip sanding sleeve over and re-install. This allows maximum use of sleeve. Worn sanding sleeves will not efficiently remove material and can burn workpiece.
Installing Table Insert
The Model G1071/G1071Z is supplied with three different sized table inserts. The inserts are designed to reduce the gap between the spindle and the table opening. The hole in each insert is oblong to allow clearance when the table is tilted.
NOTICE
Always use the table insert with the smallest opening that still allows at least 1/8" clearance around the spindle.
To install table insert:
- DISCONNECT MACHINE FROM POWER!
- Determine appropriate insert for spindle being used.
- Install insert over mounted spindle and into hole in table, as shown in Figure 31.
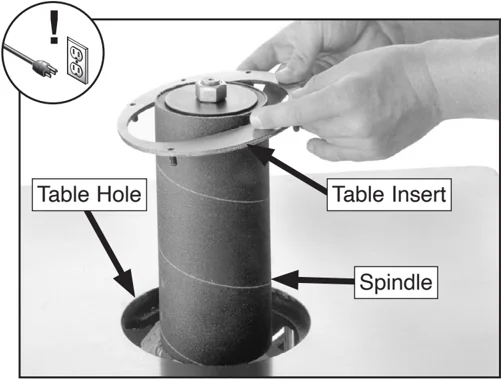
Figure 31. Installing table insert.
Note: Insert will correctly fit into table in only one position. This ensures table insert will not make contact with spindle even when table is tilted.
- Adjust set screws shown in Figure 32 so top of insert is flush with table surface.
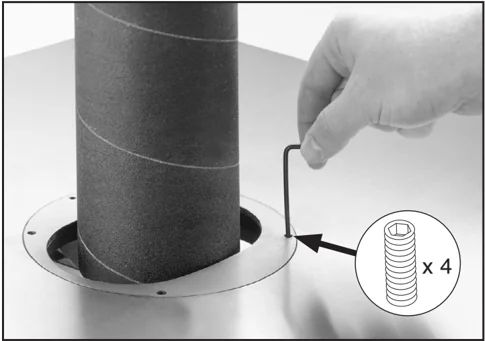
Figure 32. Adjusting table insert.
Sanding
Spindle sanding is typically used for inside curves and irregular shapes. The oscillating spindle moves up and down as it rotates to distribute the scratch pattern so it doesn't leave deep sanding lines, and helps to avoid workpiece burns and maximize sandpaper life.
WARNING
Keep hair, clothing, and jewelry away from moving parts at all times. Entanglement can result in death, amputation, or severe crushing injuries.
Contour Sanding
- Ensure table is adjusted to 90° and resting on table tilt bolt, then tighten both table tilt lock levers.
- Start dust collection system, then start sander and allow sander to reach full speed.
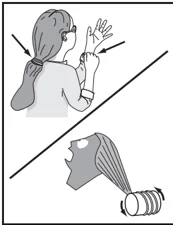
- Using both hands, hold workpiece firmly on table and guide against sanding sleeve in a right-to-left direction (see Figure 33).
 Figure 33. Example of contour sanding.
Bevel Sanding
The Model G1071/G1071Z features a tilting table that allows bevel sanding between 45° (front) and 20° (back), making it easier to shape edges, create angled joints, or refine complex profiles.
NOTICE Bevel sanding on a spindle sander is NOT an exact science. When table is tilted to 45°, actual angle sanded on edge of workpiece will change if workpiece is sanded at different positions around spindle.
Tip: When marking the finish line on your workpiece, always mark on outside, or longest, edge of bevel, as shown in Figure 34. This allows finish line to be viewed on top side of workpiece.
 Figure 34. Bevel sanding illustration.
To bevel sand a workpiece:
- DISCONNECT MACHINE FROM POWER!
- Loosen both table lock levers and adjust table to desired angle, then tighten both levers to secure it (see Figure 35).
Table Tilt Lock Lever (1 of 2)
 Figure 35. Location of table tilt lock lever.
- Rotate spindle by hand to ensure it does not make contact with table insert.
- Start dust collection system, then start sander and allow sander to reach full speed.
- Using both hands, hold workpiece firmly on table and guide against sanding sleeve in a right-to-left direction
SECTION 5: ACCESSORIES
WARNING
Installing unapproved accessories may cause machine to malfunction, resulting in serious personal injury or machine damage. To reduce this risk, only install accessories recommended for this machine by Grizzly.
NOTICE
Refer to our website or latest catalog for additional recommended accessories.
Replacement Sanding Sleeves
A full range of sanding spindles are available for the Model G1071/G1071Z. Visit www.grizzly.com to see them all!
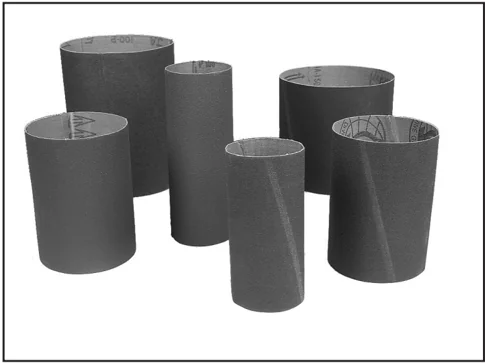
Figure 36. Replacement sanding sleeves.
PRO-STIK® Abrasive Surface Cleaners
Extend the life of your sanding discs and sleeves! Choose the Pro-Stik® with a handle for greater control or without a handle for more usable area.
| Size | Model |
|---|---|
| 1-1/2" x 1-1/2" x 8-1/2" | W1306 |
| 2" x 2" x 12" | W1307 |
| 1-1/2" x 1-1/2" x 9" with Handle | W1308 |
| 2" x 2" x 11" with Handle | W1309 |
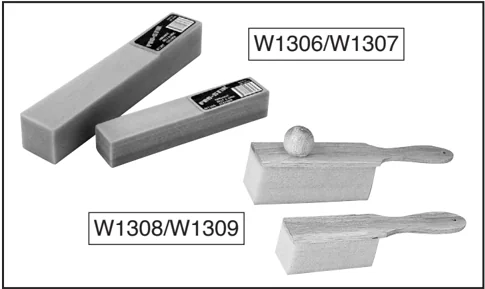
Figure 37. PRO-STIK® abrasive cleaners.
T28922—Bear Crawl "Cub" Mobile Base
The Cub version of the Bear Crawl was designed for small-footprint machines weighing up to 1200 lbs. It features wide, in-line fixed casters and outrigger swivel casters to keep your equipment moving effortlessly on almost any surface. This is a high-quality mobile base that will make your shop more convenient and efficient and will keep your equipment stable and rolling for years to come. Adjusts from 14" x 14" to 22-1/2" x 22-1/2"!
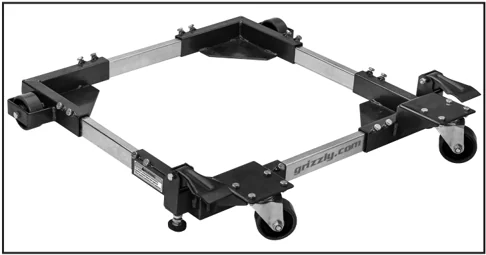
Figure 38. T28922 Bear Crawl "Cub" Mobile Base.
order online at www.grizzly.com or call 1-800-523-4777
D2274—Shop Fox 5-Roller Stand This super heavy-duty roller stand features convenient hand knobs for fast height adjustment. Invaluable for supporting work on machines of varying heights. Adjusts from 26" to 44-5/8", all-steel construction, 15-7/8" wide ball bearing rollers and has a 250 lb. capacity.
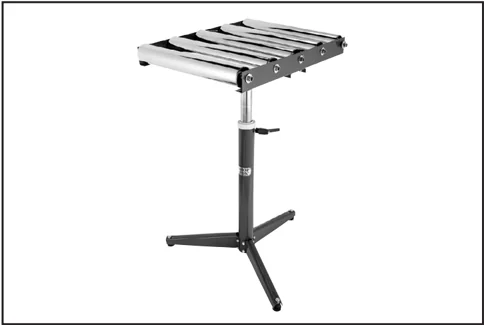
Figure 39. D2274 Shop Fox 5-Roller Stand.
G0555—14" 1 HP Bandsaw The G0555 Classic 14" Bandsaw features a 1 HP motor and 14" capacity for resawing, crosscutting hardwoods, and making accurate curved or decorative cuts. Its precision-ground cast-iron table tilts 45° right and 15° left, and the deluxe aluminum fence offers quick, accurate adjustments. Eccentric bearing mounts allow fast blade-guide tuning, plus a quick-release tensioner to simplify blade changes. Prewired for 110V with optional 220V conversion.
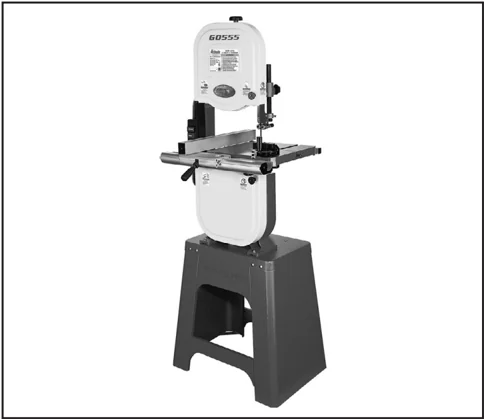
Figure 40. G0555 14" 1 HP Bandsaw.
G1028Z2—1-1/2 HP Dust Collector This portable dust collector features a powerful 1-1/2 HP motor (prewired for 120V, compatible with 240V) and delivers an impressive 1300 CFM of air suction with up to 9" of static pressure. It includes a 6" diameter inlet with two 4" ports for flexible hookups, and uses a durable 12-3/4" cast-aluminum impeller. The unit offers a 5.7 cubic-foot bag capacity, with bags measuring 19-1/2" x 33" and a total height of 78" when inflated and is built on a compact 21-1/2" x 33-1/2" portable base.
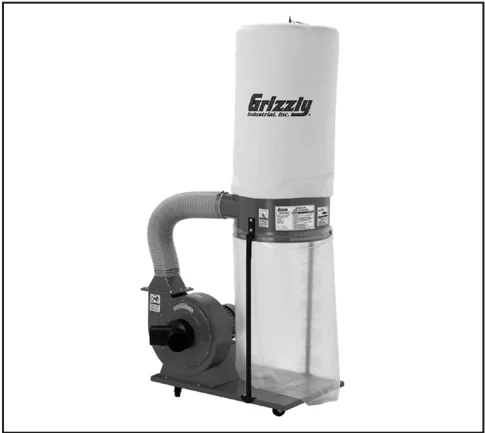
Figure 41. G1028Z2 Dust Collector.
order online at www.grizzly.com or call 1-800-523-4777
SECTION 6: MAINTENANCE
! WARNING Always disconnect power to the machine before performing maintenance. Failure to do this may result in serious personal injury.
Schedule
For optimum performance from this machine, this maintenance schedule must be strictly followed.
Ongoing
To minimize your risk of injury and maintain proper machine operation, shut down the machine immediately if you ever observe any of the items below, and fix the problem before continuing operations:
- Loose hardware.
- Damaged sanding sleeve.
- Worn or damaged wires.
- Any other unsafe condition.
Weekly Maintenance:
- Clean/vacuum dust buildup from beneath the table.
Every 1000 hours of use:
- Change gear oil (Page 33).
Cleaning & Protecting
Cleaning the Model G1071/G1071Z is relatively easy. Vacuum excess wood chips and sawdust, and wipe off the remaining dust with a dry cloth. If any resin has built up, use a resin dissolving cleaner to remove it.
Protect the unpainted cast iron table by wiping it clean after every use—this ensures moisture from wood dust does not remain on bare metal surfaces. Keep the table rust-free with regular applications of quality metal protectants.
Lubrication
Since all bearings are shielded and permanently lubricated, simply leave them alone until they need to be replaced. Do not lubricate them, as this will only attract dust and result in possible premature bearing failure.
DO NOT oil any exposed areas on the sander. Dust will be attracted to these areas, creating a gummy mixture that will hamper proper movement of components. Instead, lubricate exposed areas with dry, powdered graphite.
Cleaning Sanding Sleeves
As sanding sleeves are used, they will become "loaded" with saw dust. If not removed, this saw dust will harden on the abrasive surface, greatly reducing the effectiveness of the sanding sleeve. Routinely clean the sanding sleeves with a rubber gum abrasive cleaner such as the PRO-STIK® cleaner shown in Figure 42.
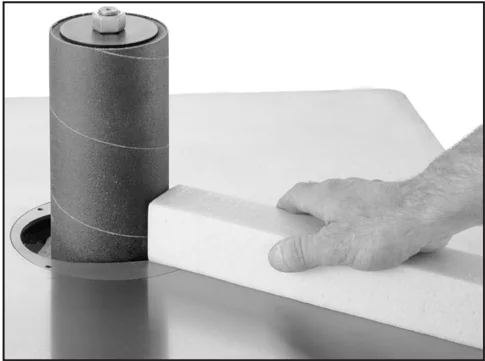
Figure 42. Sanding sleeve maintenance.
Always discard worn sanding sleeves. As abrasives begin to wear, grit will begin to fall off, causing deep gouges in the workpiece. Glue used to hold the grit to the paper will rub off onto the workpiece, causing burns and interfering with the final finishing.
Changing Gearbox Oil
NOTICE
Gearbox oil must be changed after first two hours of initial operation.
The spindle gearbox contains 4 quarts of 90 Wt. gear oil. Replace the gearbox oil after the first two hours of use, and then after approximately every 1000 hours of use. Remove the fill cap first (see Figure 43), then drain the gear oil from the drain plug located inside the sander base at the bottom of the gear box (see Figure 44). After oil is completely drained, install drain plug, fill with oil, then install fill cap.
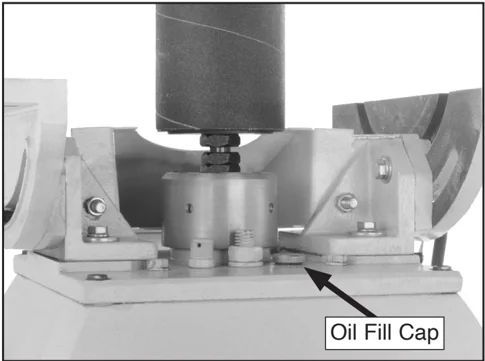
Oil Fill Cap
Figure 43. Location of oil fill cap.
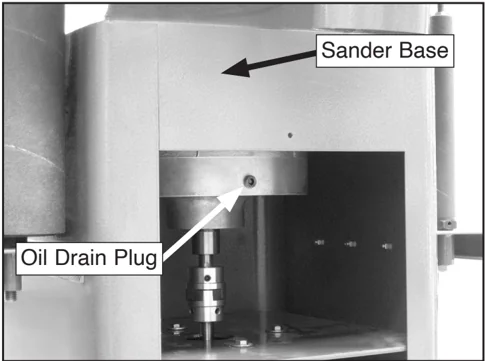
Sander Base Oil Drain Plug
Figure 44. Location of drain plug.
SECTION 7: SERVICE
Review the troubleshooting procedures in this section if a problem develops with your machine. If you need replacement parts or additional help with a procedure, call our Technical Support. Note: Please gather the serial number and manufacture date of your machine before calling.
Troubleshooting
Motor & Electrical
| Symptom | Possible Cause | Possible Solution |
|---|---|---|
| Machine does not start or a breaker trips. | 1. Switch disabling key removed (G1071 only).1. E-Stop button pressed (G1071Z only).2. Incorrect power supply voltage or circuit size.3. Plug/receptacle at fault/wired wrong (G1071 converted to 240V only).4. Power supply circuit breaker tripped or fuse blown.5. Motor wires connected incorrectly.6. Centrifugal switch needs adjustment/contact points dirty (G1071 only).7. Wiring broken, disconnected, or corroded.8. Motor at fault. | 1. Install switch disabling key.1. Rotate E-Stop button head to reset.2. Ensure correct power supply voltage and circuit size.3. Test for good contacts; correct the wiring.4. Ensure circuit is free of shorts. Reset circuit breaker or replace fuse.5. Correct motor wiring connections (Page 37).6. Adjust centrifugal switch/clean contact points.7. Check/fix broken, disconnected, or corroded wires.8. Test/repair/replace. |
| Machine stalls or is underpowered. | 1. Motor wires connected incorrectly.2. Plug/receptacle at fault/wired incorrectly (G1071 converted to 240V only).3. Motor overheated.4. Extension cord too long.5. Centrifugal switch needs adjustment/contact points dirty (G1071 only).6. Motor or motor bearings at fault. | 1. Correct motor wiring connections (Page 37).2. Test for good contacts/correct wiring.3. Clean motor, let cool, and reduce workload.4. Move machine closer to power supply; use shorter extension cord.5. Adjust centrifugal switch/clean contact points.6. Replace motor. |
| Machine has vibration or noisy operation. | 1. Motor or component loose.2. Motor fan rubbing on fan cover.3. Centrifugal switch needs adjustment.4. Motor bearings at fault. | 1. Replace damaged or missing bolts/nuts or tighten if loose.2. Fix/replace fan cover; replace loose/damaged fan.3. Adjust centrifugal switch4. Test by rotating shaft; rotational grinding/loose shaft requires bearing replacement. |
| Digital readout does not work/display is incorrect (G1071Z only). | 1. Wiring broken, disconnected, or corroded. | 1. Fix broken wires or disconnected/corroded connections (Page 39). |
Model G1071/G1071Z (Mfd. Since □□/□□)
Operations
| Symptom | Possible Cause | Possible Solution |
|---|---|---|
| Machine stalls or is underpowered (non-electrical related). | 1. Feed rate too aggressive.2. Workpiece material not suitable for machine.3. Machine undersized for task. | 1. Decrease feed rate.2. Only sand wood, ensure moisture is below 20%.3. Clean (Page 33)/replace sleeve (Page 27); reduce feed rate/sanding depth. |
| Machine has vibration or noisy operation (non-electrical related). | 1. Spindle loose, improperly installed or damaged.2. Gearbox at fault. | 1. Tighten loose spindle, re-install spindle ensuring mating surfaces are clean, replace spindle if damaged.2. Replace gearbox. |
| Deep sanding grooves or scars in workpiece. | 1. Excessive spindle speed (G1071Z only).2. Workpiece sanded across grain.3. Excessive workpiece pressure against spindle sleeve.4. Sanding sleeve too coarse for the desired finish. | 1. Reduce spindle speed.2. Sand workpiece with grain.3. Reduce workpiece pressure.4. Replace with a finer grit (Page 27). |
| Glazed sanding surfaces. | 1. Sanding wet stock.2. Sanding stock with high pitch/residue.3. Sanding sleeve worn or filled with pitch/residue. | 1. Only sand wood/ensure moisture is below 20%.2. Use different stock or accept characteristics and plan on frequently cleaning (Page 33)/replacing sanding sleeves (Page 27).3. Replace sleeve (Page 27). |
| Sanding sleeve clogs quickly. | 1. Sanding wet stock.2. Excessive spindle speed (G1071Z only).3. Excessive workpiece pressure against spindle sleeve.4. Sanding sleeve too fine for desired finish.5. Sanding softwood.6. Worn sanding sleeve.7. Poor dust collection. | 1. Only sand wood/ensure moisture is below 20%.2. Reduce spindle speed.3. Reduce workpiece pressure.4. Replace with a coarser grit sleeve (Page 27).5. Use different stock or accept characteristics and plan on frequently cleaning (Page 33)/replacing sanding sleeves (Page 27).6. Replace sleeve (Page 27).7. Unclog ducts; close gates to improve suction; redesign dust collection system. |
| Poor, non-aggressive sanding results. | 1. Sanding sleeve grit too fine for desired finish.2. Sanding sleeve clogged/worn. | 1. Replace with a coarser grit sleeve (Page 27).2. Clean (Page 33)/replace sleeve (Page 27). |
| Burn marks on workpiece. | 1. Excessive spindle speed (G1071Z only).2. Excessive workpiece pressure against spindle sleeve.3. Sanding sleeve grit too fine for desired finish.4. Sanding sleeve clogged/worn. | 1. Reduce spindle speed.2. Reduce workpiece pressure.3. Replace with a coarser grit sleeve (Page 27).4. Clean (Page 33)/replace sleeve (Page 27). |
| Workpiece not sanded square when table tilt is set to 0°. | 1. Table is not square to spindle. | 1. Adjust table stop bolt until table is square to spindle (Page 19). |
Operations (Cont.)
| Symptom | Possible Cause | Possible Solution |
|---|---|---|
| Sanded workpiece angle does not match scale angle. | 1. Table tilt scale needs to be calibrated. | 1. Use 90° square to adjust table square to spindle, then adjust scale pointer to 0° (Page 20). |
| Abrasive grit rubs off easily. | 1. Sanding sleeve has been stored in an incorrect environment.2. Sanding sleeve has been folded or crushed. | 1. Replace sleeve (Page 27). Store sleeves in a cool, dry area.2. Replace sleeve (Page 27). Do not bend/fold sleeve. |
| Workpiece frequently gets pulled out of your hands. | 1. Not supporting workpiece against table.2. Starting workpiece on a leading corner. | 1. Use table to support workpiece.2. Start workpiece on a trailing corner. |
Model G1071/G1071Z (Mfd. Since □□/□□)
SECTION 8: WIRING
These pages are current at the time of printing. However, in the spirit of improvement, we may make changes to the electrical systems of future machines. Compare the manufacture date of your machine to the one stated in this manual, and study this section carefully.
If there are differences between your machine and what is shown in this section, call Technical Support at (570) 546-9663 for assistance BEFORE making any changes to the wiring on your machine. An updated wiring diagram may be available. Note: Please gather the serial number and manufacture date of your machine before calling. This information can be found on the main machine label.
WARNING
Wiring Safety Instructions
SHOCK HAZARD. Working on wiring that is connected to a power source is extremely dangerous. Touching electrified parts will result in personal injury including but not limited to severe burns, electrocution, or death. Disconnect the power from the machine before servicing electrical components!
MODIFICATIONS. Modifying the wiring beyond what is shown in the diagram may lead to unpredictable results, including serious injury or fire. This includes the installation of unapproved aftermarket parts.
WIRE CONNECTIONS. All connections must be tight to prevent wires from loosening during machine operation. Double-check all wires disconnected or connected during any wiring task to ensure tight connections.
CIRCUIT REQUIREMENTS. You MUST follow the requirements at the beginning of this manual when connecting your machine to a power source.
WIRE/COMPONENT DAMAGE. Damaged wires or components increase the risk of serious personal injury, fire, or machine damage. If you notice that any wires or components are damaged while performing a wiring task, replace those wires or components.
MOTOR WIRING. The motor wiring shown in these diagrams is current at the time of printing but may not match your machine. If you find this to be the case, use the wiring diagram inside the motor junction box.
CAPACITORS/INVERTERS. Some capacitors and power inverters store an electrical charge for up to 10 minutes after being disconnected from the power source. To reduce the risk of being shocked, wait at least this long before working on capacitors.
EXPERIENCING DIFFICULTIES. If you are experiencing difficulties understanding the information included in this section, contact our Technical Support at (570) 546-9663.
NOTICE
The photos and diagrams included in this section are best viewed in color. You can view these pages in color at www.grizzly.com.
COLOR KEY
| BLACK | BLUE | YELLOW | LIGHT BLUE |
|---|---|---|---|
| Bk | Bl | Yl | Lb |
| WHITE | BROWN | YELLOW GREEN | BLUE WHITE |
|---|---|---|---|
| Wt | Br | Yg | Bw |
| GREEN | GRAY | PURPLE | TURQUOISE |
|---|---|---|---|
| Gn | Gy | Pu | Tu |
| RED | ORANGE | PINK |
|---|---|---|
| Rd | Or | Pk |

G1071 Wiring Diagram
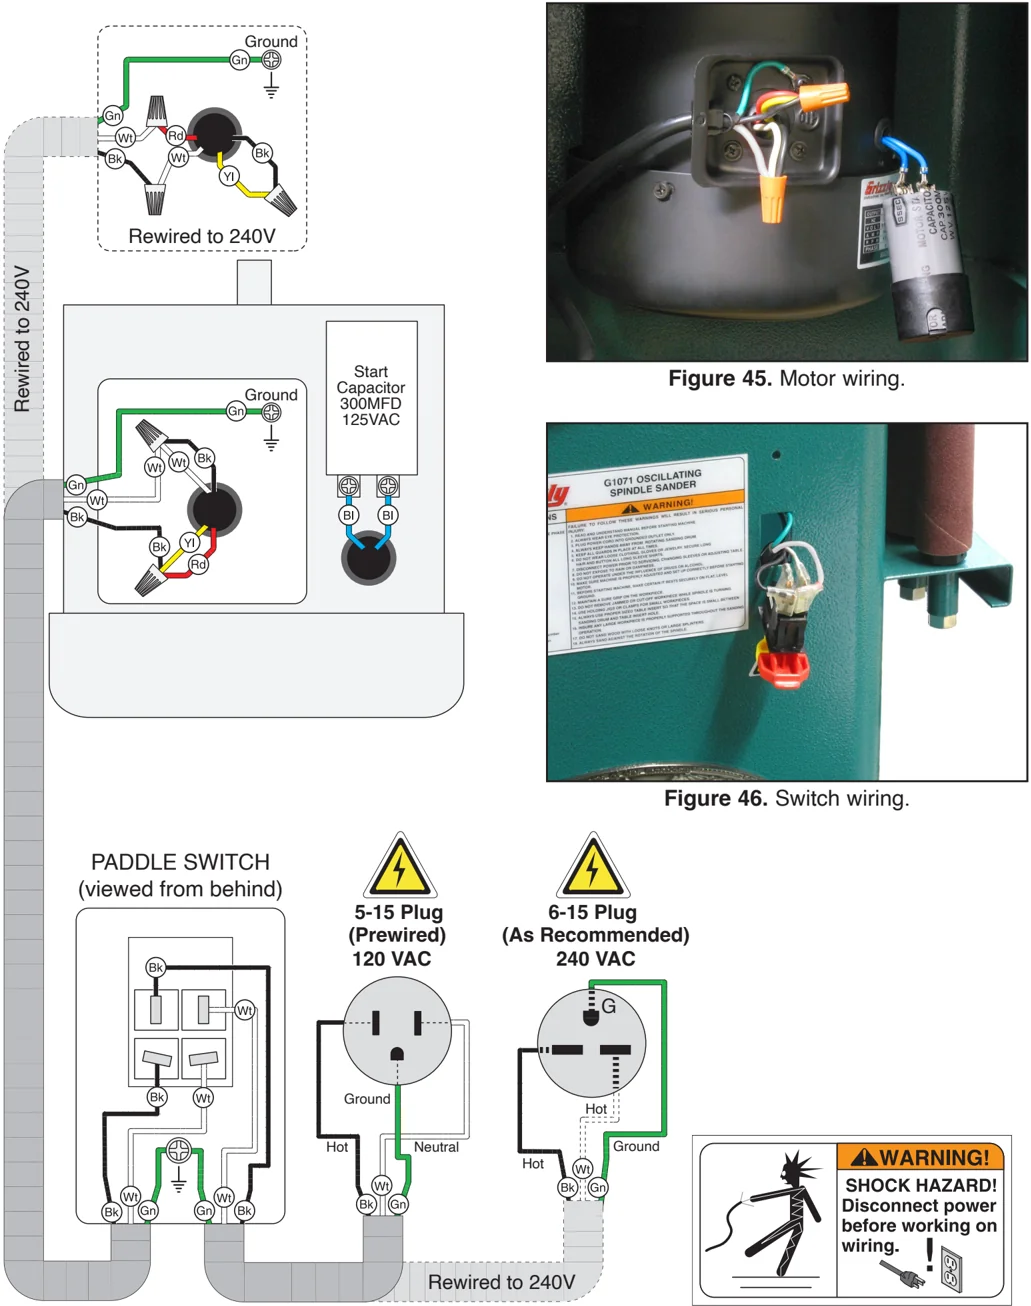
Figure 45. Motor wiring.

Figure 46. Switch wiring.
PADDLE SWITCH (viewed from behind)
5-15 Plug (Prewired) 120 VAC
6-15 Plug (As Recommended) 240 VAC
WARNING! SHOCK HAZARD! Disconnect power before working on wiring.
STOP READ ELECTRICAL SAFETY ON PAGE 37!
G1071Z Wiring Diagram
EMERGENCY STOP BUTTON NHD NPB22-H01
[Diagram of Emergency Stop Button with terminals labeled ESP, 2, NC, 1, P12]
CONTROL PANEL TAI-CHUAN 8-2B-4-900-1800-FL
[Diagram of Control Panel with terminals labeled VCC, VSS, A+, B-, and corresponding labels below: VCC, VSS, A+, A-, B+, B-]
CABINET
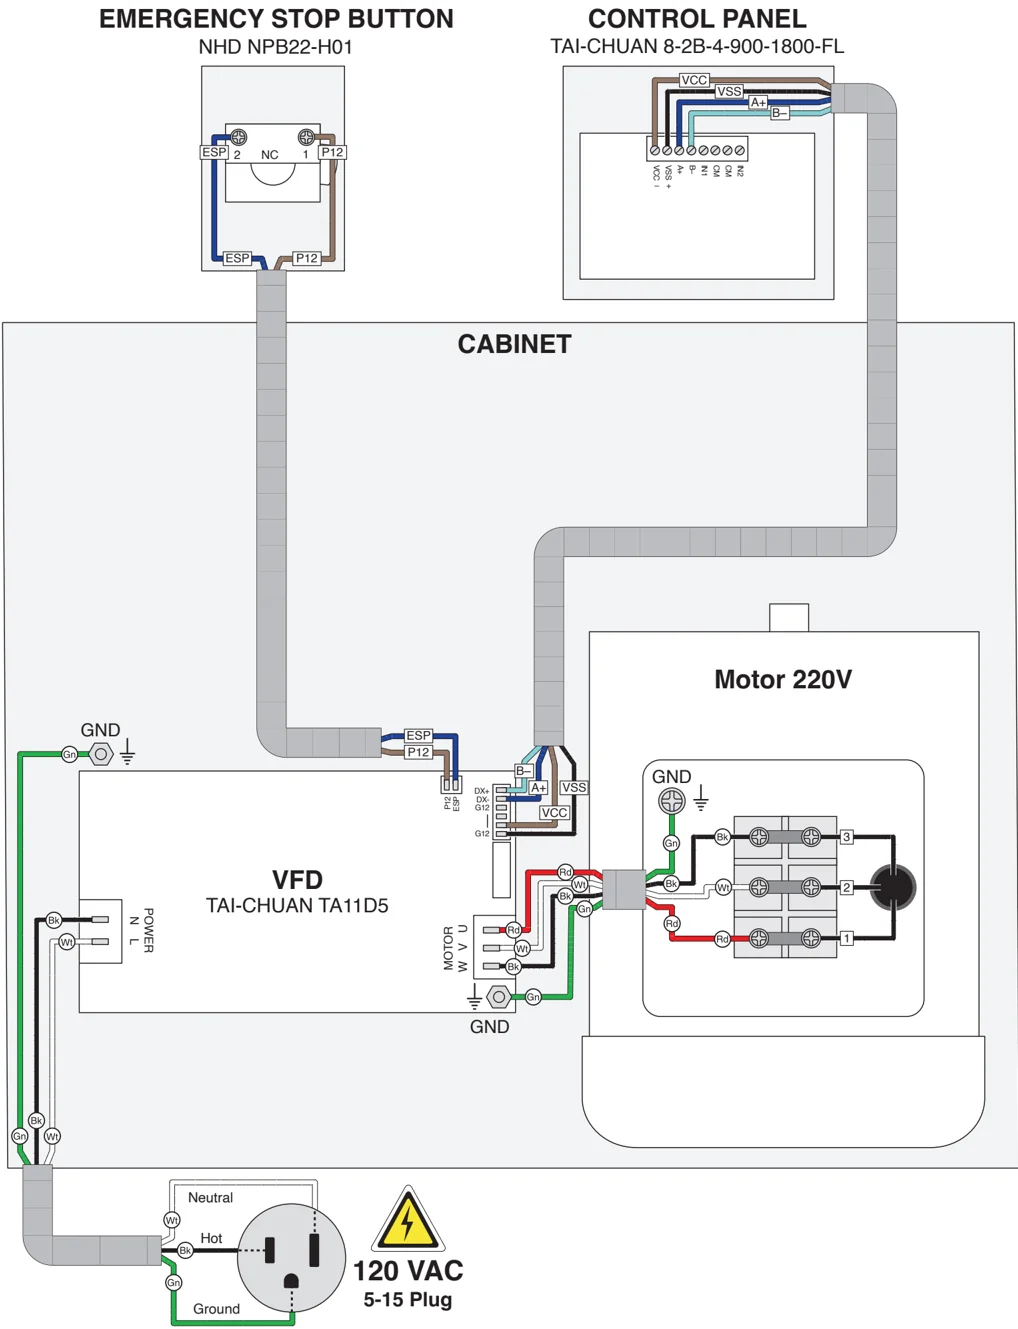
VFD TAI-CHUAN TA11D5
[Labels near VFD terminals: POWER N L; MOTOR W V U; Digital Input terminals DX, DK, G12]
Motor 220V
[Labels near Motor terminals: GND, Gn, Bk, Wt, Rd, 3, 2, 1]
120 VAC 5-15 Plug
[Diagram of 120 VAC Plug with labels: Neutral (Wt), Hot (Bk), Ground (Gn)]
STOP READ ELECTRICAL SAFETY ON PAGE 37!

G1071Z Electrical Components
 Figure 47. Emergency Stop button wiring.
 Figure 48. Control panel wiring.
 Figure 49. VFD and motor wiring.
-40- READ ELECTRICAL SAFETY ON PAGE 37! Model G1071/G1071Z (Mfd. Since 03/26)
SECTION 9: PARTS
We do our best to stock replacement parts when possible, but we cannot guarantee that all parts shown are available for purchase. Call (800) 523-4777 or visit www.grizzly.com/parts to check for availability.
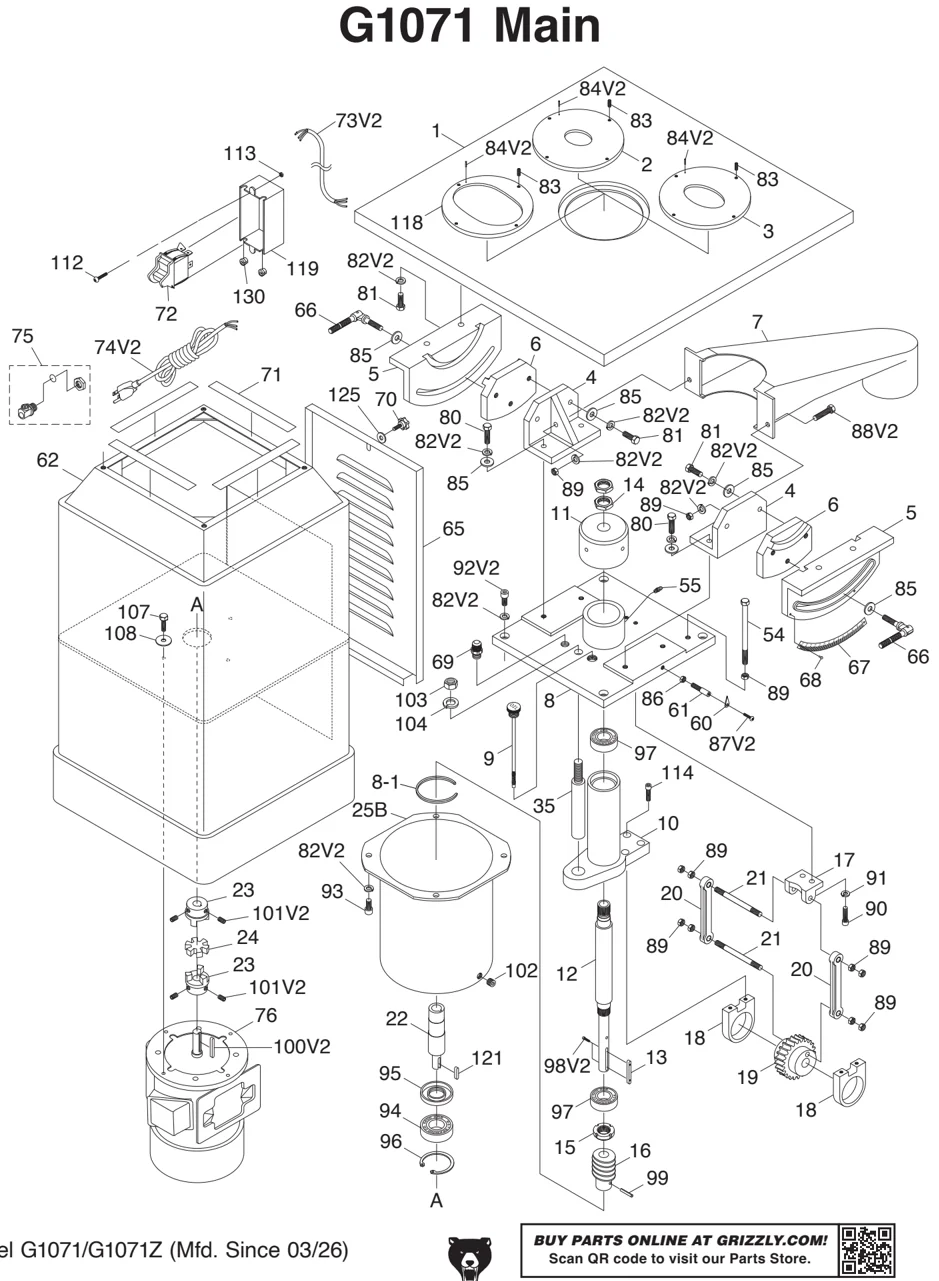
G1071 Main
BUY PARTS ONLINE AT GRIZZLY.COM! Scan QR code to visit our Parts Store. -41-
G1071 Main Parts List
| REF | PART # | DESCRIPTION |
|---|---|---|
| 1 | P1071001 | TABLE |
| 2 | P1071002 | INSERT 1-3/4" X 2-3/16" |
| 3 | P1071003 | INSERT 2" X 3-3/8" |
| 4 | P1071004 | BRACKET |
| 5 | P1071005 | TRUNNION |
| 6 | P1071006 | INNER TRUNNION |
| 7 | P1071007 | DUST HOOD |
| 8 | P1071008 | HOUSING CASTING |
| 8-1 | P1071008-1 | RUBBER STRIP |
| 9 | P1071009 | DIPSTICK |
| 10 | P1071010 | SPINDLE CASTING |
| 11 | P1071011 | COVER |
| 12 | P1071012 | SPINDLE |
| 13 | P1071013 | SPINDLE KEY 5 X 5 X 50 |
| 14 | P1071014 | JAM NUT 15/16-20 |
| 15 | P1071015 | SPANNER NUT 15/16-20 |
| 16 | P1071016 | WORM |
| 17 | P1071017 | MOUNTING BRACKET |
| 18 | P1071018 | BEARING BLOCK |
| 19 | P1071019 | WORM GEAR 24T |
| 20 | P1071020 | CONNECTING ROD |
| 21 | P1071021 | WRIST PIN |
| 22 | P1071022 | DRIVE SHAFT |
| 23 | P1071023 | HUB |
| 24 | P1071024 | CENTER BLOCK |
| 25B | P1071025B | CASE V2.11.98 |
| 35 | P1071035 | GUIDE SHAFT |
| 54 | P1071054 | HEX BOLT 3/8-16 X 6-1/2 |
| 55 | P1071055 | GREASE FITTING M6-1 X 5 |
| 60 | P1071060 | POINTER |
| 61 | P1071061 | POINTER MOUNT |
| 62 | P1071062 | CABINET |
| 65 | P1071065 | DOOR |
| 66 | P1071066 | LOCK HANDLE |
| 67 | P1071067 | SCALE |
| 68 | P1071068 | RIVET 2 X 5MM NAMEPLATE, STEEL |
| 69 | P1071069 | OIL BREATHER |
| 70 | P1071070 | KNOB |
| 71 | P1071071 | GASKET |
| 72 | P1071072 | TOGGLE SAFETY SWITCH |
| REF | PART # | DESCRIPTION |
|---|---|---|
| 73V2 | P1071073V2 | MOTOR CORD 16G 3W 30" V2.11.10 |
| 74V2 | P1071074V2 | POWER CORD 16G 3W 12' 5-15P V2.11.10 |
| 75 | P1071075 | STRAIN RELIEF M15 TYPE-2 |
| 76 | P1071076 | MOTOR 1HP 120/240V 1-PH |
| 80 | P1071080 | HEX BOLT 3/8-16 X 1-1/4 |
| 81 | P1071081 | HEX BOLT 3/8-16 X 1 |
| 82V2 | P1071082V2 | LOCK WASHER 10MM |
| 83 | P1071083 | SET SCREW 1/4-20 X 5/8 |
| 84V2 | P1071084V2 | ROLL PIN 5 X 28 |
| 85 | P1071085 | FLAT WASHER 3/8 |
| 86 | P1071086 | HEX NUT 5/16-18 |
| 87V2 | P1071087V2 | PHLP HD SCR 6-32 X 1/4 |
| 88V2 | P1071088V2 | HEX BOLT 3/8-16 X 1-1/4 |
| 89 | P1071089 | HEX NUT 3/8-16 |
| 90 | P1071090 | CAP SCREW 5/16-18 X 1 |
| 91 | P1071091 | LOCK WASHER 5/16 |
| 92V2 | P1071092V2 | CAP SCREW 3/8-16 X 1 |
| 93 | P1071093 | CAP SCREW 3/8-16 X 3/4 |
| 94 | P1071094 | BALL BEARING 6206-2RS |
| 95 | P1071095 | SEAL 30-62-8 |
| 96 | P1071096 | INT RETAINING RING 62MM |
| 97 | P1071097 | BALL BEARING 6205-2RS |
| 98V2 | P1071098V2 | CAP SCREW #4-40 X 1/2 V2.04.09 |
| 99 | P1071099 | ROLL PIN 5 X 30 |
| 100V2 | P1071100V2 | KEY 5 X 5 X 25 |
| 101V2 | P1071101V2 | SET SCREW 5/16-18 X 3/8 |
| 102 | P1071102 | OIL DRAIN PLUG |
| 103 | P1071103 | HEX NUT 5/8-11 |
| 104 | P1071104 | LOCK WASHER 5/8 |
| 107 | P1071107 | HEX BOLT 5/16-18 X 1 |
| 108 | P1071108 | FENDER WASHER 5/16 |
| 112 | P1071112 | PHLP HD SCR 10-24 X 1 |
| 113 | P1071113 | HEX NUT 10-24 |
| 114 | P1071114 | CAP SCREW 5/16-18 X 1 |
| 118 | P1071118 | INSERT 4-1/4" X 6" |
| 119 | P1071119 | DUST COVER |
| 121 | P1071121 | KEY 5 X 5 X 24 |
| 125 | P1071125 | FLAT WASHER 1/4 |
| 130 | P1071130 | STRAIN RELIEF 16MM |
BUY PARTS ONLINE AT GRIZZLY.COM!
Scan QR code to visit our Parts Store.
G1071 Spindles & Storage
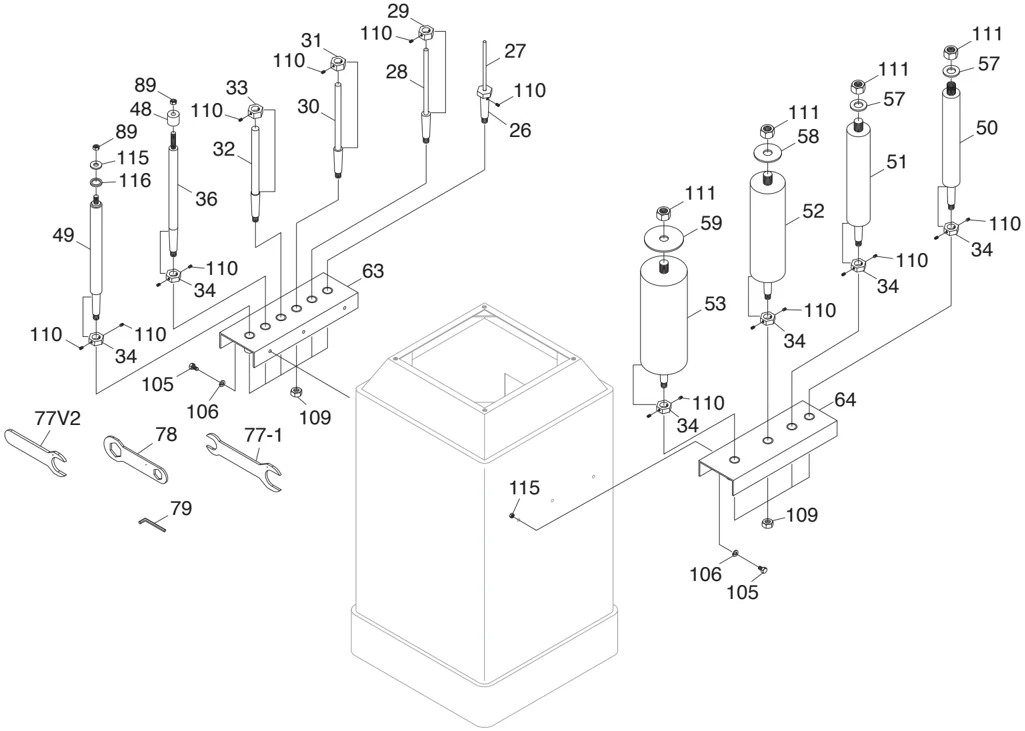
| REF | PART # | DESCRIPTION |
|---|---|---|
| 26 | P1071026 | ARBOR |
| 27 | P1071027 | SPINDLE 1/4" |
| 28 | P1071028 | SPINDLE 3/8" |
| 29 | P1071029 | RETAINER |
| 30 | P1071030 | SPINDLE 1/2" |
| 31 | P1071031 | RETAINER |
| 32 | P1071032 | SPINDLE 5/8" |
| 33 | P1071033 | RETAINER |
| 34 | P1071034 | RETAINER |
| 36 | P1071036 | SPINDLE 3/4" |
| 48 | P1071048 | GROMMET 19 X 9MM PLASTIC |
| 49 | P1071049 | SPINDLE 1" |
| 50 | P1071050 | SPINDLE 1-1/2" |
| 51 | P1071051 | SPINDLE 2" |
| 52 | P1071052 | SPINDLE 3" |
| 53 | P1071053 | SPINDLE 4" |
| REF | PART # | DESCRIPTION |
|---|---|---|
| 57 | P1071057 | WASHER 36 X 19 X 3MM |
| 58 | P1071058 | FLAT WASHER 18MM |
| 59 | P1071059 | FLAT WASHER 18MM |
| 63 | P1071063 | SPINDLE HOLDER |
| 64 | P1071064 | SPINDLE HOLDER |
| 77V2 | P1071077V2 | FLAT WRENCH 1-1/8 V2.01.02 |
| 77-1 | P1071077-1 | FLAT COMBO WRENCH 7/8 X 1-1/4 V2.01.02 |
| 78 | P1071078 | FLAT COMBO SPINDLE WRENCH 1 X 3/4 |
| 79 | P1071079 | HEX WRENCH 2MM |
| 89 | P1071089 | HEX NUT 3/8-16 |
| 105 | P1071105 | HEX BOLT 1/4-20 X 1/2 |
| 106 | P1071106 | LOCK WASHER 1/4 |
| 110 | P1071110 | SET SCREW 10-24 X 1/4 |
| 111 | P1071111 | HEX NUT 3/4-16 |
| 115 | P1071115 | FLAT WASHER 3/8 |
| 116 | P1071116 | SPACER |
BUY PARTS ONLINE AT GRIZZLY.COM! Scan QR code to visit our Parts Store.
G1071 Labels & Cosmetics
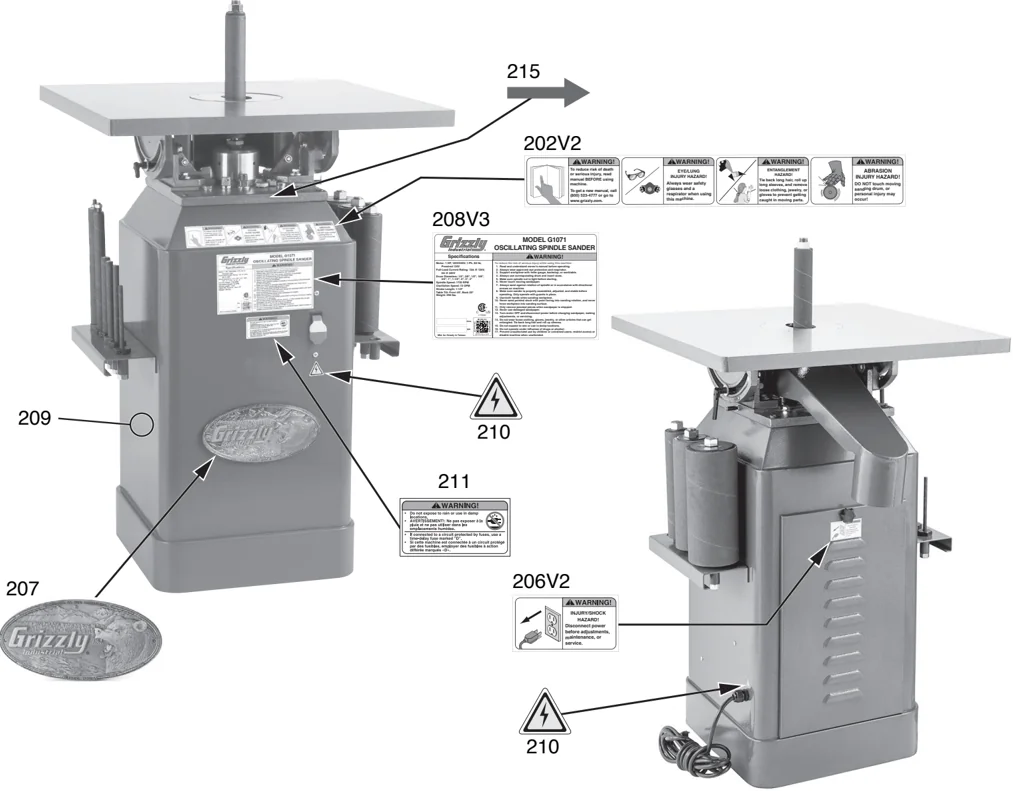
| REF | PART # | DESCRIPTION |
|---|---|---|
| 202V2 | P1071202V2 | COMBO WARNING LABEL |
| 206V2 | P1071206V2 | DISCONNECT POWER LABEL |
| 207 | P1071207 | GRIZZLY NAMEPLATE-LARGE |
| 208V3 | P1071208V3 | MACHINE ID LABEL V3.02.26 |
| REF | PART # | DESCRIPTION |
|---|---|---|
| 209 | P1071209 | TOUCH-UP PAINT, GRIZZLY GREEN |
| 210 | P1071210 | ELECTRICITY LABEL |
| 211 | P1071211 | DAMPNESS WARNING LABEL |
| 215 | P1071215 | DIRECTION LABEL |
WARNING
Safety labels help reduce the risk of serious injury caused by machine hazards. If any label comes off or becomes unreadable, the owner of this machine MUST replace it in the original location before resuming operations. For replacements, contact (800) 523-4777 or www.grizzly.com.
-44- BUY PARTS ONLINE AT GRIZZLY.COM! Scan QR code to visit our Parts Store. Model G1071/G1071Z (Mfd. Since 03/26)
G1071Z Main
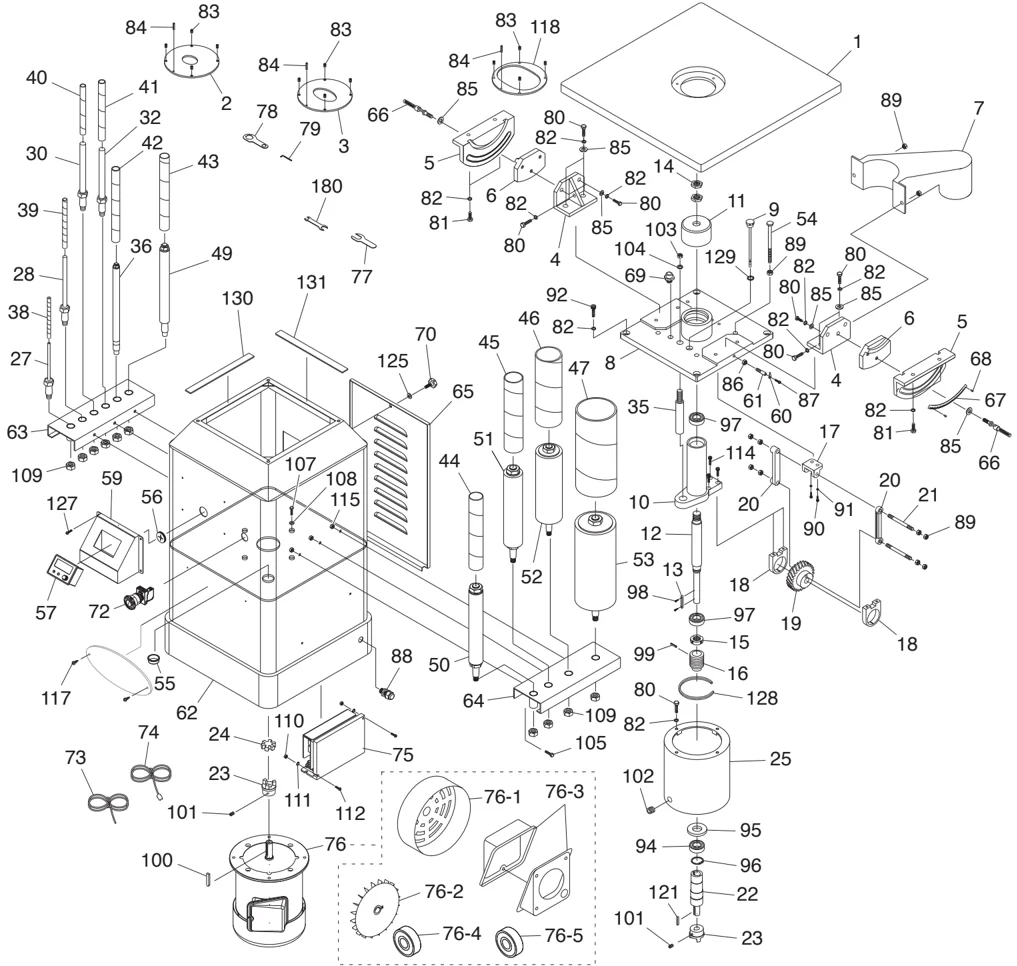
| REF | PART # | DESCRIPTION |
|---|---|---|
| 1 | P1071Z001 | TABLE |
| 2 | P1071Z002 | TABLE INSERT 1-3/4 X 2-3/16 |
| 3 | P1071Z003 | TABLE INSERT 2-3/16 X 3-1/2 |
| 4 | P1071Z004 | BRACKET |
| REF | PART # | DESCRIPTION |
|---|---|---|
| 5 | P1071Z005 | TRUNNION OUTER |
| 6 | P1071Z006 | TRUNNION INNER |
| 7 | P1071Z007 | DUST CHUTE |
| 8 | P1071Z008 | HOUSING |
BUY PARTS ONLINE AT GRIZZLY.COM! Scan QR code to visit our Parts Store.

G1071Z Main Parts List
| REF | PART # | DESCRIPTION |
|---|---|---|
| 9 | P1071Z009 | DIPSTICK |
| 10 | P1071Z010 | SPINDLE CASTING |
| 11 | P1071Z011 | COVER |
| 12 | P1071Z012 | SPINDLE |
| 13 | P1071Z013 | SPINDLE KEY 5 X 5 X 50 |
| 14 | P1071Z014 | HEX NUT 15/16-20 THIN |
| 15 | P1071Z015 | SPANNER NUT 15/16-20 |
| 16 | P1071Z016 | WORM |
| 17 | P1071Z017 | GEAR MOUNTING BRACKET |
| 18 | P1071Z018 | BEARING BLOCK |
| 19 | P1071Z019 | WORM GEAR 24T |
| 20 | P1071Z020 | CONNECTING ROD |
| 21 | P1071Z021 | STUD-DE 3/8-16 X 4-5/16, 5/8 |
| 22 | P1071Z022 | DRIVE SHAFT |
| 23 | P1071Z023 | HUB |
| 24 | P1071Z024 | CENTER BLOCK |
| 25 | P1071Z025 | SPINDLE CASE |
| 27 | P1071Z027 | SPINDLE 1/4" |
| 28 | P1071Z028 | SPINDLE 3/8" |
| 30 | P1071Z030 | SPINDLE 1/2" |
| 32 | P1071Z032 | SPINDLE 5/8" |
| 35 | P1071Z035 | GUIDE SHAFT |
| 36 | P1071Z036 | SPINDLE 3/4" |
| 38 | P1071Z038 | SANDING SLEEVE 1/4 X 5 100-GR (3-PK) |
| 39 | P1071Z039 | SANDING SLEEVE 3/8 X 6 100-GR (3-PK) |
| 40 | P1071Z040 | SANDING SLEEVE 1/2 X 6 100-GR (3-PK) |
| 41 | P1071Z041 | SANDING SLEEVE 5/8 X 6 100-GR (3-PK) |
| 42 | P1071Z042 | SANDING SLEEVE 3/4 X 9 100-GR (3-PK) |
| 43 | P1071Z043 | SANDING SLEEVE 1 X 9 100-GR (3-PK) |
| 44 | P1071Z044 | SANDING SLEEVE 1-1/2 X 9 100-GR (3-PK) |
| 45 | P1071Z045 | SANDING SLEEVE 2 X 9 100-GR (3-PK) |
| 46 | P1071Z046 | SANDING SLEEVE 3 X 9 100-GR (3-PK) |
| 47 | P1071Z047 | SANDING SLEEVE 4 X 9 100-GR (3-PK) |
| 49 | P1071Z049 | SPINDLE 1" |
| 50 | P1071Z050 | SPINDLE 1-1/2" |
| 51 | P1071Z051 | SPINDLE 2" |
| 52 | P1071Z052 | SPINDLE 3" |
| 53 | P1071Z053 | SPINDLE 4" |
| 54 | P1071Z054 | HEX BOLT 3/8-16 X 6-1/2 |
| 55 | P1071Z055 | GROMMET 30MM |
| 56 | P1071Z056 | DUST GROMMET 30MM |
| 57 | P1071Z057 | CONTROL PANEL TAI-CHUAN |
| 59 | P1071Z059 | CONTROL PANEL MOUNT |
| 60 | P1071Z060 | POINTER |
| 61 | P1071Z061 | POINTER MOUNT |
| 62 | P1071Z062 | CABINET |
| 63 | P1071Z063 | SPINDLE HOLDER 6-HOLE |
| 64 | P1071Z064 | SPINDLE HOLDER 4-HOLE |
| 65 | P1071Z065 | CABINET PANEL |
| 66 | P1071Z066 | FOLDING HANDLE 3/8-16 X 1-1/4, 2-13/16L |
| 67 | P1071Z067 | ANGLE SCALE |
| 68 | P1071Z068 | RIVET 2 X 5MM NAMEPLATE, STEEL |
| 69 | P1071Z069 | OIL BREATHER |
| 70 | P1071Z070 | KNOB BOLT 1/4-20 X 3/4, 6-LOBE, D1-5/16 |
| 72 | P1071Z072 | E-STOP BUTTON NHD NPB22-H01 |
| REF | PART # | DESCRIPTION |
|---|---|---|
| 73 | P1071Z073 | MOTOR CORD 16G 4W 16" |
| 74 | P1071Z074 | POWER CORD 14G 3W 150" 5-15P |
| 75 | P1071Z075 | VFD TAI-CHUAN TA11D5 |
| 76 | P1071Z076 | MOTOR 1HP 220V 3-PH |
| 76-1 | P1071Z076-1 | MOTOR FAN COVER |
| 76-2 | P1071Z076-2 | MOTOR FAN |
| 76-3 | P1071Z076-3 | MOTOR JUNCTION BOX |
| 76-4 | P1071Z076-4 | BALL BEARING 6204ZZ (FRONT) |
| 76-5 | P1071Z076-5 | BALL BEARING 6203ZZ (REAR) |
| 77 | P1071Z077 | FLAT WRENCH 1-1/8 OPEN-END |
| 78 | P1071Z078 | FLAT WRENCH 3/4 X 1 CLOSED-ENDS |
| 79 | P1071Z079 | HEX WRENCH 2MM |
| 80 | P1071Z080 | HEX BOLT 3/8-16 X 1-1/4 |
| 81 | P1071Z081 | HEX BOLT 3/8-16 X 1 |
| 82 | P1071Z082 | LOCK WASHER 10MM |
| 83 | P1071Z083 | SET SCREW 1/4-20 X 5/8 |
| 84 | P1071Z084 | ROLL PIN 5 X 28 |
| 85 | P1071Z085 | FENDER WASHER 3/8 |
| 86 | P1071Z086 | HEX NUT 5/16-18 |
| 87 | P1071Z087 | PHLP HD SCR 8-32 X 1/4 |
| 88 | P1071Z088 | STRAIN RELIEF TYPE-3 M16-1.5 |
| 89 | P1071Z089 | HEX NUT 3/8-16 |
| 90 | P1071Z090 | CAP SCREW 5/16-18 X 1 |
| 91 | P1071Z091 | LOCK WASHER 5/16 |
| 92 | P1071Z092 | CAP SCREW 3/8-16 X 1 |
| 94 | P1071Z094 | BALL BEARING 6206-2RS |
| 95 | P1071Z095 | OIL SEAL 30 X 62 X 2MM |
| 96 | P1071Z096 | INT RETAINING RING 35MM |
| 97 | P1071Z097 | BALL BEARING 6205-2RS |
| 98 | P1071Z098 | CAP SCREW 4-40 X 1/2 |
| 99 | P1071Z099 | ROLL PIN 5 X 30 |
| 100 | P1071Z100 | KEY 5 X 5 X 25 |
| 101 | P1071Z101 | SET SCREW 5/16-18 X 3/8 |
| 102 | P1071Z102 | DRAIN PLUG 1/4-19 X 7/16 |
| 103 | P1071Z103 | HEX NUT 5/8-11 |
| 104 | P1071Z104 | LOCK WASHER 5/8 |
| 105 | P1071Z105 | HEX BOLT 1/4-20 X 1/2 |
| 107 | P1071Z107 | HEX BOLT 5/16-18 X 1 |
| 108 | P1071Z108 | FENDER WASHER 5/16 |
| 109 | P1071Z109 | HEX NUT 1/2-13 |
| 110 | P1071Z110 | HEX NUT 10-24 |
| 111 | P1071Z111 | EXT TOOTH WASHER #10 |
| 112 | P1071Z112 | PHLP HD SCR 10-24 X 5/8 |
| 114 | P1071Z114 | CAP SCREW 5/16-18 X 1 |
| 115 | P1071Z115 | HEX NUT 1/4-20 |
| 117 | P1071Z117 | TAP SCREW #5 X 3/8 |
| 118 | P1071Z118 | TABLE INSERT 4-1/4 X 6 |
| 121 | P1071Z121 | KEY 5 X 5 X 25 |
| 125 | P1071Z125 | FLAT WASHER 1/4 |
| 127 | P1071Z127 | PHLP HD SCR 10-24 X 3/8 |
| 128 | P1071Z128 | RUBBER STRIP 3 X 755MM |
| 129 | P1071Z129 | O-RING 15.8 X 2.4 P16 |
| 130 | P1071Z130 | GASKET 20 X 1 X 240MM |
| 131 | P1071Z131 | GASKET 20 X 1 X 240MM |
| 180 | P1071Z180 | FLAT WRENCH 7/8 X 1-1/4 OPEN-ENDS |
BUY PARTS ONLINE AT GRIZZLY.COM!
Scan QR code to visit our Parts Store.
G1071Z Labels & Cosmetics
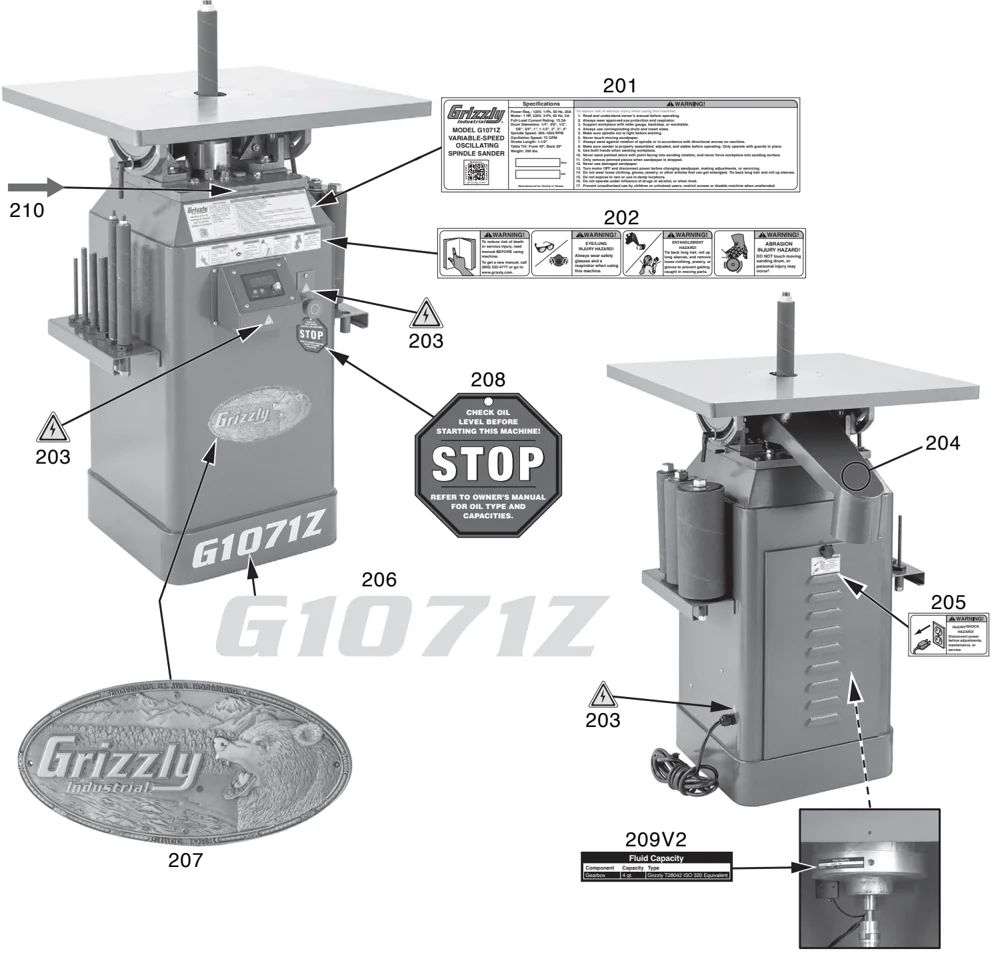
| REF | PART # | DESCRIPTION |
|---|---|---|
| 201 | P1071Z201 | MACHINE ID LABEL |
| 202 | P1071Z202 | COMBO WARNING LABEL |
| 203 | P1071Z203 | ELECTRICITY LABEL |
| 204 | P1071Z204 | TOUCH-UP PAINT, GRIZZLY GREEN |
| 205 | P1071Z205 | INJURY/SHOCK HAZARD LABEL |
| REF | PART # | DESCRIPTION |
|---|---|---|
| 206 | P1071Z206 | MODEL NUMBER LABEL |
| 207 | P1071Z207 | GRIZZLY NAMEPLATE-LARGE |
| 208 | P1071Z208 | CHECK OIL HANG TAG |
| 209V2 | P1071Z209V2 | FLUID CAPACITY LABEL V2.03.26 |
| 210 | P1071Z210 | DIRECTION LABEL |
WARNING
Safety labels help reduce the risk of serious injury caused by machine hazards. If any label comes off or becomes unreadable, the owner of this machine MUST replace it in the original location before resuming operations. For replacements, contact (800) 523-4777 or www.grizzly.com.
BUY PARTS ONLINE AT GRIZZLY.COM! Scan QR code to visit our Parts Store.
This page is blank.
WARRANTY & RETURNS
Grizzly Industrial, Inc. warrants every product it sells for a period of 1 year to the original purchaser from the date of purchase. This warranty does not apply to defects due directly or indirectly to misuse, abuse, negligence, accidents, repairs or alterations or lack of maintenance. This is Grizzly's sole written warranty and any and all warranties that may be implied by law, including any merchantability or fitness, for any particular purpose, are hereby limited to the duration of this written warranty. We do not warrant or represent that the merchandise complies with the provisions of any law or acts unless the manufacturer so warrants. In no event shall Grizzly's liability under this warranty exceed the purchase price paid for the product and any legal actions brought against Grizzly shall be tried in the State of Washington, County of Whatcom.
We shall in no event be liable for death, injuries to persons or property or for incidental, contingent, special, or consequential damages arising from the use of our products.
The manufacturers reserve the right to change specifications at any time because they constantly strive to achieve better quality equipment. We make every effort to ensure that our products meet high quality and durability standards and we hope you never need to use this warranty.
In the event you need to use this warranty, contact us by mail or phone and give us all the details. We will then issue you a "Return Number," which must be clearly posted on the outside as well as the inside of the carton. We will not accept any item back without this number. Proof of purchase must accompany the merchandise.
Please feel free to write or call us if you have any questions about the machine or the manual.
Thank you again for your business and continued support. We hope to serve you again soon.
For further information about the warranty, visit https://www.grizzly.com/forms/warranty or scan the QR code below to be automatically directed to our warranty page.

grizzly.com
TOOL WEBSITE
Buy Direct and Save with Grizzly® – Trusted, Proven and a Great Value!
Since 1983
Visit Our Website Today For Current Specials!
ORDER 24 HOURS A DAY! 1-800-523-4777
VISA MasterCard DISCOVER NOVUS AMERICAN EXPRESS