Grizzly
Industrial, Inc.
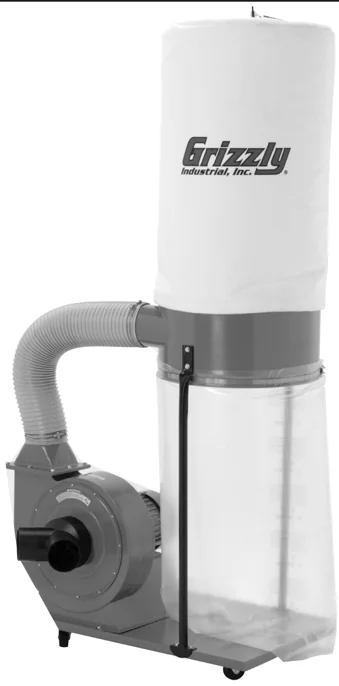
MODEL G1028Z/G1029Z
DUST COLLECTOR
OWNER'S MANUAL
COPYRIGHT © JANUARY, 2008 BY GRIZZLY INDUSTRIAL, INC. REVISED JUNE, 2008 (TR) WARNING: NO PORTION OF THIS MANUAL MAY BE REPRODUCED IN ANY SHAPE OR FORM WITHOUT THE WRITTEN APPROVAL OF GRIZZLY INDUSTRIAL, INC. #JM10379 PRINTED IN TAIWAN

WARNING!
This manual provides critical safety instructions on the proper setup, operation, maintenance and service of this machine/equipment.
Failure to read, understand and follow the instructions given in this manual may result in serious personal injury, including amputation, electrocution or death.
The owner of this machine/equipment is solely responsible for its safe use. This responsibility includes but is not limited to proper installation in a safe environment, personnel training and usage authorization, proper inspection and maintenance, manual availability and comprehension, application of safety devices, blade/cutter integrity, and the usage of personal protective equipment.
The manufacturer will not be held liable for injury or property damage from negligence, improper training, machine modifications or misuse.
WARNING!
Some dust created by power sanding, sawing, grinding, drilling, and other construction activities contains chemicals known to the State of California to cause cancer, birth defects or other reproductive harm. Some examples of these chemicals are:
- Lead from lead-based paints.
- Crystalline silica from bricks, cement and other masonry products.
- Arsenic and chromium from chemically-treated lumber.
Your risk from these exposures varies, depending on how often you do this type of work. To reduce your exposure to these chemicals: Work in a well ventilated area, and work with approved safety equipment, such as those dust masks that are specially designed to filter out microscopic particles.


Table of Contents
-
INTRODUCTION ........ 2
-
Foreword ........ 2
-
Contact Info ........ 2
-
Machine Data Sheet ........ 3
-
Machine Data Sheet ........ 5
-
SECTION 1: SAFETY ........ 7
-
Safety Instructions for Machinery ........ 7
-
Additional Safety for Dust Collectors ........ 9
-
SECTION 2: CIRCUIT REQUIREMENTS ........ 10
-
G1028Z ........ 10
-
110/220V Operation ........ 10
-
G1029Z ........ 11
-
220V Operation ........ 11
-
SECTION 3: SETUP ........ 12
-
Setup Safety ........ 12
-
Items Needed for Setup ........ 12
-
Unpacking ........ 12
-
Inventory ........ 13
-
Site Considerations ........ 13
-
Assembly ........ 14
-
Test Run ........ 16
-
SECTION 4: DESIGNING THE SYSTEM ........ 17
-
General ........ 17
-
Duct Material ........ 17
-
System Design ........ 19
-
System Grounding ........ 23
-
SECTION 5: OPERATIONS ........ 25
-
Operation Safety ........ 25
-
SECTION 6: ACCESSORIES ........ 26
-
SECTION 7: MAINTENANCE ........ 28
-
Schedule ........ 28
-
Lubrication ........ 28
-
Bag Cleaning ........ 28
-
SECTION 8: SERVICE ........ 29
-
Troubleshooting ........ 29
-
G1028Z Wiring Diagram ........ 31
-
G1029Z Wiring Diagram ........ 32
-
G1028Z/G1029Z Parts Breakdown ........ 33
-
G1028Z Parts List ........ 34
-
G1029Z Parts List ........ 34
-
WARRANTY AND RETURNS ........ 37
INTRODUCTION
Foreword
We are proud to offer the Model G1028Z/G1029Z Dust Collector. This machine is part of a growing Grizzly family of fine woodworking machinery. When used according to the guidelines set forth in this manual, you can expect years of trouble-free, enjoyable operation and proof of Grizzly’s commitment to customer satisfaction.
The specifications, drawings, and photographs illustrated in this manual represent the Model G1028Z/G1029Z when the manual was prepared. However, owing to Grizzly’s policy of continuous improvement, changes may be made at any time with no obligation on the part of Grizzly.
For your convenience, we always keep current Grizzly manuals available on our website at www.grizzly.com. Any updates to your machine will be reflected in these manuals as soon as they are complete. Visit our site often to check for the latest updates to this manual!
Contact Info
If you have any comments regarding this manual, please write to us at the address below:
Grizzly Industrial, Inc. c/o Technical Documentation Manager P.O. Box 2069 Bellingham, WA 98227-2069 Email: manuals@grizzly.com
We stand behind our machines. If you have any service questions or parts requests, please call or write us at the location listed below.
Grizzly Industrial, Inc. 1203 Lycoming Mall Circle Muncy, PA 17756 Phone: (570) 546-9663 Fax: (800) 438-5901 E-Mail: techsupport@grizzly.com Web Site: http://www.grizzly.com
G1028Z/G1029Z Dust Collector
Grizzly
Industrial, Inc.
MACHINE DATA SHEET
Customer Service #: (570) 546-9663 • To Order Call: (800) 523-4777 • Fax #: (800) 438-5901
MODEL G1028Z
1-1/2 HP DUST COLLECTOR
Product Dimensions:
- Machine Weight ........ 85 lbs.
- Lenght/Width/Height ........ 33-1/2" x 21-1/4" x 78"
- Foot Print (Lenght/Width) ........ 33-1/2" x 21-1/4"
Shipping Dimensions:
- Type ........ Cardboard
- Content ........ Machine
- Shipping Size (Lenght/Width/Height) ........ 35" x 23" x 23"
- Shipping Weight ........ 113 lbs.
Electrical:
- Switch ........ Push Button
- Switch Voltage ........ 110/220V
- Cord Length ........ 6 ft.
- Cord Gauge ........ 14 gauge
- Recommended Breaker Size ........ 20 amp
- Plug Included ........ No
Motor: Main
- Type ........ TEFC Capacitor Start Induction
- Horsepower ........ 1-1/2 HP
- Phase/Voltage ........ Single Phase / 110V/220V (Prewired 110V)
- Cycle/RPM ........ 60Hz/3450RPM
- Amps ........ 18A/9A
- Bearings ........ Shielded and Lubricated for Life
- Number of Speeds ........ 1
- Power Transfer ........ Direct Drive
Main Specifications: Operation
- Air Suction Cap ........ 1300 CFM
- Static Pressure at Rated CFM ........ 9"
- Main Inlet Size ........ 6"
- Manifold Included ........ Yes
- Manifold Inlets ........ 2
- Manifold Inlet Size ........ 4"
- Machine Collection Cap ........ 2
- Maximum Material Collection Cap ........ 5.7 cu. ft.

Bag Information
- No of Upper Bags ........ 1
- Upper Bag Cap ........ 5.7 cu. ft.
- Upper Bag Diameter ........ 19"
- Upper Bag Length ........ 35"
- No of Lower Bags ........ 1
- Lower Bag Cap ........ 5.7 cu. ft.
- Lower Bag Diameter ........ 19-1/2"
- Lower Bag Length ........ 33"
Impeller Information
- Impeller Type ........ Radial Fin
- Impeller Size ........ 11"
- Impeller Blade Thickness ........ 3/32"
Construction
- Upper Bag Material ........ 2.5 Micron Fabric
- Lower Bag Material ........ Polyethylene
- Base Construction ........ Fabricated Sheet Metal with Casters
- Frame Construction ........ Formed Steel
- Caster Construction ........ Four Plastic
- Impeller Construction ........ Balanced Steel, Riveted Fins
- Paint ........ Powder Coated
Other
- Height With Bags Inflated ........ 78"
Other Specifications:
- ISO Factory ........ ISO 9001
- Country of Origin ........ Taiwan
- Warranty ........ 1 Year
- Serial Number Location ........ Machine Label Above Magnetic ON/OFF Switch
- Assembly Time ........ 45 Minutes
Features: Large Capacity Powder Coated Paint Includes Steel Base With Casters
G1028Z/G1029Z Dust Collector
Grizzly
Industrial, Inc.
MACHINE DATA SHEET
Customer Service #: (570) 546-9663 • To Order Call: (800) 523-4777 • Fax #: (800) 438-5901
MODEL G1029Z
2 HP DUST COLLECTOR
Product Dimensions:
- Machine Weight ........ 95 lbs.
- Lenght/Width/Height ........ 33-1/2" x 21-1/4" x 78"
- Foot Print (Lenght/Width) ........ 33-1/2" x 21-1/4"
Shipping Dimensions:
- Type ........ Cardboard
- Content ........ Machine
- Shipping Size (Lenght/Width/Height) ........ 36" x 23" x 22"
- Shipping Weight ........ 123 lbs.
Electrical:
- Switch ........ Push Button
- Switch Voltage ........ 220V
- Cord Length ........ 6 ft.
- Cord Gauge ........ 14 gauge
- Recommended Breaker Size ........ 20 amp
- Plug Included ........ No
Motor: Main
- Type ........ TEFC Capacitor Start Induction
- Horsepower ........ 2 HP
- Phase/Voltage ........ Single Phase/220V
- Cycle/RPM ........ 60Hz/3450RPM
- Amps ........ 12A
- Bearings ........ Shielded and Lubricated for Life
- Number of Speeds ........ 1
- Power Transfer ........ Direct Drive
Main Specifications: Operation
- Air Suction Cap ........ 1550 CFM
- Static Pressure at Rated CFM ........ 11"
- Main Inlet Size ........ 6"
- Manifold Included ........ Yes
- Manifold Inlets ........ 2
- Manifold Inlet Size ........ 4"
- Machine Collection Cap ........ 2
- Maximum Material Collection Cap ........ 5.7 cu. ft.

Bag Information
- No of Upper Bags ........ 1
- Upper Bag Cap ........ 5.7 cu. ft.
- Upper Bag Diameter ........ 19"
- Upper Bag Length ........ 35"
- No of Lower Bags ........ 1
- Lower Bag Cap ........ 5.7 cu. ft.
- Lower Bag Diameter ........ 19-1/2"
- Lower Bag Length ........ 33"
Impeller Information
- Impeller Type ........ Radial Fin
- Impeller Size ........ 12"
- Impeller Blade Thickness ........ 3/32"
Construction
- Upper Bag Material ........ 2.5 Micron Fabric
- Lower Bag Material ........ Polyethylene
- Base Construction ........ Fabricated Sheet Metal with Casters
- Frame Construction ........ Formed Steel
- Caster Construction ........ Four Plastic
- Impeller Construction ........ Balanced Steel, Riveted Fins
- Paint ........ Powder Coated
Other
- Height With Bags Inflated ........ 78"
Other Specifications:
- ISO Factory ........ ISO 9001
- Country of Origin ........ Taiwan
- Warranty ........ 1 Year
- Serial Number Location ........ Machine Label Above Magnetic ON/OFF Switch
- Assembly Time ........ 45 Minutes
Features:
Awards: Wood Magazine Top Value 1997, Popular Woodworking Editor's Choice, Popular Woodworking Readers' Choice Large Capacity Powder Coated Paint Includes Steel Base With Casters
-6- G1028Z/G1029Z Dust Collector
SECTION 1: SAFETY
⚠WARNING
For Your Own Safety, Read Instruction Manual Before Operating this Machine
The purpose of safety symbols is to attract your attention to possible hazardous conditions. This manual uses a series of symbols and signal words intended to convey the level of importance of the safety messages. The progression of symbols is described below. Remember that safety messages by themselves do not eliminate danger and are not a substitute for proper accident prevention measures.
⚠DANGER Indicates an imminently hazardous situation which, if not avoided, WILL result in death or serious injury.
⚠WARNING Indicates a potentially hazardous situation which, if not avoided, COULD result in death or serious injury.
⚠CAUTION Indicates a potentially hazardous situation which, if not avoided, MAY result in minor or moderate injury. It may also be used to alert against unsafe practices.
NOTICE This symbol is used to alert the user to useful information about proper operation of the machine.
⚠WARNING
Safety Instructions for Machinery
- READ THE ENTIRE MANUAL BEFORE STARTING MACHINERY. Machinery presents serious injury hazards to untrained users.
- ALWAYS USE ANSI APPROVED SAFETY GLASSES WHEN OPERATING MACHINERY. Everyday eyeglasses only have impact resistant lenses—they are NOT safety glasses.
- ALWAYS WEAR A NIOSH APPROVED RESPIRATOR WHEN OPERATING MACHINERY THAT PRODUCES DUST. Most types of dust (wood, metal, etc.) can cause severe respiratory illnesses.
- ALWAYS USE HEARING PROTECTION WHEN OPERATING MACHINERY. Machinery noise can cause permanent hearing loss.
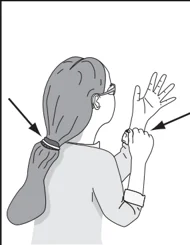
- WEAR PROPER APPAREL. DO NOT wear loose clothing, gloves, neckties, rings, or jewelry that can catch in moving parts. Wear protective hair covering to contain long hair and wear non-slip footwear.
- NEVER OPERATE MACHINERY WHEN TIRED OR UNDER THE INFLUENCE OF DRUGS OR ALCOHOL. Be mentally alert at all times when running machinery.

⚠WARNING
Safety Instructions for Machinery
-
ONLY ALLOW TRAINED AND PROPERLY SUPERVISED PERSONNEL TO OPERATE MACHINERY. Make sure operation instructions are safe and clearly understood.
-
KEEP CHILDREN AND VISITORS AWAY. Keep all children and visitors a safe distance from the work area.
-
MAKE WORKSHOP CHILDPROOF. Use padlocks, master switches, and remove start switch keys.
-
NEVER LEAVE WHEN MACHINE IS RUNNING. Turn power OFF and allow all moving parts to come to a complete stop before leaving machine unattended.
-
DO NOT USE IN DANGEROUS ENVIRONMENTS. DO NOT use machinery in damp, wet locations, or where any flammable or noxious fumes may exist.
-
KEEP WORK AREA CLEAN AND WELL LIGHTED. Clutter and dark shadows may cause accidents.
-
USE A GROUNDED EXTENSION CORD RATED FOR THE MACHINE AMPERAGE. Grounded cords minimize shock hazards. Undersized cords create excessive heat. Always replace damaged extension cords.
-
ALWAYS DISCONNECT FROM POWER SOURCE BEFORE SERVICING MACHINERY. Make sure switch is in OFF position before reconnecting.
-
MAINTAIN MACHINERY WITH CARE. Keep blades sharp and clean for best and safest performance. Follow instructions for lubricating and changing accessories.
-
MAKE SURE GUARDS ARE IN PLACE AND WORK CORRECTLY BEFORE USING MACHINERY.
-
REMOVE ADJUSTING KEYS AND WRENCHES. Make a habit of checking for keys and adjusting wrenches before turning machinery ON.
-
CHECK FOR DAMAGED PARTS BEFORE USING MACHINERY. Check for binding or misaligned parts, broken parts, loose bolts, and any other conditions that may impair machine operation. Repair or replace damaged parts before operation.
-
USE RECOMMENDED ACCESSORIES. Refer to the instruction manual for recommended accessories. Improper accessories increase risk of injury.
-
DO NOT FORCE MACHINERY. Work at the speed for which the machine or accessory was designed.
-
SECURE WORKPIECE. Use clamps or a vise to hold the workpiece when practical. A secured workpiece protects your hands and frees both hands to operate the machine.
-
DO NOT OVERREACH. Maintain stability and balance at all times.
-
MANY MACHINES CAN EJECT WORKPIECES TOWARD OPERATOR. Know and avoid conditions that cause the workpiece to "kickback."
-
ALWAYS LOCK MOBILE BASES (IF USED) BEFORE OPERATING MACHINERY.
-
CERTAIN DUST MAY BE HAZARDOUS to the respiratory systems of people and animals, especially fine dust. Be aware of the type of dust you are exposed to and always wear a respirator designed to filter that type of dust.
-8- G1028Z/G1029Z Dust Collector
⚠WARNING
Additional Safety for Dust Collectors
-
MACHINE USE. Do not use this dust collector to pick up liquids and metal scrap including, but not limited to, nails and filings. Also, do not pick up material which cannot safely pass through the impeller such as solid wood scraps.
-
KEEPING FINGERS SAFE. Do not place your hands or tools near the open inlet during operation for any reason including, but not limited to, unclogging material and testing suction. The impeller could cause serious damage to body parts if touched while spinning.
-
SAFE SERVICING. Disconnect power and allow impeller to completely stop before servicing or working on the dust collector ducting system.
-
SUSPENDED DUST PARTICLES AND IGNITION SOURCES. Do not operate the dust collector in areas where explosion risks would be high if dust were dispersed into the area. Areas of high risk include, but are not limited to, areas near pilot lights or open flames.
-
EMPTYING DUST. When emptying dust from the collection bags or drum, wear a respirator and safety glasses. Empty dust into an approved container and dispose of properly.
-
AVOIDING FIRES. Do not allow steel to strike against impeller—this may produce a spark. Sparks can smolder in wood dust for a long time before fire or flame is detected. If metal contacts metal during operation, immediately turn off the dust collector, unplug the power cord from the outlet or flip the disconnect switch and wait for all moving parts to stop. Remove collection bags and empty the dust into an approved air tight metal container in case of spark. Remedy the metal to metal contact problem before resuming operation.
-
OPERATIONAL QUESTIONS. If at any time you are experiencing difficulties performing the intended operation, stop using the machine! Then contact our Tech Support or ask a qualified expert how the operation should be performed.
-
DUST HAZARD. Be aware that certain woods may cause an allergic reaction in people and animals, especially when exposed to fine dust. Make sure you know what type of wood dust you will be exposed to in case there is a possibility of an allergic reaction. Always wear an approved respirator during and for a short time after machine operation!
-
CLEANING AIR. Do not confuse this dust collector with an air cleaner. This dust collector is only designed to collect dust from a machine, not clean dust suspended in the air.
⚠WARNING Like all machines there is danger associated with this machine. Accidents are frequently caused by lack of familiarity or failure to pay attention. Use this machine with respect and caution to lessen the possibility of operator injury. If normal safety precautions are overlooked or ignored, serious personal injury may occur.
⚠CAUTION No list of safety guidelines can be complete. Every shop environment is different. Always consider safety first, as it applies to your individual working conditions. Use this and other machinery with caution and respect. Failure to do so could result in serious personal injury, damage to equipment, or poor work results.
SECTION 2: CIRCUIT REQUIREMENTS
G1028Z
110/220V Operation
WARNING Serious personal injury could occur if you connect the machine to power before completing the setup process. DO NOT connect the machine to the power until instructed later in this manual.
WARNING Electrocution or fire could result if machine is not grounded and installed in compliance with electrical codes. Compliance MUST be verified by a qualified electrician!

NOTICE The Model G1028Z is prewired for 110V. If you plan to operate the machine at 220V, the motor must be rewired (see Page 31).
If you are unsure about the wiring codes in your area or you plan to connect your machine to a shared circuit, consult a qualified electrician.
- Minimum Circuit Size (110V) ........ 20 Amps
- Minimum Circuit Size (220V) ........ 15 Amps
Power Connection Device
The type of plug required to connect your machine to power depends on the type of service you currently have or plan to install. We recommend using one of the plugs shown in Figure 1.
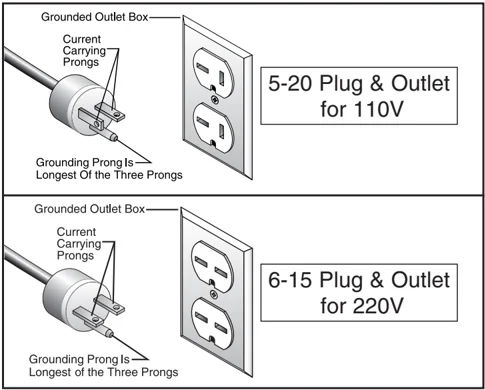
Grounded Outlet Box Current Carrying Prongs Grounding Prong Is Longest Of the Three Prongs 5-20 Plug & Outlet for 110V
Grounded Outlet Box Current Carrying Prongs Grounding Prong Is Longest Of the Three Prongs 6-15 Plug & Outlet for 220V
Figure 1. Recommended plug types.
Full Load Amperage Draw
This machine draws the following amps under maximum load:
- Amp Draw at 110V (prewired) ........ 18 Amps
- Amp Draw at 220V ........ 9 Amps
Power Supply Circuit Requirements
You MUST connect your machine to a grounded circuit that is rated for the amperage given below. Never replace a circuit breaker on an existing circuit with one of higher amperage without consulting a qualified electrician to ensure compliance with wiring codes.
Extension Cords
Using extension cords may reduce the life of the motor. Instead, place the machine near a power source. If you must use an extension cord:
- For 110V, use at least a 12 gauge cord that does not exceed 50 feet in length.
- For 220V, use at least a 14 gauge cord that does not exceed 50 feet in length.
- The extension cord must have a ground wire and plug pin.
G1028Z/G1029Z Dust Collector

G1029Z
220V Operation
WARNING Serious personal injury could occur if you connect the machine to power before completing the setup process. DO NOT connect the machine to the power until instructed later in this manual.
WARNING Electrocution or fire could result if machine is not grounded and installed in compliance with electrical codes. Compliance MUST be verified by a qualified electrician!
Full Load Amperage Draw
This machine draws the following amps under maximum load:
- Amp Draw ........ 12 Amps
Power Supply Circuit Requirements
You MUST connect your machine to a grounded circuit that is rated for the amperage given below. Never replace a circuit breaker on an existing circuit with one of higher amperage without consulting a qualified electrician to ensure compliance with wiring codes. If you are unsure about the wiring codes in your area or you plan to connect your machine to a shared circuit, consult a qualified electrician.
- Minimum Circuit Size ........ 15 Amps
Power Connection Device
The type of plug required to connect your machine to power depends on the type of service you currently have or plan to install. We recommend using the plug shown in Figure 2.
 Grounded Outlet Box
Current Carrying Prongs
Grounding Prong Is Longest of the Three Prongs
Figure 2. 6-15 plug and receptacle.
Extension Cords
Using extension cords may reduce the life of the motor. Instead, place the machine near a power source. If you must use an extension cord:
- Use at least a 14 gauge cord that does not exceed 50 feet in length!
- The extension cord must also have a ground wire and plug pin.
- A qualified electrician MUST size cords over 50 feet long to prevent motor damage.

SECTION 3: SETUP
Setup Safety
WARNING This machine presents serious injury hazards to untrained users. Read through this entire manual to become familiar with the controls and operations before starting the machine!
 WARNING
Wear safety glasses during the entire setup process!
 WARNING
This machine and its components are very heavy. Get lifting help or use power lifting equipment such as a forklift to move heavy items.
Items Needed for Setup
The following items are needed to complete the setup process, but are not included with your machine:
| Description | Qty |
|---|---|
| • Safety Glasses (for each person) | 1 |
| • Open End Wrench 12mm | 1 |
| • Phillips Head Screwdriver | 1 |
Unpacking
Your machine was carefully packaged for safe transportation. Remove the packaging materials from around your machine and inspect it. If you discover the machine is damaged, please immediately call Customer Service at (570) 546-9663 for advice.
Save the containers and all packing materials for possible inspection by the carrier or its agent. Otherwise, filing a freight claim can be difficult.
When you are completely satisfied with the condition of your shipment, inventory the contents.
-12- G1028Z/G1029Z Dust Collector
Inventory
The following is a description of the main components shipped with your machine. Lay the components out to inventory them.
Note: If you can't find an item on this list, check the mounting location on the machine or examine the packaging materials carefully. Occasionally we pre-install certain components for shipping purposes.
Inventory:
- A. Collector Body Assembly ........ 1
- B. Base ........ 1
- C. Upper Bag (Fabric) ........ 1
- D. Lower Bag (Plastic) ........ 1
- E. Lower Support Brackets ........ 2
- F. Casters ........ 4
- G. Rubber Gasket ........ 1
- H. Upper Support Bracket ........ 1
- I. Outlet ........ 1
- J. Outlet Hose ........ 1
- K. Hose Clamps ........ 2
- L. Flange Bolts 5/16"-18 x 1/2" ........ 36
If any nonproprietary parts are missing (e.g. a nut or a washer), we will gladly replace them; or for the sake of expediency, replacements can be obtained at your local hardware store.
Site Considerations
Floor Load
Refer to the Machine Data Sheet for the weight and footprint specifications of your machine. Some residential floors may require additional reinforcement to support both the machine and operator.
Placement Location
Consider existing and anticipated needs, size of material to be processed through each machine, and space for auxiliary stands, work tables or other machinery when establishing a location for your new machine. See Figure 3 for the minimum working clearances.
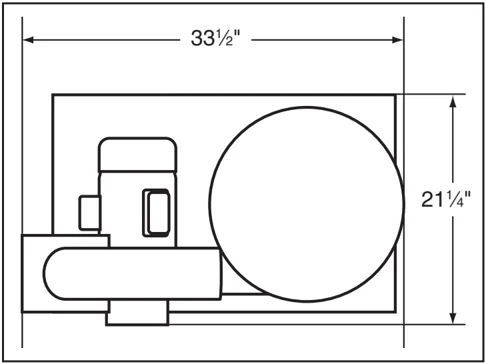
Figure 3. Minimum working clearances.
! CAUTION Children and visitors may be seriously injured if unsupervised around this machine. Lock entrances to the shop or disable start switch or power connection to prevent unsupervised use.
Assembly
To assemble your machine:
- Position the base plate upside down and mount the casters to the base plate using (16) 5/16"-18 x 1/2" flange bolts, as shown in Figure 4.
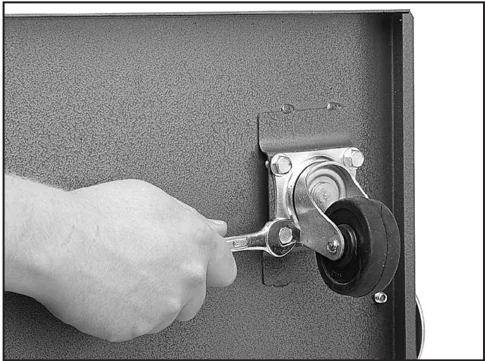
Figure 4. Mounting casters to base.
- Set the collector body on top of the base plate so the intake portion is near the edge of the base plate and the bolt holes are aligned, as shown in Figure 5. Secure the collector body to the base plate with (4) 5/16"-18 x 1/2" flange bolts.
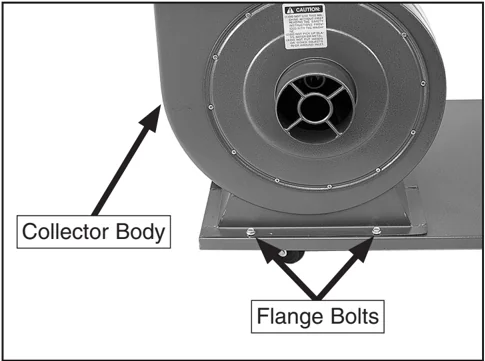
Figure 5. Mounting collector to base.
- Insert the rubber gasket between the collector and lower outlet flange, and secure using (8) 5/16"-18 x 1/2" flange bolts, as shown in Figure 6.
Note: When connecting parts that have a gasket applied to the mounting surface, always tighten the fasteners in a diagonal and rotational manner to ensure the gasket does not become crimped and the seal compromised.
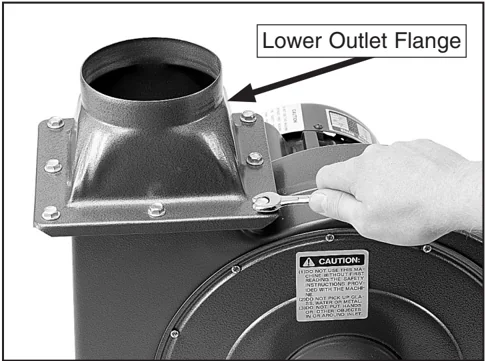
Figure 6. Mounting outlet to collector body.
- Attach the lower collector support brackets to the top edge of the base plate using (4) 5/16"-18 x 1/2" flange bolts, as shown in Figure 7.
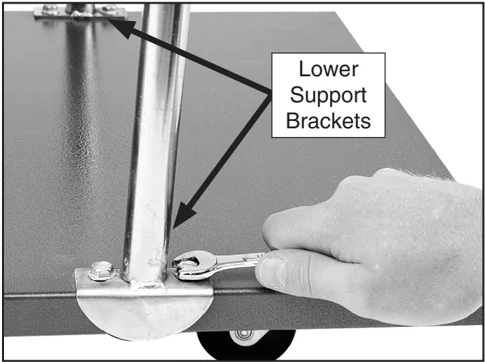
Figure 7. Mounting support bracket to base.
-
Secure the front lower support bracket to the collector with (2) 5/16"-18 x 1/2" flange bolts.
-
Place the upper support bracket over the lower support bracket, and secure with (2) 5/16"-18 x 1/2" flange bolts, as shown in Figure 8.
Note: The collector attaches to each support bracket. The inside of the collector is funnel shaped and directs the air around in a cyclone motion. Make sure that the inside taper (funnel) is faced downward and the collector inlet faces toward the collector body.
 Upper Support Bracket
Lower Support Bracket
Collector
Figure 8. Mounting collector to brackets.
- Slip a loosened hose clamp over each end of the flex-hose, and attach the ends over the collector and collector body outlet. Tighten each hose clamp until snug, as shown in Figure 9.
 Flex Hose
Hose Clamp
Figure 9. Attaching flex hose onto collector body outlet.
- Hook the top loop of the upper filter bag (fabric) over the support bracket, as shown in Figure 10.
 Figure 10. Attaching upper filter bag.
- Tighten the upper bag to the collector using the clamp shown in Figure 11.
 Clamp
Figure 11. Upper collection bag secured.
10. Slip the bottom plastic collection bag over the bottom edge of the collector and tighten the clamp on the tightest notch possible.
Note: DO NOT force the clamp, choose the next notch over, then clamp in place.
11. Press the “Y” inlet onto the inlet cover flange, as shown in Figure 12. The inlet is secured to the collector body by a press-on fit.
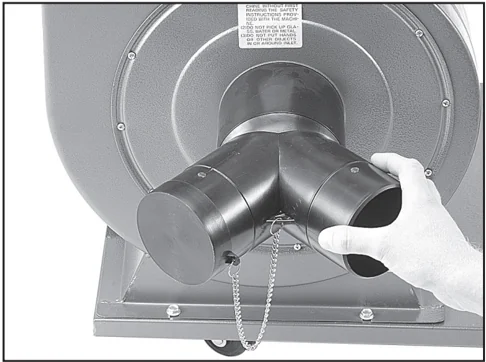
Figure 12. Installing "Y" inlet.
Test Run
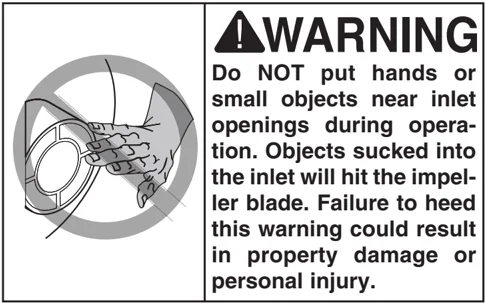
! WARNING Do NOT put hands or small objects near inlet openings during operation. Objects sucked into the inlet will hit the impeller blade. Failure to heed this warning could result in property damage or personal injury.
Once the assembly is complete, test run your machine to make sure it runs properly.
If, during the test run, you cannot easily locate the source of an unusual noise or vibration, stop using the machine immediately, then review the Troubleshooting on Page 29.
If you still cannot remedy a problem, contact our Tech Support at (570) 546-9663 for assistance.
To test run the machine:
1. Make sure you have read the safety instructions at the beginning of the manual and that the machine is setup properly.
2. Make sure all tools and objects used during setup are cleared away from the machine..
3. Connect the machine to the power source.
4. Turn the machine ON.
5. Listen to and watch for abnormal noises or actions. The machine should run smoothly with little or no vibration or rubbing noises.
—Strange or unusual noises should be investigated and corrected before operating the machine further. Always disconnect the machine from power when investigating or correcting potential problems.
6. Turn the machine OFF.
-16- G1028Z/G1029Z Dust Collector
SECTION 4: DESIGNING THE SYSTEM
General
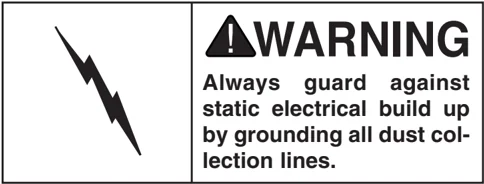
WARNING Always guard against static electrical build up by grounding all dust collection lines.
The Model G1028Z/G1029Z can be operated as either a stationary or a mobile unit. There are advantages and disadvantages to both set-ups. The advantage of the mobile system is eliminating the cost of many ducts and fittings. On the other hand, the stationary system is more versatile and convenient.
If using the Model G1028Z/G1029Z as a central dust collector system, put the dust collector in an out of the way location such as a corner or separate room. The dust collector is capable of collecting dust from up to two machines running simultaneously. Grizzly offers a complete line of dust collection accessories for setting up a stationary system. Additionally, Grizzly offers a complete guide book entitled Dust Collection Basics.
Whatever system you choose, always make sure there are no open flames or pilot lights in the same room as the dust collector. There is a risk of explosion if dust is dispersed into the air.
Duct Material
You have many choices regarding main line and branch line duct material. For best results, use metal duct for the main line and branch lines, then use a short lengths of flexible hose to connect each machine to the branch lines.
Plastic duct is also a popular material for home shops. However, be aware that there is a fire or explosion hazard if plastic duct material is used for dust collection without being grounded against static electrical charge build-up. This topic will be discussed later in this section. Another problem with using plastic is that it is less efficient per foot than metal.
Metal Duct
Advantages of metal duct is its conductivity and that it does not contribute to static electrical charge build-up. However, static charges are still produced when dust particles strike other dust particles as they move through the duct. Since metal duct is a conductor, it can be grounded quite easily to dissipate any static electrical charges.
 Figure 13. Examples of metal pipe and components.
There are a number of options when it comes to metal duct, but metal duct that is specially manufactured for dust collection is the best choice. When selecting your metal duct, choose high quality metal duct with smooth welded internal seams that will minimize airflow resistance. This type of duct usually connects to other ducts or elbows with a simple, self-sealing clamp, is very quick and easy to assemble, and can be readily dismantled and re-installed. This is especially important if you ever need to change things around in your shop or add more tools.
Avoid inferior metal duct that requires you to cut it to length and snap it together. This type of duct is time consuming to install because it requires you to seal all the seams with silicone and screw the components on the ends with sheet metal screws. Another disadvantage is the rough internal seams and crimped ends that unavoidably increase static pressure loss.
Flexible Duct
Flexible hose is generally used for short runs, small shops, and at rigid duct-to-tool connections. There are many different types of flex hose on the market today. These are manufactured from materials such as polyethylene, PVC, cloth hose dipped in rubber, and even metal, including steel and aluminum.
The superior choice for flexible ducting is metal flex hose that is designed to be flexible and as smooth as possible to reduce static pressure loss.
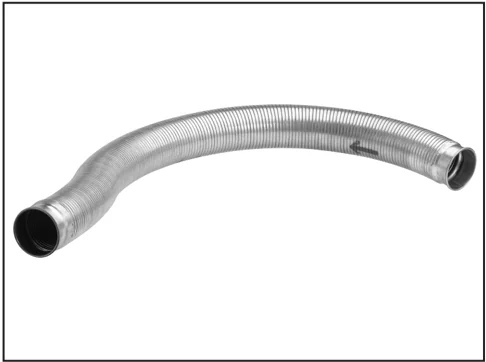
Figure 14. Example of flexible metal duct.
There are also many kinds of pure plastic flexible hose, such as non-perforated drainage type hose and dryer vent hose. Drainage type hose, while being economical, does not quite have the flexibility required for dust collection. The inside of the duct is also deeply corrugated and can increase the static pressure loss by as much as 50% over smooth wall duct. Dryer vent hose offers greater flexibility, but is non-resistant to abrasion and tends to collapse in a negative pressure system. We DO NOT recommend using dryer vent hose in your dust collection system.
If using flex-hose, choose one of the many types designed specifically for the movement of solid particles, i.e. dust, grains and plastics. However, the cost of specifically designed flexible duct can vary greatly. Grizzly offers polyethylene hose, which is well suited for the removal of particulate matter, especially sawdust, since it is durable and completely flexible. Polyethylene is also very economical and available in a wide variety of diameters and lengths for most applications.
Plastic Duct
The popularity of plastic duct is due to the fact that it is economical and readily available. It is also simple to assemble and easily sealed against air loss. The primary disadvantage of plastic duct for dust collection is the inherent danger of static electrical build-up.
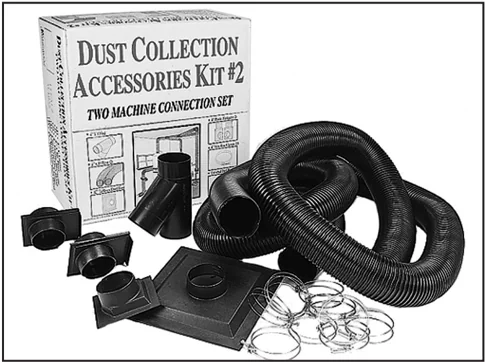
Figure 15. Example of plastic duct and components.
System Design
Step 1. Decide Who Will Design
For most small-to-medium sized shops, you can design and build the dust collection system yourself without hiring engineers or consultants. We have included some basic information here to get you started on a basic design.
If you have a large shop or end up designing a complicated system, then we recommend additional research beyond this manual, or that you seek the help of an expert.
Step 2. Sketch Your Shop Layout
When designing a successful dust collection system, planning is the most important step. In this step, you must sketch a basic layout of your shop.
Before you get out your pencil and paper, we recommend you visit our FREE Workshop Planner available on our website at www.grizzly.com.
Our Workshop Planner will allow you to quickly and easily draw and print a basic shop layout. Don't worry, non-Grizzly brand machines can be substituted with Grizzly machines for layout purposes. Note: After you're finished, make sure to save your layout for later modification.
Your sketch only needs the basic details of the shop layout, similar to Figure 16, including all your current/planned machines and your planned placement of the dust collector.
 Dust Collector
Figure 16. Basic sketch of shop layout.
Step 3. Sketch a Basic Duct Layout
For the next step, sketch how you will connect your machines to the dust collector. Consider these general guidelines for an efficient system:
- Machines that produce the most saw dust should be placed nearest to the dust collector (i.e. planers and sanders).
- Ideally, you should design the duct system to have the shortest possible main line and secondary branch ducts. See Figures 17 & 18 for ideas of good duct layouts vs bad duct layouts.
 Figure 17. Good duct layout.
 Figure 18. Bad duct layout.
-
Directional changes should be kept to a minimum. The more directional change fittings you use directly increases the overall resistance to airflow.
-
Gradual directional changes are more efficient than sudden directional changes (i.e. use the largest corner radius possible when changing hose or pipe direction).
-
Each individual branch line should have a blast gate immediately after the branch to control suction from one machine to another.
-
The simpler the system, the more efficient and less costly it will be.
Step 4. Determine Required CFM of Each Machine
Since each machine produces a different amount of sawdust, the requirements for the minimum amount of CFM to move that sawdust is unique to the machine (for example, a planer produces more sawdust than a table saw). Knowing this required CFM is important to gauging which size of duct to use.
Figure 19 gives you a close estimation of the airflow your machine requires. Keep in mind that machines that generate the most sawdust should be placed closest to the dust collector. If the machine has multiple dust ports, the total CFM required is the sum of all ports.
| Machine Dust Port Size | Approximate Required CFM |
|---|---|
| 2" | 98 |
| 2.5" | 150 |
| 3" | 220 |
| 4" | 395 |
| 5" | 614 |
| 6" | 884 |
| 7" | 1203 |
| 8" | 1570 |
| 9" | 1990 |
| 10" | 2456 |
Figure 19. Approximate required airflow for machines, based on dust port size.
If your machine doesn't have a built in dust port, use Figure 20 to determine which size of dust port to install on your machine.
| Machine | Average Dust Port Size |
|---|---|
| Table Saw | 4" |
| Miter/Radial-Arm Saw | 2" |
| Jointer (6" and smaller) | 4" |
| Jointer (8"-12") | 5" |
| Thickness Planer (13" and smaller) | 4" |
| Thickness Planer (14"-20") | 6" |
| Shaper | 4" |
| Router (mounted to table) | 2" |
| Bandsaw | 4" |
| Lathe | 4" |
| Disc Sander (12" and smaller) | 2" |
| Disc Sander (13-18") | 4" |
| Belt Sander (6" and smaller) | 2" |
| Belt Sander (7"-9") | 3" |
| Edge Sander (6" x 80" and smaller) | 4" |
| Edge Sander (6" x 80" and larger) | 5" |
| Drum Sander (24" and smaller) | 2 x 4" |
| Drum Sander (24" and larger) | 4 x 4" |
| Widebelt Sander (18" and smaller) | 5" |
| Widebelt Sander (24"-37" single head) | 2 x 6" |
| Widebelt Sander (24"-51" double head) | 5 x 4" |
Figure 20. Dust port size and quantity per average machine.
Write the required CFM for each machine on your sketch, as shown in Figure 21.
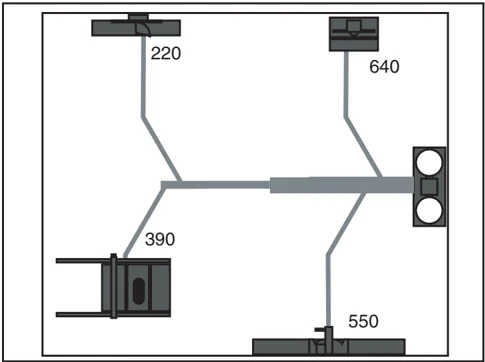
Figure 21. CFM requirements labeled for each machine.
G1028Z/G1029Z Dust Collector
Determining Main Line Duct Size
The general rule of thumb for a main line duct is that the velocity of the airflow must not fall below 3500 FPM.
For small/medium sized shops, using the inlet size of the dust collector as the main line duct size will usually keep the air velocity above 3500 FPM and, depending on your system, will allow you to keep multiple branches open at one time.
Mark your drawing as in Figure 22, but using the inlet size for your dust collector as the main line.
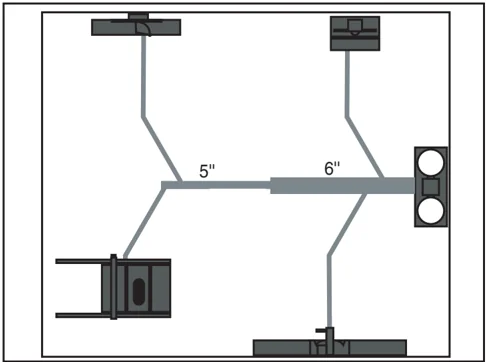
Figure 22. Main line size labeled on sketch.
Determining Branch Line Duct Size
The general rule of thumb for a branch line duct is that the velocity of the airflow must not fall below 4000 FPM.
For small/medium sized shops, using the dust port size from the machine as the branch line duct size will achieve the correct velocity in most applications. However, if the dust port on the machine is smaller than 4", make the branch line 4" and neck the line down right before the dust port.
Note: Systems with powerful dust collectors work better if multiple blast gates are left open. This also allows you to run two machines at once. Experiment with different combinations of blast gates open/closed to find the best results for your system.
Write your determined branch line sizes on your drawing, as shown in Figure 23.
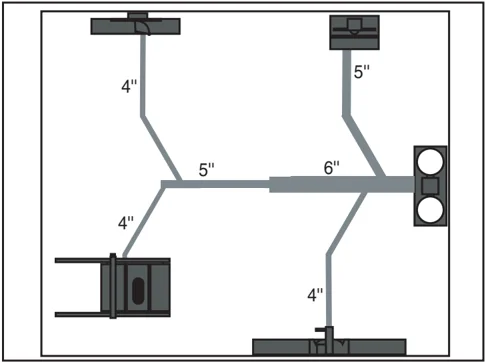
Figure 23. Branch line sizes labeled on sketch.
Here are some frequently asked questions when determining branch line sizes:
How do I figure which size of branch line to use if the machine has two dust ports?
Simply add the total CFM given for each size from Figure 19 and refer to that CFM number to Figure 24. Then, split the branch line just before the dust ports with matching duct sizes.
What if two machines share the same branch line?
You have two options:
-
If both machines will be running at the same time, add the total CFM given for each size from Figure 19 and match the branch line given in Figure 24.
-
If both the machines will never be run at the same time, reference the machine with biggest dust port to Figure 24 and add blast gates after the Y-branch to open/close the line to each machine.
| Total CFM | Branch Line Size |
|---|---|
| 400 | 4" |
| 500 | 4" |
| 600 | 5" |
| 700 | 5" |
| 800 | 6" |
| 900 | 6" |
| 1000 | 6" |
Figure 24. Branch line sizing chart by total CFM (for use when multiple machines share line).
G1028Z/G1029Z Dust Collector
Calculating Duct Resistance
Adding duct work, elbows, branches and any other components to a duct line increases airflow resistance (static pressure loss). This resistance can be minimized by using rigid (smooth) pipe and gradual curves, as opposed to flexible pipe and 90° elbows.
To help you think about this resistance, imagine riding a bicycle in a tunnel that is an exact replica of your duct work. If the inside of the tunnel is very bumpy (flexible pipe) and has a lot of sharp turns (90° elbows), it will take a lot more effort to travel from one end to the other.
The purpose of calculating the resistance is to determine if it is low enough from the machine to the dust collector to meet the given CFM requirement for the machine. Use the charts in Figure 25 to calculate the resistance of duct work.
In most small/medium shops it is only necessary to calculate the line with the longest duct length or the most fittings (operating under the assumption that if the line with the highest resistance works, the others will be fine).
To calculate the static pressure of any given line in the system, follow these steps:
- Make a list of each size duct in the line, including the length, and multiply those numbers by the static pressure value given in Figure 25.
- List each type of elbow or branch and multiply the quantity (if more than one) by the static pressure loss given in Figure 25.
- Add the additional factors from Figure 26 to your list.
\begin{tabular}{|l|c|c|c|c|} \hline Duct Dia. & \multicolumn{2}{c|}{Approximate Static Pressure Loss Per Foot of Rigid Pipe} & \multicolumn{2}{c|}{Approximate Static Pressure Loss Per Foot of Flex Pipe} \ \cline{2-5} & Main Lines at 3500 FPM & Branch Lines at 4000 FPM & Main Lines at 3500 FPM & Branch Lines at 4000 FPM \ \hline 2" & .091 & .122 & .35 & .453 \ \hline 2.5" & .08 & .107 & .306 & .397 \ \hline 3" & .071 & .094 & .271 & .352 \ \hline 4" & .057 & .075 & .215 & .28 \ \hline 5" & .046 & .059 & .172 & .225 \ \hline 6" & .037 & .047 & .136 & .18 \ \hline 7" & .029 & .036 & .106 & .141 \ \hline 8" & .023 & .027 & .08 & .108 \ \hline 9" & .017 & .019 & .057 & .079 \ \hline \end{tabular}
Figure 25. Static pressure loss charts.
\begin{tabular}{|l|c|} \hline Fitting Dia. & 90° Elbow & 45° Elbow & 45° Wye(Y) & 90° Wye(Y) \ \hline 3" & .47 & .235 & .282 & .188 \ \hline 4" & .45 & .225 & .375 & .225 \ \hline 5" & .531 & .266 & .354 & .236 \ \hline 6" & .564 & .282 & .329 & .235 \ \hline 7" & .468 & .234 & .324 & .216 \ \hline 8" & .405 & .203 & .297 & .189 \ \hline \end{tabular}
\begin{tabular}{|l|c|} \hline Additional Factors & Static Pressure \ \hline Seasoned (well used) Dust Collection Filter & 1" \ \hline Entry Loss at Large Machine Hood & 2" \ \hline \end{tabular}
Figure 26. Additional factors affecting static pressure.
- Total your list as shown in the example in Figure 27 to come up with your overall static pressure loss number for that line.
Note: Always account for a seasoned filter, so you don't end up with a system that only works right when the filter is clean.
Main Line
- 6" Rigid Pipe (.037) at 20' ........ 0.740
Branch Line
- 4" Rigid Pipe (.075) at 10' ........ 0.750
- 4" Flex Pipe (.28) at 5' ........ 1.400
Elbows/Branches
- 6" 45° Y-Branch ........ 0.329
- 4" 45° Elbow ........ 0.225
Additional Factors
-
Seasoned Filter ........ 1.000
-
Total Static Pressure Loss ........ 4.444
Figure 27. Totaling static pressure numbers.
Note: When calculating static pressure loss to determine if multiple lines can be left open at the same time, only include the main line numbers once.
- Compare the total static pressure loss for that line to the maximum static pressure loss found on the data sheet for your machine (located toward the front of this manual).
—If the CFM for your static pressure loss is above the requirement of the machine, then the line will most likely be successful. Congratulations! You've just designed your own dust system. Refer to Page 26 to start buying the components necessary to make your system a reality.
—If the CFM for your static pressure loss is below the requirement of the machine, then that line will not effectively collect the dust. You must then modify some of the factors in that line to reduce the static pressure loss. Some of the ways to do this include 1) installing larger duct, 2) reducing amount of flexible duct used, 3) increasing machine dust port size, 4) moving machine closer to dust collector to eliminate duct length, and 5) reducing 90° elbows or replacing them with 45° elbows.
System Grounding
Since plastic hose is abundant, relatively inexpensive, easily assembled and air tight, it is a very popular material for conveying dust from woodworking machines to the dust collector. We recommend using flexible hose (flex-hose) to connect the woodworking machine to the dust collector. However, plastic flex-hose and plastic duct are an insulator, and dust particles moving against the walls of the plastic duct create a static electrical build up. This charge will build until it discharges to a ground. If a grounding medium is not available to prevent static electrical build up, the electrical charge will arc to the nearest grounded source. This electrical discharge may cause an explosion and subsequent fire inside the system.
To protect against static electrical build up inside a non-conducting duct, a bare copper wire should be placed inside the duct along its length and grounded to the dust collector. You must also confirm that the dust collector is continuously grounded through the electrical circuit to the electric service panel.
If you connect the dust collector to more than one machine by way of a non-conducting branching duct system and blast gates, the system must still be grounded as mentioned above. We recommend inserting a continuous bare copper ground wire inside the entire duct system and attaching the wire to each grounded woodworking machine and dust collector.
 WARNING
Always guard against static electrical build up by grounding all dust collection lines.
Be sure that you extend the bare copper wire down all branches of the system. Do not forget to connect the wires to each other with wire nuts when two branches meet at a “Y” or “T” connection.
Ensure that the entire system is grounded. If using plastic blast gates to direct air flow, the grounding wire must be jumped (Figure 28) around the blast gate without interruption to the grounding system.
 Figure 28. Ground jumper wire when using plastic blast gates and metal duct.
 Figure 29. Flex-hose grounded to machine.
We also recommend wrapping the outside of all plastic ducts with bare copper wire to ground the outside of the system against static electrical build up. Wire connections at Y’s and T’s should be made with wire nuts.
Attach the bare ground wire to each stationary woodworking machine and attach to the dust collector frame with a ground screw as shown in Figure 29. Ensure that each machine is continuously grounded to the grounding terminal in your electric service panel.
SECTION 5: OPERATIONS
Operation Safety
WARNING To reduce the risk of serious injury when using this machine, read and understand this entire manual before beginning any operations.
WARNING Damage to your eyes and lungs could result from using this machine without proper protective gear. Always wear safety glasses and a respirator when operating this machine.
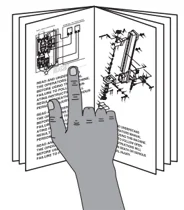
WARNING Loose hair, clothing, or jewelry could get caught in machinery and cause serious personal injury. Keep these items away from moving parts at all times to reduce this risk.

NOTICE If you have never used this type of machine or equipment before, WE STRONGLY RECOMMEND that you read books, trade magazines, or get formal training before beginning any projects. Regardless of the content in this section, Grizzly Industrial will not be held liable for accidents caused by lack of training.
WARNING Do NOT put hands or small objects near inlet openings during operation. Objects sucked into the inlet will meet with the impeller blade. Failure to heed this warning could result in property damage or personal injury.

General
Operating your Model G1028Z/G1029Z is simple and straightforward. Blast gates can be used at the start of each branch line to control the air flow from the woodworking machine to the dust collector. If a machine is not being used, keep the blast gate closed to maintain higher levels of efficiency throughout the system.

SECTION 6: ACCESSORIES
T20514—Small Half-Mask Respirator
T20515—Medium Half-Mask Respirator
T20516—Large Half-Mask Respirator
T20511—Pre-Filter P100
T20539—Cartridge Filter 2PK P100
T20541—Cartridge Filter 2PK P100 & O Vapor
Wood and other types of dust can cause severe respiratory damage. If you work around dust every day, a half-mask respirator can greatly reduce your risk. Compatible with safety glasses!
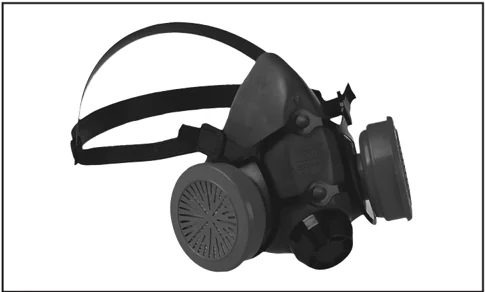
Figure 30. Half-mask respirator with disposable cartridge filters.
H5293—4" Metal Duct Starter Kit
H5295—5" Metal Duct Starter Kit
H5297—6" Metal Duct Starter Kit
Save over 20% with this great starter kit. Includes: (2) machine adapters, (10) pipe clamps, (3) 5' straight pipes, (1) branch, (3) pipe hangers, (1) end cap, (3) adjustable nipples, (1) 90° elbow, and (1) 60° elbow.
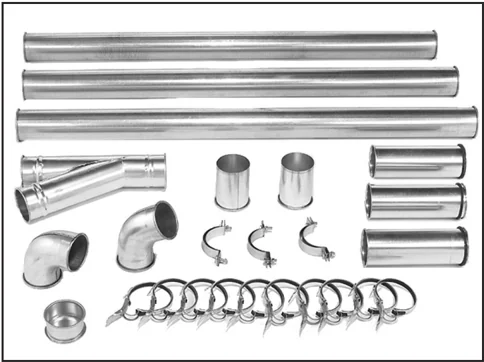
Figure 31. Metal Duct Starter Kit.
H5294—4" Metal Duct Machine Addition Kit
H5296—5" Metal Duct Machine Addition Kit
H5298—6" Metal Duct Machine Addition Kit
Save over 20% with this great machine addition kit. Includes: (2) blast gates, (1) machine adapter, (10) pipe clamps, (2) pipe hangers, (2) 5' straight pipes, (2) adjustable nipples, (1) branch, and (1) 60° elbow.
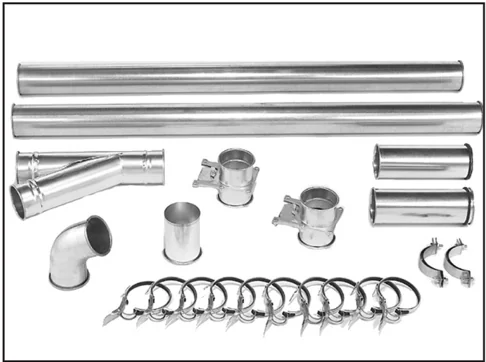
Figure 32. Metal Duct Machine Addition Kit.
G6163—4" Clamp
G7343—5" Clamp
G7361—6" Clamp
H5228—7" Clamp
H5238—8" Clamp
H5253—9" Clamp
These clamps feature lever latches and foam seals, and secure around the rolled ends of fittings and pipe.
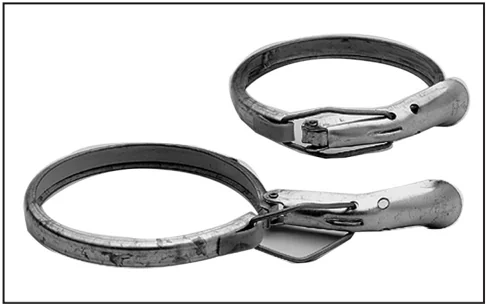
Figure 33. Dust collection pipe clamps.
G1028Z/G1029Z Dust Collector
G6162—4" x 5' Straight Metal Pipe G7346—5" x 5' Straight Metal Pipe G7364—6" x 5' Straight Metal Pipe H5227—7" x 5' Straight Metal Pipe H5237—8" x 5' Straight Metal Pipe
These laser welded straight pipes ensure a super smooth internal seam. Ends easily clamp together for a sealed fit without screws or silicone.
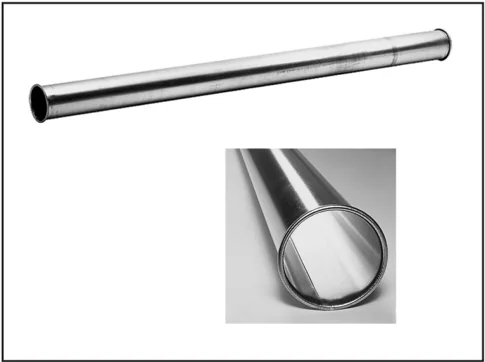
Figure 34. Straight Metal Pipe.
H7215—4" x 5' Rigid Metal Flex Hose H7216—5" x 5' Rigid Metal Flex Hose H7217—6" x 5' Rigid Metal Flex Hose H7218—7" x 5' Rigid Metal Flex Hose H7219—8" x 5' Rigid Metal Flex Hose
This flex hose provides just enough flexibility to make difficult connections while still keeping the inside wall as smooth as possible to minimize static pressure loss.
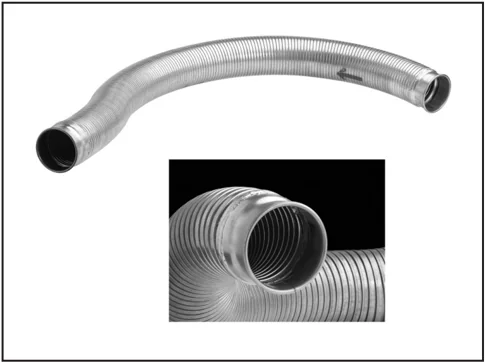
Figure 35. Rigid Metal Flex Hose.
Call 1-800-523-4777 To Order
G1028Z/G1029Z Dust Collector
Metal Branches We carry many different branches, all designed to minimize airflow resistance.
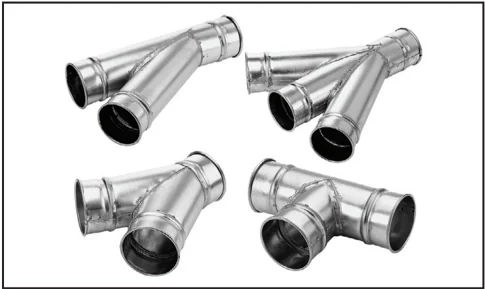
Figure 36. Metal Branches.
Reducers & Adapters We carry a multitude of reducers and elbows to cover most applications from 4" through 9".
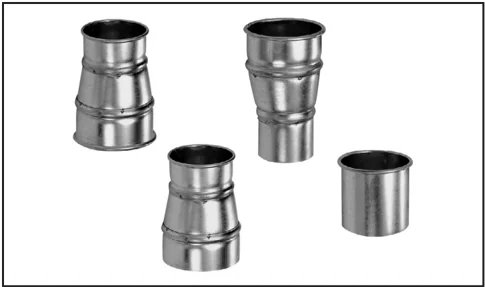
Figure 37. Metal Reducers & Adapters.
Metal Elbows These industrial metal elbows are available from 4"—8" with 90°, 60°, 45°, or 30° curves. Call (800) 523-4777 or visit www.grizzly.com for more information and pricing.
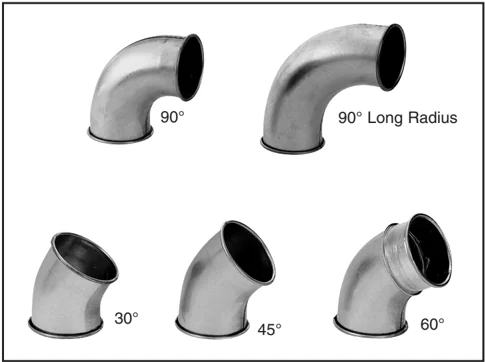
Figure 38. Metal elbow examples.
SECTION 7: MAINTENANCE
WARNING Always disconnect power to the machine before performing maintenance. Failure to do this may result in serious personal injury.
CAUTION Always wear a respirator when emptying the dust collection bags on the dust collector. Sawdust may cause allergic reactions or respiratory problems.
Schedule
For optimum performance from your machine, follow this maintenance schedule and refer to any specific instructions given in this section.
Daily Check:
- Loose mounting bolts.
- Worn switch.
- Worn or damaged wires.
- Almost full collection bag.
- Any other unsafe condition.
Lubrication
Since all bearings are shielded and permanently lubricated, simply leave them alone until they need to be replaced. Do not lubricate them.
Bag Cleaning
Always empty the collection bags on a regular basis. Emptying the collection bags allows the machine to operate at a much higher level of efficiency.
Always wear the appropriate respirator or dust mask and safety glasses when emptying the collection bags. Small dust particles can escape the bags during emptying, causing them to become airborne and easily inhaled. This microscopic airborne dust is extremely unhealthy to breathe and can cause serious health problems.
While the Model G1028Z/G1029Z excels at collecting the majority of wood dust produced by your machines, it is not an air filter; therefore, we strongly recommend the supplemental aid of a shop air filter such as the Grizzly G5955 or G9956. Air filters are designed to collect the smaller dust particles that a dust collector bags cannot trap.
G1028Z/G1029Z Dust Collector
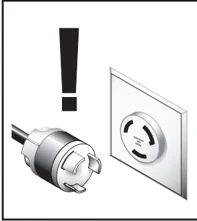

SECTION 8: SERVICE
Review the troubleshooting and procedures in this section to fix or adjust your machine if a problem develops. If you need replacement parts or you are unsure of your repair skills, then feel free to call our Technical Support at (570) 546-9663.
Troubleshooting
Motor & Electrical
| Symptom | Possible Cause | Possible Solution |
|---|---|---|
| Machine does not start or a breaker trips. | 1. Fuse has blown.2. Wall fuse/circuit breaker is blown/tripped.3. Power supply switched OFF or is at fault.4. Wiring is open/has high resistance.5. Motor ON button or ON/OFF switch is at fault.6. Motor is at fault. | 1. Correct short/replace fuse in control box.2. Ensure circuit size is suitable for this machine; replace weak breaker.3. Ensure power supply is switched on; ensure power supply has the correct voltage.4. Check for broken wires or disconnected/corroded connections, and repair/replace as necessary.5. Replace faulty ON button or ON/OFF switch.6. Test/repair/replace. |
| Machine has vibration or noisy operation. | 1. Motor or component is loose.2. Motor mount loose/broken.3. Machine is incorrectly mounted or sits unevenly.4. Motor fan is rubbing on fan cover.5. Motor bearings are at fault. | 1. Inspect/replace stripped or damaged bolts/nuts, and re-tighten with thread locking fluid.2. Tighten/replace.3. Tighten/replace anchor studs in floor if mounted; chock machine casters if mobile.4. Replace dented fan cover; replace loose/damaged fan.5. Test by rotating shaft; rotational grinding/loose shaft requires bearing replacement. |
Dust Collector Operation
| Symptom | Possible Cause | Possible Solution |
|---|---|---|
| Loud, repetitious noise, or excessive vibration coming from dust collector. | 1. Dust collector is not on a flat surface and wobbles.2. Impeller is damaged and unbalanced.3. The motor mounting or housing connections are loose.4. Impeller is loose on the motor shaft.5. Motor fan cover is dented, causing the motor fan to hit the cover while spinning. | 1. Stabilize the dust collector.2. Disconnect dust collector from power, and inspect the impeller for dents, bends, loose fins. Replace impeller if any damage is found.3. Make sure all fasteners on the dust collector are tight.4. Replace the motor and impeller as a set if the motor shaft and the impeller hub are damaged.5. Replace motor fan cover. |
| Dust collector does not adequately collect dust or chips; poor performance. | 1. Dust collection bags are full.2. Filter is dirty.3. There is a restriction in the duct line.4. The dust collector is too far away from the point of suction, or there are too many sharp bends in the ducting.5. The lumber is wet and dust is not flowing through the ducting smoothly.6. There is a leak in the ducting, or a series of small leaks, or too many open ports.7. There are not enough open branch lines at one time, thereby causing a velocity drop in the main line.8. The ducting and ports are incorrectly sized.9. The machine dust collection design is inadequate.10. The dust collector is too small for the dust collection system. | 1. Empty collection bags.2. Clean filter.3. Remove dust line from dust collector inlet and unblock the restriction in the duct line. A plumbing snake may be necessary.4. Relocate the dust collector closer to the point of suction, and rework ducting without sharp bends. Refer to System Design, beginning on Page 19.5. Process lumber with less than 20% moisture content.6. Rework the ducting to eliminate all leaks. Close dust ports for lines not being used.7. Open 1 or 2 more blast gates to different branch lines to allow the velocity in the main line to increase.8. Reinstall correctly sized ducts and fittings. Refer to System Design beginning on Page 19 for more solutions.9. Use a dust collection nozzle on a stand.10. Install a larger dust collector to power your dust collection system. |
| Sawdust being blown into the air from the dust collector. | 1. Duct clamps or dust collection bags are not properly clamped and secured.2. Bag clamps are loose or damaged. | 1. Re-secure ducts and dust collection bag, making sure duct and bag clamps are tight and completely over the ducts and bags.2. Retighten bag clamps. |
G1028Z/G1029Z Dust Collector
G1028Z Wiring Diagram
Grizzly Industrial, Inc.
[Icon] View this page in color at www.grizzly.com.
NOTICE
The motor wiring shown here is current at the time of printing, but it may not match your machine. Always use the wiring diagram inside the motor junction box.
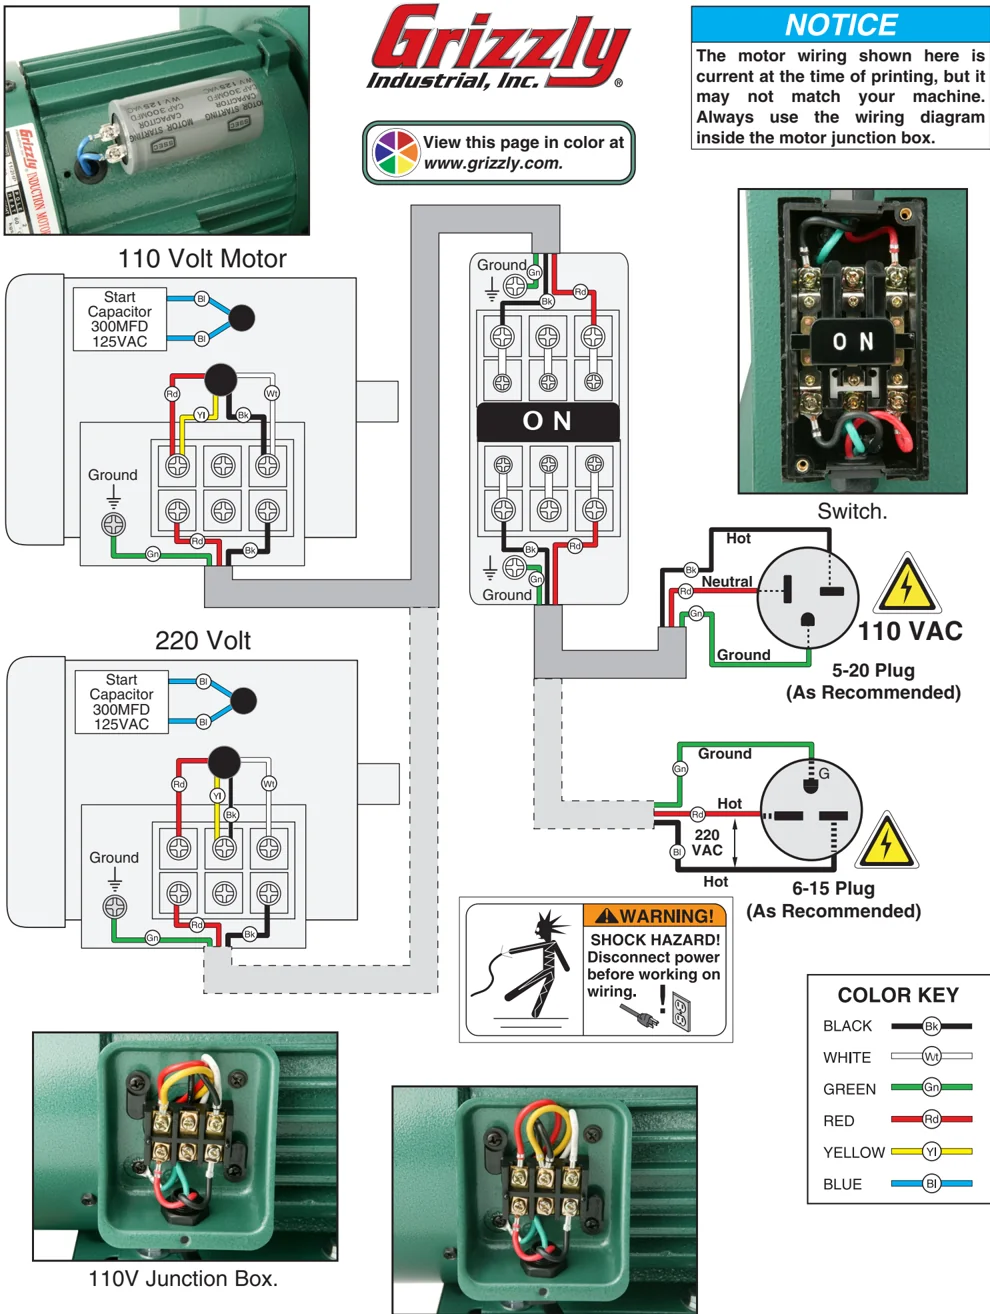
110 Volt Motor
Start Capacitor 300MFD 125VAC
Ground
220 Volt
Start Capacitor 300MFD 125VAC
Ground
Switch.
Hot Neutral Ground 110 VAC 5-20 Plug (As Recommended)
Ground Hot 220 VAC Hot 6-15 Plug (As Recommended)
WARNING! SHOCK HAZARD! Disconnect power before working on wiring.
COLOR KEY
BLACK — Bk WHITE — Wt GREEN — Gn RED — Rd YELLOW — Yl BLUE — Bl
110V Junction Box.
220V Junction Box.
G1029Z Wiring Diagram
 Start Capacitor.
Grizzly Industrial, Inc.
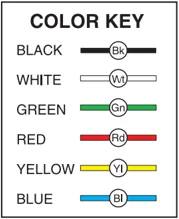
COLOR KEY
BLACK — Bk WHITE — Wt GREEN — Gn RED — Rd YELLOW — Yl BLUE — Bl
220 Volt
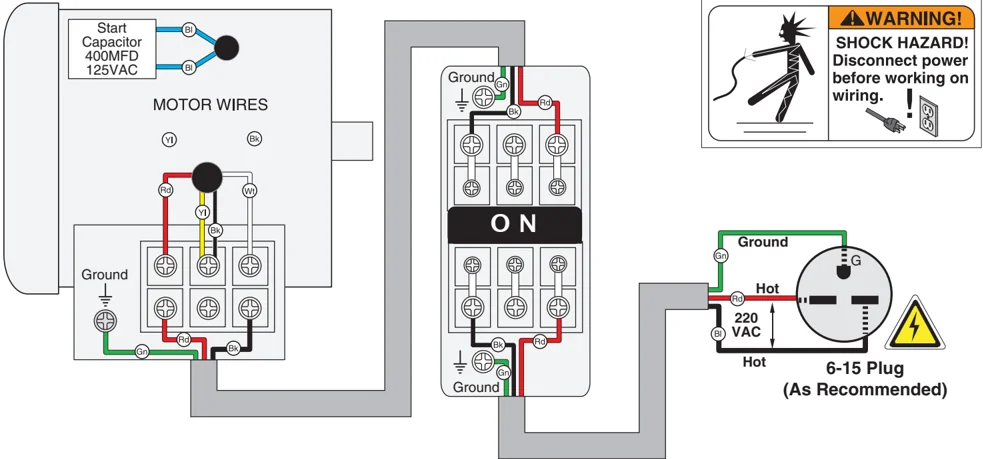
Start Capacitor 400MFD 125VAC
MOTOR WIRES
Ground
ON
Ground Rd Hot Gn 220 VAC Bl Hot
6-15 Plug (As Recommended)
⚠ WARNING! SHOCK HAZARD! Disconnect power before working on wiring. !
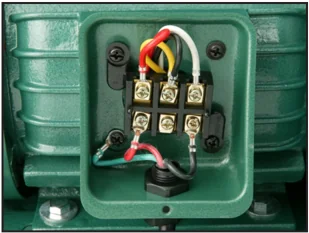
Junction Box.
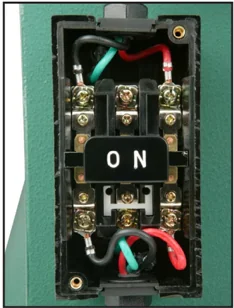
Switch.
NOTICE The motor wiring shown here is current at the time of printing, but it may not match your machine. Always use the wiring diagram inside the motor junction box.
View this page in color at www.grizzly.com.
G1028Z/G1029Z Dust Collector


G1028Z/G1029Z Parts Breakdown
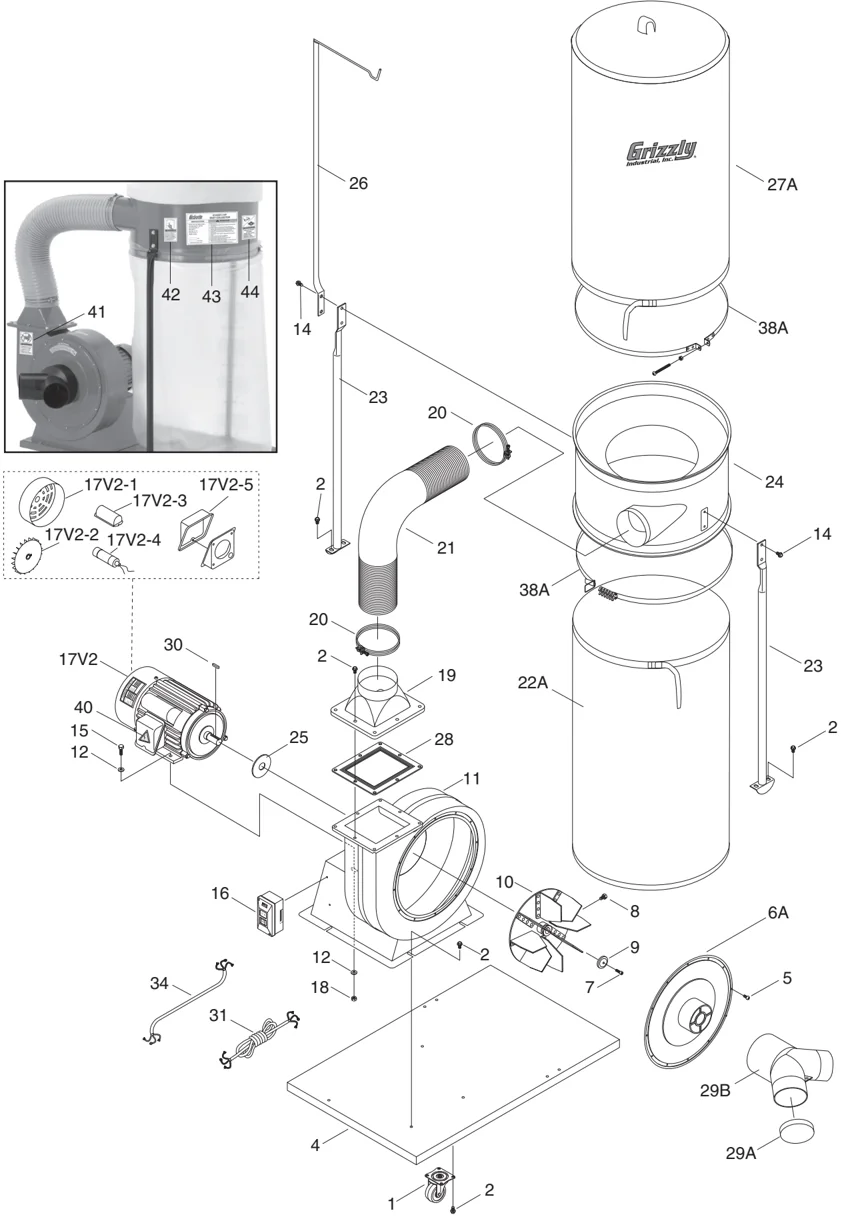
G1028Z Parts List
| REF | PART # | DESCRIPTION |
|---|---|---|
| 1 | P1028001 | CASTER |
| 2 | PFB01 | FLANGE BOLT 5/16-18 X 1/2 |
| 4 | P1028004 | BASE PLATE |
| 5 | PS06 | PHLP HD SCR 10-24 X 3/8 |
| 6A | P1029006A | 6" INLET COVER V2.10.01 |
| 7 | PSB121M | CAP SCREW M6-1 X 20 (LH) |
| 8 | PB09 | HEX BOLT 5/16-18 X 1/2 |
| 9 | P1028009 | SPECIAL WASHER |
| 10 | P1028Z010 | 11" IMPELLER |
| 11 | P1028011 | COLLECTOR BODY |
| 12 | PW07 | FLAT WASHER 5/16 |
| 14 | PFB01 | FLANGE BOLT 5/16-18 X 1/2 |
| 15 | PB03 | HEX BOLT 5/16-18 X 1 |
| 16 | PSW04 | PUSH BUTTON SWITCH (G1028/29/30) |
| 17V2 | P1028Z017V2 | MOTOR 1-1/2HP 110/220V V2.06.08 |
| 17V2-1 | P1028Z017V2-1 | MOTOR FAN COVER V2.06.08 |
| 17V2-2 | P1028Z017V2-2 | MOTOR FAN V2.06.08 |
| 17V2-3 | P1028Z017V2-3 | CAPACITOR COVER V2.06.08 |
| 17V2-4 | P1028Z017V2-4 | S CAPACITOR 300M 125V 1-3/4 X 3-3/8 |
| 17V2-5 | P1028Z017V2-5 | JUNCTION BOX V2.06.08 |
| 18 | PN02 | HEX NUT 5/16-18 |
| REF | PART # | DESCRIPTION |
|---|---|---|
| 19 | P1028019 | OUTLET |
| 20 | P1028020 | HOSE CLAMP |
| 21 | P1028021 | HOSE |
| 22A | H6899 | LOWER BAG V2.1.08 |
| 23 | P1028023 | COLLECTOR SUPPORT |
| 24 | P1028024 | COLLECTOR |
| 25 | P1028025 | PACKING (G1028Z) |
| 26 | P1028026 | UPPER BAG SUPPORT |
| 27A | G5556 | UPPER BAG V2. 1.08 |
| 28 | P1028028 | GASKET |
| 29A | P1029029A | INLET CAP 6" |
| 29B | P1029029B | 6"x4"x4" Y-INLET V2.10.01 |
| 30 | PK32M | KEY 6 X 6 X 28 |
| 31 | PWRCRD220S | POWER CORD |
| 34 | PWRCRD220L | MOTOR CORD |
| 38A | G3707 | CLAMP V2. 1.08 |
| 40 | P1028Z040 | ELECTRICITY LABEL |
| 41 | P1028Z041 | HANDS/OUTLET LABEL |
| 42 | P1028Z042 | READ MANUAL LABEL |
| 43 | P1028Z043 | MACHINE ID LABEL |
| 44 | P1028Z044 | EYE/LUNG LABEL |
G1029Z Parts List
| REF | PART # | DESCRIPTION |
|---|---|---|
| 1 | P1028001 | CASTER |
| 2 | PFB01 | FLANGE BOLT 5/16-18 X 1/2 |
| 4 | P1028004 | BASE PLATE |
| 5 | PS06 | PHLP HD SCR 10-24 X 3/8 |
| 6A | P1029006A | 6" INLET COVER V2.10.01 |
| 7 | PSB121M | CAP SCREW M6-1 X 20 (LH) |
| 8 | PB09 | HEX BOLT 5/16-18 X 1/2 |
| 9 | P1028009 | SPECIAL WASHER |
| 10 | P1029010 | 12" IMPELLER |
| 11 | P1028011 | COLLECTOR BODY |
| 12 | PW07 | FLAT WASHER 5/16 |
| 14 | PFB01 | FLANGE BOLT 5/16-18 X 1/2 |
| 15 | PB03 | HEX BOLT 5/16-18 X 1 |
| 16 | PSW04 | PUSH BUTTON SWITCH |
| 17V2 | P1029017V2 | MOTOR 2 HP 220V V2.06.08 |
| 17V2-1 | P1028Z017V2-1 | MOTOR FAN COVER V2.06.08 |
| 17V2-2 | P1028Z017V2-2 | MOTOR FAN V2.06.08 |
| 17V2-3 | P1028Z017V2-3 | CAPACITOR COVER V2.06.08 |
| 17V2-4 | P1028Z017V2-4 | S CAPACITOR 400M 125V 1-3/4 X 3-3/8 |
| 17V2-5 | P1028Z017V2-5 | JUNCTION BOX V2.06.08 |
| 18 | PN02 | HEX NUT 5/16-18 |
| REF | PART # | DESCRIPTION |
|---|---|---|
| 19 | P1028019 | OUTLET |
| 20 | P1028020 | HOSE CLAMP |
| 21 | P1028021 | HOSE |
| 22A | H6899 | LOWER BAG V2.1.08 |
| 23 | P1028023 | COLLECTOR SUPPORT |
| 24 | P1028024 | COLLECTOR |
| 25 | P1029025 | PACKING |
| 26 | P1028026 | UPPER BAG SUPPORT |
| 27A | G5556 | UPPER BAG V2. 1.08 |
| 28 | P1028028 | GASKET |
| 29A | P1029029A | INLET CAP 6" |
| 29B | P1029029B | 6"x4"x4" Y-INLET V2.10.01 |
| 30 | PK28M | KEY 7 X 7 X 29 |
| 31 | PWRCRD220S | POWER CORD |
| 34 | PWRCRD220L | MOTOR CORD |
| 38A | G3707 | CLAMP V2. 1.08 |
| 40 | P1029Z040 | ELECTRICITY LABEL |
| 41 | P1029Z041 | HANDS/OUTLET LABEL |
| 42 | P1029Z042 | READ MANUAL LABEL |
| 43 | P1029Z043 | MACHINE ID LABEL |
| 44 | P1029Z044 | EYE/LUNG LABEL |
Grizzly WARRANTY CARD
Name ___________________________________________________________________________________ Street ___________________________________________________________________________________ City ________________________________________ State _________________________________ Zip _______________________ Phone #____________________________________ Email __________________________________ Invoice #__________________________ Model #____________________________________ Order #________________________________ Serial #_____________________________
The following information is given on a voluntary basis. It will be used for marketing purposes to help us develop better products and services. Of course, all information is strictly confidential.
1. How did you learn about us? ____ Advertisement ____ Friend ____ Catalog ____ Card Deck ____ Website ____ Other:
2. Which of the following magazines do you subscribe to? ____ Cabinet Maker ____ Popular Mechanics ____ Today’s Homeowner ____ Family Handyman ____ Popular Science ____ Wood ____ Hand Loader ____ Popular Woodworking ____ Wooden Boat ____ Handy ____ Practical Homeowner ____ Woodshop News ____ Home Shop Machinist ____ Precision Shooter ____ Woodsmith ____ Journal of Light Cont. ____ Projects in Metal ____ Woodwork ____ Live Steam ____ RC Modeler ____ Woodworker West ____ Model Airplane News ____ Rifle ____ Woodworker’s Journal ____ Modeltec ____ Shop Notes ____ Other: ____ Old House Journal ____ Shotgun News
3. What is your annual household income? ____ $20,000-$29,000 ____ $30,000-$39,000 ____ $40,000-$49,000 ____ $50,000-$59,000 ____ $60,000-$69,000 ____ $70,000+
4. What is your age group? ____ 20-29 ____ 30-39 ____ 40-49 ____ 50-59 ____ 60-69 ____ 70+
5. How long have you been a woodworker/metalworker? ____ 0-2 Years ____ 2-8 Years ____ 8-20 Years ____ 20+ Years
6. How many of your machines or tools are Grizzly? ____ 0-2 ____ 3-5 ____ 6-9 ____ 10+
7. Do you think your machine represents a good value? ____ Yes ____ No
8. Would you recommend Grizzly Industrial to a friend? ____ Yes ____ No
9. Would you allow us to use your name as a reference for Grizzly customers in your area? Note: We never use names more than 3 times. ____ Yes ____ No
10. Comments: ___________________________________________________________________________________
CUT ALONG DOTTED LINE

FOLD ALONG DOTTED LINE
Place Stamp Here
GRIZZLY INDUSTRIAL, INC. P.O. BOX 2069 BELLINGHAM, WA 98227-2069
FOLD ALONG DOTTED LINE
Send a Grizzly Catalog to a friend:
Name________________________________________ Street_______________________________________ City_________________State_________Zip_________
TAPE ALONG EDGES--PLEASE DO NOT STAPLE

WARRANTY AND RETURNS
Grizzly Industrial, Inc. warrants every product it sells for a period of 1 year to the original purchaser from the date of purchase. This warranty does not apply to defects due directly or indirectly to misuse, abuse, negligence, accidents, repairs or alterations or lack of maintenance. This is Grizzly’s sole written warranty and any and all warranties that may be implied by law, including any merchantability or fitness, for any particular purpose, are hereby limited to the duration of this written warranty. We do not warrant or represent that the merchandise complies with the provisions of any law or acts unless the manufacturer so warrants. In no event shall Grizzly’s liability under this warranty exceed the purchase price paid for the product and any legal actions brought against Grizzly shall be tried in the State of Washington, County of Whatcom.
We shall in no event be liable for death, injuries to persons or property or for incidental, contingent, special, or consequential damages arising from the use of our products.
To take advantage of this warranty, contact us by mail or phone and give us all the details. We will then issue you a “Return Number,” which must be clearly posted on the outside as well as the inside of the carton. We will not accept any item back without this number. Proof of purchase must accompany the merchandise.
The manufacturers reserve the right to change specifications at any time because they constantly strive to achieve better quality equipment. We make every effort to ensure that our products meet high quality and durability standards and we hope you never need to use this warranty.
Please feel free to write or call us if you have any questions about the machine or the manual.
Thank you again for your business and continued support. We hope to serve you again soon.
grizzly.com
TOOL WEBSITE
Buy Direct and Save with Grizzly® – Trusted, Proven and a Great Value!
Visit Our Website Today And Discover Why Grizzly® Is The Industry Leader!
- SECURE ORDERING
- ORDERS SHIPPED WITHIN 24 HOURS
- E-MAIL RESPONSE WITHIN ONE HOUR
-OR-
Call Today For A FREE Full Color Catalog 1-800-523-4777
VISA | MasterCard | DISCOVER NOVUS | AMERICAN EXPRESS