Grizzly
Industrial, Inc.
10" HEAVY-DUTY TABLE SAW
MODEL G1023Z, ZX & ZX3 INSTRUCTION MANUAL

COPYRIGHT © NOVEMBER 2001 BY GRIZZLY INDUSTRIAL, INC WARNING: NO PORTION OF THIS MANUAL MAY BE REPRODUCED IN ANY SHAPE OR FORM WITHOUT THE WRITTEN APPROVAL OF GRIZZLY INDUSTRIAL, INC. REVISED AUGUST 2016 PRINTED IN TAIWAN
WARNING
Some dust created by power sanding, sawing, grinding, drilling, and other construction activities contains chemicals known to the State of California to cause cancer, birth defects or other reproductive harm. Some examples of these chemicals are:
- Lead from lead-based paints.
- Crystalline silica from bricks, cement, and other masonry products.
- Arsenic and chromium from chemically treated lumber.
Your risk from these exposures varies, depending on how often you do this type of work. To reduce your exposure to these chemicals: work in a well ventilated area, and work with approved safety equipment, such as those dust masks that are specially designed to filter out microscopic particles.
TABLE OF CONTENTS
-
SAFETY
- SAFETY RULES FOR ALL TOOLS ........ 2-3
- ADDITIONAL SAFETY INSTRUCTIONS FOR TABLE SAWS ........ 4
- AVOIDING KICKBACK ........ 5
- SAFETY ACCESSORIES ........ 5-6
-
INTRODUCTION
- COMMENTARY ........ 7
-
CIRCUIT REQUIREMENTS
- G1023Z ........ 8
- G1023ZX ........ 9
- G1023ZX3 ........ 10
- GROUNDING ........ 11
- EXTENSION CORDS ........ 11
-
MACHINE FEATURES
- TERMS & DEFINITIONS ........ 12-13
- MAIN FEATURES ........ 13
-
SET UP
- UNPACKING ........ 14
- PIECE INVENTORY ........ 14-15
- HARDWARE RECOGNITION CHART ........ 16
- CLEAN UP ........ 17
- SITE CONSIDERATIONS ........ 17
- BEGINNING ASSEMBLY ........ 18
- EXTENSION WINGS ........ 18-19
- FENCE & RAILS ........ 19
- SWITCH ........ 19
- DUST HOOD ........ 20
- MOTOR COVER ........ 20
- MOTOR BRACE ........ 21
- GUARD BRACKET ........ 21
- HANDWHEEL ........ 22
- TABLE INSERT ........ 22
- SAW BLADE ........ 23
- BLADE GUARD/SPLITTER ........ 23-25
- MITER GAUGE ........ 26
- START UP ........ 27
- RECOMMENDED ADJUSTMENTS ........ 27
-
OPERATIONS
- BLADE SELECTION ........ 28-29
- CROSSCUTTING ........ 30
- RIPPING ........ 31
- DADO OPERATIONS ........ 32-34
- RABBET OPERATIONS ........ 34-37
-
MAINTENANCE
- GENERAL ........ 38
- LUBRICATION ........ 39
- TABLES ........ 39
- V-BELT ........ 39-40
- MAINTENANCE LOG ........ 41
-
SERVICE AGREEMENT
- 45° & 90° STOPS ........ 42
- BLADE PARALLELISM ........ 43-44
- BLADE ALIGNMENT ........ 45-46
- WIRING DIAGRAM ........ 47-49
-
CLOSURE ........ 50
- DATA SHEET ........ 51
- PARTS BREAKDOWNS & LIST ........ 52-54
- TROUBLESHOOTING ........ 55
- PUSH STICK PATTERN ........ 57
- WARRANTY AND RETURNS ........ 58-60
SECTION 1: SAFETY
⚠WARNING
For Your Own Safety Read Instruction Manual Before Operating This Equipment
The purpose of safety symbols is to attract your attention to possible hazardous conditions. This manual uses a series of symbols and signal words which are intended to convey the level of importance of the safety messages. The progression of symbols is described below. Remember that safety messages by themselves do not eliminate danger and are not a substitute for proper accident prevention measures.
⚠DANGER Indicates an imminently hazardous situation which, if not avoided, WILL result in death or serious injury.
⚠WARNING Indicates a potentially hazardous situation which, if not avoided, COULD result in death or serious injury.
⚠CAUTION Indicates a potentially hazardous situation which, if not avoided, MAY result in minor or moderate injury, or MAY cause property damage.
NOTICE This symbol is used to alert the user to useful information about proper operation of the equipment.
⚠WARNING
Safety Instructions For Power Tools
- KEEP GUARDS IN PLACE and in working order.
- REMOVE ADJUSTING KEYS AND WRENCHES. Form habit of checking to see that keys and adjusting wrenches are removed from tool before turning on.
- KEEP WORK AREA CLEAN. Cluttered areas and benches invite accidents.
- DO NOT USE IN DANGEROUS ENVIRONMENT. Do not use power tools in damp or wet locations, or where any flammable or noxious fumes may exist. Keep work area well lighted.
- KEEP CHILDREN AND VISITORS AWAY. All children and visitors should be kept at a safe distance from work area.
- MAKE WORKSHOP CHILD PROOF with padlocks, master switches, or by removing starter keys.
- DO NOT FORCE TOOL. It will do the job better and safer at the rate for which it was designed.
- USE RIGHT TOOL. Do not force tool or attachment to do a job for which it was not designed.
-2- G1023Z Series Heavy-Duty 10" Table Saw

⚠WARNING
Safety Instructions For Power Tools
- USE PROPER EXTENSION CORD. Make sure your extension cord is in good condition. Conductor size must be in accordance with the chart below. The amperage rating is listed on the motor or tool nameplate. An undersized cord will cause a drop in line voltage resulting in loss of power and overheating. Your extension cord must also contain a ground wire and plug pin. Always repair or replace damaged extension cords.
Minimum Gauge for Extension Cords
\begin{tabular}{|l|c|c|c|} \hline AMP RATING & \multicolumn{3}{c|}{LENGTH} \ \cline{2-4} & 25ft & 50ft & 100ft \ \hline 0-6 & 16 & 16 & 16 \ \hline 7-10 & 16 & 16 & 14 \ \hline 11-12 & 16 & 16 & 14 \ \hline 13-16 & 14 & 12 & 12 \ \hline 17-20 & 12 & 12 & 10 \ \hline 21-30 & 10 & 10 & No \ \hline \end{tabular}
-
WEAR PROPER APPAREL. Do not wear loose clothing, gloves, neckties, rings, bracelets, or other jewelry which may get caught in moving parts. Non-slip footwear is recommended. Wear protective hair covering to contain long hair.
-
ALWAYS USE ANSI-APPROVED SAFETY GLASSES. Also use face or dust mask if cutting operation is dusty. Everyday eyeglasses only have impact resistant lenses, they are NOT safety glasses.
-
SECURE WORK. Use clamps or a vise to hold work when practical. It is safer than using your hand and frees both hands to operate tool.
-
NEVER OVERREACH. Keep proper footing and balance at all times.
-
MAINTAIN TOOLS WITH CARE. Keep tools sharp and clean for best and safest performance. Follow instructions for lubricating and changing accessories.
-
DISCONNECT TOOLS before servicing and changing accessories, such as blades, bits, cutters, and any other item.
-
REDUCE THE RISK OF UNINTENTIONAL STARTING. Make sure switch is in off position before plugging in. Also, the magnetic switch on this machine may start if the switch gets bumped hard enough.
-
USE RECOMMENDED ACCESSORIES. Consult the owner's manual for recommended accessories. The use of improper accessories may cause risk of injury.
-
CHECK DAMAGED PARTS. Before further use of the tool, a guard or other part that is damaged should be carefully checked to determine that it will operate properly and perform its intended function. Check for alignment of moving parts, binding of moving parts, breakage of parts, mounting, and any other conditions that may affect its operation. A guard or other part that is damaged must be properly repaired or replaced.
-
NEVER LEAVE TOOL RUNNING UNATTENDED. TURN POWER OFF. Do not leave tool until it comes to a complete stop.
-
NEVER USE UNDER THE INFLUENCE of alcohol or drugs, or when tired.
-
IF AT ANY TIME YOU ARE EXPERIENCING DIFFICULTIES performing the intended operation, stop using the machine! Then contact our service department or ask a qualified expert how the operation should be performed.

⚠WARNING
Additional Safety Instructions For Table Saws
- THRU-SAWING: Use blade guard, splitter, and anti-kickback fingers on all thru-sawing operations. See Page 12 for the definition of thru-sawing.
- KICKBACK: Use anti-kickback devices during ALL cutting operations. If you do not have a complete understanding of how kickback occurs, or how to prevent it, Do not operate this table saw. See Page 12 for the definition of kickback.
- DANGEROUS REACHING: Do not reach behind or over the saw blade with either hand while the saw is running.
- PUSHSTICK: Use a push stick when ripping narrow stock.
- FREE-HAND CUTTING: The fence or the miter gauge must support the workpiece during all cutting operations.
- BODY POSITION WHEN CUTTING: Do not stand or have any part of your body in-line with the path of the saw blade.
- WORKPIECE CONTROL: Hold the work-piece firmly against the miter gauge or fence and hold the workpiece firmly against the table.
- CROSSCUTTING: Move the rip fence out of the way when crosscutting.
- MITER GAUGE/RIP FENCE: Never use the miter gauge and rip fence at the same time.
- STALLLED BLADE: Never attempt to free a stalled saw blade without first turning the saw off.
- CUTOFF TABLES: Use adequate support to the rear and sides of the saw table for wide or long workpieces.
- HAND SAFETY: Avoid awkward cutting operations and hand positions where a sudden slip could cause your hand to move into the saw blade.
- SAW BLADE: Lower the saw blade below the table when not in use.
- DAMAGED SAW BLADE: Never use a damaged saw blade or one that has been dropped.
- DADO CUTTING: There is a high degree of risk involved with any dado operation. See Page 12 for the definition of dado.
⚠WARNING Unfamiliarity with this manual could result in serious personal injury. Become familiar with the contents of this manual, including all the safety warnings.
⚠WARNING No list of safety guidelines can be complete. Operating this machinery may require additional safety precautions specific to your shop environment. Failure to use reasonable caution while operating this machine could result in serious personal injury.
-4- G1023Z Series Heavy-Duty 10" Table Saw



Avoiding Kickback
Failure to understand how and why kick-back occurs could cause serious personal injury. DO NOT operate this table saw if you do not have a clear understanding of kickback, and how it occurs.
Statistics prove that most common accidents among table saw users can be linked to kickback.
Kickback is typically defined as the high-speed expulsion of stock from the table saw toward its operator.
In addition to the danger of the operator or others in the area being struck by the flying stock, it is often the case that the operator's hands are forced into the blade during the kickback.
The following can help minimize kickbacks:
- Use your blade guard and splitter.
- Never for any reason place your hand behind the blade. Should kickback occur, your hand will be pulled into the blade.
- Inspect splitter for alignment between it and your blade.
- Never use the fence as a guide for crosscutting.
- Never attempt freehand cuts.
- Use a push stick or featherboard to maintain control of your workpiece.
- Feed cuts through to completion.
- Stand to the side when ripping.
- Ensure your fence and miter slot are parallel to the blade.
If you do not have a clear understanding of kickback and how it occurs, do not operate this table saw.
Safety Accessories
WARNING Not using safety accessories could cause serious personal injury. Learn how to correctly use each safety accessory.
Push Sticks The use of push sticks, particularly when cutting small or narrow workpieces, provides a double benefit for saw operators. The push stick provides added leverage, enabling the operator to keep the workpiece firmly supported against the fence and table. At the same time, the push stick keeps the operator's hand safely away from the rotation of the saw blade as shown in Figure 1. See the template on Page 57 of the manual for construction details, or purchase one from the Grizzly catalog or website.
 Push Stick
Figure 1. Push Stick.

Zero Clearance Table Inserts Ideal for use when ripping thin strips or making bevel cuts, these prevent tearout and jammed blades by supporting material close to the blade.
Use the standard table insert as a template when creating additional inserts from wood or plywood. Slots can be custom cut for specific blade angles by raising the running blade into an uncut insert at the angle you desire. Be sure to make an additional slot for the blade splitter.
We also carry a wide selection of table inserts (Figure 2) in the Grizzly catalog or website. Be sure to hold the insert firmly in place with a piece of wood when creating slots. Never hold the table insert with your hand while cutting new slots.
 Figure 2. Zero Clearance Table Inserts.
Push Paddles Push paddles provide added leverage and support when ripping or crosscutting wide workpieces as shown in Figure 3. We offer a number of push paddles in the Grizzly catalog.
 Push Paddles
Figure 3. Push Paddles.
Featherboards Easily made from scrap stock, featherboards provide an added degree of protection against kickback as shown in Figure 4. To make a featherboard, cut a 30-40° angle at one end of the board and make a number of end cuts at approximately 1/4" apart and 2" to 3" deep. We also offer a number of featherboards in the Grizzly catalog.
 Featherboards
Figure 4. Featherboards.

SECTION 2: INTRODUCTION
Commentary
We are proud to offer the Grizzly Model G1023Z Series Table Saw. The Model G1023Z Series is part of a growing Grizzly family of fine woodworking machinery. When used according to the guidelines set forth in this manual, you can expect years of trouble-free, enjoyable operation and proof of Grizzly's commitment to customer satisfaction.
The Model G1023Z Series is an industrial grade table saw intended for professional use. Features include cast iron trunnions, triple V-belt drive, magnetic switch, and the Shop Fox® Fence. The G1023Z features a 3 HP 220V single-phase motor and the Model G1023ZX features a 5 HP 220V single-phase motor. The Model G1023ZX3 makes the step up to a 5 HP 220V 3-phase motor.
Grizzly offers many accessories for the table saws including blades, extension rails, outfeed rollers and mobile bases. Please refer to the current Grizzly catalog or website for prices and ordering information.
Grizzly is also pleased to provide this manual with the Model G1022 Series Table Saws. It was written to guide you through assembly, review safety considerations, and cover general operating procedures. If you have any comments regarding this manual, please write to us at the address below:
Grizzly Industrial, Inc. c/o Technical Documentation P.O. Box 2069 Bellingham, WA 98227-2069
Most importantly, we stand behind our machines. If you have any service questions or parts requests, please call or write us at the location listed below:
Grizzly Industrial, Inc. 1203 Lycoming Mall Circle Muncy, PA 17756 Phone: (570) 546-9663 Fax: (800) 438-5901 E-Mail: techsupport@grizzly.com Web Site: http://www.grizzly.com
The specifications, drawings, and photographs illustrated in this manual represent the Model G1023Z Series Table Saws as supplied when the manual was prepared. However, owing to Grizzly's policy of continuous improvement, changes may be made at any time with no obligation on the part of Grizzly. Current Grizzly machine manuals can be viewed and printed at: www.grizzly.com.
Lack of familiarity with this manual could cause serious personal injury. Become familiar with the contents of this manual, including all the safety warnings.

SECTION 3: CIRCUIT REQUIREMENTS
G1023Z
If the machine is not wired correctly a fire could result. Make sure your wiring, receptacle, plug, and circuit breaker can handle the current draw of the machine. If you are not sure that your electrical circuit can handle the current draw, get a qualified electrician to test your electrical system and do any required upgrades. DO NOT attempt to modify an existing circuit by only replacing the circuit breaker with one rated for a higher amperage draw than the wiring, receptacle, and plug are rated for.
The motor supplied with the Model Z is a 3 HP 220V single-phase motor. Under normal 220V use, the motor draws approximately 18 amps. Use a 20 amp circuit breaker or a 20 amp slow-blow fuse for 220V operation.
The Model Z does not come with a plug. When operating at 220V, use a NEMA-style L6-20 plug and receptacle as shown in Figure 5.
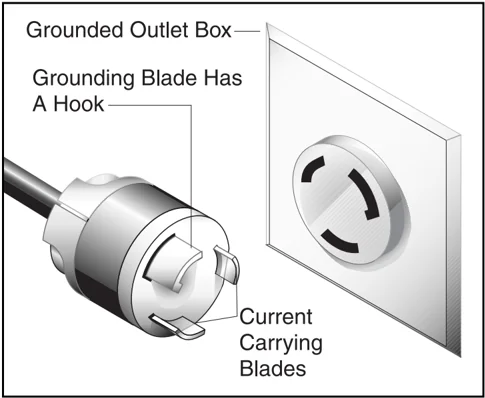
Figure 5. NEMA-style L6-20 plug and outlet.
The circuit you use should be dedicated, (i.e., the machine should provide the only draw from that circuit). If frequent circuit failures occur when using this machine, contact our Service Department or your local electrical contractor.
-8- G1023Z Series Heavy-Duty 10" Table Saw

G1023ZX
If the machine is not wired correctly a fire could result. Make sure your wiring, receptacle, plug, and circuit breaker can handle the current draw of the machine. If you are not sure that your electrical circuit can handle the current draw, get a qualified electrician to test your electrical system and do any required upgrades. DO NOT attempt to modify an existing circuit by only replacing the circuit breaker with one rated for a higher amperage draw than the wiring, receptacle, and plug are rated for.
The motor supplied with the Model ZX is a 5 HP 220V single-phase motor. Under normal 220V use, the motor draws approximately 25 amps. Use a 30 amp circuit breaker or a 30 amp slow-blow fuse for 220V operation.
The Model ZX does not come with a plug. When operating at 220V, use a NEMA-style L6-30 plug and receptacle as shown in Figure 6.
 Grounded Outlet Box—
Grounding Blade Has A Hook—
Current Carrying Blades
Figure 6. NEMA-style L6-30 plug and outlet.
The circuit you use should be dedicated, (i.e., the machine should provide the only draw from that circuit). If frequent circuit failures occur when using this machine, contact our Service Department or your local electrical contractor.

G1023ZX3
WARNING
If the machine is not wired correctly a fire could result. Make sure your wiring, receptacle, plug, and circuit breaker can handle the current draw of the machine. If you are not sure that your electrical circuit can handle the current draw, get a qualified electrician to test your electrical system and do any required upgrades. DO NOT attempt to modify an existing circuit by only replacing the circuit breaker with one rated for a higher amperage draw than the wiring, receptacle, and plug are rated for.
The motor supplied with the Model ZX3 is a 5 HP 220V 3-phase motor. Under normal 220V use, the motor draws approximately 15 amps. Use a 20 amp circuit breaker or a 20 amp slow-blow fuse for 220V operation.
The Model ZX3 does not come with a plug. When operating at 220V, use a NEMA-style L15-20 plug and receptacle as shown in Figure 7.
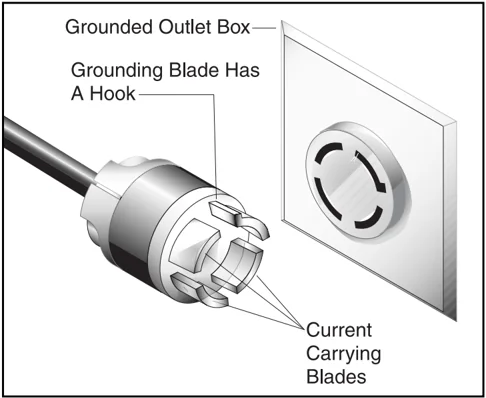
Grounded Outlet Box Grounding Blade Has A Hook Current Carrying Blades
Figure 7. NEMA-style L15-20 plug and outlet.
The circuit you use should be dedicated, (i.e., the machine should provide the only draw from that circuit). If frequent circuit failures occur when using this machine, contact our Service Department or your local electrical contractor.

Grounding
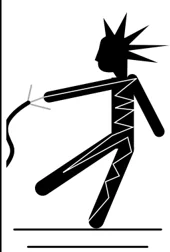
Electrocution or a fire can result if the band-saw is not grounded correctly. Make sure all electrical circuits are grounded. Do not use the machine if it is not grounded.
NOTICE
The wire on the power cord with green or green and yellow striped insulation is the grounding conductor.
In the event of an electrical short, grounding provides electric current a path of least resistance to reduce the risk of electrical shock to the operator. Ground the power cord and this machine in accordance with all local codes and ordinances.
Operating this machine when it is not properly grounded can result in electric shock or electrocution.
Extension Cord
Should it be necessary to use an extension make sure the cord is rated Hard Service (grade S) or better. Refer to the chart in Section 1: Safety Instructions to determine the minimum gauge for the extension cord. The extension cord must also contain a ground wire and plug pin. Always repair or replace extension cords when they become worn or damaged.
CAUTION No single list of electrical guidelines can be comprehensive for all shop environments. Operating this machinery may require additional electrical upgrades specific to your machine and shop environment. It is your responsibility to make sure your electrical systems comply with all local electrical codes and ordinances.


SECTION 4: MACHINE FEATURES
Terms & Definitions
The following is a list of common definitions, terms and phrases used throughout this manual as they relate to this table saw and woodworking in general. It is important that you read and become familiar with them before assembling, adjusting or operating this machine. Your safety is VERY important to us at Grizzly!
Arbor: Metal shaft extending from the drive mechanism, to which the cutting blade is attached.
Bevel Edge Cut: Tilting the saw arbor and blade to an angle between 0° and 45° to perform an angled cutting operation.
Blade Guard: Metal or plastic mechanism that mounts over the saw blade to prevent accidental contact with the cutting edge.
Crosscut: Table saw operation in which the miter gauge is used to cut across the grain of a piece of wood.
Dado Blade: Blade or set of blades that attach to the arbor and are used for cutting grooves and rabbets.
Dado Cut: Table saw operation that uses a dado blade to cut a flat bottomed groove into the face of wood stock.
Featherboard: Safety device used to keep the workpiece against the rip fence or table during a cutting operation. The featherboard also allows the operator to keep his/her hands at a safe distance away from the saw blade while cutting the workpiece.
Kerf: The resulting cut or gap made by a saw blade.
Kickback: A condition in which the wood is thrown back towards an operator at a high rate of speed.
Miter Gauge: A component that controls the wood stock movement while performing a crosscut. Allows for variation of angle cuts such as miter cuts used on a picture frame.
Moulding Head: A cutterhead attached to the arbor that accepts interchangeable moulding knives for profile cutting. We DO NOT recommend the use of moulding head cutters.
Parallel: Being an equal distance apart at every point. i.e. the rip fence face is parallel to the side face of the saw blade.
Non-Thru Cut: A sawing operation that requires the removal of the blade guard and splitter. Dado and rabbet cuts are considered Non-Thru Cuts because the blade does not protrude above the top face of the wood stock. Always remember to reinstall the blade guard and splitter after performing a non-thru cut.
Perpendicular: Intersecting and forming right angles; at right angles to the vertical and horizontal planes. i.e. the blade is perpendicular to the table surface.
Push Paddle: Safety aid used to push a piece of wood stock through a cutting operation.
Push Stick: Safety aid used to push a piece of wood stock through a cutting operation. Usually used when rip cutting.
Rabbet: Cutting operation that creates an L-shaped channel along the edge of wood stock.
-12- G1023Z Series Heavy-Duty 10" Table Saw
Splitter: Metal plate attached to the back of the blade guard that maintains the kerf opening in the wood when performing a cutting operation.
Standard Kerf: 1/8" gap made with a standard blade.
Straightedge: A tool used to check the flatness, parallelness, or consistency of a surface(s).
Thru-Sawing: A sawing operation where the wood stock thickness is completely sawn through. Proper blade height usually allows 1/4" of the top of the blade to extend above the wood stock.
Thin Kerf: 3/32" gap made with a thin kerf blade.
Rip Cut: A cut made along the grain of the wood.
Sacrificial Fence: A piece of wood attached to the face of the rip fence that is designed to extend the fence face away from the metal portion of the fence. Used primarily when making rabbet cuts with a dado blade.
Main Features
Set up and operation instructions will be easier to understand if you become familiar with the location and names of the basic features.
Match up the feature list below with the letters in Figure 8 to identify the table saw feature locations.
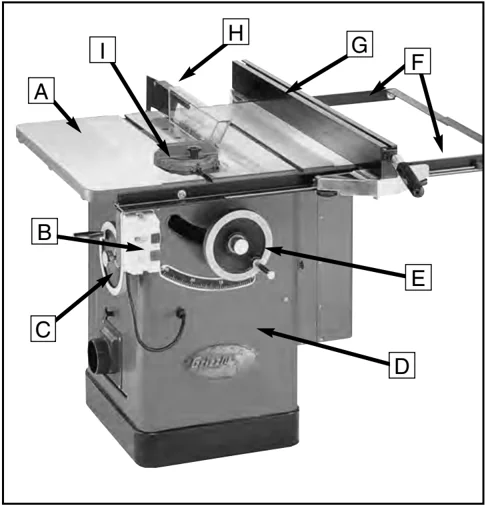
Figure 8. The front of the table saw.
A. Extension Wing B. On/Off Switch C. Blade Height Handwheel D. Base E. Blade Angle Handwheel F. Rip Fence Rails G. Rip Fence H. Blade Guard/Splitter Assembly I. Miter Gauge

