Grizzly
Industrial, Inc.
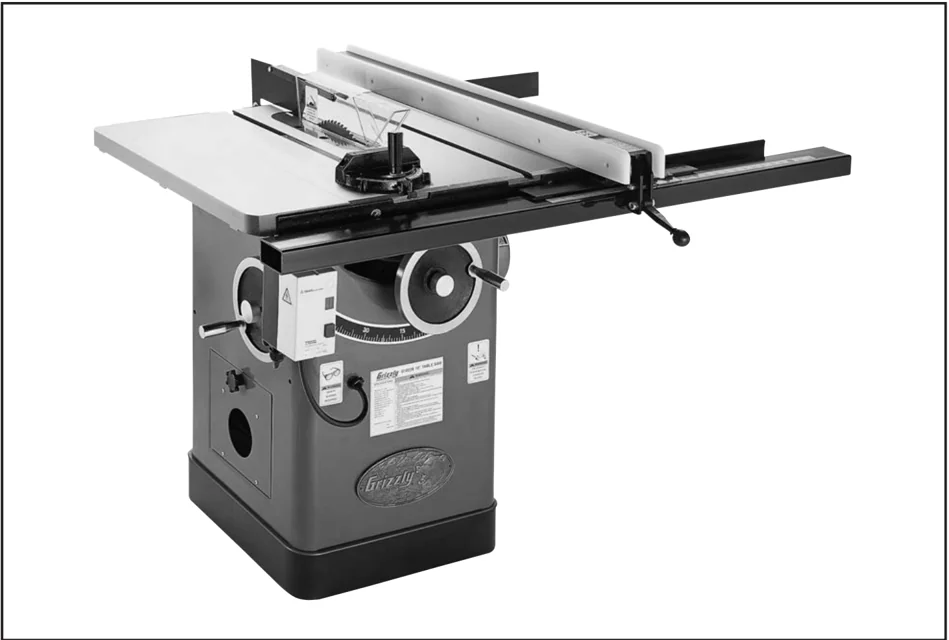
10" HEAVY-DUTY TABLE SAW
MODEL G1023S & G1023S110 INSTRUCTION MANUAL
COPYRIGHT © FEBRUARY, 2002 BY GRIZZLY INDUSTRIAL, INC WARNING: NO PORTION OF THIS MANUAL MAY BE REPRODUCED IN ANY SHAPE OR FORM WITHOUT THE WRITTEN APPROVAL OF GRIZZLY INDUSTRIAL, INC. PRINTED IN TAIWAN

WARNING
Some dust created by power sanding, sawing, grinding, drilling, and other construction activities contains chemicals known to the State of California to cause cancer, birth defects or other reproductive harm. Some examples of these chemicals are:
- Lead from lead-based paints.
- Crystalline silica from bricks, cement, and other masonry products.
- Arsenic and chromium from chemically treated lumber.
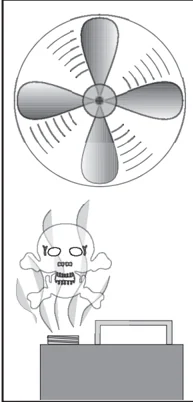
Your risk from these exposures varies, depending on how often you do this type of work. To reduce your exposure to these chemicals: work in a well ventilated area, and work with approved safety equipment, such as those dust masks that are specially designed to filter out microscopic particles.
TABLE OF CONTENTS
| PAGE | ||
|---|---|---|
| 1. | SAFETY | |
| SAFETY RULES FOR ALL TOOLS | 2-3 | |
| ADDITIONAL SAFETY INSTRUCTIONS FOR TABLE SAWS | 4 | |
| SAFETY ACCESSORIES | 5-6 | |
| COMMON DEFINITIONS, TERMS AND PHRASES | 7 | |
| 2. | CIRCUIT REQUIREMENTS | |
| MODEL G1023S110 | 8 | |
| MODEL G1023S | 9 | |
| GROUNDING | 10 | |
| EXTENSION CORDS | 10 | |
| 3. | INTRODUCTION | |
| COMMENTARY | 11 | |
| UNPACKING | 12 | |
| PIECE INVENTORY | 13 | |
| CLEAN UP | 14 | |
| SITE CONSIDERATIONS | 14 | |
| 4. | ASSEMBLY | |
| EXTENSION WINGS | 15-16 | |
| SWITCH | 16 | |
| FENCE | 16 | |
| MOTOR BRACE | 17 | |
| GUARD BRACKET | 17 | |
| HANDWHEEL | 18 | |
| TABLE INSERT | 18 | |
| SAW BLADE | 19 | |
| BLADE GUARD/SPLITTER | 19-21 | |
| 5. | ADJUSTMENTS | |
| BLADE HEIGHT | 22 | |
| BLADE TILT | 22 | |
| MITER SLOT TO BLADE | 23-24 | |
| BLADE ALIGNMENT | 25-26 | |
| RIP FENCE | 26 | |
| MITER GAUGE | 26 | |
| 6. | OPERATIONS | |
| PRE-RUN CHECK | 27 | |
| TEST RUN | 28 | |
| BLADE SELECTION | 28-30 | |
| CROSSCUTTING | 30 | |
| RIPPING | 31 | |
| DADO OPERATIONS | 32-33 | |
| RABBET OPERATIONS | 33-34 | |
| 7. | MAINTENANCE | |
| GENERAL | 35 | |
| TABLES | 35 | |
| V-BELTS | 35-36 | |
| LUBRICATION | 36 | |
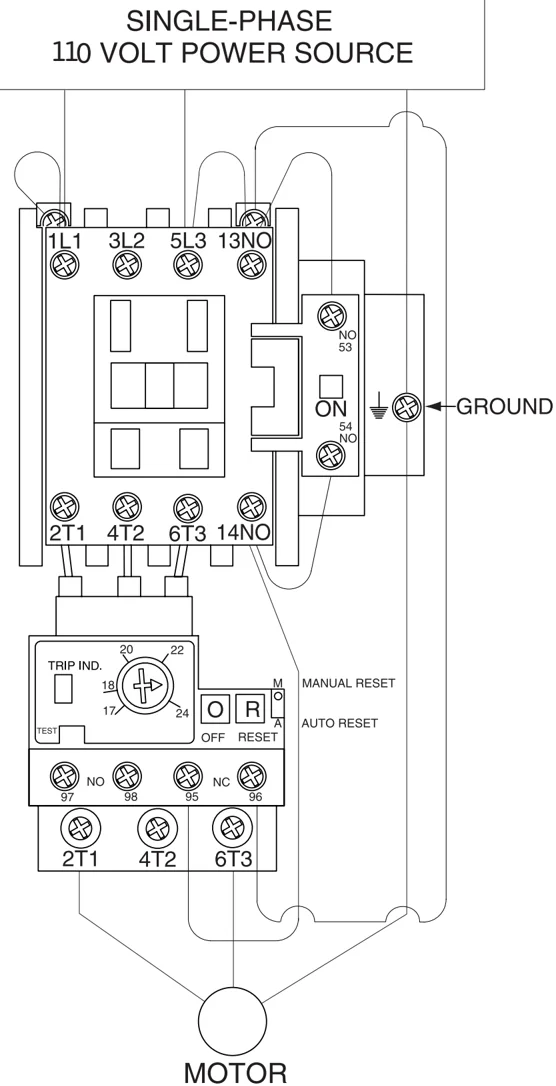
| MODEL G1023S110 WIRING DIAGRAM | 37 | |
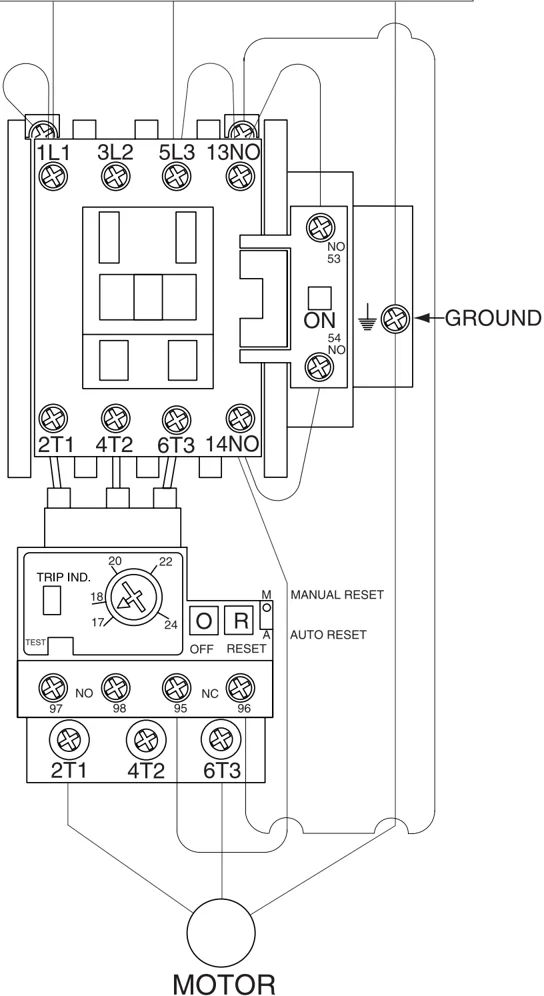
| MODEL G1023S WIRING DIAGRAM | 38 | |
| 8. | CLOSURE | 39 |
| MACHINE DATA | 40 | |
| PARTS BREAKDOWNS AND LIST | 41-43 | |
| TROUBLESHOOTING | 44 | |
| PUSH STICK PATTERN | 45 | |
| WARRANTY AND RETURNS | 46-48 |
SECTION 1: SAFETY
⚠WARNING
For Your Own Safety Read Instruction Manual Before Operating This Equipment
The purpose of safety symbols is to attract your attention to possible hazardous conditions. This manual uses a series of symbols and signal words which are intended to convey the level of importance of the safety messages. The progression of symbols is described below. Remember that safety messages by themselves do not eliminate danger and are not a substitute for proper accident prevention measures.
⚠DANGER Indicates an imminently hazardous situation which, if not avoided, WILL result in death or serious injury.
⚠WARNING Indicates a potentially hazardous situation which, if not avoided, COULD result in death or serious injury.
⚠CAUTION Indicates a potentially hazardous situation which, if not avoided, MAY result in minor or moderate injury. It may also be used to alert against unsafe practices.
NOTICE This symbol is used to alert the user to useful information about proper operation of the equipment.
⚠WARNING
Safety Instructions For Power Tools
- KEEP GUARDS IN PLACE and in working order.
- REMOVE ADJUSTING KEYS AND WRENCHES. Form habit of checking to see that keys and adjusting wrenches are removed from tool before turning on.
- KEEP WORK AREA CLEAN. Cluttered areas and benches invite accidents.
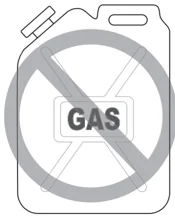
- DO NOT USE IN DANGEROUS ENVIRONMENT. Do not use power tools in damp or wet locations, or where any flammable or noxious fumes may exist. Keep work area well lighted.
- KEEP CHILDREN AND VISITORS AWAY. All children and visitors should be kept a safe distance from work area.
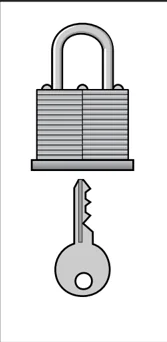
- MAKE WORKSHOP CHILD PROOF with padlocks, master switches, or by removing starter keys.
- DO NOT FORCE TOOL. It will do the job better and safer at the rate for which it was designed.
- USE RIGHT TOOL. Do not force tool or attachment to do a job for which it was not designed.
-2- G1023S/G1023S110 Heavy-Duty 10" Table Saw


WARNING
Safety Instructions For Power Tools
- USE PROPER EXTENSION CORD. Make sure your extension cord is in good condition. Conductor size should be in accordance with the chart below. The amperage rating should be listed on the motor or tool nameplate. An undersized cord will cause a drop in line voltage resulting in loss of power and overheating. Your extension cord must also contain a ground wire and plug pin. Always repair or replace extension cords if they become damaged.
Minimum Gauge for Extension Cords
| AMP RATING | LENGTH | ||
|---|---|---|---|
| 25ft | 50ft | 100ft | |
| 0-6 | 18 | 16 | 16 |
| 7-10 | 18 | 16 | 14 |
| 11-12 | 16 | 16 | 14 |
| 13-16 | 14 | 12 | 12 |
| 17-20 | 12 | 12 | 10 |
| 21-30 | 10 | 10 | No |
-
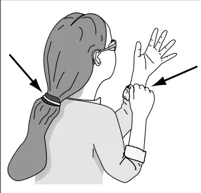
WEAR PROPER APPAREL. Do not wear loose clothing, gloves, neckties, rings, bracelets, or other jewelry which may get caught in moving parts. Non-slip footwear is recommended. Wear protective hair covering to contain long hair.
-
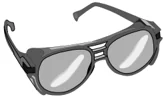
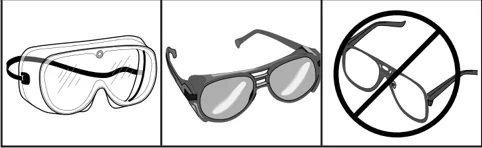
ALWAYS USE SAFETY GLASSES. Also use face or dust mask if cutting operation is dusty. Everyday eyeglasses only have impact resistant lenses, they are NOT safety glasses.
-
SECURE WORK. Use clamps or a vise to hold work when practical. It’s safer than using your hand and frees both hands to operate tool.
-
DO NOT OVER-REACH. Keep proper footing and balance at all times.
-
MAINTAIN TOOLS WITH CARE. Keep tools sharp and clean for best and safest performance. Follow instructions for lubricating and changing accessories.
-
USE RECOMMENDED ACCESSORIES. Consult the owner’s manual for recommended accessories. The use of improper accessories may cause risk of injury.
-
REDUCE THE RISK OF UNINTENTIONAL STARTING. On machines with magnetic contact starting switches there is a risk of starting if the machine is bumped or jarred. Always disconnect from power source before adjusting or servicing. Make sure switch is in OFF position before reconnecting.
-
MANY WOODWORKING TOOLS CAN “KICKBACK” THE WORKPIECE toward the operator if not handled properly. Know what conditions can create “kickback” and know how to avoid them.
-
CHECK DAMAGED PARTS. Before further use of the tool, a guard or other part that is damaged should be carefully checked to determine that it will operate properly and perform its intended function. Check for alignment of moving parts, binding of moving parts, breakage of parts, mounting, and any other conditions that may affect its operation. A guard or other part that is damaged should be properly repaired or replaced.
-
NEVER LEAVE TOOL RUNNING UNATTENDED. TURN POWER OFF. Do not leave tool until it comes to a complete stop.
-
NEVER OPERATE A MACHINE WHEN TIRED, OR UNDER THE INFLUENCE OF DRUGS OR ALCOHOL. Full mental alertness is required at all times when running a machine.
-
NEVER ALLOW UNTRAINED PERSONNEL TO OPERATE THE MACHINE WHILE UNSUPERVISED. Make sure any instructions you give in regards to machine operation are approved, correct, safe, and clearly understood.
-
IF AT ANY TIME YOU ARE EXPERIENCING DIFFICULTIES performing the intended operation, stop using the machine! Then contact our service department or ask a qualified expert how the operation should be performed.
⚠WARNING
Additional Safety Instructions For Table Saws
- ALWAYS use blade guard, splitter and anti-kickback fingers on all "through-sawing" operations. Through-sawing operations are those when the blade cuts completely through the workpiece as in ripping or crosscutting.
- AVOID KICKBACKS. A condition in which a piece of wood is thrown back towards an operator at a high rate of speed. If you do not have a complete understanding of how kickback occurs, or how to prevent it, DO NOT operate this table saw.
- ALWAYS hold the work firmly against the miter gauge or fence while holding down against the table.
- ALWAYS use a push stick for ripping narrow stock.
- NEVER perform any operation "free-hand," which means using only your hands to support or guide the workpiece. Always use either the fence or the miter gauge to position and guide the work.
- NEVER stand or have any part of your body in line with the path of the saw blade.
- NEVER reach behind or over the blade with either hand while the saw is running. If kickback occurs, that hand will be pulled into the spinning blade.
- NEVER use the miter gauge and rip fence at the same time. Move the rip fence out of the way when crosscutting.
- NEVER attempt to free a stalled saw blade without first turning the saw OFF.
- PROVIDE adequate support to the rear and sides of the saw table for wide or long workpieces.
- AVOID awkward operations and hand positions where a sudden slip could cause your hand to move into the blade.
- IF AT ANY TIME YOU ARE EXPERIENCING DIFFICULTIES performing the intended operation, stop using the machine! Then contact our service department or ask a qualified expert how the operation should be performed.
- ALWAYS LOWER OR REMOVE SAW BLADE WHEN NOT IN USE.
- NEVER USE A DAMAGED SAW BLADE OR ONE THAT HAS BEEN DROPPED.
- DADO AND RABBET OPERATIONS PRESENT SPECIFIC DANGER because those operations must be performed with the blade guard removed. Be especially aware of your personal safety whenever operating saw with the guard removed, and always immediately replace the blade guard after these operations are complete.
⚠WARNING
Like all power tools, there is danger associated with table saws. Accidents are frequently caused by lack of familiarity or failure to pay attention. Use this tool with respect and caution to lessen the possibility of operator injury. If normal safety precautions are overlooked or ignored, serious personal injury may occur.
⚠CAUTION
No list of safety guidelines can be complete. Every shop environment is different. Always consider safety first, as it applies to your individual working conditions. Use this and other machinery with caution and respect. Failure to follow guidelines could result in serious personal injury, damage to equipment or poor work results.
-4- G1023S/G1023S110 Heavy-Duty 10" Table Saw


Safety Accessories
Push Sticks
The use of push sticks, particularly when cutting small or narrow workpieces, provides a double benefit for saw operators. The push stick provides added leverage, enabling the operator to keep the workpiece firmly supported against the fence and the table. At the same time, the push stick keeps the operator's hand safely away from the rotation of the saw blade. See the template at the end of the manual for construction details, or purchase one from the Grizzly catalog. See Figure 1.
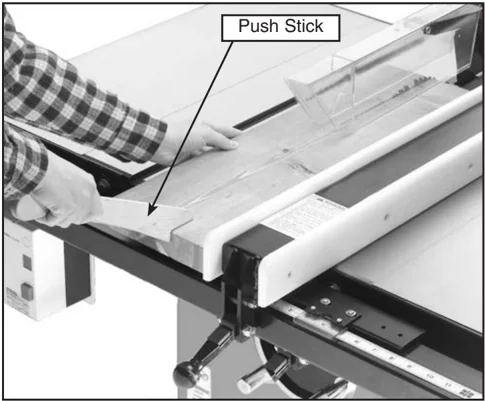
Figure 1. Push Stick.
Zero Clearance Table Inserts
Ideal for use when ripping thin strips or making bevel cuts, zero clearance table inserts prevent tear-out and jammed blades by supporting material that is close to the blade. Use the standard table insert as a template when creating additional inserts from wood or plywood. Blade slot inserts can be custom cut for specific blade angles by raising the running blade into an uncut insert at the angle you desire. Be sure to make an additional slot for the blade splitter. There are also a wide selection of table inserts in the Grizzly catalog. Clamp the insert firmly in place with a piece of wood when creating slots. Never hold the table insert with your hand while cutting new slots. See Figure 2 for examples of zero clearance table inserts.
G1023S/G1023S110 Heavy-Duty 10" Table Saw -5-
WARNING
Statistics prove that most common accidents among table saw users can be linked to kickback. Kickback is typically defined as the high-speed expulsion of stock from the table saw toward its operator. In addition to the danger of the operator or others in the area being struck by the flying stock, it is often the case that the operator's hands are pulled into the blade during the kickback. The following can help minimize kickbacks.
- Use your blade guard and splitter.
- Never, for any reason, place your hand behind the blade. Should kickback occur, your hand will be pulled into the blade.
- Inspect for alignment along the splitter and your blade.
- Never use the fence as a guide for cross-cutting.
- Never attempt freehand cuts.
- Use a pushstick or featherboard to maintain control of your workpiece.
- Feed cuts through to completion.
- Stand to the side when ripping.
- Ensure that your fence and your miter slot are parallel to the blade.
If you do not have a clear understanding of kickback and how it occurs, do not operate this table saw.

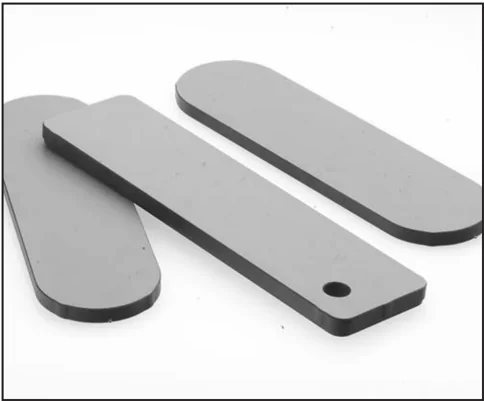
Figure 2. Zero Clearance Table Inserts
Push Paddles
Push paddles (shown in Figure 3) provide added leverage and support when ripping or crosscutting wide workpieces. There are a number of push paddles in the Grizzly catalog.
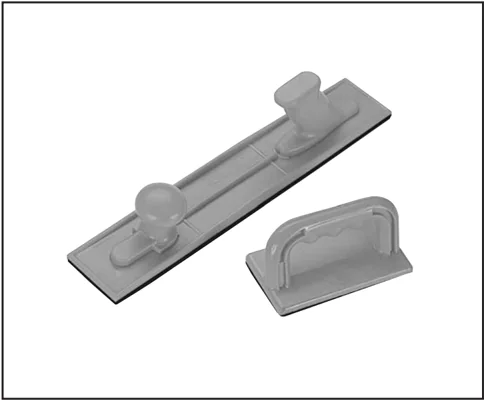
Figure 3. Push Paddles
Featherboards
Easily made from scrap stock, featherboards provide an added degree of protection against kickback. To make a featherboard, cut a 30-40° angle at one end of the board, and make a number of end cuts at approximately 1/4" apart and 2" to 3" deep. There are a number of featherboards in the Grizzly catalog. See Figure 4.
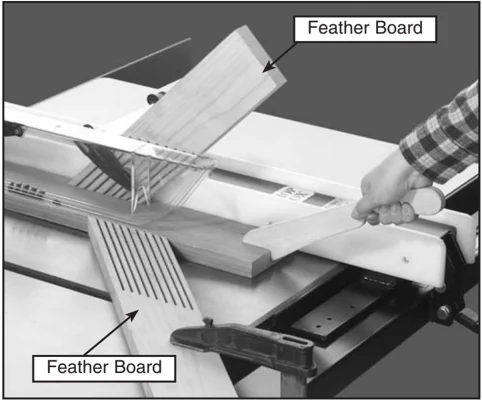
Figure 4. Featherboards
-6- G1023S/G1023S110 Heavy-Duty 10" Table Saw

Common Definitions, Terms and Phrases
The following is a list of common definitions, terms and phrases used throughout this manual as they relate to this table saw and woodworking in general. It is important that you read and become familiar with them before assembling, adjusting or operating this machine. Your safety is VERY important to us at Grizzly!
Arbor: Metal shaft extending from the drive mechanism, to which the cutting blade is attached.
Bevel Edge Cut: Tilting the saw arbor and blade to an angle between 0° and 45° to perform an angled cutting operation.
Blade Guard: Metal or plastic mechanism that mounts over the saw blade to prevent accidental contact with the cutting edge.
Crosscut: Table saw operation in which the miter gauge is used to cut across the grain of a piece of wood.
Dado Blade: Blade or set of blades that attach to the arbor and are used for cutting grooves and rabbets.
Dado Cut: Table saw operation that uses a dado blade to cut a flat bottomed groove into the face of wood stock.
Featherboard: Safety device used to keep a board against the rip fence or table. Allows operator to keep hands away from the saw blade.
Kerf: The resulting cut or gap made by a saw blade.
Kickback: A condition in which the wood is thrown back towards an operator at a high rate of speed.
Miter Gauge: A component that controls the wood stock movement while performing a crosscut. Allows for variation of angle cuts such as miter cuts used on a picture frame.
Moulding Head: A cutterhead attached to the arbor. Accepts interchangeable moulding knives for profile cutting. We DO NOT recommend the use of a moulding head as they require advanced skills in their operation.
Parallel: Being an equal distance apart at every point. i.e. the rip fence face is parallel to the side face of the saw blade.
Non-Thru Cut: A sawing operation that requires the removal of the blade guard and splitter. Dado and rabbet cuts are considered Non-Thru Cuts because the blade does not protrude above the top face of the wood stock. Always remember to reinstall the blade guard and splitter after performing a non-thru cut.
Perpendicular: Intersecting and forming right angles; at right angles to the vertical and horizontal planes. i.e. the blade is perpendicular to the table surface.
Push Paddle: Safety aid used to push a piece of wood stock through a cutting operation.
Push Stick: Safety aid used to push a piece of wood stock through a cutting operation. Usually used when rip cutting.
Rabbet: Cutting operation that creates an L-shaped channel along the edge of wood stock.
Splitter: Metal plate attached to the back of the blade guard that maintains the kerf opening in the wood when performing a cutting operation.
Standard Kerf: 1/8" gap made with a standard blade.
Straightedge: A tool used to check the flatness, parallelness, or consistency of a surface(s).
Thru-Sawing: A sawing operation where the wood stock thickness is completely sawn through. Proper blade height usually allows 1/4" of the top of the blade to extend above the wood stock.
Thin Kerf: 3/32" gap made with a thin kerf blade.
Rip Cut: A cut made along grain of the wood.
Sacrificial Fence: A piece of wood attached to the face of the rip fence that is designed to extend the fence face away from the metal portion of the fence. Used primarily when making rabbet cuts with a dado blade.
SECTION 2: CIRCUIT REQUIREMENTS
Model G1023S110 Only:
110V Operation
The Model G1023S110 motor is prewired to operate at 110V. When operating at 110V, we recommend using a NEMA-style 5-30 plug and outlet. See Figure 5A. You may also “hard-wire” the machine directly to your panel, provided you place a disconnect switch near the machine. Check the electrical codes in your area for specifics on wiring requirements.
Under normal 110V use, the motor draws approximately 24 amps. We recommend a 30 amp circuit breaker or a 30 amp slow-blow fuse.
The circuit you use should be dedicated, (i.e., the Model G1023S110 should provide the only draw from that circuit). If frequent circuit failures occur when using this machine, contact our Service Department or your local electrical contractor.
Because of the high amperage draw of this machine when wired for 110V, standard household circuit wiring may not be of a large enough gauge. A qualified electrician must install a new circuit with wires capable of handling a 30 amperage draw. Do not attempt to modify an existing circuit by replacing the circuit breaker with one rated for a higher amperage.
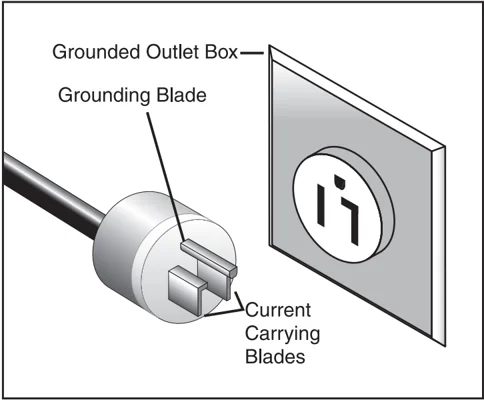
Figure 5A. NEMA 5-30 110V plug and outlet.
220V Operation
The motor supplied with the Model G1023S110 can be operated at either 110V or 220V. The motor comes prewired for 110V. Refer to the wiring diagram insert supplied with this manual for information about converting to operate at 220V.
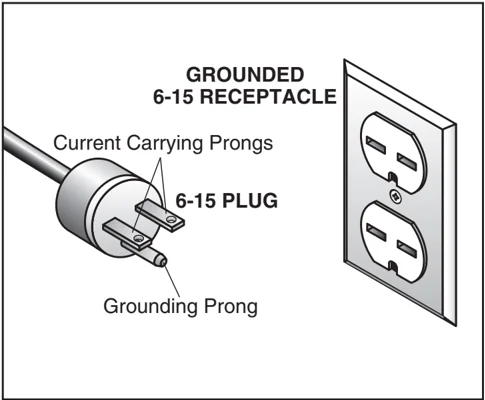
If converting to operate at 220V, a suitable 220V plug and magnetic switch must be wired in. When operating at 220V, we recommend using a NEMA-style 6-15 plug and outlet. See Figure 5B. You may also “hard-wire” the machine directly to your panel, provided you place a disconnect switch near the machine. Check the electrical codes in your area for specifics on wiring requirements. You will also need to replace the existing 110V switch with a magnetic 220V switch such as the Grizzly Model G4572.
Under normal use, the motor draws approximately 12 amps at 220V. We recommend a 15 amp circuit breaker for 220V operation This should be satisfactory for normal use while providing enough protection against circuit damage caused by power surges. Always check to see if your current wires are capable of handling a 15 amp load. If you are unsure, consult the advice of a qualified electrician. Do not attempt to modify an existing circuit by replacing the circuit breaker with one rated for a higher amperage.

Figure 5B. NEMA 6-15 220V plug and outlet
Model G1023S Only:
220V Operation
The Model G1023S is wired to operate at 220V. The cord set enclosed does not have a plug as the style of plug you require will depend upon the type of service you currently have or plan to install. The motor will safely draw about 18 amps at 220V under load. If you operate the Model G1023S on any circuit that is already close to its capacity, it might blow a fuse or trip a circuit breaker. However, if an unusual load does not exist, and power failure still occurs, have the circuit inspected by a qualified electrician.
Because of the high amperage draw of this machine, standard household circuit wiring may not be of a large enough gauge. A qualified electrician may need to install a new circuit with wiring capable of handling an 18 amperage draw. Do not attempt to modify an existing circuit by replacing the circuit breaker with one rated for a higher amperage.
Circuit Load
When operating at 220V, we recommend using a NEMA-style L6-20 plug and outlet. See Figure 5C. You may also "hard-wire" the machine directly to your panel, provided you place a disconnect switch near the machine. Check the electrical codes in your area for specifics on wiring requirements.
Under normal use, the motor draws approximately 18 amps at 220V. We recommend a 20 amp circuit breaker for 220V operation. This should be satisfactory for normal use while providing enough protection against circuit damage caused by power surges. Always check to see if your current wires are capable of handling a 18 amp load. If you are unsure, consult the advice of a qualified electrician.
 Grounded Outlet Box—
Grounding Blade Has
A Hook
Current
Carrying
Blades
Figure 5C. NEMA L6-20 220V plug and outlet

Models G1023S110 & G1023S:
Grounding
In the event of an electrical short, grounding provides electric current a path of least resistance to reduce the risk of electrical shock. This tool is equipped with an electric cord having an equipment-grounding conductor which must be properly connected to a grounding plug. The plug must be plugged into a matching outlet that is properly installed and grounded in accordance with all local codes and ordinances.
Improper connections of the electrical-grounding conductor can result in risk of electric shock. The conductor with green or green and yellow striped insulation is the electrical-grounding conductor. If repair or replacement of the electric cord or plug is necessary, do not connect the equipment grounding conductor to a live terminal.
 WARNING
This equipment must be grounded. Verify that any existing electrical outlet and circuit you intend to plug into is actually grounded. Under no circumstances should the grounding pin from any three-pronged plug be removed. Serious injury may occur.
Extension Cords
We do not recommend the use of extension cords with 220V equipment. It is much better to arrange the placement of your equipment and the installed wiring to eliminate the need for extension cords. Should it be necessary to use an extension, make sure the cord is rated Hard Service (grade S) or better. Refer to the chart in Section 1: Safety Instructions to determine the minimum gauge for the extension cord when using either 110V or 220V. The extension cord must also contain a ground wire and plug pin. Always repair or replace extension cords when they become worn or damaged.
CAUTION We have covered some basic electrical requirements for the safe operation of your machine. These requirements are not necessarily comprehensive. You must be sure that your particular electrical configuration complies with local and state codes. Ensure compliance by checking with your local municipality or a licensed electrician.
SECTION 3: INTRODUCTION
Commentary
We are proud to offer the Grizzly Model G1023S/ G1023S110 10" Heavy-Duty Table Saw. The Model G1023 Series is part of a growing Grizzly family of fine woodworking machinery. When used according to the guidelines set forth in this manual, you can expect years of trouble-free, enjoyable operation and proof of Grizzly's commitment to customer satisfaction.
The Model G1023 Series is an industrial grade table saw intended for professional use. Features include cast iron trunnions, triple V-belt drive, magnetic switch, and the Shop Fox® Classic Fence. The G1023S110 features a 2 H.P. dual voltage, TEFC motor that is prewired for 110V. The G1023S features a 3 H.P. 220V, TEFC motor.
All running parts operate on sealed ball bearings and require no maintenance for the life of the bearings. We also offer many accessories for the table saw including blades, outfeed rollers, a sliding table and a mobile base. Please refer to our current catalog for prices and ordering information.
We are also pleased to provide this manual with the Model G1023 Series. It was written to guide you through assembly, review safety considerations, and cover general operating procedures. It represents our effort to produce the best documentation possible. If you have any comments regarding this manual, please write to us at the address below:
Grizzly Industrial, Inc. c/o Technical Documentation P.O. Box 2069 Bellingham, WA 98227-2069
Most importantly, we stand behind our machines. If you have any service questions or parts requests, please call or write us at the location listed below.
Grizzly Industrial, Inc. 1203 Lycoming Mall Circle Muncy, PA 17756 Phone: (570) 546-9663 Fax: (800) 438-5901 E-Mail: techsupport@grizzly.com Web Site: http://www.grizzly.com
The specifications, drawings, and photographs illustrated in this manual represent the Model G1023 Series as supplied when the manual was prepared. However, owing to Grizzly's policy of continuous improvement, changes may be made at any time with no obligation on the part of Grizzly. Whenever possible, though, we send manual updates to all owners of a particular tool or machine. Should you receive one, we urge you to insert the new information with the old and keep it for reference.
WARNING Read the manual before assembly and operation. Become familiar with the machine and its operation before beginning any work. Serious personal injury may result if safety or operational information is not understood or followed.

Unpacking
The Model G1023 Series is shipped from the manufacturer in a carefully packed carton. If you discover the machine is damaged after you have signed for delivery, immediately call our Customer Service for advice.
When you are completely satisfied with the condition of your shipment, you should inventory its parts.
 WARNING
The G1023 Series is a heavy machine. DO NOT over-exert yourself while unpacking or moving your machine – you will need assistance and power equipment. Serious personal injury may occur if safe moving methods are not followed.
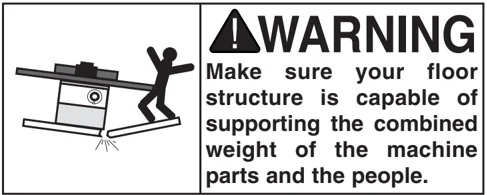
WARNING Make sure your floor structure is capable of supporting the combined weight of the machine parts and the people.
NOTICE
Save all containers and packing materials until you are satisfied that your Model G1023 Series has arrived in good condition. Freight company adjusters will want to inspect those materials in the event that a freight claim must be made.
-12- G1023S/G1023S110 Heavy-Duty 10" Table Saw
Piece Inventory
After all the parts have been removed from their containers, you should have:
- Table Saw Unit (Figure 6)
- Shop Fox® Classic Fence w/Rails (Figure 7)
- Miter Gauge
- Extension Wings (2)
- Fence Assembly
- Splitter/Guard Assembly
- Dust Port
- Table Insert
- Dado Insert
- Arbor Wrench
- Support Shaft
- Handwheel and Handle
- Switch Brace
- Hardware Bag (Figure 8)
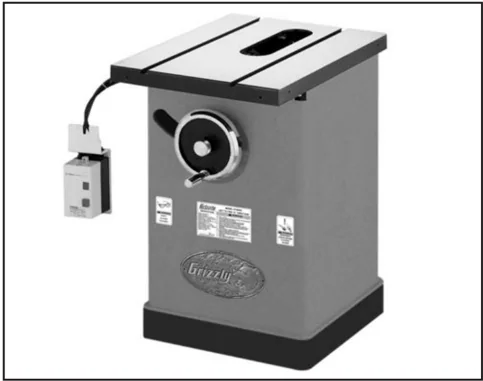
Figure 6. G1023 Series base unit.
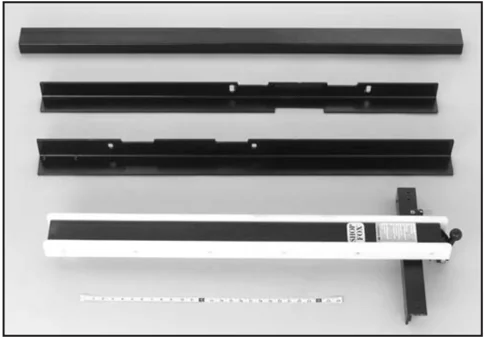
Figure 7. Rip fence assembly.
G1023S/G1023S110 Heavy-Duty 10" Table Saw
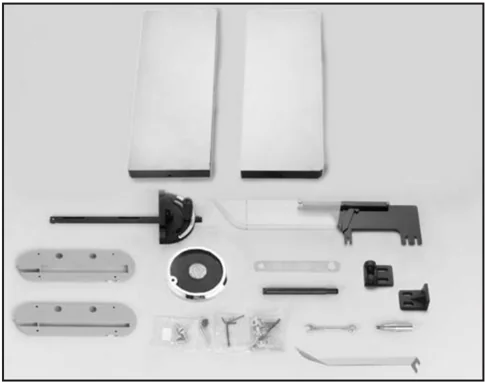
Figure 8. G1023 Series component layout.
The hardware bag should contain the following:
- (1) 3mm Allen® Wrench
- (1) 4mm Allen® Wrench
- (1) Arbor Wrench 7/8" and 1"
- (1) Combo Wrench 5/8"
- (1) Blade Guard Support
- (1) Jam Nut 5/8"-18
- (2) Phlp Hd Screw 1/4"-20 x 3/8"
- (2) Lock Washer 1/4"
- (4) Self Tapping Screw
- (4) Flat washer (For Self Tapping Screw)
In the event that any nonproprietary parts are missing (e.g. a nut or a washer), we would be glad to replace them; or for the sake of expediency, replacements can be obtained at your local hardware store.
Note: A full component and hardware breakdown of the Shop Fox® Classic fence can be found in the manual that accompanies the fence. Those items are not included in this manual.
Clean Up
The table and other unpainted parts of the Model G1023 Series are coated with a waxy grease that protects them from corrosion during shipment. Clean this grease off with a solvent cleaner or citrus-based degreaser such as Grizzly’s G7895 Degreaser. Do not use chlorine-based solvents – if you happen to splash some onto a painted surface, you will ruin the finish.
Site Considerations
- Floor Load: Your Model G1023 Series represents a large weight load in a small footprint. Most commercial floors are suitable for the saw. Some residential floors may require additional bracing to support both machine and operator.
- Working Clearances: Consider existing and anticipated needs, size of material to be processed through each machine, and space for auxiliary stands, work tables or other machinery when establishing a location for your table saw.
- Lighting and Outlets: Lighting should be bright enough to eliminate shadows and prevent eye strain. Electrical circuits should be dedicated or large enough to handle amperage requirements. Outlets should be located near each machine so power or extension cords are clear of high-traffic areas. Observe local electrical codes for proper installation of new lighting, outlets, or circuits.

SECTION 4: ASSEMBLY
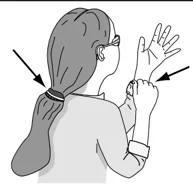
WARNING Keep clothing rolled up and out of the way of machinery and keep hair pulled back.
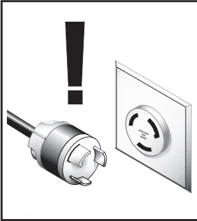
WARNING Disconnect power to the machine when performing any maintenance or assembly. Failure to do this may result in serious personal injury.
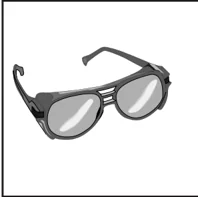
WARNING Wear safety glasses during the entire assembly process. Failure to comply may result in serious personal injury.
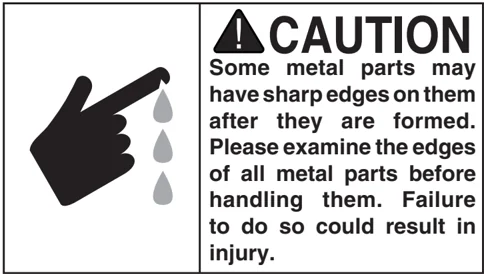
CAUTION Some metal parts may have sharp edges on them after they are formed. Please examine the edges of all metal parts before handling them. Failure to do so could result in injury.
Most of your Model G1023 Series has been assembled at the factory, but some parts must be assembled or installed after delivery. We have organized the assembly process into steps. Please follow along in the order presented here.
TOOLS REQUIRED: You will need a high quality square, a long straightedge, 10mm, 12mm, 14mm open end wrenches and a 3mm Allen® wrench.
Extension Wings
Inspect the extension wings for burrs or foreign material that may inhibit assembly. The mating edges of the wings and the table must be clean, smooth, and flat. Use a wire brush or file if necessary to clean up the edges.
 WARNING
The table and the wings represent a very heavy load. DO NOT over-exert yourself while lifting or moving the table and the wings – get assistance.
- Attach the left wing to the table using the three hex head bolts and the flat washers provided. Adjust the wing reasonably flush with the table. Do not tighten the bolts.
- Attach the right wing to the table using the three hex head bolts and the flat washers provided. Adjust the wing reasonably flush with the table. Do not tighten the bolts.
- Align the top of the wing flush with the table top directly above the front bolt, and tighten the front bolt. The front edge of the extension wing should also be flush with the front edge of the table.
- Raise or lower the rear of the extension wing until the middle of the wing is flush with the table top. Tighten the middle bolt.
- Raise or lower the rear of the wing until the wing and table are flush. Tighten the bolt. Any adjustment at this point should be minimal.
- Check flushness over the front bolt and re-adjust if necessary.
- Repeat Steps 3-4 for the other extension wing.


-
Now, check the alignment of the table and both wings with a straightedge. The straightedge should run flat across both wings and the table top. If the straightedge contacts both wings and the table evenly, you are finished with this section. If the straightedge does not contact them evenly, continue to Step 9.
-
If the extension wings tilt up or down at the outside edges, remove the wings and shim them with masking tape similar to Figure 9.
a. If the wings tilt down, stick layers of masking tape under each bolt near the bottom edge of the wing and retighten.
b. If the wing tilts up, stick layers of masking tape above each bolt near the top edge of the wing and retighten. Allow the tape to extend above table surface and trim with a sharp knife after final assembly.
- Replace the wings and check again.
 Masking Tape
Figure 9. Using tape to shim for wing alignment.
Switch
The switch comes prewired to the motor and can be easily mounted to the table through the holes in the extension wing.
To mount the switch:
-
Line the switch bracket holes up with the holes in the extension wing on the backside of the edge.
-
Use the 5/16"-18 Phillips® flat head screw and nut to attach the switch to the extension wing as shown in Figure 10.
-
Mount the switch brace between the lower switch screw and the table screw.
 Figure 10. Installing switch.
Fence
Your Model G1023 Series comes with a Shop Fox® Classic fence. For fence assembly instructions, refer to the manual provided with the fence.



Motor Brace
The motor brace shown in Figure 11 has been installed for shipping purposes. Please remove this brace before continuing with assembly. The bolts that secure the brace should be screwed back in at the locations from which they came.
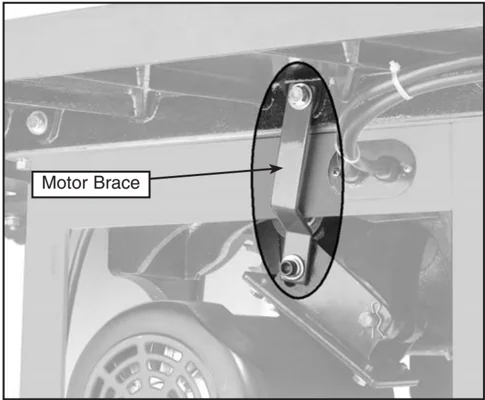
Figure 11. Motor Brace.
Guard Bracket
To install the guard support shaft:
- Place the threaded end of the shaft through the hole in the back of the saw (Figure 12).
- Thread the shaft into the tilt assembly.
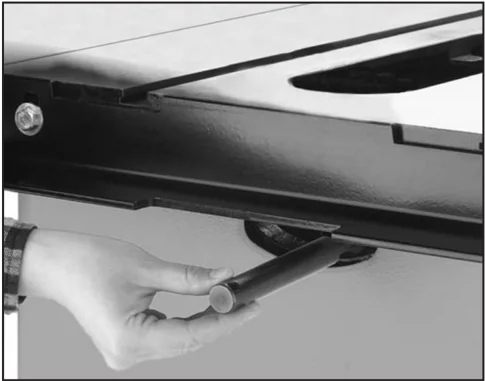
Figure 12. Attaching guard support shaft.
- Slide the lower half of the bracket onto the splitter shaft and temporarily tighten the set-screws.
- Place the upper bracket half on the lower half and secure both halves with the bolts, nuts and washers as shown in Figure 13. Do not fully tighten the nuts at this moment.
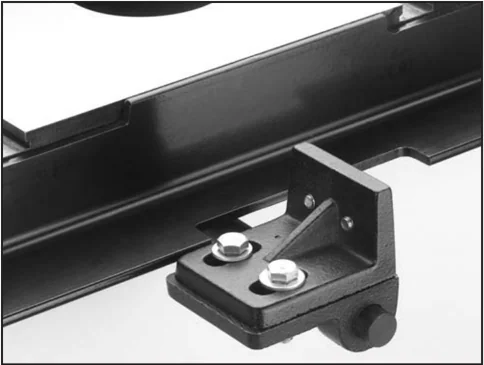
Figure 13. Splitter bracket installed.


Handwheel
One handwheel has been removed for shipping. To install, place the handwheel over the threads and screw the lock knob into the center. Next insert the handle into the handwheel and tighten it as shown in Figure 14. Install the other handle onto the other handwheel.
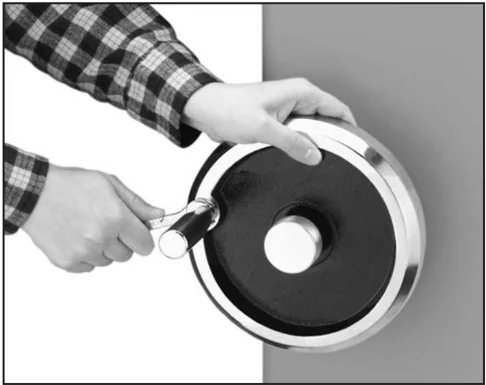
Figure 14. Tightening handle onto handwheel.
Table Insert
! WARNING Disconnect power to the machine when performing any maintenance, assembly or adjustments. Failure to do this may result in serious personal injury.
The table insert provides access to the blade and the arbor when removed. When in place, the insert provides support for the materials being cut.
- Disconnect the power cord from the outlet!
- Ensure that all four setscrews are firmly in contact with the table casting.
- Using a 6mm Allen® wrench, raise or lower each of the four setscrews shown in Figure 15 until the insert is flush with the table top. Use a straightedge to make sure the table insert is flush with the top of the table.
- Now make sure the blade will not come into contact with the table insert. Position the blade at 90°, then raise and lower the blade through its full range of motion. Also, rotate the blade, making sure that the blade never contacts any part of the table insert. Do the same with the blade in the 45° position. Wear leather gloves while rotating the blade to prevent being cut.
NOTICE The table insert must be flush with the top of the table or the workpiece will hit the edge of the table insert at the beginning of the cut.
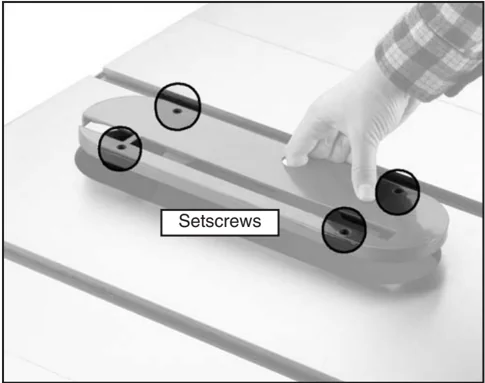
Setscrews
Figure 15. Setscrews on each corner of insert.

Saw Blade
WARNING Disconnect power to the machine when performing any maintenance or assembly. Failure to do this may result in serious personal injury.
WARNING The saw blade is extremely sharp. Use extra care when handling the blade or working near it. Serious injury is possible.
Please review this section even if your saw blade came pre-installed. To install the blade:
- Remove the table insert to gain access to the arbor.
- Remove the nut and the outer arbor flange from the arbor.
- Place the blade on the arbor, making sure that it seats firmly against the inner arbor flange. Ensure that the top blade teeth are facing the front of the saw.
- Replace the outer arbor flange and rethread the arbor nut onto the arbor.
- Hand tighten the nut and snug with the wrench included with the saw. DO NOT overtighten.
IMPORTANT: Make sure the blade is installed with the teeth facing the front of the saw.
Blade Guard/Splitter
- Slip the blade guard/splitter over the mounting bolts as shown in Figure 16. The washers should be between the bolt head and the slots. Tighten the bolts to secure the blade guard/splitter.
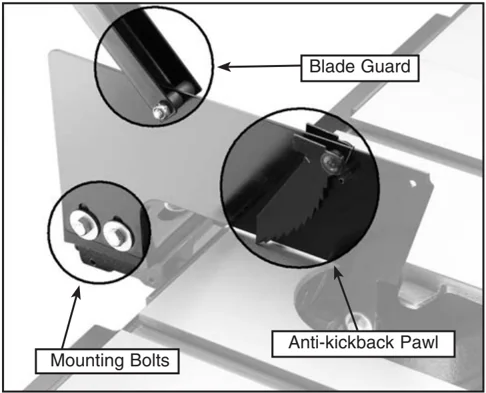
Figure 16. Blade guard and splitter in place.
- Set a machinist's square against the face of the blade splitter. Slightly rotate the rear bracket to adjust the face of the blade splitter perpendicular to the table top as shown in Figure 17.
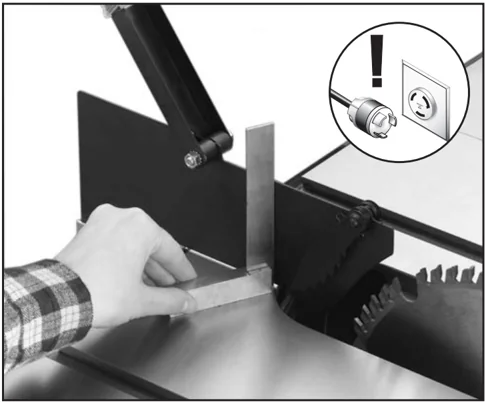
Figure 17. Blade splitter square to table.

WARNING
The saw blade is extremely sharp. Use extra care when handling the blade or working near it. Serious injury is possible.
- Next, set a straightedge against the face of the saw blade and the blade splitter as shown in Figure 18. If the blade splitter is properly aligned, please skip ahead to the "Table Insert" instructions; otherwise, continue with the next step.
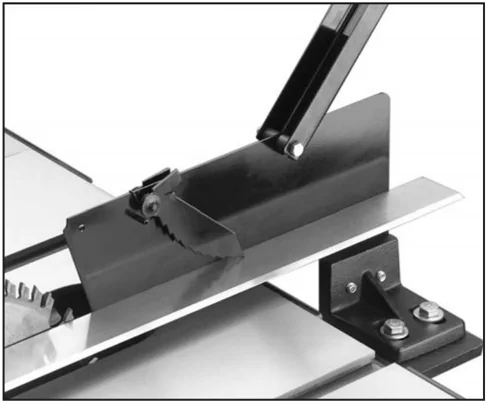
Figure 18. Guard in line with blade.
- If the blade splitter is to the right of the blade as shown in Figure 19, simply add washers between the splitter and the front support bracket, and adjust the rear splitter support as shown in Figure 20.
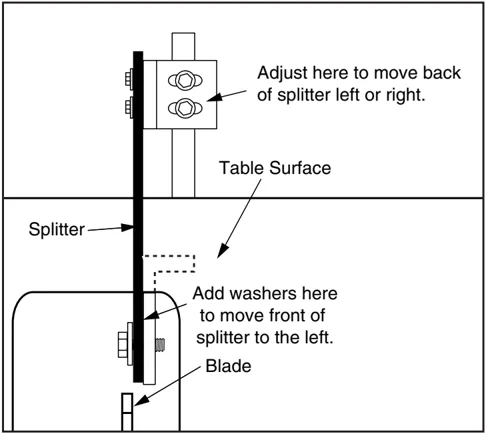
Figure 19. Improper splitter/blade alignment.
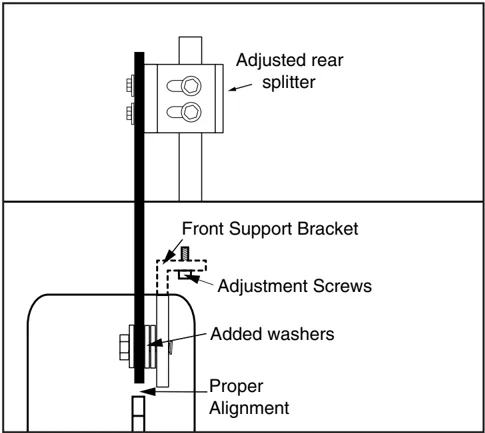
Figure 20. Proper splitter/blade alignment.
-20- G1023S/G1023S110 Heavy-Duty 10" Table Saw

-
Recheck the splitter alignment to the blade and to the table top. Adjust as necessary and tighten all the bolts before use. If the blade guard is properly aligned, please skip ahead to Step 10; otherwise, continue with the next step.
-
If the splitter is positioned to the left of the blade, alignment cannot be achieved by washer placement. Adjustment of the front support bracket is required. See Figure 20 for adjustment details. Loosen the (2) adjustment screws and move left or right.
-
If this adjustment does not allow enough movement of the splitter, remove the table and wings, and set them to one side. Be sure to note the position of the table shims. Replace them to their original position before re-attaching the table.

 The table and wings represent a very heavy load. DO NOT over-exert yourself while lifting or moving the table and wings – get assistance.
- The arbor bracket and motor pulley needs adjusting. Loosen the adjustment bolt shown in Figure 21, and slowly slide the arbor bracket towards the end of the shaft. Only move the arbor bracket a distance equal to the amount of misalignment between the blade and the splitter, or a little more. You can always adjust the splitter back to the left with washers. Tighten the adjustment bolt securely.
Blade Adjustment Bolt
Arbor Bracket
 Figure 21. Arbor bracket adjustment locations.
-
Moving the arbor bracket moves the V-belts and pulleys out of alignment, so adjustment of the motor pulley is required. Simply loosen the setscrew in the middle groove of the pulley, and slowly slide the pulley toward the end of the motor shaft. Once the V-belts are back in alignment, tighten the setscrew securely.
-
Recheck the guard alignment to the blade and to the table top. Adjust as necessary and tighten down all the bolts before use. If the blade guard is properly aligned, re-attach the table, making sure there is adequate blade clearance through all blade adjustments.
-
Adjust the blade to 45°. Raise and lower it through the full range. Re-adjust the blade to 90°, then raise and lower it through the full range. There should be no contact between the blade, the base, the table insert, or any other part of the saw. If there is contact, repeat steps 7-9.
SECTION 5: ADJUSTMENTS
WARNING Disconnect power to the machine when performing any maintenance, assembly or adjustments. Failure to do this may result in serious personal injury.
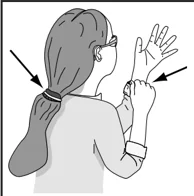
WARNING Keep loose clothing rolled up and out of the way of machinery and keep hair pulled back.
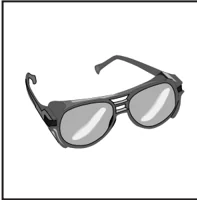
WARNING Wear safety glasses during the entire adjustment process. Failure to comply may result in serious personal injury.
Blade Height
When preparing to operate your table saw, you should adjust the blade height to approximately 1/4" above the surface of the material you plan on cutting. The handwheel at the front of the saw adjusts blade height. To adjust blade height:
- Loosen the locking knob at the center of the blade height handwheel.
- Using a sample of the material you plan on cutting as a gauge, turn the handwheel until the blade reaches its intended height.
- Retighten the locking knob.
- Recheck your blade height with the sample material and re-adjust, if necessary.
Blade Tilt
- Set your blade angle at zero as shown on the angle indicator on the front of the saw and raise the blade several inches above the table.
- Place a machinist's square flat on the table and slide it alongside the blade. The square should contact the blade evenly from bottom to top. Make sure that a blade tooth does not obstruct the movement of the square.
- Adjust the handwheel until the square is flush with the blade. Loosen the tilt indicator arrow, set to zero, and retighten. Loosen and adjust the stop bolt on the left side of the front trunnion to allow a 90° stop point. See Figure 22 for details.
- Turn the blade angle handwheel until the angle indicator points at the desired angle.
- Tighten the handwheel locking knob.
- Repeat Steps 1-6 for setting the blade to 45° and adjust the 45° stop bolt on the right side of the front trunnion. Use the 45° side of a combo square or a bevel gauge set at 45°.
 90° Stop Bolt
45° Stop Bolt
Figure 22. Geared trunnion.

Miter Slot to Blade
Your table saw will give the best results if the miter slot and the rip fence are adjusted parallel to the blade. If either of these are not exactly parallel, your cuts and your finished work will be lower in quality, but more important, this condition increases the risk of kickback. Take the time to adjust your table saw properly. A few minutes now will be time well spent.
- Disconnect the power cord from the outlet.
- Use an adjustable square to measure the distance from the miter slot to a carbide tip on the blade as shown in Figure 23. Make sure that the face of the adjustable square is even along the miter slot.
- With the end of the adjustable square just touching the tip, lock the square in place. Now, mark the carbide tip with a magic marker where you made this measurement,
- Rotate that tip to the other end of the table insert.
- Slide the adjustable square down to the other end of the table insert, and compare the distance from the marked blade tip to the end of the adjustable square.
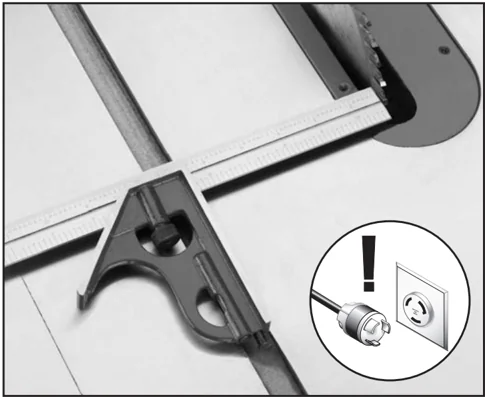
Figure 23. Adjusting blade to miter slot.
- If the blade tip does not touch the end of the adjustable square similar to the first measurement, then the table will need to be adjusted.
- To adjust the table, loosen the four bolts in the table mounting locations (see Figure 24) and slightly tap the table. Repeat Steps 1-5 until satisfactory. Do not forget to tighten the table mounting bolts when finished.
Table Mount Holes
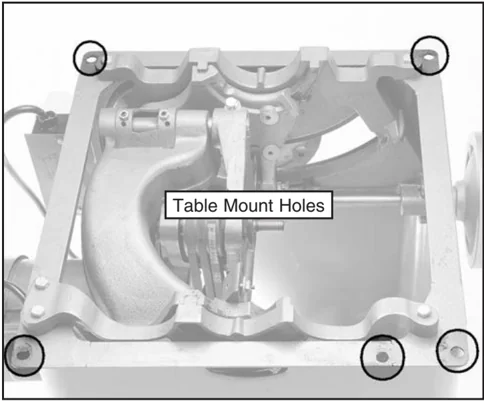
Figure 24. Table mounting bolt holes.
- Now check to see if the blade remains parallel to the miter slot when tilted to 45°.
- Tilt the blade to 45° and repeat Steps 1-5. If the blade is still parallel to the miter slot, continue on to the "Miter Gauge" instructions. Otherwise, continue with the next step.
- If the blade was parallel to the miter slot at 90° but not at 45°, the table will need to be shimmed with metal shim stock. The shims are placed under the table over each of the four table mounting bolts.
WARNING The saw blade is dangerously sharp. Use extra care when handling the blade or working near it. Serious injury is possible.

11. Refer to Figures 25 and 26, for shim placement. If the distance of A is longer than B, shim(s) will need to be placed under corners #1 and #2. If the distance of B is longer than A, shim(s) will need to be placed under corners #3 and #4. Very thin shim stock works well, just make sure they are all the same thickness, and you put an equal number under each of the two corners.
12. Tighten down one bolt a small amount and then move on to each of the others, tightening each down the same amount. Continue to rotate through the bolts, tightening them a little each time until they are all secure.
13. Now recheck the blade to miter slot at 90° and 45° by repeating Steps 1-5. If the distance of A and B are equal, continue to the "Miter Gauge" instructions. If the distances are still off, repeat Steps 9-12.
14. Once you feel you have the miter slot adjusted to the blade, recheck all measurements and be sure the table mounting bolts are secure. Repeat Step 10 in Section 4: Assembly, "Blade Guard/Splitter." Also, if you ever remove the table in the future, be sure to make note of shim placements and reassemble exactly how it came apart.
 STEP 1
Blade tilted to 45°
#1 #3
A
#2 #4
Figure 25.
 STEP 2
Blade tilted to 45°
#1 #3
B
#2 #4
Figure 26.
-24- G1023S/G1023S110 Heavy-Duty 10" Table Saw
Blade Alignment
The blade position can be adjusted slightly in case it contacts the table insert when raised or tilted. This adjustment can be made either by moving the whole trunnion assembly, or by just moving the arbor bracket. Try adjusting by moving the whole trunnion first, this is the easier of the two ways.
To adjust the blade position by moving the trunnion:
- Disconnect plug from power source.
- Remove the table and wings and set them to one side. Be sure to note the position of the table shims. Replace them to their original position before re-attaching the table.
- Loosen the four trunnion mounting bolts as shown in Figure 27, and nudge to either the left or right depending on where the blade is hitting the saw.
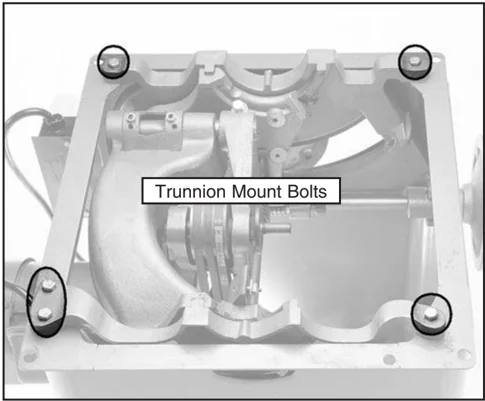
Figure 27. Trunnion mounting bolts.
WARNING
The table and wings represent a very heavy load. DO NOT over-exert yourself while lifting or moving the table and wings – get assistance.
- Re-attach the table, making sure there is adequate blade clearance through all blade adjustments. Recheck guard alignment to the blade and to the table top. Adjust as necessary and tighten down all the bolts before use.
- If the blade is still contacting the insert, repeat Steps 1-4. Check all other adjustments.
- Recheck the blade to miter slot adjustments, and adjust as necessary.
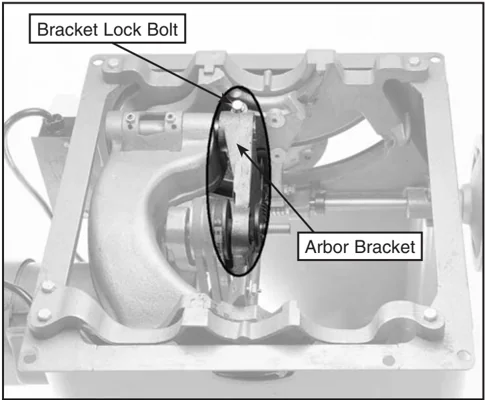
Figure 28. Adjusting arbor bracket.
To adjust the blade position by moving the arbor bracket:
- Disconnect plug from power source.
- Remove the table and wings and set them to one side. Be sure to note the position of the table shims. Replace them to their original position before re-attaching the table.
- Loosen the bracket lock bolt shown in Figure 28.
- Slowly slide the arbor bracket towards the end of the shaft.
NOTICE
If you make the adjustment described in this section, check and adjust the blade splitter to make sure it aligns with the blade.
-
Moving the arbor bracket moves the V-belts and pulleys out of alignment, so adjustment of the motor pulley is required. Simply loosen the setscrew in the middle motor groove pulley and slowly slide the pulley towards the end of the motor shaft. Once the V-belts are back in alignment, tighten the setscrew securely.
-
Re-attach the table, making sure there is adequate blade clearance through all blade adjustments. Recheck guard alignment to the blade and to the table top. Adjust as necessary and tighten down all the bolts before use.
-
If the blade is still contacting the insert, repeat Steps 1-6. Check all other adjustments.
-
Recheck the blade to miter slot adjustments, and adjust as necessary.
Rip Fence
The rip fence included with your Model G1023 Series is designed to provide excellent ripping accuracy when properly adjusted. For complete adjustment procedures, refer to the manual that is included with the fence.
Miter Gauge
To adjust the miter gauge so it is perpendicular to the saw blade:
-
Disconnect machine from the power source. Loosen the lock knob on the miter gauge and place a square against the face of the miter body and the blade.
-
Adjust the miter body until there is no space between the square and the blade. Tighten the lock knob.
-
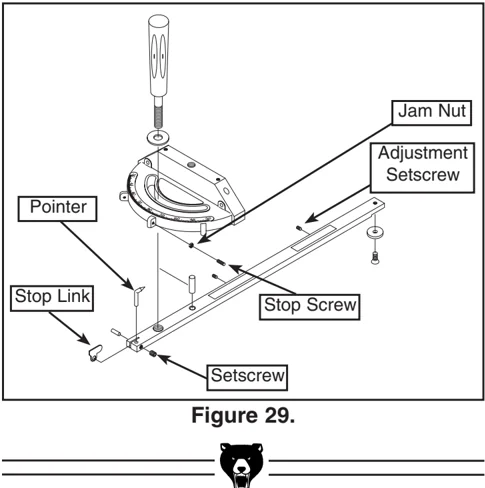
With the stop link in the up position, loosen the jam nut and adjust the stop screw until it is seated against the stop link. See Figure 29 for part locations.
-
Now loosen the setscrew on the left front side of the miter bar, adjust the pointer to 90° and tighten the setscrew.
-
To adjust to 45°, follow Steps 1-4 using an adjustable square set to 45°.
-
After rotating the miter body from 45° to 90° and back a few times, double-check your adjustments at both angles to assure that you have accurately set your miter gauge.
The miter bar can be adjusted so that it fits tighter in the miter slot. To do this, turn the adjustment setscrew shown in Figure 29 clockwise. Turn the adjustment setscrew in small increments at a time so you do not over-adjust the miter bar.
 Figure 29.
SECTION 6: OPERATIONS
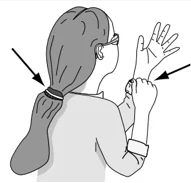
WARNING Keep loose clothing out of the way of machinery and keep hair pulled back.
WARNING Disconnect power to the machine when performing any adjustments or maintenance. Failure to do this may result in serious personal injury.
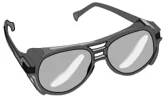
WARNING Wear safety glasses during all operations on the shaper. Failure to comply may result in serious personal injury.
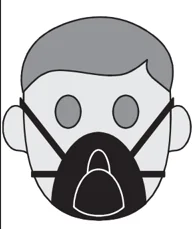
CAUTION Always wear a dust mask when operating the table saw. Using this machine produces sawdust which may cause allergic reactions or respiratory problems.
Pre-Run Check
Before you begin to use your Model G1023 Series, you should give it a thorough inspection. While making your inspection, ask yourself the following questions:
- Are all the fasteners tight?
- Is the blade mounted correctly?
- Is the saw stable?
- Is it wired properly?
- Is your electrical system properly configured?
- Have you checked your workpiece for obvious defects?
- Are the V-belts properly tensioned and the pulleys properly aligned?
- Is the guard assembly installed and functional?
- Have you checked the saw blade clearance when it is adjusted to varying angles and depths?
- Have you read all the warnings and directions regarding the operation of this machine?
NOTICE
The following section was designed to give instructions on the basic operations of this table saw. However, it is in no way comprehensive of every table saw application. There are many different jigs that can be built to increase safety, accuracy, and types of cuts. WE STRONGLY RECOMMEND that you read books, trade magazines, or get formal training to maximize the potential of your table saw.
Test Run
- Face the table saw and stand to the left of the blade path.
- With one finger on the START button and one finger on the STOP button, turn the saw on. Be ready to turn the saw off in case of mishap.
- Watch and listen to the saw. Note whether there are any unusual sounds or excessive vibrations.
- If anything appears abnormal, immediately turn off the saw, unplug it, and fix the problem. If a problem exists that is beyond the scope of this manual, call our service department.
- If the saw is operating correctly, turn it off and prepare to make a cut according to the instructions outlined in this section.
Blade Selection
Choosing the correct blade for the job is essential for the safe and efficient use of your table saw. Ignoring this important step could result in damage to the saw and serious injury to the operator. Below are the most common saw blades and their uses.
- Rip Blade (shown in Figure 30): Used for cutting with the grain. Typically, 10" rip blades have between 20-40 teeth, a flat-top ground profile (see Figure 31 for saw tooth profiles) and large gullets to allow for large chip removal.
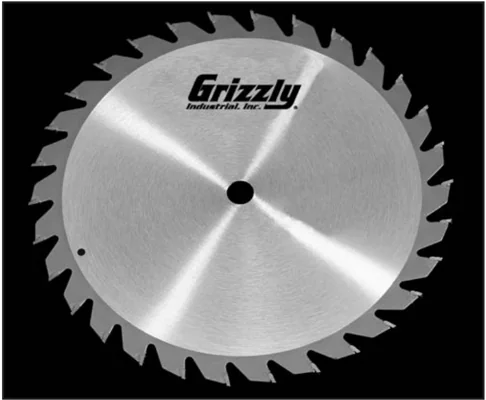
Figure 30. Ripping blade.
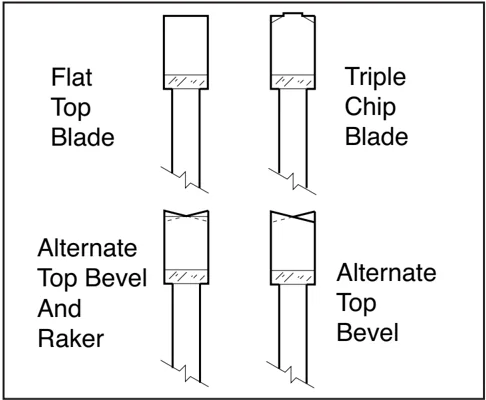
Figure 31. Various saw tooth cutting profiles.

- Crosscut Blade: Used for cutting across the grain. 10" crosscut blades have between 60-80 teeth, alternate top bevel or steep alternate top bevel tooth profiles, small hook angle and a shallow gullet. See Figure 32.
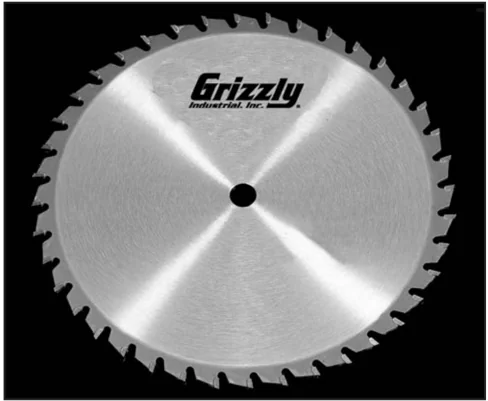
Figure 32. Crosscutting blade.
- Combination Blade: Used for cutting with and across the grain. A compromise between a rip blade and a crosscut blade, a 10" combination blade will typically have between 40-50 teeth, an alternate top bevel and flat or alternate top bevel and raker tooth profile. The teeth are arranged in groups of five. The gullets are small and shallow within the groups of five teeth, similar to a crosscut blade; then large and deep between the groups, like a ripping blade. See Figure 33.
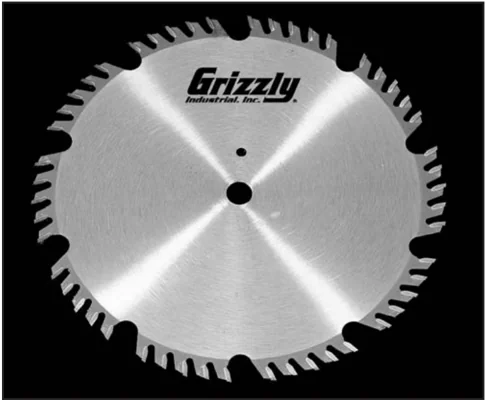
Figure 33. Combination blade.
- Plywood Blade: Used for cutting plywood or veneers. A 10" plywood blade will have 40-80 teeth, a steep alternate top bevel tooth profile and very shallow gullet. See Figure 34.
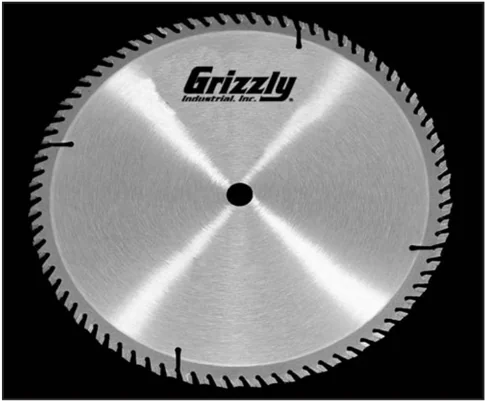
Figure 34. Plywood blade.
-
Thin-kerf: Most types of saw blades are available in a thin-kerf style. Designed primarily to minimize stock waste, thin-kerf blades be used in conjunction with a blade stabilizer to reduce blade wobble. Note: Most blade guards/splitters are thicker than most thin-kerf blades. Make sure that the stock will pass by the guard/splitter before beginning a cut.
-
Dado Blades: There are two types of dado blades: stack and wobble. Stack dadoes are expensive and time consuming to set up but leave a clean and smooth finish. Stack dadoes are used for fine furniture and cabinet making. Wobble dadoes are inexpensive and easy to set up, but leave a rough finish.
-
Moulding Heads: A moulding head is a cutterhead that attaches to the arbor and holds individual moulding knives. We do not recommend their use. They are very dangerous and required training beyond the scope of this manual.
This section on blade selection is by no means comprehensive. Always follow the saw blade manufacturer's recommendations to assure safe and efficient operation of your table saw.
Crosscutting
Crosscutting means cutting across the grain of the wood. In wood products without grain (i.e. MDF, particleboard) crosscutting simply means cutting across the width of the stock.
Crosscuts are made with the miter gauge. There are two miter gauge slots in the table top. Use the one that works best for the piece being crosscut. To make a crosscut using the miter gauge:
- Inspect the board for soundness. You do not necessarily need a square edge to crosscut with accuracy.
- Inspect the miter gauge. Is it properly set and tight? Move the rip fence completely out of the way.
- Turn on the saw and allow it to come to full speed.
- Hold the workpiece firmly against the face of the miter gauge and ease it into the blade (See Figure 35) and through the workpiece.
- Turn off the saw and allow the blade to come to a full stop.
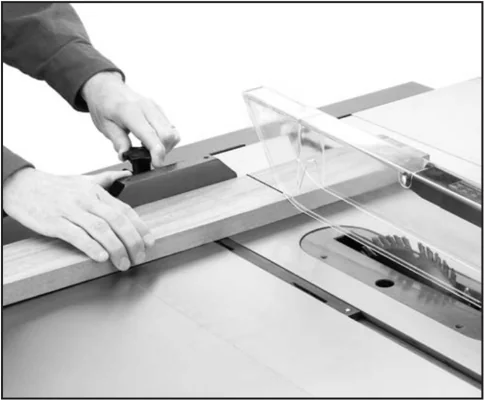
Figure 35. Crosscut operation.
WARNING Small cutoff pieces can contact the moving blade and be thrown back toward the operator. Always use the least amount of clearance between the table insert and the blade to reduce the risk of injury from these pieces. Never attempt to grab these pieces while the table saw is turned on. Your hand may come into contact with the blade. Turn the table saw off and safely remove these pieces AFTER the blade has come to a complete stop.


Ripping
Ripping means to cut with the grain of the wood. In other materials such as MDF or plywood, ripping simply means to cut lengthwise. To rip a board:
- Inspect the board for soundness. You will need a straightedge to rip with accuracy. Your workpiece may need to be jointed flat before attempting to cut on the table saw.
WARNING Never attempt to rip a board that does not have one perfectly straight edge on it. Always run the straight edge of the board against the rip fence. Failure to do this could result in kickback and serious personal injury.
-
Set the rip fence to the desired distance from the blade. IF YOU ARE MAKING NARROW CUTS, USE A PUSH STICK. Serious injury can occur if you put your hands close to the blade. A push stick pattern has been included in this manual on Page 45, or you can purchase the G3445 or G1411 push stick from the Grizzly catalog. Use them to hold the workpiece against the table and fence, and push the workpiece fully past the blade. When a small width is to be ripped and a push stick cannot be safely put between the blade and rip fence, rip a larger piece to obtain the desired piece.
-
Turn on the saw and allow it to reach full speed. Place the trued edge of the board against the rip fence. Feed the workpiece slowly and evenly into the blade and through the workpiece. Do not stand behind the board as shown in Figure 36.
 Figure 36. Do not stand directly behind wood!
WARNING Stand out of the line of potential kickback. Hold the workpiece firmly against the fence and table. Do not allow your fingers to get close to the blade! Do not reach over the blade to off-load the workpiece.


Dado Operations
In addition to its ability to rip and crosscut lumber, the table saw is also an invaluable tool for creating a variety of dadoes. These non-through cuts can be created with a regular saw blade or with specially-designed stacking or wobbling dado blades. See Figure 37.
 Figure 37. Optional dado blade system.
!WARNING Never allow hands or arms to be above or behind the saw blade. Should kickback occur, the hands and arms can be pulled into the saw blade. Serious injury will result.
!WARNING Never perform a through cut operation with a dado blade. A dado blade was designed to make non-through cuts only. Failure to follow these directions could result in serious injury will result.
!WARNING Dado operations present very real hazards requiring proper procedures to avoid serious injury. The chance of kickback is always greater when dado blades are used so extra precautions must be used. Any movement of the stock away from the fence will cause kickback. Be certain that stock is flat and straight. Failure to follow these warnings could result in serious personal injury.
!CAUTION Always use push sticks, featherboards, push paddles and other safety accessories whenever possible to increase safety and control during operations which require the blade guard and splitter to be removed from the saw. ALWAYS replace the blade guard after dadoing is complete.
Proper dado operations will differ depending on the blade system you choose. Consult the instructions included with your dado blades for directions regarding attachment and adjustment. To use a dado blade:
- Ensure that the saw is switched off and disconnected from its power source.
- Remove the table insert, splitter guard, and regular saw blade.
- Attach and adjust the dado blade system as recommended in the dado blade's instructions.
- Install the dado table insert.
- Raise the blade system up to the desired depth of the dado. Make sure the dado blade will not cut through the work piece.
- If dadoing along the length of your workpiece, adjust the distance between the fence and the inside edge of the blade to suit your needs. When cutting across the wood grain, use the miter gauge as a guide while dadoing. Remember: Never use the fence as a stop in conjunction with your miter gauge.
- Reconnect the saw to the power source.
- Using a scrap as a test piece, switch on the saw and take a pass over the dado blade.
- If the cut is satisfactory, repeat with your finish stock.
- Re-install the blade guard.
Dadoing operations can also be accomplished using a conventional saw blade. To create a single-blade dado:
- Clearly mark the width of the dado cut on your workpiece. Include marks on the edge of your workpiece so you can clearly identify your intended cut while the material is laying flat on the saw table.
- Set the blade height to the depth of cut you wish to create.
- If the dado runs the length of the material, adjust the fence so the blade is aligned with the inside of your dado channel. See Figure 38.
- Turn on your saw and make the first cut.
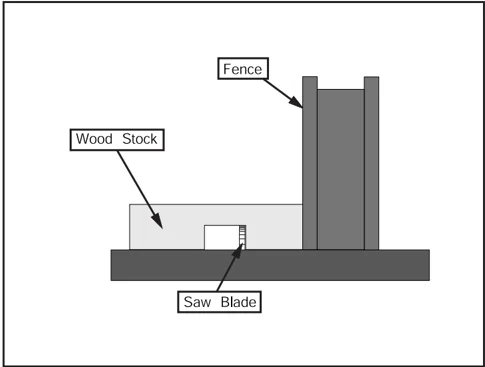
Figure 38. Single-blade dado cut.
- Turn off the saw and re-adjust the fence so the blade is aligned with the other edge of the intended dado channel. Be sure to keep the cuts within your marks; otherwise, your dado will be too large.
- Turn on the saw and make a second cut.
- Move toward the center of the dado with your subsequent cuts until the dado is complete.
- Re-install the blade guard.
Rabbet Operations
In addition to its ability to create a variety of dados, this table saw can be used to cut L-shaped rabbets. These cuts can be created with a regular saw blade or with specially-designed stacking or wobbling dado blades like the one shown in Figure 37.
Proper rabbet operation will differ depending on the blade system you choose. Consult the instructions included with your dado blades for directions regarding attachment and adjustment. To use a dado blade for rabbeting operations:
- Rabbet cutting on the edge of a piece of stock requires the use of a sacrificial fence attachment. See Figure 39. The sacrificial fence can be made from a piece of wood that is as long as the metal fence and 3/4" thick. Once the sacrificial fence has been cut, attach it to the metal fence with screws or clamps, making sure they are all secure and tight.
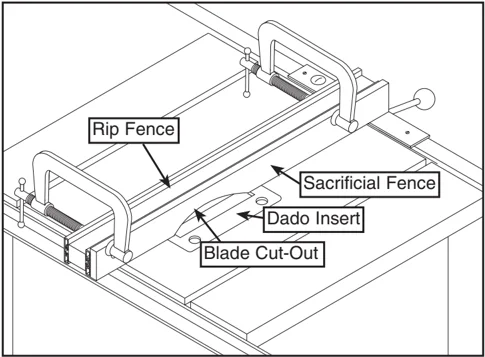
Figure 39. Sacrificial fence.
CAUTION
Always use push sticks, featherboards, push paddles and other safety accessories whenever possible to increase safety and control during operations which require that the blade guard and splitter must be removed from the saw. ALWAYS replace the blade guard after dadoing is complete.

-
Ensure that the saw is switched off and disconnected from its power source.
-
Remove the table insert, splitter guard and the regular saw blade from the arbor.
-
Attach and adjust the dado blade system as recommended in the dado blade’s instructions. Raise the blade system according to your needs. Make sure it will not cut through the workpiece.
-
If rabbeting along the length of your workpiece, adjust the distance between the fence and the outside edge of the blade to suit your needs. See Figure 40. When cutting across the wood grain, use the miter gauge as a guide while rabbeting. Remember: Never use the fence as a stop in conjunction with your miter gauge.
-
Using a scrap as a test piece, switch on the saw and take a pass over the dado blade.
-
If the cut is satisfactory, repeat with your finish stock.
-
Re-install the blade guard.
 Figure 40. Rabbet cutting.
Rabbeting operations can also be accomplished using a conventional saw blade. To create a single-blade rabbet:
-
Clearly mark the width of the rabbet cut on your workpiece. Include marks on the edge of your workpiece so you can clearly identify your intended cut while the material is laying flat on the saw table.
-
Set the blade height to the depth of cut you wish to create.
-
If the rabbet runs the length of the material, adjust the fence so the blade is aligned with the inside of your rabbet channel.
-
Turn on your saw and make the first cut.
-
Turn off the saw and re-adjust the fence so that the next cut will remove another portion of the wood stock between the inside edge of the rabbet and the edge of the wood.
-
Turn on the saw and make a second cut.
-
Continue to readjust the blade and cut until the entire rabbet is made.
-
Re-install the blade guard.
CAUTION Instructions on using moulding heads have been intentionally left out. They are very dangerous when not used properly. Considerable skill and training beyond the scope of this manual are required to safely operate a moulding head. Serious personal injury could result if this caution is not followed.
SECTION 7: MAINTENANCE
General
Regular periodic maintenance on your Model G1023 Series will ensure its optimum performance. Make a habit of inspecting your machine each time you use it. Check for the following conditions and repair or replace when necessary:
- Guard alignment and operation.
- Worn switch.
- Worn or damaged cords and plugs.
- Damaged V-belt.
- Loose mounting bolts.
- Inspect blades for damage.
- Any other condition that could hamper the safe operation of this machine.
Tables
The nonpainted surfaces on the Model G1023 Series should be protected against rust and pitting. Wiping the machine clean after every use ensures that wood dust is not allowed to trap moisture against bare metal surfaces.
Tables can be kept rust-free with regular applications of products like Boeshield® T-9. For long term storage you may want to consider products like Kleen Bore's Rust Guardit™.
V-Belt
To ensure optimum power transmission from the motor to the blade, the V-belts must be in good condition and operate under the proper tension. When replacing V-belts, replace all three at the same time —even if they do not all appear worn.
Belt tension should be checked at least every 3 months; more often if using the table saw intensively.
The V-belts are accessed through the cavity on the right side of the saw. They link the arbor and motor pulleys. To check V-belt tension:
- With moderate pressure, push the center of each V-belt.
- Note the amount of deflection. Deflection should be approximately 1/2", similar to Figure 41.
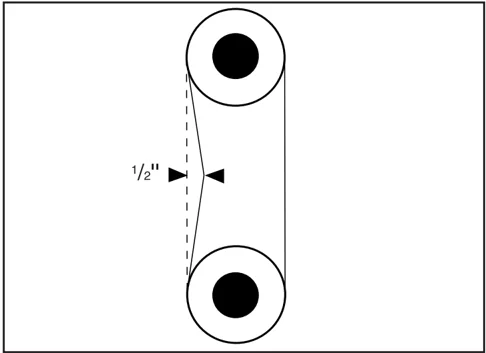
Figure 41.
!WARNING Disconnect power to the machine when performing any maintenance or repairs. Failure to do this may result in serious personal injury.


To adjust V-belt tension:
- Loosen the motor mount bolt.
- Shift the motor up or down to increase or decrease the V-belt tension. Tighten the motor mount bolt.
- Check the V-belt tension again. Ensure that the motor pulley and arbor pulley are lined up.
To replace the V-belts:
- Remove the blade.
- Adjust the arbor so it is up all the way and in the 90° position.
- Place a board under the motor and loosen the motor mount bolt. Slowly lower the arbor until the motor rests on the board, allowing the belts to be loose on the pulleys.
- Pull off the old V-belts and replace them with new ones. Have the number from the belt ready when calling the service department for replacements.
- Raise the arbor and remove the board to adjust the V-belt tension.
- Tighten the motor mount bolt.
Lubrication
Lubricate the areas indicated below every 12 months.
- Blade angling trunnions. These should be lubricated with 6 or 7 drops of light machine oil.
- Blade height trunnion. This should also be lubricated with 6 or 7 drops of light machine oil.
- The two (2) worm gears should be lubricated with an automotive wheel bearing grease.
These points can be reached by removing the table. Check all adjustments when finished lubricating.
-36- G1023S/G1023S110 Heavy-Duty 10" Table Saw


Grizzly Industrial, Inc.
2HP MAGNETIC SWITCH -Taian Type

DANGER Disconnect power from machine before performing any electrical service. Failure to do this will result in a shock hazard leading to injury or death.
SINGLE-PHASE 110 VOLT POWER SOURCE
1L1 3L2 5L3 13NO
NO 53
ON
54 NO
GROUND
2T1 4T2 6T3 14NO
TRIP IND. TEST 20 22 18 17 24
O R OFF RESET
M MANUAL RESET AUTO RESET A
NO 97 98
NC 95 96
2T1 4T2 6T3
MOTOR
Grizzly
Industrial, Inc.
3 HP MAGNETIC SWITCH -Taian Type

DANGER Disconnect power from machine before performing any electrical service. Failure to do this will result in a shock hazard leading to injury or death.
SINGLE-PHASE 220 VOLT POWER SOURCE
1L1 3L2 5L3 13NO 2T1 4T2 6T3 14NO
TRIP IND. TEST 20 22 18 17 24 O R M OFF RESET A NO 97 98 NC 95 96 2T1 4T2 6T3
NO 53 ON 54 NO GROUND MANUAL RESET AUTO RESET
MOTOR
-38- G1023S/G1023S110 Heavy-Duty 10" Table Saw
SECTION 8: CLOSURE
The following pages contain general machine data, troubleshooting guide, parts diagram, parts list and Warranty/Return information for your Model G1023 Series Heavy-Duty 10" Table Saw.
If you need parts or help in assembling your machine, or if you need operational information, we encourage you to call the Customer Service Department. Our trained service technicians will be glad to help you.
If you have comments dealing specifically with this manual, please write to our Bellingham, Washington location using the address in the Introduction. The specifications, drawings, and photographs illustrated in this manual represent the Model G1023 Series as supplied when the manual was prepared. However, due to Grizzly's policy of continuous improvement, changes may be made at any time with no obligation on the part of Grizzly. Whenever possible, though, we send manual updates to all owners of a particular tool or machine. Should you receive one, add the new information to this manual and keep it for reference.
We have included some important safety measures that are essential to this machine's operation. While most safety measures are generally universal, Grizzly reminds you that each workshop is different and safety rules should be considered as they apply to your specific situation.
WARNING Operating this equipment has the potential for flying debris to cause eye injury. Always wear safety glasses or goggles when operating equipment. Everyday glasses or reading glasses only have impact resistant lenses, they are not safety glasses. Be certain the safety glasses you wear meet the appropriate standards of the American National Standards Institute (ANSI).
G1023S/G1023S110 Heavy-Duty 10" Table Saw
We recommend you keep a copy of our current catalog for complete information regarding Grizzly's warranty and return policy. If you need additional technical information relating to this machine, or if you need general assistance or replacement parts, please contact the Customer Service Department listed in the introduction.
Additional information sources are necessary to realize the full potential of this machine. Trade journals, woodworking magazines, and your local library are good places to start.
WARNING The Model G1023 Series was specifically designed for woodcutting operations. DO NOT MODIFY AND/OR USE THIS MACHINE FOR ANY OTHER PURPOSE. Modifications or improper use of this tool will void the warranty. If you are confused about any aspect of this machine, DO NOT use it until all your questions have been answered. Serious personal injury may occur.
WARNING Like all power tools, there is danger associated with the Model G1023 Series. Accidents are frequently caused by lack of familiarity or failure to pay attention. Use this tool with respect and caution to lessen the possibility of operator injury. If normal safety precautions are overlooked or ignored, serious personal injury may occur.
Grizzly
Industrial, Inc.
MACHINE DATA SHEET
Customer Service #: (570) 546-9663 • To Order Call: (800) 523-4777 • Fax #: (800) 438-5901
GRIZZLY MODELS G1023S & G1023S110 TABLE SAWS
-
Design Type ........ 10" Tilting Arbor
-
Maximum Diameter of Saw Blade ........ 10"
-
Diameter of Arbor ........ 5/8" Capacities:
-
Maximum Depth of Cut at 90° ........ 3-1/8"
-
Maximum Depth of Cut at 45° ........ 2-1/8"
-
Maximum Rip to Right of Blade (Standard) ........ 26"
-
Maximum Rip to Right of Blade (Optional) ........ 46"
-
Maximum Rip to Left of Blade ........ 11"
-
Distance Front of Table to Center of Blade ........ 17"
-
Table in Front of Blade at Maximum Cut ........ 12"
-
Maximum Width of Dado ........ 13/16" Overall Dimensions:
-
With Wings and Guide Bars ........ 50" W x 31-5/16" D
-
Weight (Shipping) ........ 460 lbs. Construction:
-
Table ........ Precision Ground Cast Iron
-
Stand ........ Pre-formed Steel
-
Miter Gauge ........ Cast Iron/Steel Bar
-
Trunnions ........ Cast Iron Table:
-
Height ........ 34"
-
Size ........ 27" Deep x 20-5/8" Wide
-
Size w/Extension Wings ........ 27" Deep x 40-1/8" Wide
-
Miter Gauge Groove Type ........ T-slot
-
Spindle Bearings ........ Sealed and Lubricated-For-Life/Ball Motor:
-
Type ........ TEFC Capacitor Start Induction
-
Horsepower G1023S ........ 3 H.P.
-
Horsepower G1023S110 ........ 2 H.P.
-
Power Transfer ........ Triple Belt Drive
-
Phase / Cycle ........ Single Phase / 60 HZ
-
Voltage G1023S ........ 220V
-
Voltage G1023S110 ........ 110V / 220V
-
Amps G1023S ........ 18A
-
Amps G1023S110 ........ 24A / 12A
-
Motor R.P.M ........ 3450 R.P.M.
-
Blade R.P.M ........ 4140 R.P.M.
-
Bearings ........ Shielded and Lubricated-For-Life / Ball
-
Switch ........ Magnetic with Thermal Overload Protector
Specifications, while deemed accurate, are not guaranteed.

 79
80B
79
80-1
80D
80-1
80-2
80-2
48A
84B
83
82A
81
84A
538
535
543
542
536
541
537
539
540
48
47
45
44A
41
43
42
41
36
38
37A
35
38
39
37C
40A
93
94
95
33
60
61
62
57A
58
71
19
20
21
70
72
63
64
65
66
67A
68
27
24
25
97
69
9A
11
8B
10A
18
21
20
19
17
16
31
30
30
29
32
85B
85A
85C
96B
5
96A
22A
50
23
11
12A
13
10A
8B
14A
15
9A
28A
25
24
26
27
97
22A
23
85D
86
7A
4
6
5A
2
3
106A
101
102
100
104
1
54
43
89
55
85C
53A
56A
98
99
91B
91A
88
87A
105
91C
| REF | PART # | DESCRIPTION |
|---|---|---|
| 1 | P1023S001 | CABINET |
| 2 | P1023S002 | SCALE |
| 3 | P1023S003 | TAP SCREW #6 X 1/2 |
| 4 | P1023S004 | TRAP DOOR |
| 5 | P1023S005 | HEX NUT 5/16-18 |
| 5A | P1023S005A | HEX NUT 3/8-16 |
| 6 | P1023S006 | LATCH |
| 7A | P1023S007A | KNOB 3/8-16 X 1-1/2 |
| 8B | P1023S008B | HANDWHEEL LOCK V2.07.07 |
| 9A | P1023S009A | HANDLE V2.07.07 |
| 10A | P1023S010A | HANDWHEEL V2.01.06 |
| 11 | P1023S011 | SET SCREW 1/4-20 X 5/16 |
| 12A | P1023S012A | CAP SCREW 10-24 X 2 |
| 13 | P1023S013 | POINTER BRACKET |
| 14A | P1023S014A | PHLP HD SCR 5/16-18 X 3/8 |
| 15 | P1023S015 | POINTER |
| 16 | P1023S016 | CAP SCREW 1/4-20 X 1/2 |
| 17 | P1023S017 | CAP SCREW 1/4-20 X 1-3/4 |
| 18 | P1023S018 | CAP SCREW 3/8-16 X 1 |
| 19 | P1023S019 | HEX BOLT 3/8-16 X 1-1/2 |
| 20 | P1023S020 | LOCK WASHER 3/8 |
| 21 | P1023S021 | HEX NUT 3/8-16 |
| 22A | P1023S022A | SET SCREW 1/4-20 X 3/8 |
| 23 | P1023S023 | WORM 1.410" OD |
| 24 | P1023S024 | COLLAR |
| 25 | P1023S025 | SET SCREW 5/16-18 X 1/4 |
| 26 | P1023S026 | PHLP HD SCR 10-24 X 3/4 |
| 27 | P1023S027 | DOWEL PIN |
| 28A | P1023S028A | KEY 5 X 5 X 40 |
| 29 | P1023S029 | FLAT WASHER #6 |
| 30 | P1023S030 | FLAT WASHER #10 |
| 31 | P1023S031 | FLAT WASHER 1/4 |
| 32 | P1023S032 | FLAT WASHER 3/8 |
| 33 | P1023S033 | FLAT WASHER #10 |
| 35 | P1023S035 | GEARED BEARING HOUSING |
| 36 | P1023S036 | HEX BOLT 3/8-16 X 1-1/2 |
| 37A | P1023S037A | LOCK WASHER 3/8 |
| 37C | P1023S037C | KEY 1/4 X 1/4 X 1-1/2 |
| 38 | P1023S038 | BALL BEARING 6203-2RS |
| 39 | P1023S039 | FLAT WASHER 1/4 |
| 40A | P1023S040A | JAM NUT 5/8-18 |
| 41 | P1023S041 | COLLAR |
| 42 | P1023S042 | FLAT WASHER 5/16 |
| 43 | P1023S043 | SET SCREW 1/4-20 X 1/2 |
| 44A | P1023S044A | KEY 5 X 5 X 40 |
| 45 | P1023S045 | BLADE ARBOR W/SHAFT |
| 47 | P1023S047 | ARBOR FLANGE |
| 48 | P1023S048 | ARBOR NUT 5/8-12 LH |
| 48A | P1023S048A | OPEN-END ARBOR WRENCH 7/8 X 7/8" |
| 50 | P1023S050 | MOTOR FRAME SUPPORT V2.12.95 |
| 51 | P1023S051 | CLIP |
| 52 | P1023S052 | PIVOT PIN |
| 53A | P1023S053A | HEX BOLT 1/2-13 X 4 |
| 54 | P1023S054 | V-BELT M26 3L260 |
| 55 | P1023S055 | MOTOR PULLEY |
| REF | PART # | DESCRIPTION |
|---|---|---|
| 56 | P1023S110056 | MOTOR 2HP 110V (G1023S110) |
| 56A | P1023S056A | MOTOR 3HP 220V (G1023S) |
| 57A | P1023S057A | HEX BOLT 5/16-18 X 1-5/8 |
| 58 | P1023S058 | HEX BOLT 5/16-18 X 1 |
| 60 | P1023S060 | HEX BOLT 5/16-18 X 3/4 |
| 61 | P1023S061 | FLAT WASHER 5/16 |
| 62 | P1023S062 | SUPPORT BRACKET |
| 63 | P1023S063 | FLANGE CASTING V1.12.95 |
| 64 | P1023S064 | ROLL PIN 5/16 X 5/8 |
| 65 | P1023S065 | CAP SCREW 3/8-16 X 1 |
| 66 | P1023S066 | FLAT WASHER 3/8 |
| 67A | P1023S067A | KEY 5 X 5 X 40 |
| 68 | P1023S068 | SHAFT |
| 69 | P1023S069 | LOCK NUT 3/4-16 |
| 70 | P1023S070 | REAR TRUNNION V3.02.96 |
| 71 | P1023S071 | HEX NUT 5/8-18 |
| 72 | P1023S072 | BLADE GUARD SUPPORT |
| 79 | P1023S079 | SET SCREW 1/4-20 X 1/2 |
| 80-1 | P1023S080-1 | SPRING CLIP 10 X 30.7 X 7.5 |
| 80-2 | P1023S080-2 | PHLP HD SCR 10-24 X 3/8 |
| 80B | P1023S080B | STD TABLE INSERT 8.5 |
| 80D | P1023S080D | DADO TABLE INSERT 8.5 IN |
| 81 | P1023S081 | TABLE |
| 82A | P1023S082A | LOCK WASHER 3/8 |
| 83 | P1023S083 | HEX BOLT 3/8-16 X 1-1/4 |
| 84A | P1023S084A | BEVELED LEFT EXT WING V2.07.07 |
| 84B | P1023S084B | BEVELED RIGHT EXT WING V2.07.07 |
| 85A | P1023S085A | LOCK WASHER 1/2 |
| 85B | P1023S085B | HEX NUT 1/2-12 |
| 85C | P1023S085C | FLAT WASHER 1/2 |
| 85D | P1023S085D | LOCK WASHER 7/16 |
| 86 | P1023S086 | HEX BOLT 7/16-20 X 1 |
| 87 | P1023S087 | MAGNETIC SWITCH ASSEMBLY SDE (G1023S110) |
| 87A | P1023S087A | MAGNETIC SWITCH ASSEMBLY SDE (G1023S) |
| 88 | P1023S088 | SWITCH MOUNT BRACKET |
| 89 | P1023S089 | KEY 5 X 5 X 40 |
| 90 | P1023S090 | WHITE SWITCH COVER SCREW V1.12.95 |
| 91A | P1023S091A | FLAT WASHER #10 |
| 91B | P1023S091B | HEX NUT 10-24 |
| 91C | P1023S091C | PHLP HD SCR 10-24 X 3/4 |
| 93 | P1023S093 | SET SCREW 5/16-18 X 3/8 |
| 94 | P1023S094 | SPRING 5.5 X 12 X 7 |
| 95 | P1023S095 | BALL |
| 96A | P1023S096A | SET SCREW 5/16-18 X 1/2 |
| 96B | P1023S096B | SET SCREW 5/16-18 X 3/8 |
| 97 | P1023S097 | WAVE WASHER |
| 98 | P1023S098 | POWER CORD 12G X 3W 86"L |
| 99 | P1023S099 | POWER CORD 12G X 3W 36"L |
| 100 | P1023S100 | LOGO PLATE |
| 101 | P1023S101 | DISCONNECT POWER LABEL |
| 102 | P1023S102 | SAFETY GLASSES LABEL |
| 103 | P1023S103 | USE GUARD LABEL |
| 104 | P1023S104 | READ MANUAL LABEL |
| 105 | P1023S105 | ELECTRICITY LABEL |
| 106A | P1023S106A | WARNING ID LABEL |
G1023S/G1023S110 Heavy-Duty □□" Table Saw
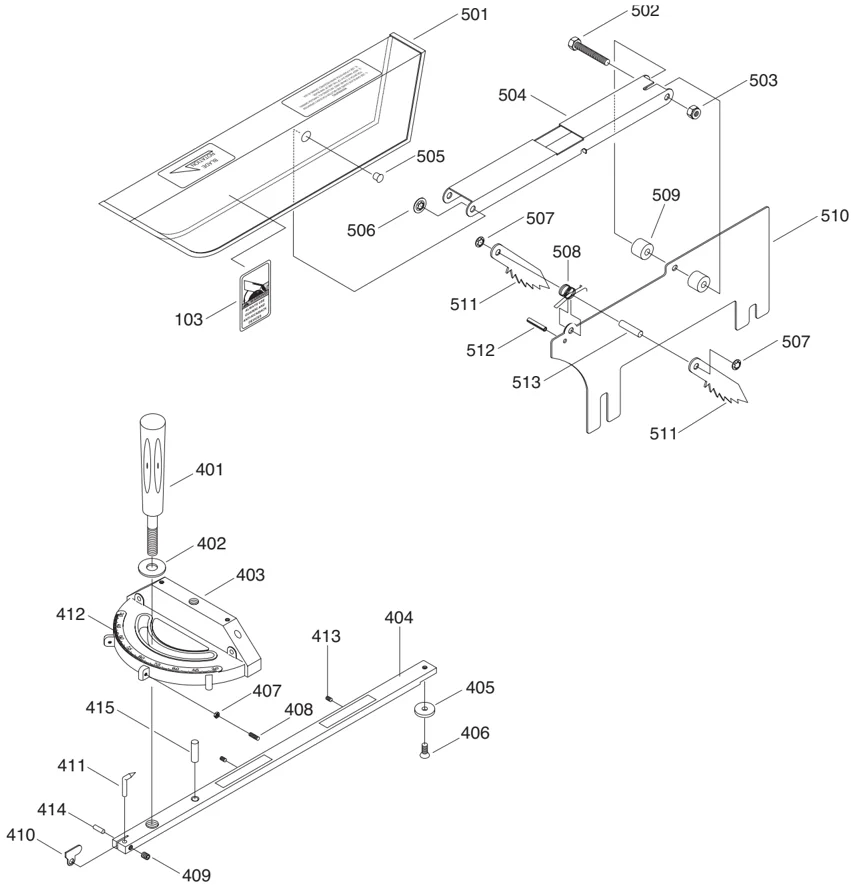
| REF | PART # | DESCRIPTION |
|---|---|---|
| 400 | P1023S400 | COMPLETE MITER GAUGE |
| 401 | P1023S401 | MITER GAUGE HANDLE V2.10.01 |
| 402A | P1023S402A | FLAT WASHER 5/16 |
| 403 | P1023S403 | MITER GAUGE BODY V2.05.07 |
| 404 | P1023S404 | MITER BAR ASSY V2.04.03 |
| 405A | P1023S405A | RING |
| 406A | P1023S406A | FLAT HD SCR 10-24 X 1/4 |
| 407A | P1023S407A | HEX NUT 10-24 |
| 408A | P1023S408A | SET SCREW 10-24 X 3/4 |
| 409A | P1023S409A | SET SCREW 10-24 X 1/4 |
| 410 | P1023S410 | MITER GAUGE STOP |
| 411 | P1023S411 | POINTER |
| 412 | P1023S412 | MITER GAUGE SCALE |
| 413 | P1023S413 | SET SCREW 10-24 X 5/8 |
| 414 | P1023S414 | ROLL PIN 1.5 X 13 |
| 415 | P1023S415 | MITER GAUGE HINGE PIN |
| 500 | P1023S500 | HANDWHEEL UPGRADE KIT |
| 501 | P1023S501 | BLADE GUARD |
| 502 | P1023S502 | HEX BOLT M6-1 X 40 |
| 503 | P1023S503 | LOCK NUT M6-1 |
| REF | PART # | DESCRIPTION |
|---|---|---|
| 504 | P1023S504 | SUPPORTING ARM |
| 505 | P1023S505 | PIVOT PIN |
| 506 | P1023S506 | RETAINER |
| 507 | P1023S507 | RETAINER |
| 508 | P1023S508 | SPRING 14 X 6 |
| 509 | P1023S509 | SPACER |
| 510 | P1023S510 | COMPLETE BLADE GUARD ASSY |
| 511 | P1023S511 | PAWL |
| 512 | P1023S512 | ROLL PIN 4 X 22 |
| 513 | P1023S513 | HEADLESS CLEVIS PIN GROOVED |
| 535 | P1023S535 | V-CLAMP |
| 536 | P1023S536 | L-BRACKET |
| 537 | P1023S537 | LOCKING PLATE |
| 538 | P1023S538 | HEX BOLT 1/4-20 X 1-1/2 |
| 539 | P1023S539 | FLAT WASHER 1/4 |
| 540 | P1023S540 | HEX NUT 1/4-20 |
| 541 | P1023S541 | HEX BOLT 5/16-18 X 3/4 |
| 542 | P1023S542 | FLAT WASHER 5/16 |
| 543 | P1023S543 | HEX NUT 5/16-18 |
TROUBLESHOOTING GUIDE
| SYMPTOM | POSSIBLE CAUSE | CORRECTIVE ACTION |
|---|---|---|
| Motor will not start. | 1. Low voltage.2. Open circuit in motor or loose connections. | 1. Check power line for proper voltage.2. Inspect all lead connections on motor for loose or open connections. |
| Motor will not start; fuses or circuit breakers blow. | 1. Short circuit in line cord or plug.2. Short circuit in motor or loose connections.3. Incorrect fuses or circuit breakers in power line. | 1. Inspect cord or plug for damaged insulation and shorted wires.2. Inspect all connections on motor for loose or shorted terminals or worn insulation.3. Install correct fuses or circuit breakers. |
| Motor overheats. | 1. Motor overloaded.2. Air circulation through the motor restricted. | 1. Reduce load on motor.2. Clean out motor to provide normal air circulation. |
| Motor stalls (resulting in blown fuses or tripped circuit). | 1. Short circuit in motor or loose connections.2. Low voltage.3. Incorrect fuses or circuit breakers in power line.4. Motor overloaded. | 1. Inspect connections on motor for loose or shorted terminals or worn insulation.2. Correct the low voltage conditions.3. Install correct fuses or circuit breakers.4. Reduce load on motor. |
| Machine slows when operating. | 1. Applying too much pressure to workpiece.2. Belts loose. | 1. Feed workpiece slower.2. Tighten belts. |
| Loud, repetitious noise coming from machine. | 1. Pulley setscrews or keys are missing or loose.2. Motor fan is hitting the cover.3. V-belts are defective. | 1. Inspect keys and setscrews. Replace or tighten if necessary.2. Tighten fan or shim cover.3. Replace V-belts. See Maintenance. |
| Blade is not square w/mitter slot or fence is not square to blade. | 1. Blade is warped.2. Table top is not parallel to blade.3. Fence is not parallel to blade. | 1. Replace blade.2. Make table parallel to blade. See Adjustments.3. Make fence parallel to blade. See Adjustments. |
| Fence hits table top when sliding on to the table. | 1. Front rail is bolted too low on table.2. Rear rail is bolted too low on the table. | 1. Raise front rail.2. Raise rear rail. |
| Blade does not reach 90°. | 1. 90° stop bolt is out of adjustment.2. Pointer bracket is hitting before the blade reaches 90°. | 1. Adjust 90° stop bolt. See Adjustments.2. File down the right side of the pointer bracket until the blade can reach 90°. |
| Blade hits insert at 45°. | 1. Hole in insert is inadequate.2. Table out of alignment.3. Blade position is incorrect. | 1. File or mill the hole in the insert.2. Align table. See Adjustments.3. Adjust blade position. See Adjustments. |
| Blade won’t go beneath table surface. | Table top too low. | Raise table top w/washers. |
| Hand wheels won’t turn. | 1. Hand wheel key is inserted too far.2. Bullets are wedged.3. Roll pin or setscrew in worm gear is contacting geared trunnion. | 1. Remove hand wheel and adjust key.2. Remove hand wheel and adjust bullets.3. Inspect roll pins and setscrews in the worm gear. Tighten if necessary. |
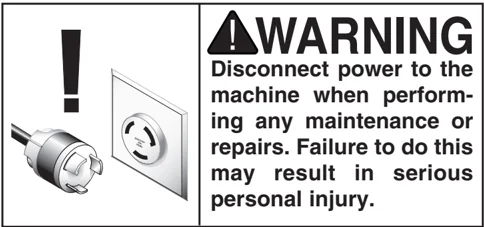
WARNING
Disconnect power to the machine when performing any maintenance or repairs. Failure to do this may result in serious personal injury.
G1023S/G1023S110 Heavy-Duty □□" Table Saw
 PUSH STICK
MAKE FROM 1/2" OR 3/4"
WOOD OR THICKNESS
LESS THAN WIDTH OF
MAT'L TO BE CUT
CAUTION USE ONLY GOOD STRONG WOOD OR PLYWOOD
NOTCH TO HELP PREVENT HAND FROM SLIPPING
CUT HERE TO PUSH 1/4" WOOD
CUT HERE TO PUSH 1/2" WOOD
1/2" GRID
WARRANTY AND RETURNS
Grizzly Industrial, Inc. warrants every product it sells for a period of 1 year to the original purchaser from the date of purchase. This warranty does not apply to defects due directly or indirectly to misuse, abuse, negligence, accidents, repairs or alterations or lack of maintenance. This is Grizzly's sole written warranty and any and all warranties that may be implied by law, including any merchantability or fitness, for any particular purpose, are hereby limited to the duration of this written warranty. We do not warrant or represent that the merchandise complies with the provisions of any law or acts unless the manufacturer so warrants. In no event shall Grizzly's liability under this warranty exceed the purchase price paid for the product and any legal actions brought against Grizzly shall be tried in the State of Washington, County of Whatcom.
We shall in no event be liable for death, injuries to persons or property or for incidental, contingent, special, or consequential damages arising from the use of our products.
To take advantage of this warranty, contact us by mail or phone and give us all the details. We will then issue you a "Return Number," which must be clearly posted on the outside as well as the inside of the carton. We will not accept any item back without this number. Proof of purchase must accompany the merchandise.
The manufacturers reserve the right to change specifications at any time because they constantly strive to achieve better quality equipment. We make every effort to ensure that our products meet high quality and durability standards and we hope you never need to use this warranty.
Please feel free to write or call us if you have any questions about the machine or the manual.
Thank you again for your business and continued support. We hope to serve you again soon.
-46- G1023S/G1023S110 Heavy-Duty 10" Table Saw
WARRANTY CARD
Name_______________________________________________________________ Street_______________________________________________________________ City ____________________________________________________ State________ Zip________ Phone Number________________________________ E-Mail____________________ FAX_________________ Model # G1023 Series 10" Table Saw Order#________________________________
The following information is given on a voluntary basis. It will be used for marketing purposes to help us develop better products and services. Of course, all information is strictly confidential.
-
How did you learn about us? Advertisement Friend Catalog Card Deck World Wide Web Other_____________________________________________
-
Which of the following magazines do you subscribe to. ___American Woodworker ___Practical Homeowner Cabinetmaker Shop Notes Family Handyman Today's Homeowner Fine Homebuilding WOOD Fine Woodworking Wooden Boat Home Handyman Woodshop News Journal of Light Construction Woodsmith Old House Journal Woodwork Popular Mechanics Woodworker Popular Science Woodworker's Journal Popular Woodworking Workbench Other
-
Which of the following woodworking/remodeling shows do you watch? Backyard America The New Yankee Workshop Home Time This Old House The American Woodworker Woodwright's Shop Other__________________________________________
-
What is your annual household income? ___$20,000-$29,999 ___$60,000-$69,999 ___$30,000-$39,999 ___$70,000-$79,999 ___$40,000-$49,999 ___$80,000-$89,999 ___$50,000-$59,999 ___$90,000 +
-
What is your age group? ___20-29 ___50-59 ___30-39 ___60-69 ___40-49 ___70 +
-
How long have you been a woodworker? ___0 - 2 Years ___8 - 20 Years ___2 - 8 Years ___20+ Years
-
How would you rank your woodworking skills? ___Simple ___Advanced ___Intermediate ___Master Craftsman
-
What stationary woodworking tools do you own? Check all that apply. ___Air Compressor ___Panel Saw ___Band Saw ___Planer ___Drill Press ___Power Feeder ___Drum Sander ___Radial Arm Saw ___Dust Collector ___Shaper ___Horizontal Boring Machine ___Spindle Sander ___Jointer ___Table Saw ___Lathe ___Vacuum Veneer Press ___Mortiser ___Wide Belt Sander
-
How many of your woodworking machines are Grizzly? _______________________
-
Which benchtop tools do you own? Check all that apply. 1" x 42" Belt Sander 6" - 8" Grinder 5" - 8" Drill Press Mini Lathe 8" Table Saw 10" - 12" Thickness Planer 8" - 10" Bandsaw Scroll Saw Disc/Belt Sander Spindle/Belt Sander Mini Jointer Other___________________________
-
How many of the machines checked above are Grizzly? _______________________
-
Which portable/hand held power tools do you own? Check all that apply. Belt Sander Orbital Sander Biscuit Joiner Palm Sander Circular Saw Portable Planer Detail Sander Saber Saw Drill/Driver Reciprocating Saw Miter Saw Router Other________________________
-
What machines/supplies would you like Grizzly Industrial to carry?
-
What new accessories would you like Grizzly Industrial to carry?
-
What other companies do you purchase your tools and supplies from?
-
Do you think your purchase represents good value? ___Yes ___No
-
Would you recommend Grizzly Industrial to a friend? ___Yes ___No
-
Would you allow us to use your name as a reference for Grizzly customers in your area? Note: We never use names more than three times. ___Yes ___No
-
Comments:_______________________________________________________________
CUT ALONG DOTTED LINE
FOLD ALONG DOTTED LINE
Place Stamp Here

GRIZZLY INDUSTRIAL, INC. P.O. BOX 2069 BELLINGHAM, WA 98227-2069
FOLD ALONG DOTTED LINE
Send a Grizzly Catalog to a friend:
Name________________________________________ Street______________________________________ City_________________State_________Zip_________
TAPE ALONG EDGES--PLEASE DO NOT STAPLE
This page is blank.
This page is blank.