Grizzly
Industrial, Inc.
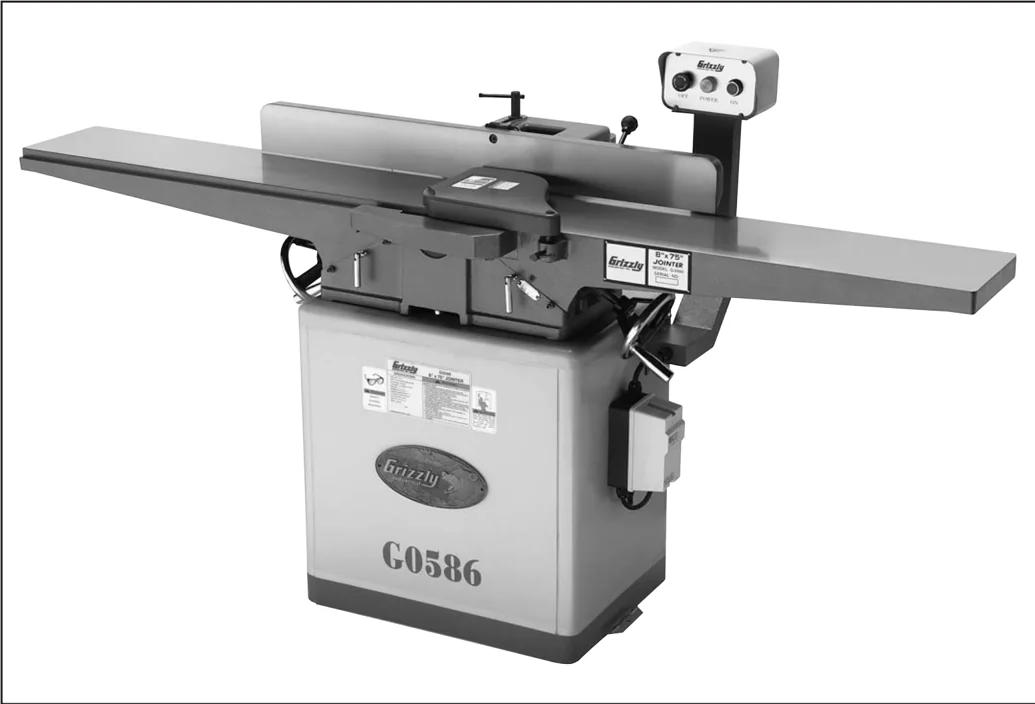
8" X 75" DELUXE JOINTER
MODEL G0586
INSTRUCTION MANUAL

COPYRIGHT © MARCH, 2005 BY GRIZZLY INDUSTRIAL, INC. WARNING: NO PORTION OF THIS MANUAL MAY BE REPRODUCED IN ANY SHAPE OR FORM WITHOUT THE WRITTEN APPROVAL OF GRIZZLY INDUSTRIAL, INC. #TR6958 PRINTED IN CHINA. REVISED FEBRUARY, 2006.
WARNING
Some dust created by power sanding, sawing, grinding, drilling, and other construction activities contains chemicals known to the State of California to cause cancer, birth defects or other reproductive harm. Some examples of these chemicals are:
- Lead from lead-based paints.
- Crystalline silica from bricks, cement, and other masonry products.
- Arsenic and chromium from chemically treated lumber.
Your risk from these exposures varies, depending on how often you do this type of work. To reduce your exposure to these chemicals: work in a well ventilated area, and work with approved safety equipment, such as those dust masks that are specially designed to filter out microscopic particles.
Table of Contents
- INTRODUCTION ........ 3
- Foreword ........ 3
- Contact Info ........ 3
- Machine Data Sheet ........ 4
- Identification ........ 5
- SECTION 1: SAFETY ........ 6
- Safety Instructions for Machinery ........ 6
- Additional Safety for Jointers ........ 8
- SECTION 2: CIRCUIT REQUIREMENTS ........ 9
- 220V Single-Phase ........ 9
- SECTION 3: SET UP ........ 10
- Set Up Safety ........ 10
- Items Needed for Set Up ........ 10
- Unpacking ........ 10
- Inventory ........ 11
- Clean Up ........ 12
- Site Considerations ........ 12
- Mounting Jointer ........ 13
- V-Belt ........ 13
- Setting Outfeed Table Height ........ 14
- Cutterhead Guard ........ 15
- Switch Components ........ 15
- Dust Port ........ 16
- Handwheels ........ 17
- Fence Tilt Lever ........ 17
- Knife Setting Jig ........ 17
- Test Run ........ 18
- Recommended Adjustments ........ 18
- SECTION 4: OPERATIONS ........ 19
- Operation Safety ........ 19
- Stock Inspection and Requirements ........ 19
- Squaring Stock ........ 20
- Surface Planing ........ 21
- Edge Jointing ........ 22
- Bevel Cutting ........ 23
- Rabbet Cutting ........ 24
- SECTION 5: ACCESSORIES ........ 25
- SECTION 6: MAINTENANCE ........ 28
- Schedule ........ 28
- V-Belts ........ 28
- Cleaning ........ 28
- Lubrication ........ 28
- SECTION 7: SERVICE ........ 29
- About Service ........ 29
- Inspecting Knives ........ 29
- Setting Knives ........ 30
- Calibrating Depth Scale ........ 31
- Setting Fence Stops ........ 32
- Adjusting Gibs ........ 33
- Wiring Diagram ........ 34
- G0586 Electrical Components ........ 35
- Troubleshooting Guide ........ 36
- Jointer Parts Breakdown ........ 38
- Jointer Parts List ........ 39
- Stand/Motor Parts Breakdown ........ 40
- Stand/Motor Parts List ........ 41
- WARRANTY AND RETURNS ........ 42
INTRODUCTION
Foreword
We are proud to offer the Model G0586 8" X 75" Deluxe Jointer. This machine is part of a growing Grizzly family of fine woodworking machinery. When used according to the guidelines set forth in this manual, you can expect years of trouble-free, enjoyable operation and proof of Grizzly’s commitment to customer satisfaction.
We are pleased to provide this manual with the Model G0586. It was written to guide you through assembly, review safety considerations, and cover general operating procedures. It represents our effort to produce the best documentation possible.
The specifications, drawings, and photographs illustrated in this manual represent the Model G0586 as supplied when the manual was prepared. However, owing to Grizzly’s policy of continuous improvement, changes may be made at any time with no obligation on the part of Grizzly. For your convenience, we always keep current Grizzly manuals available on our website at www.grizzly.com. Any updates to your machine will be reflected in these manuals as soon as they are complete. Visit our site often to check for the latest updates to this manual!

Contact Info
If you have any comments regarding this manual, please write to us at the address below:
Grizzly Industrial, Inc. c/o Technical Documentation Manager P.O. Box 2069 Bellingham, WA 98227-2069
We stand behind our machines. If you have any service questions or parts requests, please call or write us at the location listed below.
Grizzly Industrial, Inc. 1203 Lycoming Mall Circle Muncy, PA 17756 Phone: (570) 546-9663 Fax: (800) 438-5901 E-Mail: techsupport@grizzly.com Web Site: http://www.grizzly.com
G0586 8" X 75" Deluxe Jointer -3-
Grizzly Industrial, Inc. MACHINE DATA SHEET
Customer Service #: (570) 546-9663 • To Order Call: (800) 523-4777 • Fax #: (800) 438-5901
MODEL G0586 8" X 75" DELUXE JOINTER
Design Type: Cabinet
Overall Dimensions:
- Table Size ........ 9-1/4" W x 75" L
- Height (from floor to table) ........ 31"
- Overall Length ........ 75-1/2"
- Overall Width ........ 24"
- Shipping Weight ........ 546 lbs.
- Net Weight ........ 418 lbs.
- 1st Box Size ........ 80" x 24-1/2" x 14"
- 2nd Box Size ........ 25-3/4" x 23-3/4" x 17-3/4"
- Stand Footprint ........ 23-1/2" x 16-3/4"
- Cutterhead Diameter ........ □-□/□"
Capacities:
- Maximum Rabbeting Capacity ........ 1/2"
- Maximum Depth of Cut (per pass) ........ 1/8"
- Maximum Width of Cut ........ 8"
- Cutterhead Speed ........ 5000 RPM
- Cuts Per Minute ........ 20,000
Construction:
- Tables ........ Independently Adjustable, Precision Ground Cast Iron
- Ways ........ Dovetailed, Adjustable
- Fence Assembly ........ Cast Iron
- Body Assembly ........ Cast Iron
- Stand ........ One Piece Steel Cabinet
- Cutterhead ........ 3" Diameter, 4-Knife
- Cutterhead Knife Size ........ 8" x 1/8" x 3/4"
- Guard ........ Die Cast Metal
- Bearings ........ Shielded and Lubricated
Motor:
- Type ........ TEFC Capacitor Start Induction
- Horsepower ........ 2 HP
- Phase / Voltage ........ Single-Phase 220V
- Amps ........ 12A
- Cycle / RPM ........ 60 Hertz / 3450 RPM
- Switch ........ Magnetic w/Thermal Overload Protection
- Power Transfer ........ Double V-Belt Drive
- Bearings ........ Shielded & Lubricated Ball Bearings
Features:
- Handwheel Controlled Fence Adjustment
- Top Mount Switch Controls
- Super Long 75" Bed
- Included 4" Dust Port
Specifications, while deemed accurate, are not guaranteed.
-4- G0586 8" X 75" Deluxe Jointer

Identification
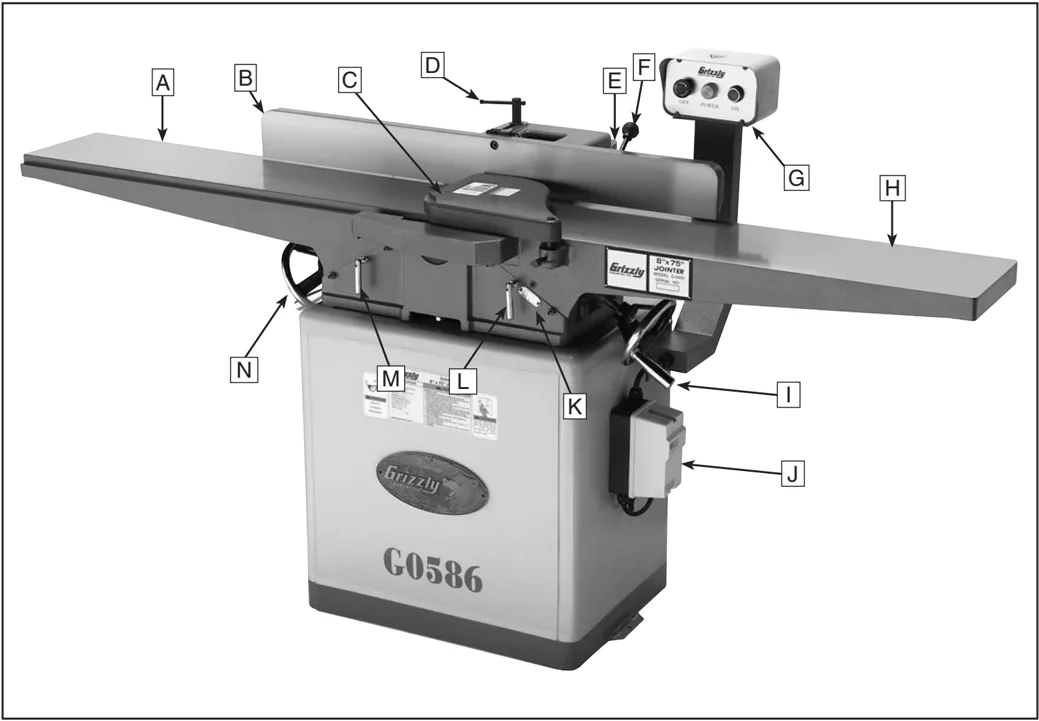
A. Outfeed Table B. Fence C. Cutterhead Guard D. Fence Lock E. Fence Adjustment Knob F. Fence Tilt Handle G. Control Panel H. Infeed Table I. Infeed Table Handwheel J. Magnetic Switch K. Depth Scale L. Infeed Table Lock M. Outfeed Table Lock N. Outfeed Table Handwheel
G0586 8" X 75" Deluxe Jointer -5-
SECTION 1: SAFETY
WARNING
For Your Own Safety, Read Instruction Manual Before Operating this Machine
The purpose of safety symbols is to attract your attention to possible hazardous conditions. This manual uses a series of symbols and signal words which are intended to convey the level of importance of the safety messages. The progression of symbols is described below. Remember that safety messages by themselves do not eliminate danger and are not a substitute for proper accident prevention measures.
- DANGER Indicates an imminently hazardous situation which, if not avoided, WILL result in death or serious injury.
- WARNING Indicates a potentially hazardous situation which, if not avoided, COULD result in death or serious injury.
- CAUTION Indicates a potentially hazardous situation which, if not avoided, MAY result in minor or moderate injury. It may also be used to alert against unsafe practices.
- NOTICE This symbol is used to alert the user to useful information about proper operation of the machine.
WARNING
Safety Instructions for Machinery
- READ THROUGH THE ENTIRE MANUAL BEFORE STARTING MACHINERY. Machinery presents serious injury hazards to untrained users.
- ALWAYS USE ANSI APPROVED SAFETY GLASSES WHEN OPERATING MACHINERY. Everyday eyeglasses only have impact resistant lenses—they are NOT safety glasses.
- ALWAYS WEAR AN ANSI APPROVED RESPIRATOR WHEN OPERATING MACHINERY THAT PRODUCES DUST. Wood dust is a carcinogen and can cause cancer and severe respiratory illnesses.
- ALWAYS USE HEARING PROTECTION WHEN OPERATING MACHINERY. Machinery noise can cause permanent hearing damage.
- WEAR PROPER APPAREL. DO NOT wear loose clothing, gloves, neckties, rings, or jewelry which may get caught in moving parts. Wear protective hair covering to contain long hair and wear non-slip footwear.
- NEVER OPERATE MACHINERY WHEN TIRED, OR UNDER THE INFLUENCE OF DRUGS OR ALCOHOL. Be mentally alert at all times when running machinery.
-6- G0586 8" X 75" Deluxe Jointer

⚠WARNING
Safety Instructions for Machinery
7. ONLY ALLOW TRAINED AND PROPERLY SUPERVISED PERSONNEL TO OPERATE MACHINERY. Make sure operation instructions are safe and clearly understood.
8. KEEP CHILDREN AND VISITORS AWAY. Keep all children and visitors a safe distance from the work area.
9. MAKE WORKSHOP CHILD PROOF. Use padlocks, master switches, and remove start switch keys.
10. NEVER LEAVE WHEN MACHINE IS RUNNING. Turn power OFF and allow all moving parts to come to a complete stop before leaving machine unattended.
11. DO NOT USE IN DANGEROUS ENVIRONMENTS. DO NOT use machinery in damp, wet locations, or where any flammable or noxious fumes may exist.
12. KEEP WORK AREA CLEAN AND WELL LIT. Clutter and dark shadows may cause accidents.
13. USE A GROUNDED EXTENSION CORD RATED FOR THE MACHINE AMPERAGE. Undersized cords overheat and lose power. Replace extension cords if they become damaged. DO NOT use extension cords for 220V machinery.
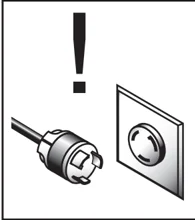
14. ALWAYS DISCONNECT FROM POWER SOURCE BEFORE SERVICING MACHINERY. Make sure switch is in OFF position before reconnecting.
15. MAINTAIN MACHINERY WITH CARE. Keep blades sharp and clean for best and safest performance. Follow instructions for lubricating and changing accessories.
16. MAKE SURE GUARDS ARE IN PLACE AND WORK CORRECTLY BEFORE USING MACHINERY.
17. REMOVE ADJUSTING KEYS AND WRENCHES. Make a habit of checking for keys and adjusting wrenches before turning machinery ON.
18. CHECK FOR DAMAGED PARTS BEFORE USING MACHINERY. Check for binding and alignment of parts, broken parts, part mounting, loose bolts, and any other conditions that may affect machine operation. Repair or replace damaged parts.
19. USE RECOMMENDED ACCESSORIES. Refer to the instruction manual for recommended accessories. The use of improper accessories may cause risk of injury.
20. DO NOT FORCE MACHINERY. Work at the speed for which the machine or accessory was designed.
21. SECURE WORKPIECE. Use clamps or a vise to hold the workpiece when practical. A secured workpiece protects your hands and frees both hands to operate the machine.
22. DO NOT OVERREACH. Keep proper footing and balance at all times.
23. MANY MACHINES WILL EJECT THE WORKPIECETOWARDTHEOPERATOR. Know and avoid conditions that cause the workpiece to "kickback."
24. ALWAYS LOCK MOBILE BASES (IF USED) BEFORE OPERATING MACHINERY.
25. BE AWARE THAT CERTAIN WOODS MAY CAUSE AN ALLERGIC REACTION in people and animals, especially when exposed to fine dust. Make sure you know what type of wood dust you will be exposed to and always wear an approved respirator.
G0586 8" X 75" Deluxe Jointer -7-
⚠WARNING
Additional Safety for Jointers
- JOINTER KICKBACK. "Kickback" is when the workpiece is thrown off the jointer table by the force of the cutterhead. Always use push blocks and safety glasses to reduce the likelihood of injury from "kickback." If you do not understand what kickback is, or how it occurs, DO NOT operate this machine.
- CUTTERHEAD ALIGNMENT. Keep the top edge of the outfeed table aligned with the edge of the knife at top dead center (TDC) to avoid kickback and personal injuries.
- PUSH BLOCKS. Always use push blocks whenever surface planing. Never pass your hands directly over the cutterhead without a push block.
- WORKPIECE SUPPORT. Supporting the workpiece adequately at all times while cutting is crucial for making safe cuts and avoiding injury. Never attempt to make a cut with an unstable workpiece.
- KICKBACK ZONE. The "kickback zone" is the path directly through the end of the infeed table. Never stand or allow others to stand in this area during operation.
- MAXIMUM CUTTING DEPTH. The maximum cutting depth for one pass is 1/8". Never attempt any single cut deeper than this!
- JOINTING WITH THE GRAIN. Jointing against the grain or jointing end grain is dangerous and could produce chatter or excessive chip out. Always joint with the grain.
- KEEPING GUARDS IN PLACE. With the exception of rabbeting, all operations must be performed with the guard in place. After rabbeting, be sure to replace the guard.
- PROPER CUTTING. When cutting, always keep the workpiece moving toward the outfeed table until the workpiece has passed completely over the cutterhead. Never back the work toward the infeed table.
- USING GOOD STOCK. Jointing safety begins with your lumber. Inspect your stock carefully before you feed it over the cutterhead. Never joint a board that has loose knots, nails, or staples. If you have any doubts about the stability or structural integrity of your stock, DO NOT joint it!
⚠WARNING Like all machines there is danger associated with the Model G0586. Accidents are frequently caused by lack of familiarity or failure to pay attention. Use this machine with respect and caution to lessen the possibility of operator injury. If normal safety precautions are overlooked or ignored, serious personal injury may occur.
⚠CAUTION No list of safety guidelines can be complete. Every shop environment is different. Always consider safety first, as it applies to your individual working conditions. Use this and other machinery with caution and respect. Failure to do so could result in serious personal injury, damage to equipment, or poor work results.
SECTION 2: CIRCUIT REQUIREMENTS
220V Single-Phase
WARNING Serious personal injury could occur if you connect the machine to the power source before you have completed the set up process. DO NOT connect the machine to the power source until instructed to do so.
Amperage Draw
The 2 HP motor on the Model G0586 will draw the following amps:
- Full Load at 220V (Prewired) ........ 12 Amps
- Full Load at 110V ........ 24 Amps
Circuit Requirements
We recommend connecting this machine to a dedicated circuit with a verified ground and a circuit breaker sized no larger than the minimum circuit requirement below. Never replace a circuit breaker with one of higher amperage without consulting a qualified electrician to ensure compliance with wiring codes. If you are unsure about the wiring codes in your area or you plan to connect your machine to a shared circuit, you may create a fire hazard—consult a qualified electrician to reduce this risk.
- 220V Minimum Circuit Requirement ........ 15 Amps
- 110V Minimum Circuit Requirement ........ 30 Amps
Plug/Receptacle Type
- 220V Operation (Prewired) ........ NEMA 6-15
- 110V Operation ........ NEMA L5-30
Grounding
In the event of an electrical short, grounding reduces the risk of electric shock. This tool is equipped with a power cord that has a grounding wire, which must be properly connected to the grounding prong on the plug; likewise, the outlet must be properly installed and grounded. All electrical connections must be made in accordance with local codes and ordinances.

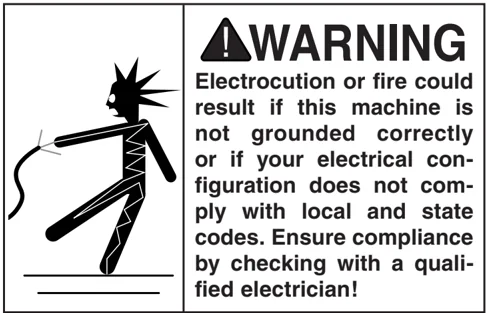
WARNING Electrocution or fire could result if this machine is not grounded correctly or if your electrical configuration does not comply with local and state codes. Ensure compliance by checking with a qualified electrician!
Extension Cords
We do not recommend the use of extension cords. Instead, arrange the placement of your equipment and the installed wiring to eliminate the need for extension cords.
If you find it absolutely necessary to use an extension cord:
- Make sure the cord is rated for Standard Service (grade S) or better.
- The extension cord must also contain a ground wire and plug prong.
- Only use a 50 ft. or shorter cord.
- For 220V operation, use a 14 gauge cord.
- For 110V operation, use a 10 gauge cord.
G0586 8" X 75" Deluxe Jointer -9-

SECTION 3: SET UP
Set Up Safety
WARNING
This machine presents serious injury hazards to untrained users. Read through this entire manual to become familiar with the controls and operations before starting the machine!

WARNING
Wear safety glasses during the entire set up process!
WARNING
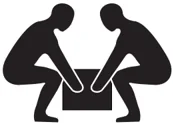
The Model G0586 is a heavy machine (546 lbs. shipping weight). DO NOT over-exert yourself while unpacking or moving your machine—get assistance.
Items Needed for Set Up
The following items are needed to complete the set up process, but are not included with your machine:
| DESCRIPTION | QTY |
|---|---|
| Extra Person for Lifting Help | 1 |
| Straightedge (see Page 26) | 1 |
| Phillips Head Screwdriver | 1 |
Unpacking
The Model G0586 was carefully packed when it left our warehouse. If you discover the machine is damaged after you have signed for delivery, please immediately call Customer Service at (570) 546-9663 for advice.
Save the containers and all packing materials for possible inspection by the carrier or its agent. Otherwise, filing a freight claim can be difficult.
When you are completely satisfied with the condition of your shipment, you should inventory the contents.



Inventory
After all the parts have been removed from the two boxes, you should have the following items:
Wood Crate: (Figure 1)
| Qty | Item |
|---|---|
| 1 | A. Jointer Assembly w/Fence |
| 1 | B. Cutterhead Guard Assembly |
| 1 | C. Dust Port |
| 2 | D. Handles |
| 2 | E. Handwheels |
| 1 | F. Fence Tilt Lever |
| 2 | G. V-Belts |
| H. Knife Setting Jig Hardware Bag | |
| 1 | —Knife Setting Jig Rod |
| 2 | —Knife Setting Jig Foot |
| 4 | —E-Clip |
| I. Tools and Fastener Hardware Bag | |
| 3 | —Special Mounting Bolts |
| 3 | —Lock Washers 3/8" |
| 4 | —Phillips Head Screws 1/4"-20 x 3/8" |
| 4 | —Flat Washers 1/4"-20 |
| 1 | —Hex Wrench 3mm |
| 1 | —Hex Wrench 4mm |
| 1 | —Hex Wrench 5mm |
| 1 | —Open End Wrench 8/10mm |
| 1 | —Open End Wrench 12/14mm |
| 2 | J. Push Blocks |
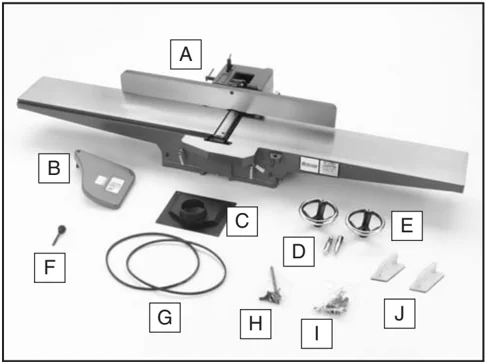
Figure 1. Box 1 inventory contents.
Cardboard Carton: (Figure 2)
| Qty | Item |
|---|---|
| 1 | K. Stand Assembly w/Motor and Door |
| 1 | L. Pedestal Arm w/Magnetic Switch |
| M. Pedestal and Switch Hardware Bag | |
| 2 | —Phillips Head Screw M5-.8 x 20 |
| 2 | —Flat Washer 5MM |
| 2 | —Hex Nut M5-.8 |
| 1 | —Strain Relief |
| 4 | —Hex Bolt M8-1.25 x 20 |
| 4 | —Flat Washer 8MM |
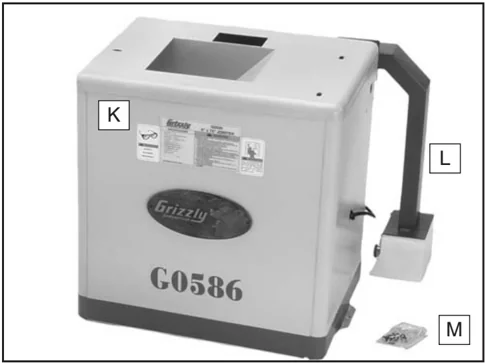
Figure 2. Box 2 inventory contents.
In the event that any nonproprietary parts are missing (e.g. a nut or a washer), we would be glad to replace them, or for the sake of expediency, replacements can be obtained at your local hardware store.
Clean Up
The unpainted surfaces are coated with a waxy oil to protect them from corrosion during shipment. Remove this protective coating with a solvent cleaner or citrus-based degreaser such as Grizzly’s G7895 Degreaser. To clean thoroughly, some parts may need to be removed. For optimum performance from your machine, make sure you clean all moving parts or sliding contact surfaces that are coated. Avoid chlorine-based solvents, such as acetone or brake parts cleaner, as they may damage painted surfaces should they come in contact.
To access the sliding surfaces, remove the fence lock nut (Figure 3) and handle, and remove the fence from the jointer unit.
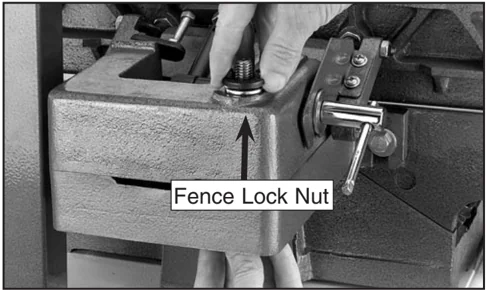
Figure 3. Removing the fence lock nut so the sliding surfaces can be cleaned.
Once the sliding surfaces of the fence are clean, reassemble the fence to the jointer with the lock handle on the top and the fence lock nut below the fence support assembly.

Site Considerations
Floor Load
The Model G0586 weighs 418 lbs. and has a base footprint of 17-1/2" x 23". Most floors are suitable for your machine. Some residential floors may require additional reinforcement to support both the machine and operator.
Working Clearances
Consider the jointer dimensions and size of material to be processed through each machine, and space for auxiliary stands, work tables or other machinery when establishing a location for your jointer. See Figure 4 for the Model G0586 overhead dimensions.
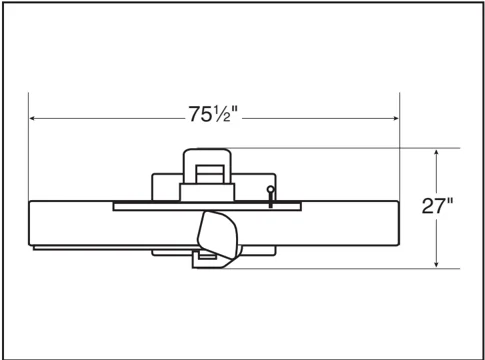
Figure 4. Model G0586 overhead dimensions.

CAUTION
Unsupervised children and visitors inside your shop could cause serious personal injury to themselves. Lock all entrances to the shop when you are away and DO NOT allow unsupervised children or visitors in your shop at any time!

Mounting Jointer
Components and Hardware Needed: Qty
- Jointer ........ 1
- Jointer Stand ........ 1
- Special Mounting Bolts ........ 3
- Lock Washers 3/8" ........ 3
Tools Needed: Qty
- Wrench or Socket 14mm ........ 1
- Extra Person for Lifting Help ........ 1
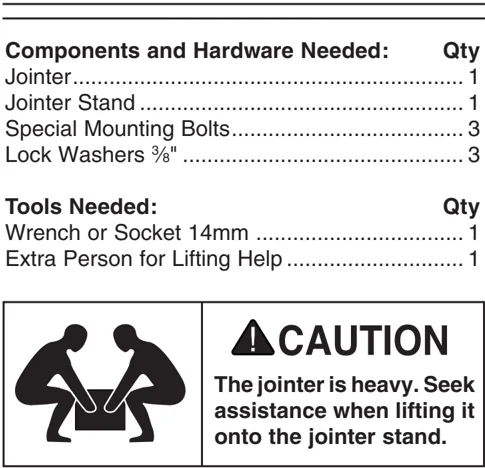
To mount the jointer to the stand:
-
With the help of an assistant, lift the jointer onto the stand.
-
Align the three bolt holes on the jointer with the three holes on the stand (Figure 5).
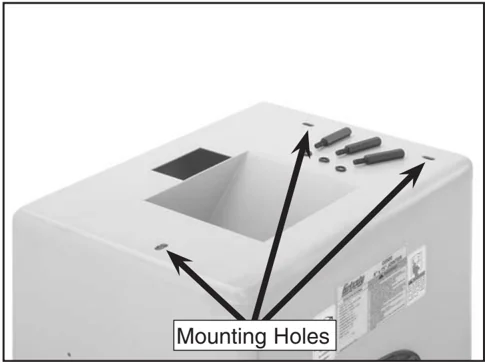
Figure 5. Mounting holes.
- Using a 14mm wrench, secure the jointer to the stand with the special mounting bolts and lock washers.
V-Belt
Components and Hardware Needed: Qty
- V-Belts ........ 2
Tools Needed: Qty
- Wrench or Socket 12mm ........ 1
To install the V-belt:
-
Remove the back access panel from the jointer stand, and the belt guard from the jointer.
-
Using a 12mm wrench, loosen the motor mount bolts. Note—DO NOT completely remove the motor mount bolts.
-
Slide the motor upward far enough to allow the V-belts to be placed around the cutterhead pulley and the motor pulley.
-
Carefully allow the motor to slide downward, tensioning the V-belts with the weight of the motor.
-
Visually check the alignment of the two pulleys (Figure 6) to make sure that they are aligned and that the V-belts are straight up and down between the pulleys.
Note—We find it is easiest to see the alignment by laying on the ground and looking up from underneath the motor. Or, with the fence removed, by looking from above.
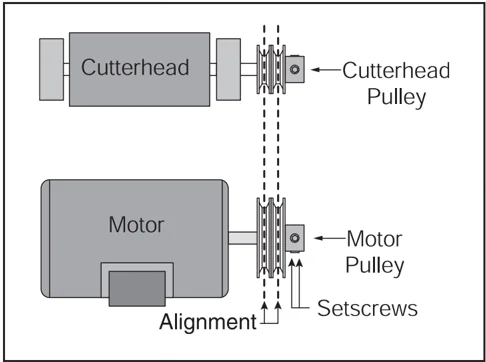
Figure 6. The pulleys should be aligned so the V-belts are straight up and down.
G0586 8" X 75" Deluxe Jointer -13-

— If the pulleys are aligned, tighten the motor mounts and go to Step 8.
— If the pulleys are NOT aligned, perform Steps 6 & 7.
6. Remove the V-belts, loosen the set screws on the end of the motor pulley, and align the motor pulley with the cutterhead pulley.
7. Tighten the set screws, replace the V-belts, and repeat Step 5.
8. Replace the access cover on the stand and the V-belt cover on the jointer (Figure 7).
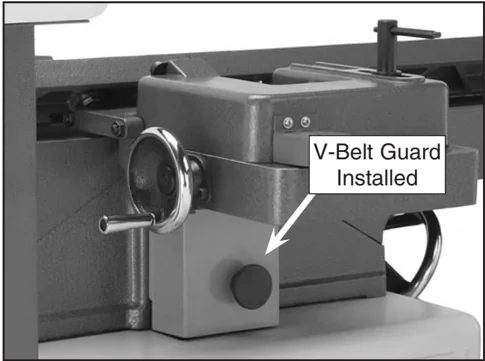
V-Belt Guard Installed
Figure 7. V-belt guard installed.
Setting Outfeed Table Height
The outfeed table must be level with the knives when they are at top-dead-center.
To set the outfeed table height:
1. Place a straightedge on the outfeed table so it extends over the cutterhead.
2. Rotate the cutterhead pulley until one of the knives is at top-dead-center (TDC), as illustrated in Figure 8.
Top Dead Center
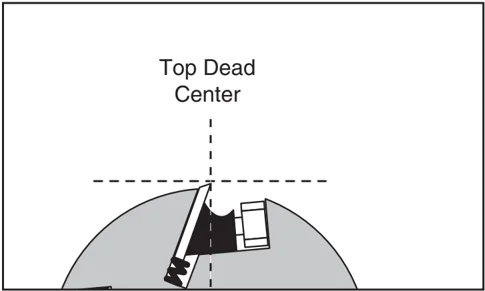
Figure 8. Cutterhead knife at top-dead-center.
3. Raise or lower the outfeed table until the knife just touches the straightedge (Figure 9).
Straightedge Outfeed Infeed
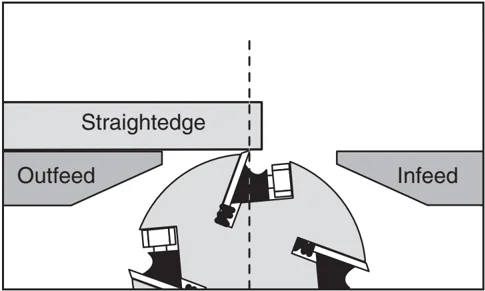
Figure 9. Using a straightedge to align outfeed table height with knife at TDC.
4. Lock the outfeed table.
-14- G0586 8" X 75" Deluxe Jointer


Cutterhead Guard
CAUTION
The cutterhead guard is a critical safety feature on this machine. A torsion spring is mounted on the cutterhead guard shaft to help it return to its proper position over the cutterhead after a cutting operation. This torsion spring must have spring pressure during guard installation to work properly.
To install the cutterhead guard:
- Wind the tang on the torsion spring back a half turn, and slide the guard shaft into the casting so the spring tang points to the right and rests against the casting, as shown in Figure 10.
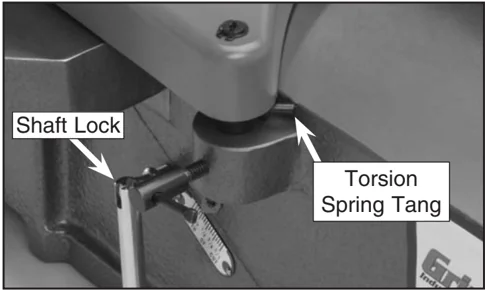
Figure 10. Guard mounted with spring tang in the correct position for proper return tension.
- Test the guard by pulling it back and letting go.
—The guard should snap back over the cutterhead without dragging across the table. If it does, tighten the shaft lock.
—If the guard drags across the table, raise it until it won't drag, then tighten the shaft lock.
—If the guard does not snap back, remove it and repeat Steps 1 & 2, increasing the spring tension as needed.
Switch Components
Components and Hardware Needed:
| Component | Qty |
|---|---|
| Pedestal Arm w/Magnetic Switch | 1 |
| Hex Bolts M8-1.25 x 20 | 4 |
| Flat Washers 8mm | 4 |
| Phillips Head Screw M5-.8 x 20 | 2 |
| Flat Washer 5mm | 2 |
| Hex Nut M5-.8 | 2 |
| Strain Relief | 1 |
Tools Needed:
| Tool | Qty |
|---|---|
| Wrench or Socket 12mm | 1 |
To install the switch components:
-
Make sure you have NOT connected your jointer to the power source at this time.
-
Remove the white cover from the magnetic switch via the two plastic screws on the front.
-
Attach the magnetic switch to the jointer stand, as shown in Figure 11, using the Phillips head screws, flat washers, and hex nuts.
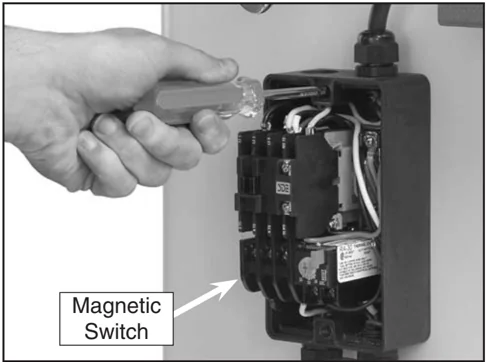
Figure 11. Attaching magnetic switch to stand.
- Re-attach the cover to the magnetic switch. Note—DO NOT overtighten the plastic screws or they will break!
Continued on next page →

- Secure the pedestal arm to the jointer stand with the hex bolts and flat washers, as shown in Figure 12.
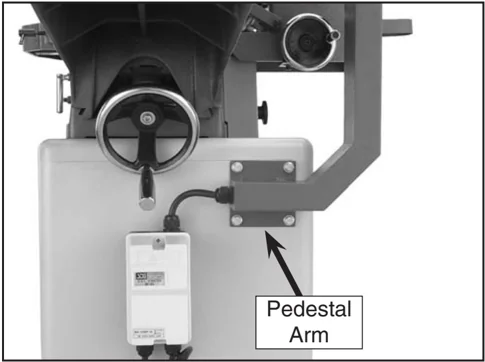
Figure 12. Correctly installed switch components.
-
Place the strain relief around the shortest cord coming out of the switch (motor cord), so the larger side of the strain relief is toward the switch.
-
Thread the motor cord through the access hole in the stand.
-
Make sure there is a little slack in the wire between the switch and the strain relief, then snap fit the strain relief into the opening as shown in Figure 13.
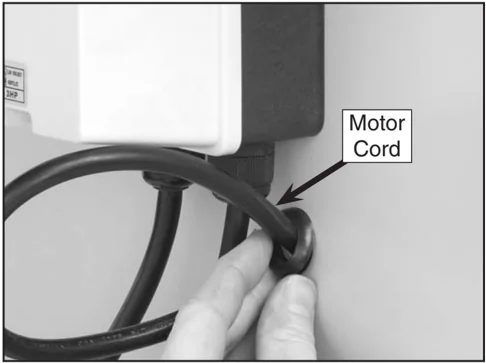
Figure 13. Installing strain relief.
-
Remove the cover from the motor junction box.
-
Connect motor in accordance with the diagram on the inside cover of the motor junction box (if that diagram is not available, use Figure 14). For additional help, refer to Page 35.
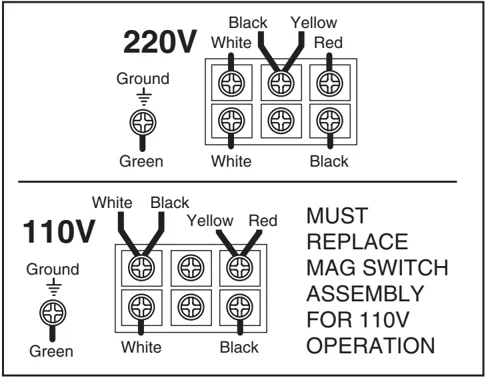
Figure 14. 220V motor wiring.
Dust Port
Components and Hardware Needed:
| Component | Qty |
|---|---|
| Dust Port | 1 |
| Phillips Head Screws 1/4"-20 x 3/8" | 4 |
| Flat Washers 1/4" | 4 |
Tools Needed:
| Tool | Qty |
|---|---|
| Phillips Head Screwdriver | 1 |
Install the dust port as shown in Figure 15.
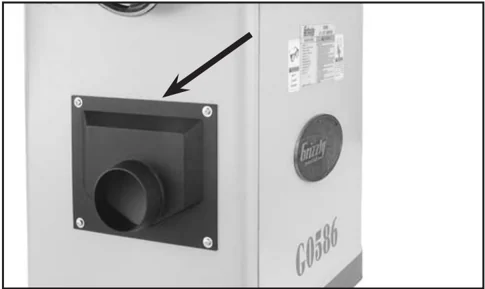
Figure 15. Correctly installed dust port.


Handwheels
Components and Hardware Needed:
| Component | Qty |
|---|---|
| Handwheels | 2 |
| Handwheel Handles | 2 |
Tools Needed:
| Tool | Qty |
|---|---|
| Phillips Head Screwdriver | 1 |
| Wrench 14mm | 1 |
To install the handwheels:
- Remove the two screws and flat washers already mounted to the handwheel shafts.
- Secure the handwheels to the shafts with the hardware removed in Step 1.
- Secure the handwheel handles to the handwheels, as shown in Figure 16.
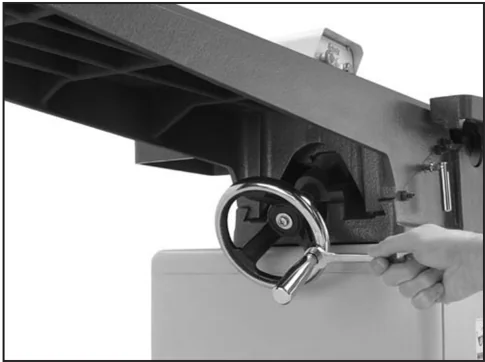
Figure 16. Securing the handwheel handle.
Fence Tilt Lever
Components and Hardware Needed:
| Component | Qty |
|---|---|
| Fence Tilt Lever | 1 |
Install the tilt lever where shown in Figure 17.
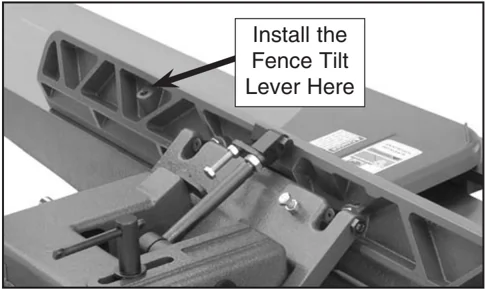
Figure 17. Tilt lever installation location.
Knife Setting Jig
Components and Hardware Needed:
| Component | Qty |
|---|---|
| Knife Setting Jig Rod | 1 |
| Knife Setting Jig Foot | 2 |
| E-Clip | 4 |
Assemble the knife setting jig as shown in Figure 18.
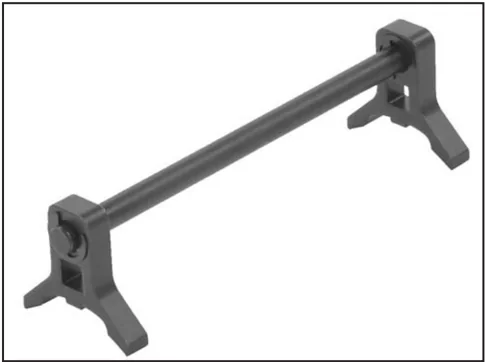
Figure 18. Knife setting jig assembly.


Test Run
WARNING
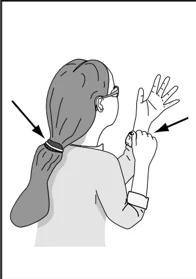
Loose hair and clothing could get caught in machinery and cause serious personal injury. Keep loose clothing rolled up and long hair tied up and away from machinery.

WARNING
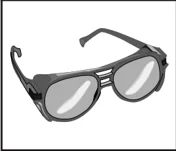
Projectiles thrown from the machine could cause serious eye injury. Wear safety glasses during assembly and operation.
Starting the machine:
- Read the entire instruction manual.
- Make sure the cutterhead guard is installed and correctly adjusted (Page 15).
- Make sure all tools and foreign objects have been removed from the machine.
- Review Section 2: Circuit Requirements (Page 9) and connect your machine to the power source.
- Press the START button to turn the machine ON.
—The jointer should run smoothly with little or no vibration.
—Immediately stop the jointer if you suspect any problems, and refer to Page 36 to troubleshoot/fix any problems before starting the jointer again.
—If you need any help with your jointer call our Tech Support at (570) 546-9663.
Recommended Adjustments
For your convenience, the adjustments listed below have been performed at the factory and no further setup is required to operate your machine.
However, because of the many variables involved with shipping, we recommend that you at least verify the following adjustments to ensure the best possible results from your new machine.
Step-by-step instructions for these adjustments can be found in Section 7: Service.
Factory adjustments that should be verified:
- Knife Settings (Page 30).
- Depth Scale Calibration (Page 31).
- Fence Stop Accuracy (Page 32).

SECTION 4: OPERATIONS
Operation Safety
WARNING
Damage to your eyes, lungs, and ears could result from using this machine without proper protective gear. Always wear safety glasses, a respirator, and hearing protection when operating this machine.
WARNING
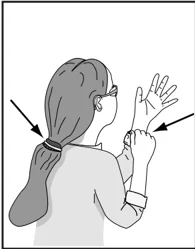
Loose hair and clothing could get caught in machinery and cause serious personal injury. Keep loose clothing and long hair away from moving machinery.

NOTICE
If you have never used this type of machine or equipment before, WE STRONGLY RECOMMEND that you read books, trade magazines, or get formal training before beginning any projects. Regardless of the content in this section, Grizzly Industrial will not be held liable for accidents caused by lack of training.
Stock Inspection and Requirements
Here are some rules to follow when choosing and jointing stock:
-
DO NOT joint or surface plane stock that contains knots. Injury to the operator or damage to the workpiece can occur if the knots become dislodged during the cutting operation.
-
DO NOT joint or surface plane against the grain direction. Cutting against the grain increases the likelihood of stock kickback, as well as tear-out on the workpiece.
-
Jointing and surface planing with the grain produces a better finish and is safer for the operator. Cutting with the grain is described as feeding the stock on the jointer so the grain points down and toward you as viewed on the edge of the stock (Figure 19).
Note—If the grain changes direction along the edge of the board, decrease the cutting depth and make additional passes.
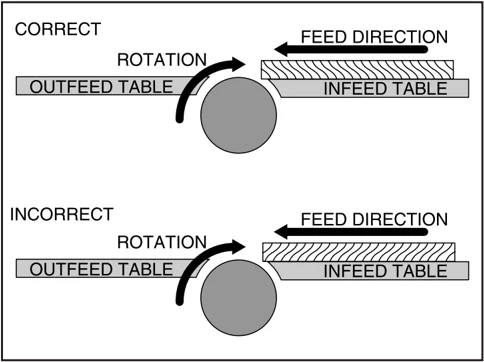
Figure 19. Correct and incorrect grain alignment to cutterhead.


• Remove foreign objects from the stock. Make sure that any stock you process with the jointer is clean and free of any dirt, nails, staples, tiny rocks or any other foreign objects that may damage the jointer blades.
• Only process natural wood fiber through your jointer. Never joint MDF, particle board, plywood, laminates or other synthetically made materials.
• Make sure all stock is sufficiently dried before jointing. Wood with a moisture content over 20% will cause unnecessary wear on the knives and poor cutting results.
• Make sure your workpiece exceeds the minimum dimension requirements (Figures 20 & 21) before edge jointing or surface planing, or it may break or kick back during the operation!
 Figure 20. Minimum dimensions for edge jointing.
 Figure 21. Minimum dimensions for surface planing.
Squaring Stock
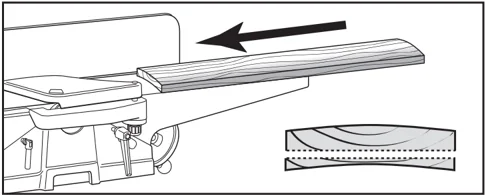
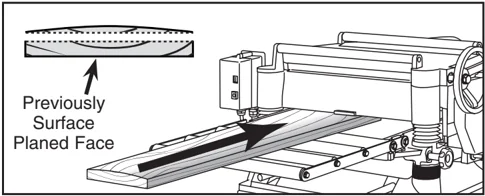
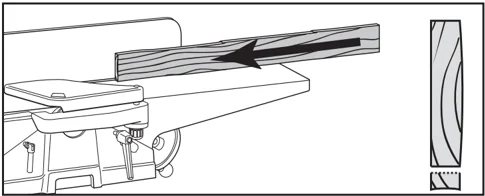
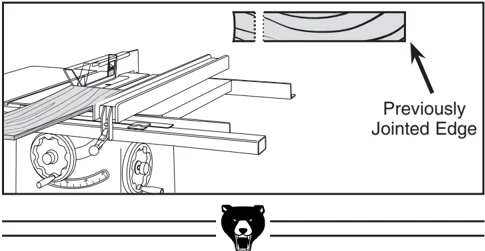
Squaring stock involves four steps performed in the order below:
1. Surface Plane On The Jointer—The concave face of the workpiece is surface planed flat with the jointer.
2. Surface Plane On a Thickness Planer—The opposite face of the workpiece is surface planed flat with a thickness planer.
3. Edge Joint On The Jointer—The concave edge of the workpiece is jointed flat with the jointer.
4. Rip Cut On A Table Saw—The jointed edge of the workpiece is placed against a table saw fence and the opposite edge cut off.

Surface Planing
The purpose of surface planing on the jointer is to make one flat face on a piece of stock (see Figures 22 & 23) to prepare it for surface planing on a thickness planer.
NOTICE
If you are not experienced with a jointer, set the depth of cut to 0", and practice feeding the workpiece across the tables as described. This procedure will better prepare you for the actual operation.
 Figure 22. Typical surface planing operation.
 Figure 23. Illustration of surface planing results.
To surface plane on the jointer:
- Read and understand Section 1: Safety, beginning on Page 6.
- Make sure your stock has been inspected for dangerous conditions as described in the Stock Inspection & Requirements instructions, beginning on Page 19.
- Set the cutting depth for your operation. (We suggest 1/32" for surface planing, using a more shallow depth for hard wood species or for wide stock.)
- Make sure your fence is set to 90°
- If your workpiece is cupped (warped), place it so the concave side is face down on the surface of the infeed table.
- Start the jointer.
WARNING
Failure to use push blocks when surface planing may result in cutterhead contact, which will cause serious personal injury. Always use push blocks to protect your hands when surface planing on the jointer.
- With a push block in each hand, press the workpiece against the table and fence with firm pressure, and feed the workpiece over the cutterhead.
Note—If your leading hand (with push block) gets within 4" of the cutterhead, lift it up and over the cutterhead, and place the push block on the portion of the workpiece that is on the outfeed table. Now, focus your pressure on the outfeed end of the workpiece while feeding, and repeat the same action with your trailing hand when it gets within 4" of the cutterhead. To keep your hands safe, DO NOT let them get closer than 4" from the cutterhead when it is moving!
- Repeat Step 7 until the entire surface is flat.
G0586 8" X 75" Deluxe Jointer -21-
Edge Jointing
The purpose of edge jointing is to produce a finished, flat-edged surface (see Figures 24 & 25) that is suitable for joinery or finishing. It is also a necessary step when squaring rough or warped stock.
NOTICE
If you are not experienced with a jointer, set the depth of cut to 0", and practice feeding the workpiece across the tables as described below. This procedure will better prepare you for the actual operation.
 Figure 24. Typical edge jointing operation.
 Figure 25. Illustration of edge jointing results.
To edge joint on the jointer:
- Read and understand Section 1: Safety, beginning on Page 6.
- Make sure your stock has been inspected for dangerous conditions as described in the Stock Inspection instructions, beginning on Page 19.
- Set the cutting depth for your operation. (We suggest between 1/16" and 1/8" for edge jointing, using a more shallow depth for hard wood species or for wide stock.)
- Make sure the fence is set to 90°.
- If your workpiece is cupped (warped), place it so the concave side is face down on the surface of the infeed table.
- Start the jointer.
- Press the workpiece against the table and fence with firm pressure. Use your trailing hand to guide the workpiece through the cut, and feed the workpiece over the cutterhead.
Note—If your leading hand gets within 4" of the cutterhead, lift it up and over the cutterhead, and place it on the portion of the workpiece that is over the outfeed table. Now, focus your pressure on the outfeed end of the workpiece while feeding, and repeat the same action with your trailing hand when it gets within 4" of the cutterhead. To keep your hands safe, DO NOT let them get closer than 4" from the cutterhead when it is moving!
- Repeat Step 7 until the entire edge is flat.
-22- G0586 8" X 75" Deluxe Jointer

Bevel Cutting
The purpose of bevel cutting is to cut a specific angle into the edge of a workpiece (see Figures 26 & 27).
The Model G0586 has preset fence stops at 45° inward, 90°, and 45° outward (135°). If your situation requires a different angle, the preset fence stops can be easily adjusted for your needs.
NOTICE
If you are not experienced with a jointer, set the depth of cut to 0", and practice feeding the workpiece across the tables as described below. This procedure will better prepare you for the actual operation.
 Figure 26. Typical bevel cutting operation.
 Figure 27. Illustration of bevel cutting results.
G0586 8" X 75" Deluxe Jointer
To bevel cut on the jointer:
- Read and understand Section 1: Safety, beginning on Page 6.
- Make sure your stock has been inspected for dangerous conditions as described in the Stock Inspection instructions, beginning on Page 19.
- Set the cutting depth for your operation. (We suggest between 1/16" and 1/8" for bevel cutting, using a more shallow depth for hard wood species or for wide stock.)
- Make sure your fence is set to the angle of your desired cut.
- If your workpiece is cupped (warped), place it so the concave side is face down on the surface of the infeed table.
- Start the jointer.
- With a push block in your leading hand, press the workpiece against the table and fence with firm pressure, and feed the workpiece over the cutterhead.
Note—If your leading hand gets within 4" of the cutterhead, lift it up and over the cutterhead, and place the push block on the portion of the workpiece that is on the outfeed table. Now, focus your pressure on the outfeed end of the workpiece while feeding, and repeat the same action with your trailing hand when it gets within 4" of the cutterhead. To keep your hands safe, DO NOT let them get closer than 4" from the cutterhead when it is moving!
- Repeat Step 7 until the angled cut is satisfactory to your needs.

Rabbet Cutting
The purpose of rabbet cutting is to remove a section of the workpiece edge (see Figures 28 & 29). When combined with another rabbet cut edge, the rabbet joints create a simple, yet strong method of joining stock.
NOTICE
If you are not experienced with a jointer, set the depth of cut to 0", and practice feeding the workpiece across the tables as described below. This procedure will better prepare you for the actual operation.
 Figure 28. Typical rabbet cutting operation.
 Figure 29. Illustration of rabbet cutting effects and a few sample joints.
To rabbet cut on the jointer:
- Read and understand Section 1: Safety, beginning on Page 6.
- Make sure your stock has been inspected for dangerous conditions as described in the Stock Inspection instructions, beginning on Page 19.
- Set the cutting depth for your operation. (We suggest between 1/16" and 1/8" for rabbet cutting, using a more shallow depth for hard wood species or for wide stock.)
- Remove the cutterhead guard.
- Make sure your fence is moved forward, so the amount of infeed/outfeed table exposed is the same as the size of your rabbet. Also, make sure your fence is set to 90°
- Start the jointer.
- With a push block in each hand, press the workpiece against the table and fence with firm pressure, and feed the workpiece over the cutterhead.
Note—If your leading hand gets within 4" of the cutterhead, lift it up and over the cutterhead, and place the push block on the portion of the workpiece that is on the outfeed table. Now, focus your pressure on the outfeed end of the workpiece while feeding, and repeat the same action with your trailing hand when it gets within 4" of the cutterhead. To keep your hands safe, DO NOT let them get closer than 4" from the cutterhead when it is moving!
- Repeat Step 6 until the your rabbet is cut to depth.
WARNING
When the cutterhead guard is removed, attempting any other cut besides a rabbet directly exposes the operator to the moving cutterhead. Always replace the cutterhead guard after rabbet cutting!
SECTION 5: ACCESSORIES
G7314—Heavy-Duty SHOP FOX® Mobile Base
Make your machine mobile with this popular patented mobile base. The unique outrigger type supports increase stability and lower machine height. This heavy duty mobile base is rated for up to a 600 lb. capacity.
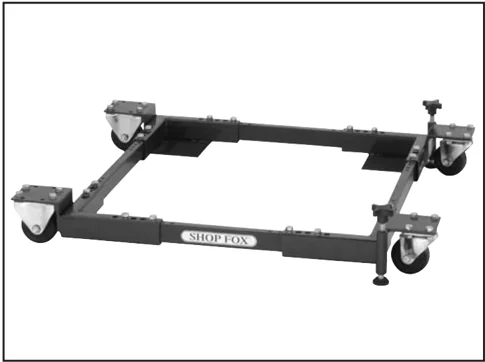
Figure 30. G7314 SHOP FOX® Mobile Base.
G3639—Power Twist® V-Belt - 3/8" x 48"
Smooth running with less vibration and noise than solid belts. The Power Twist® V-belts can be customized in minutes to any size—just add or remove sections to fit your needs. Size: 3/8" x 48"; replaces all "M" sized V-belts. Requires two Power Twist® V-belts to replace the stock V-belts on your Model G0586.
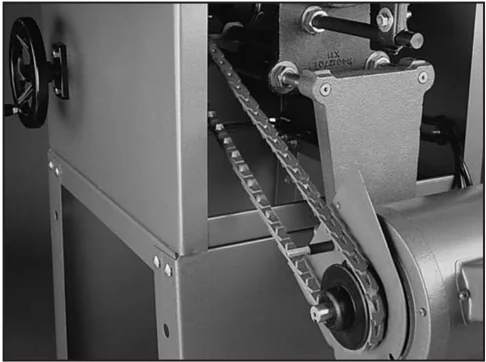
Figure 31. G3639 Power Twist® V-Belt.
G1753—Jointer Pal® Magnetic Knife Jig (For HSS & Cobalt Knives)
G1756—Jointer Pal® Magnetic Knife Jig (For Carbide Knives)
This patented magnetic knife-setting system lets you set jointer knives in perfect alignment every time! It also allows you to shift nicked knives to get a perfect cut to an accuracy of + or - 0.001".
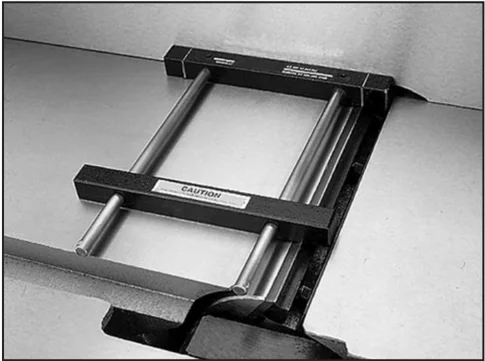
Figure 32. G1753 Jointer Pal® Knife Jig.
G3631—Jointer/Planer Knife Hone
Add a razor hone to your planer and jointer knives with this hand-held sharpening device. This handy tool sharpens flat and beveled surfaces quickly and easily. Great for touch-ups.
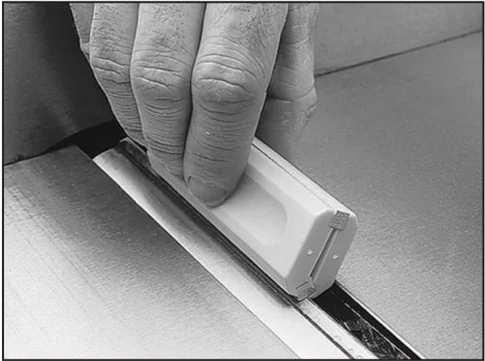
Figure 33. G3631 Jointer/Planer Knife Hone.
Call 1-800-523-4777 To Order
G9256—6" Dial Caliper G9257—8" Dial Caliper G9258—12" Dial Caliper
Required for jointing, planing, or sanding to critical tolerances. These traditional dial calipers are accurate to 0.001" and can measure outside surfaces, inside surfaces, and heights/depths. Features stainless steel, shock resistant construction and a dust proof display. An absolute treat for the perfectionist!
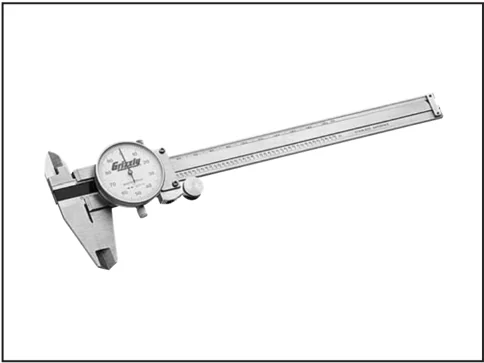
Figure 34. Grizzly® Dial Calipers.
H5142—Dispoz-A-Blade® System (Includes 4 Holders & Knife Inserts) H5143—Dispoz-A-Blade® Knife Inserts (Set of 4)
Install a Dispoz-A-Blade® Knife system in your new jointer and save up to 70% on knife replacements for the life of your jointer. Each knife insert is double-edged, so you get two knives in one, and is indexed so that all knife inserts can be installed at the same height in just minutes. Yes, that means you can throw away the knife jig!
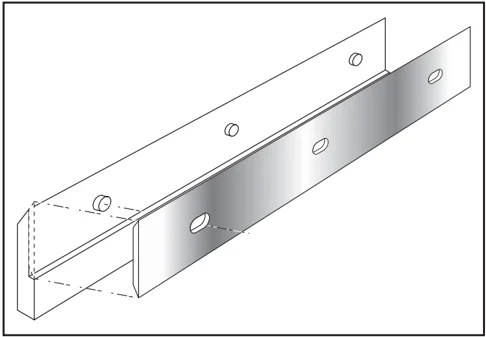
Figure 35. Dispoz-A-Blade® Holder and Knife.
-26-
H4982—8" HSS Replacement Jointer Knives (Set of 4)
H1411—PowerHands™ Safety Stick
This safety push stick features interchangeable traction treads; one for flat stock, and one for pressing against table and fence. It also has a spring loaded push-pin for full workpiece contact. Made in the USA.
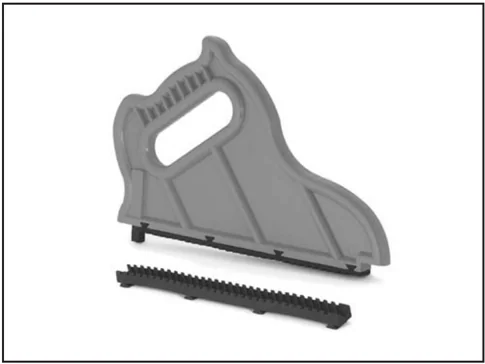
Figure 36. H1411 PowerHands™ Safety Stick.
G9643—8" Precision Straightedge G9644—12" Precision Straightedge H2675—16" Precision Straightedge
Ideal for aligning your outfeed bed to the cutterhead and calibrating your depth scale. These grade 00 heavy-duty stainless steel straightedges are manufactured to DIN874 standards for professional results in set-up and inspection work.
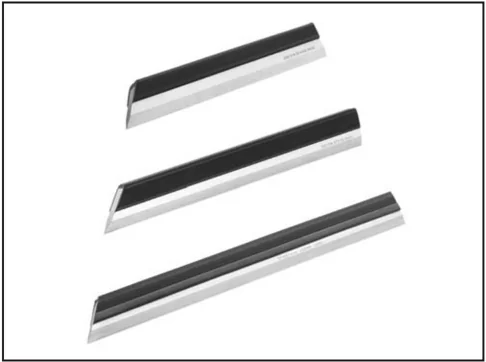
Figure 37. Straightedges.
Call 1-800-523-4777 To Order
G7984—Face Shield H1298—Dust Sealed Safety Glasses H1300—UV Blocking, Clear Safety Glasses H2347—Uvex® Spitfire Safety Glasses H0736—Shop Fox® Safety Glasses Safety Glasses are essential to every shop. If you already have a pair, buy extras for visitors or employees. You can't be too careful when it comes to shop safety!
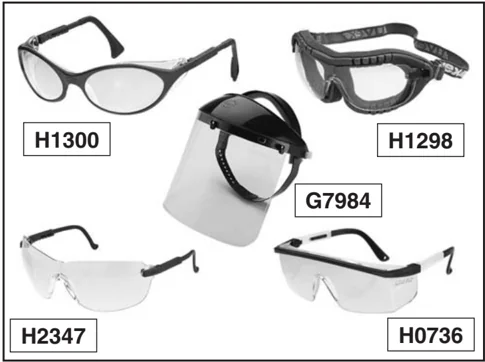
Figure 38. Our most popular safety glasses.
H6175—Power Respirator H6892—3M Pre-Filter, 10-Pack H6893—Filter Cartridge, 10-Pack, P100 Say goodbye to foggy safety glasses and labored breathing, this battery powered respirator supplies a constant breeze of fresh air all day long. Comes with its own plastic case for clean, sealed storage. Finally, a respirator you can look forward to wearing—at an affordable price!
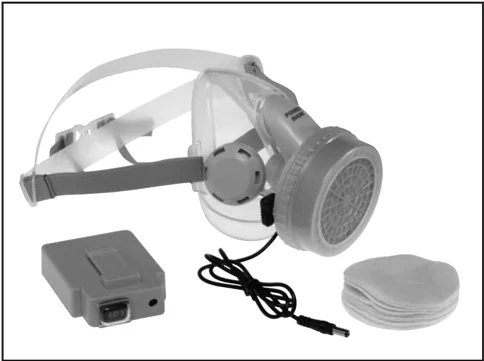
Figure 39. H6175 Power Respirator.
H2499—Small Half-Mask Respirator H3631—Medium Half-Mask Respirator H3632—Large Half-Mask Respirator H3635—Disposable Cartridge Filter Pair P100 Wood dust is a known carcinogen and has been linked to nasal cancer and severe respiratory illnesses. If you work around dust everyday, a half-mask respirator can be a lifesaver. Also compatible with safety glasses!
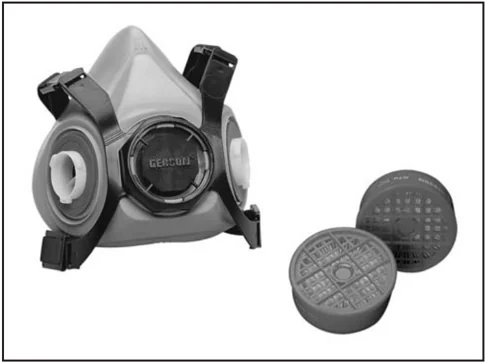
Figure 40. Half-mask respirator and disposable cartridge filters.
G5562—SLIPIT® 1 Qt. Gel G5563—SLIPIT® 12 oz Spray G2871—Boeshield® T-9 12 oz Spray G2870—Boeshield® T-9 4 oz Spray H3788—G96® Gun Treatment 12 oz Spray H3789—G96® Gun Treatment 4.5 oz Spray

Figure 41. Recommended products for protecting unpainted cast iron/steel part on machinery.
Call 1-800-523-4777 To Order

SECTION 6: MAINTENANCE
! WARNING Always disconnect power to the machine before performing maintenance. Failure to do this may result in serious personal injury.
Schedule
For optimum performance from your machine, follow this maintenance schedule and refer to any specific instructions given in this section.
Daily:
- Vacuum all dust on and around the machine.
- Wipe down tables and all other unpainted cast iron with a metal protectant.
Monthly Check:
- V-belt tension, damage, or wear.
- Clean/vacuum dust buildup from inside cabinet and off of motor.
V-Belts
To ensure optimum power transmission from the motor to the blade, the V-belts must be in good condition (free from cracks, fraying and wear) and properly aligned and tensioned (refer to the instructions on Page 13).
Cleaning
Cleaning the Model G0586 is relatively easy. Vacuum excess wood chips and sawdust, and wipe off the remaining dust with a dry cloth. If any resin has built up, use a resin dissolving cleaner to remove it.
Protect the unpainted cast iron surfaces on the table by wiping the table clean after every use—this ensures moisture from wood dust does not remain on bare metal surfaces.
Keep tables rust-free with regular applications of products like , G96® Gun Treatment, SLIPIT®, or Boeshield® T-9.
Lubrication
Since all bearings are sealed and permanently lubricated, simply leave them alone until they need to be replaced. DO NOT lubricate them.
Table ways and the fence assembly should not be lubricated. If the tables appear to be stuck, disassemble and clean any foreign materials from the ways. Re-assemble and reset the gibs.




SECTION 7: SERVICE
! WARNING Always disconnect power to the machine before performing service adjustments. Failure to do this may result in serious personal injury.
About Service
This section is designed to help the operator with adjustments that were made at the factory and that might also need to be made during the life of the machine.
This section is provided for your convenience—it is not a substitute for the Grizzly Service Department.
If any adjustments arise that are not described in this manual or you are unsure of how to perform the procedures in this section, then feel free to call Technical Support at (570) 546-9663.
I nspecting Knives
The height of the knives can be easily and quickly inspected with the knife setting jig. This inspection will ensure that the knives are set in the cutterhead as they should be. Usually this is done before calibrating the outside table or when troubleshooting.
To inspect the knives:
- Disconnect the jointer from the power source!
- Remove the cutterhead guard or block it out of the way.
- Lower the infeed table to the 1/2" scale mark.
- Place the knife jig on the cutterhead, directly over a knife, as shown in Figure 42.
 Middle Pad
Figure 42. Jig positioned over cutterhead knife.
- Carefully inspect how the jig touches the cutterhead and the knife.
—If both outside legs of the jig sit firmly on the cutterhead and the middle pad just touches the knife, then that knife is set correctly. (Repeat this inspection with the other knives.)
—If the jig does not sit firmly on the cutterhead and touch the knife edge as described, then reset that knife. (Repeat this inspection with the other knives before resetting.)
G0586 8" X 75" Deluxe Jointer -29-
Setting Knives
Setting the knives correctly is crucial to the proper operation of the jointer and is very important in keeping the knives sharp. If one knife is higher than the others, it will do the majority of the work, and thus, dull much faster than the others.
The knife jig included with the jointer is designed to set the knives at the correct height.
The Grizzly 8" Jointers come with both jack screws and springs to provide you with two options for cutterhead adjustments (see Figure 43). Note—Only one of these options is needed to set the knives—see Step 5* for clarification.
 Loosen
Tighten
Knife
Spring
Jack Screw
Gib
Gib Bolt
Figure 43. Cutterhead profile diagram.
To set the knives:
-
Disconnect the jointer from the power source!
-
Remove the cutterhead guard from the table and lower the infeed and outfeed tables as far as they go. This will give you unrestricted access to the cutterhead.
-
Remove the belt guard to expose the cutterhead pulley.
-
Rotate the cutterhead pulley to give you good access to one of the cutterhead knives.
-
Loosen the cutterhead gib bolts, starting in the middle, and alternating back and forth until all of the gib bolts are loose, but not falling out.
Note—If this is the first time you are setting the knives, remove the gib and knife from the cutterhead. Decide which adjustment option you are going to use between the jack screws and the springs. If you decide to use the jack screws, remove the springs from the cutterhead. If you decide to use the springs, you can just thread the jack screws completely into the cutterhead so they will not get lost. Replace the gib and knife.
-
Position the knife gauge over the knife as shown in Figure 42 and loosen the gib bolts until the knife is completely loose.
-
Jack Screws—Using a 3mm hex wrench, find the jack screws through the access holes in the cutterhead (Figure 44) and rotate the jack screws to raise or lower the knife. When the knife is set correctly, it will barely touch the middle pad of the knife setting jig. Snug the gib bolts tight enough to just hold the knife in place. Repeat Steps 5-7 with the rest of the knives.
 Figure 44. Jack screw access hole.
Springs—Push the knife down with the jig so that the knife edge is touching the middle pad of the jig. Hold the jig down and tighten the gib bolts just tight enough to hold the knife in place. Repeat Steps 5-7 with the rest of the knives.
-30- G0586 8" X 75" Deluxe Jointer
-
Rotate the cutterhead to the first knife you started with. Slightly tighten all the gib bolts, starting at the ends and working your way to the middle by alternating left and right. Repeat this step on the rest of the knives.
-
Repeat Step 8.
-
Repeat Step 8, but final tighten each gib bolt.
-
Adjust the outfeed table to match the new knife heights.
Calibrating Depth Scale
The depth scale on the infeed table can be calibrated or "zeroed" if it is not correct.
To calibrate the depth scale:
-
Set the outfeed table height as described in the Outfeed Table Height sub-section.
-
Place a straightedge across the infeed and outfeed tables.
-
Adjust the infeed table until it is level with the outfeed table, as illustrated in Figure 45.
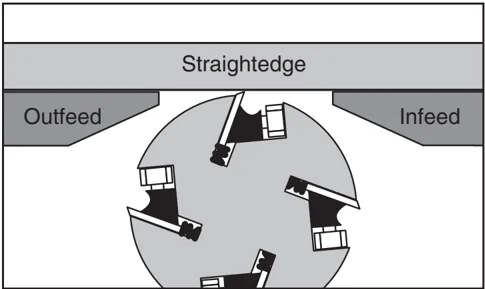
Figure 45. Infeed table adjusted even with outfeed table and knife at TDC.
- Using a screwdriver, adjust the scale pointer exactly to “0” (Figure 46).
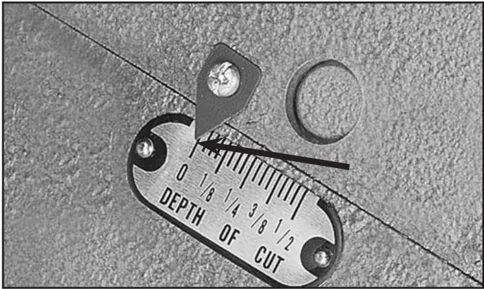
Figure 46. Depth-of-cut pointer adjusted to “0” position.


Setting Fence Stops
The fence stops are adjustable nuts and bolts that simplify the task of adjusting the fence to 45° inward, 90°, and 45° outward (135°).
To set the 45° inward fence stop:
- Using a 45° square, adjust the fence to the 45° inward position, as shown in Figure 47.
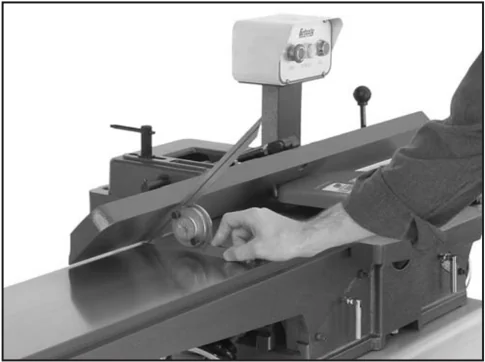
Figure 47. Adjusting fence 45° inward.
- Loosen the jam nut shown in Figure 48.
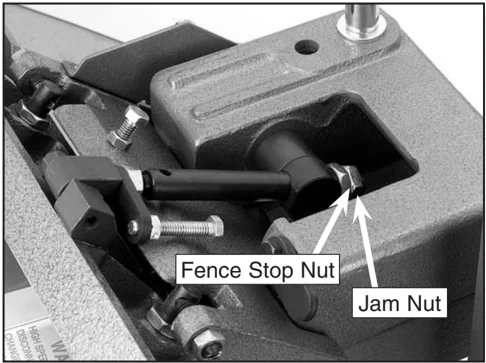
Figure 48. 45° inward fence stop jam nut.
-
Adjust the 45° inward fence stop nut until it makes contact with the back of the fence bracket.
-
Retighten the jam nut loosened in Step 2.
To set the 90° fence stop:
- Using a 90° square, adjust the fence to the 90° position, as shown in Figure 49.
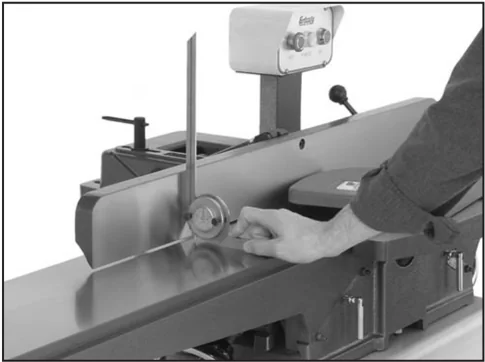
Figure 49. Adjusting fence to 90°.
- Flip the 90° swing stop into the position shown in Figure 50.
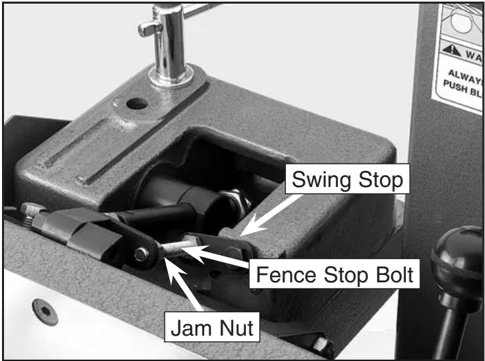
Figure 50. 90° swing stop engaged.
-
Loosen the jam nut on the 90° fence stop bolt (Figure 50).
-
Adjust the 90° fence stop bolt until it makes contact with the 90° swing stop.
-
Retighten the jam nut loosened in Step 3.
Continued on next page →
To set the 45° outward fence stop:
- Using a sliding bevel adjusted to 135°, adjust the fence to the 135° (45° outward) position.
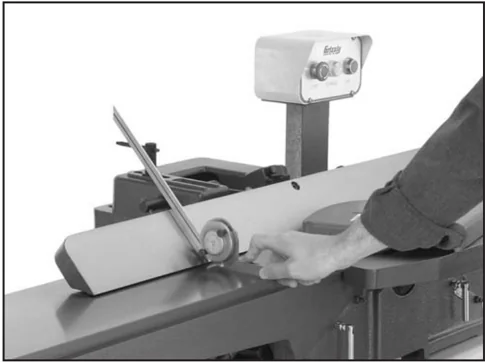
Figure 51. Adjusting fence 45° outward.
- Loosen the jam nut on the 45° outward fence stop bolt (Figure 52).
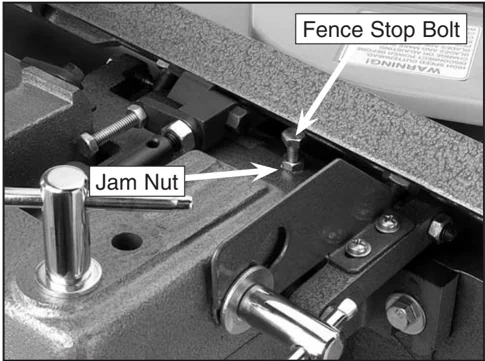
Figure 52. 45° outward fence stop jam nut.
-
Adjust the 45° outward fence stop bolt until it makes contact with the back of the fence.
-
Retighten the jam nut loosened in Step 2.
Adjusting Gibs
The function of the table gibs is to eliminate excessive play in the table movement. The gibs also control how easy it will be to move the tables up and down.
To adjust the table gibs:
- Using a 12mm wrench, loosen the two outfeed table gib nuts on the side of the jointer base (Figure 53).
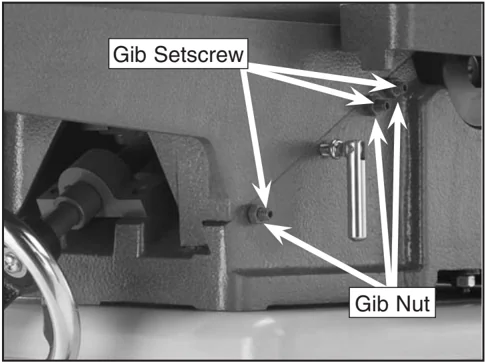
Figure 53. Outfeed table gib controls.
- Using a 4mm hex wrench, evenly tighten both gib setscrews a small amount, then check the table by moving it up and down. Adjust the setscrews as needed until the friction of the table movement is balanced between minimal play and ease of movement.
Note—Tighter gibs reduce play but make it harder to adjust the tables.
-
Repeat Steps 1-2 with the other table.
-
Set the outfeed table height as described in Outfeed Table Height on Page 14.


Wiring Diagram
MODEL G0586
MODEL G0593
CONTROL PANEL (viewed from behind)

COLOR KEY
| COLOR | CODE |
|---|---|
| BLACK | BI |
| WHITE | Wt |
| GREEN | Gn |
| RED | Rd |
| YELLOW | YI |
| ORANGE | Or |
DANGER
Disconnect power before performing any electrical service. Electricity presents serious shock hazards that will result in severe personal injury and even death!
Ground
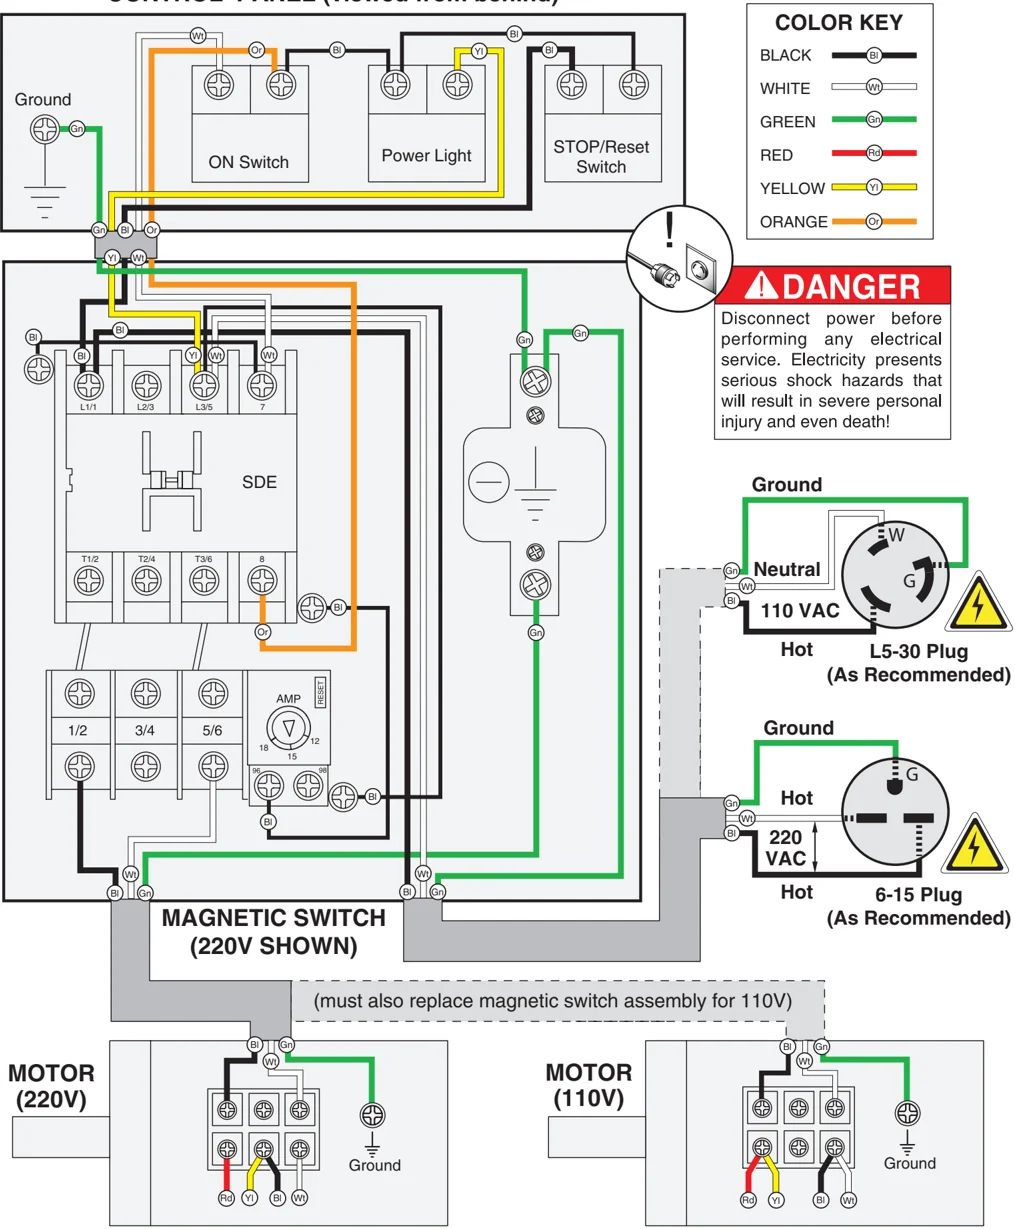
MAGNETIC SWITCH (220V SHOWN)
(must also replace magnetic switch assembly for 110V)
MOTOR (220V)
MOTOR (110V)
G0586/G0593 Electrical Components
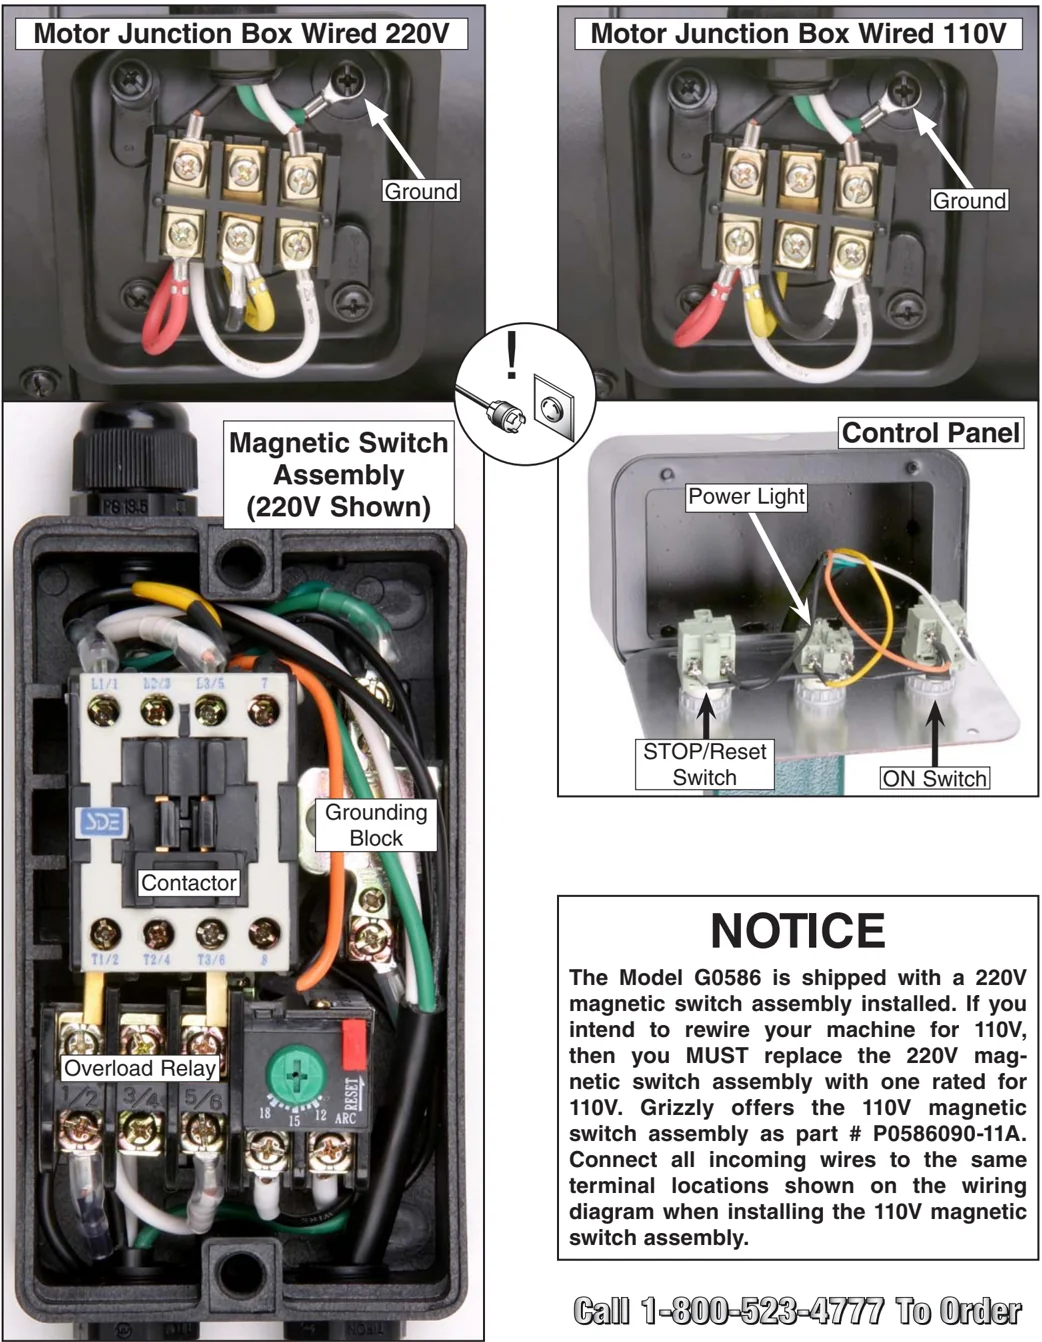
NOTICE
The Model G0586 is shipped with a 220V magnetic switch assembly installed. If you intend to rewire your machine for 110V, then you MUST replace the 220V magnetic switch assembly with one rated for 110V. Grizzly offers the 110V magnetic switch assembly as part # P0586090-11A. Connect all incoming wires to the same terminal locations shown on the wiring diagram when installing the 110V magnetic switch assembly.
Call 1-800-523-4777 To Order
G0586 8" X 75" Deluxe Jointer -35-
Troubleshooting Guide
Motor & Machine Operation
| Symptom | Possible Cause | Possible Solution |
|---|---|---|
| Motor will not start. | 1. Emergency stop button depressed.2. Low voltage.3. Open circuit in motor or loose connections. | 1. Twist the emergency stop button to allow it to pop out.2. Check power line for proper voltage.3. Inspect all lead connections on motor for loose or open connections. |
| Fuses or circuit breakers blow. | 1. Short circuit in line cord or plug. | 1. Repair or replace cord or plug for damaged insulation and shorted wires. |
| Motor fails to develop full power (output of motor decreases rapidly with decrease in voltage at motor terminals). | 1. Power supply circuit overloaded with lights, appliances, and other motors.2. Undersized wires or circuits too long. | 1. Reduce load on circuit.2. Increase wire sizes or reduce length of the circuit. |
| Motor overheats. | 1. Motor overloaded during operation.2. Air circulation through the motor restricted. | 1. Reduce load on motor; take lighter cuts.2. Clean out motor to provide normal air circulation. |
| Motor stalls or shuts off during a cut. | 1. Motor overloaded during operation.2. Thermal overload protection tripped in magnetic switch.3. Short circuit in motor or loose connections.4. Circuit breaker tripped. | 1. Reduce load on motor; take lighter cuts.2. Press the "Reset" button on the thermal overload relay, located inside the magnetic switch.3. Repair or replace connections on motor for loose or shorted terminals or worn insulation.4. Install correct circuit breaker; reduce # of machines running on that circuit (circuit overload). |
| Blade slows when cutting or makes a squealing noise, especially on start-up. | 1. V-belt loose.2. V-belt worn out. | 1. Tighten V-belt (Page 13).2. Replace V-belt (Page 13). |
| Loud repetitious noise coming from machine. | 1. Pulley setscrews or keys are missing or loose.2. Motor fan is hitting the cover.3. V-belts are damaged. | 1. Inspect keys and setscrews. Replace or tighten if necessary.2. Adjust fan cover mounting position, tighten fan, or shim fan cover.3. Replace V-belts (Page 13). |
| Vibration when running or cutting. | 1. Loose or damaged blade.2. Damaged V-belt.3. Worn cutterhead bearings. | 1. Tighten or replace blade.2. Replace.3. Check/replace cutterhead bearings. |
Table
| Symptom | Possible Cause | Possible Solution |
|---|---|---|
| Tables are hard to adjust | 1. Table lock is engaged or partially engaged.2. Table gibs are too tight. | 1. Completely loosen the table lock.2. Re-adjust the table gibs (Page 33). |
| Excessive play in table movement. | 1. Table gibs are too loose. | 1. Re-adjust the table gibs (Page 33). |
G0586 □" X □□" Deluxe Jointer
Cutting
| Symptom | Possible Cause | Possible Solution |
|---|---|---|
| Excessive snipe (gouge in the end of the board that is uneven with the rest of the cut). | 1. Outfeed table is set too low.2. Operator pushing down on end of workpiece. | 1. Align outfeed table with cutterhead knife at top dead center (Page 14).2. Reduce/eliminate downward pressure on that end of workpiece. |
| Workpiece stops in the middle of the cut. | 1. Outfeed table is set too high. | 1. Align outfeed table with cutterhead knife at top dead center (Page 14). |
| Chipping. | 1. Knots or conflicting grain direction in wood.2. Nicked or chipped blades.3. Feeding workpiece too fast.4. Taking too deep of a cut. | 1. Inspect workpiece for knots and grain (Page 19); only use clean stock.2. Adjust one of the nicked knives sideways; replace knives (Page 30).3. Slow down the feed rate.4. Take a smaller depth of cut. (Always reduce cutting depth when surface planing or working with hard woods.) |
| Fuzzy Grain. | 1. Wood may have high moisture content or surface wetness.2. Dull knives. | 1. Check moisture content and allow to dry if moisture is too high.2. Replace knives (Page 30). |
| Long lines or ridges that run along the length of the board | 1. Nicked or chipped knives. | 1. Adjust one of the nicked knives sideways; replace knives (Page 30). |
| Uneven cutter marks, wavy surface, or chatter marks across the face of the board. | 1. Feeding workpiece too fast.2. Knives not adjusted at even heights in the cutterhead. | 1. Slow down the feed rate.2. Adjust the knives so they are set up evenly in the cutterhead (Page 30). |
| Board edge is concave or convex after jointing. | 1. Board not held with even pressure on infeed and outfeed table during cut.2. Board started too uneven.3. Board has excessive bow or twist along its length.4. Insufficient number of passes. | 1. Hold board with even pressure as it moves over the cutterhead.2. Take partial cuts to remove the extreme high spots before doing a full pass.3. Surface plane one face so there is a good surface to position against the fence.4. It may take 3 to 5 passes to achieve a perfect edge, depending on the starting condition of the board and the depth of cut. |
| Uneven cut or breakout when rabbeting. | 1. Uneven feed rate.2. Depth of cut too deep.3. Knives not adjusted evenly with each other in the cutterhead.4. Nicked or chipped knives. | 1. Feed the board evenly and smoothly during the cut.2. Raise the infeed table to take a smaller depth of cut. Never exceed 1/16" per pass when rabbeting.3. Adjust the knives so they are set up evenly in the cutterhead (Page 30).4. Adjust one of the nicked knives sideways; replace knives (Page 30). |
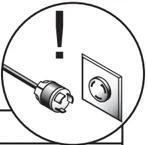
Jointer Parts Breakdown
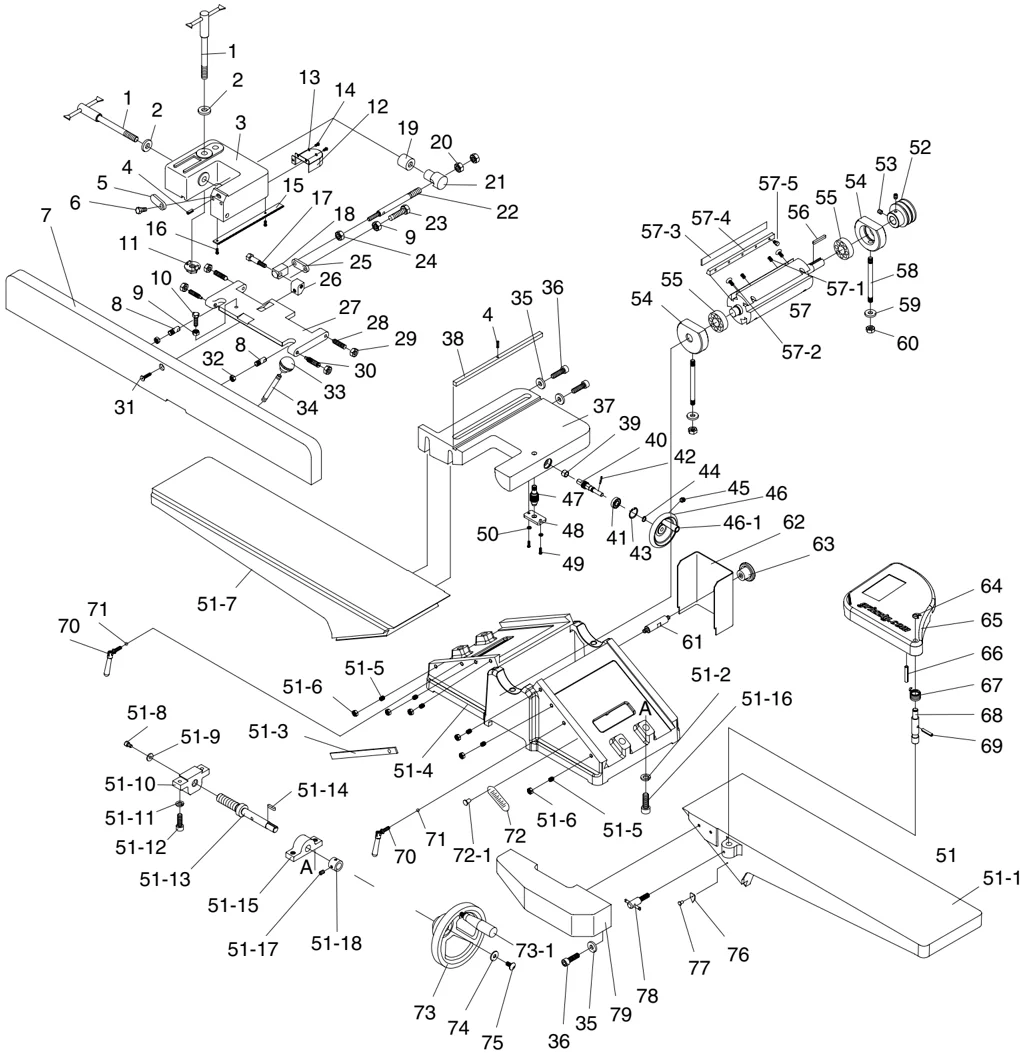
Jointer Parts List
| REF | PART # | DESCRIPTION |
|---|---|---|
| 1 | P0586001 | FENCE LOCK HANDLE |
| 2 | P0586002 | FLAT WASHER 1/2 |
| 3 | P0586003 | FENCE BRACKET |
| 4 | P0586004 | ROLL PIN 4 X 14 |
| 5 | P0586005 | STOP TAB |
| 6 | P0586006 | SHOULDER BOLT 5/16-18 X 5/8 |
| 7 | P0586007 | FENCE |
| 8 | P0586008 | SWIVEL SHAFT |
| 9 | PN02 | HEX NUT 5/16-18 |
| 10 | PB12 | HEX BOLT 5/16-18 X 1-1/4 |
| 11 | P0586011 | FENCE LOCK NUT |
| 12 | P0586012 | COVER |
| 13 | PW03 | FLAT WASHER #10 |
| 14 | PS06 | PHLP HD SCR 10-24 X 3/8 |
| 15 | P0586015 | TOOTH GIB |
| 16 | PS01 | PHLP HD SCR 10-24 X 1/2 |
| 17 | P0586017 | SHOULDER BOLT |
| 18 | P0586018 | TAB BLOCK |
| 19 | P0586019 | SPACING COLLAR |
| 20 | PN09 | HEX NUT 5/8-18 |
| 21 | P0586021 | PIVOT NUT |
| 22 | P0586022 | FENCE ADJUSTMENT STUD |
| 23 | PB22 | HEX BOLT 5/16-18 X 1-3/4 |
| 24 | PN19 | HEX NUT 7/16-14 |
| 25 | P0586025 | STOP TAB |
| 26 | P0586026 | FENCE BRACKET |
| 27 | P0586027 | FENCE HINGE |
| 28 | P0586028 | CONE SET SCREW 3/8-16 X 1-1/2 |
| 29 | PN08 | HEX NUT 3/8-16 |
| 30 | P0586030 | CONE SET SCREW 3/8-16 X 1-1/2 |
| 31 | PB76 | HEX BOLT 5/16-18 X 1-5/8 |
| 32 | PN01 | HEX NUT 1/2-20 |
| 33 | P0586033 | BALL KNOB 3/8-16 |
| 34 | P0586034 | HANDLE |
| 35 | PW02 | FLAT WASHER 3/8 |
| 36 | PSB26 | CAP SCREW 3/8-16 X 1-1/2 |
| 37 | P0586037 | TABLE BRACKET |
| 38 | P0586038 | FENCE KEY |
| 39 | P0586039 | BUSHING |
| 40 | P0586040 | WORM GEAR |
| 41 | P0586041 | RADIAL BALL BEARING 6000 |
| 42 | PRP42M | ROLL PIN 3 X 20 |
| 43 | PR20M | INT RETAINING RING 28MM |
| 44 | PR03M | EXT RETAINING RING 12MM |
| 45 | PSS11 | SET SCREW 1/4-20 X 1/4 |
| 46 | P0586046 | HANDWHEEL |
| 46-1 | P0586046-1 | HANDLE |
| 47 | P0586047 | WORM GEAR |
| 48 | P0586048 | BRACKET |
| 49 | PS22 | PHLP HD SCR 10-24 X 5/8 |
| 50 | PLW03 | LOCK WASHER #10 |
| 51 | P0586051 | TABLE ASSEMBLY |
| 51-1 | P0586051-1 | INFEED TABLE |
| REF | PART # | DESCRIPTION |
|---|---|---|
| 51-2 | PLW07 | LOCK WASHER 1/2 |
| 51-3 | P0586051-3 | GIB |
| 51-4 | P0586051-4 | BASE |
| 51-5 | PSS01 | SET SCREW 5/16-18 x 1 |
| 51-6 | PN02 | HEX NUT 5/16-18 |
| 51-7 | P0586051-7 | OUTFEED TABLE |
| 51-8 | PSB30 | CAP SCREW 5/16-18 X 1/2 |
| 51-9 | PW07 | FLAT WASHER 5/16 |
| 51-10 | P0586051-10 | TABLE BRACKET |
| 51-11 | PLW04 | LOCK WASHER 3/8 |
| 51-12 | PSB19 | CAP SCREW 3/8-16 X 1-1/4 |
| 51-13 | P0586051-13 | WORM GEAR |
| 51-14 | PK01M | KEY 5 X 5 X 22 |
| 51-15 | P0586051-15 | BRACKET |
| 51-16 | PSB44 | CAP SCREW 1/2-12 X 1-3/4 |
| 51-17 | PSS03 | SET SCREW 1/4-20 X 3/8 |
| 51-18 | P0586051-18 | COLLAR |
| 52 | P0586052 | CUTTERHEAD PULLEY |
| 53 | PSS02 | SET SCREW 5/16-18 X 3/8 |
| 54 | P0586054 | BEARING HOUSING |
| 55 | P6204 | RADIAL BALL BEARING 6204 |
| 56 | PK01M | KEY 5 X 5 X 22 |
| 57 | P0586057 | CUTTERHEAD |
| 57-1 | P0586057-1 | COMPRESSION SPRING |
| 57-2 | P0586057-2 | JACK SCREW |
| 57-3 | P0586057-3 | KNIVES-SET OF 4 |
| 57-4 | P0586057-4 | KNIFE GIB |
| 57-5 | P0586057-5 | HEX HD GIB BOLT |
| 58 | P0586058 | STUD |
| 59 | PW02 | FLAT WASHER 3/8 |
| 60 | PN08 | HEX NUT 3/8-16 |
| 61 | P0586061 | SPECIAL DOUBLE END STUD |
| 62 | P0586062 | BELT GUARD |
| 63 | P0586063 | ROUND KNOB 5/16-18 |
| 64 | PR48M | EXT RETAINING RING 11MM |
| 65 | P0586065 | CUTTERHEAD GUARD |
| 66 | PRP31M | ROLL PIN 6 X 36 |
| 67 | P0586067 | TORSION SPRING |
| 68 | P0586068 | PIVOT SHAFT |
| 69 | PRP27M | ROLL PIN 5 X 28 |
| 70 | P0586070 | SWIVELING LOCK HANDLE |
| 71 | P5960850 | STEEL BALL 6MM |
| 72 | P0586072 | DEPTH SCALE |
| 72-1 | P4000809 | RIVET 2 X 5 |
| 73 | P0586073 | 6" HANDWHEEL |
| 73-1 | P0586073-1 | HANDLE |
| 74 | PW07 | FLAT WASHER 5/16 |
| 75 | PS38 | PHLP HD SCR 5/16-18 X 1/2 |
| 76 | P0586076 | DEPTH POINTER |
| 77 | PS23 | PHLP HD SCR 8-32 X 1/4 |
| 78 | P0586078 | GUARD LOCK HANDLE |
| 79 | P0586079 | RABBET TABLE |
Stand/Motor Parts Breakdown
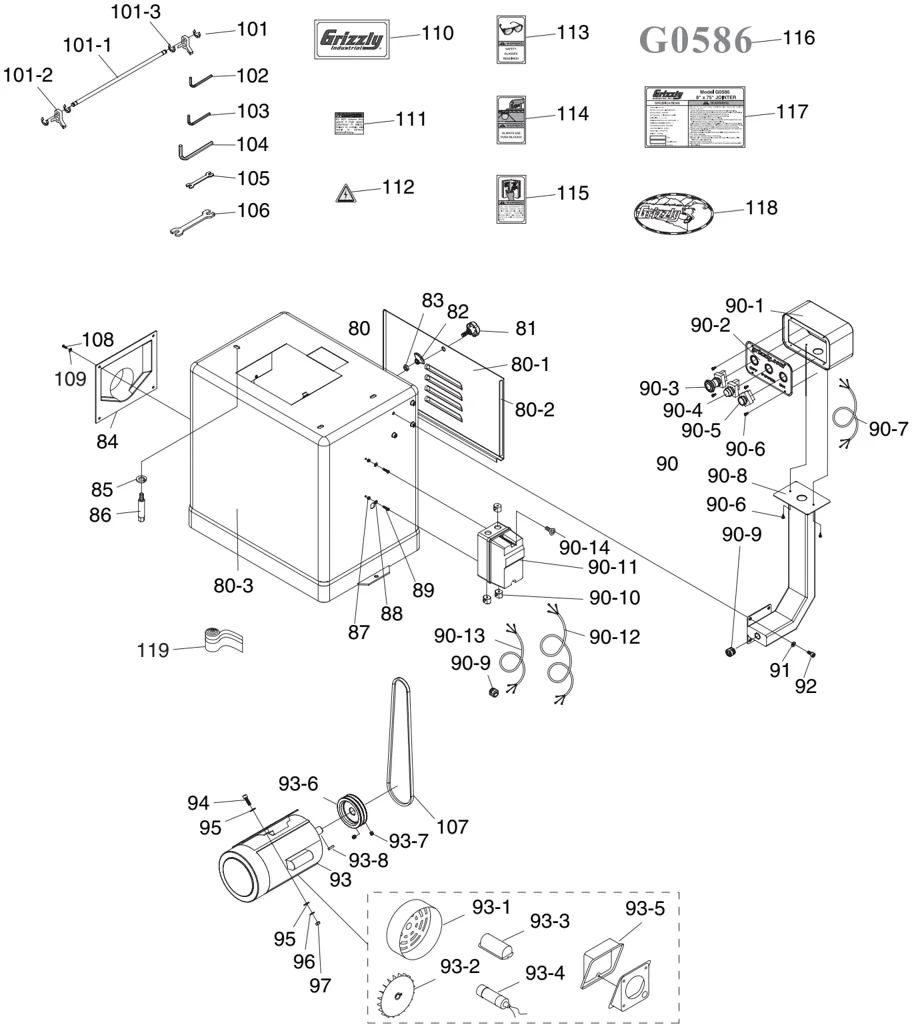
-40- G0586 8" X 75" Deluxe Jointer
Stand/Motor Parts List
| REF | PART # | DESCRIPTION |
|---|---|---|
| 80 | P0586080 | STAND ASSEMBLY |
| 80-1 | P0586080-1 | COVER |
| 80-2 | P0586080-2 | SEAL |
| 80-3 | P0586080-3 | CABINET STAND |
| 81 | P0586081 | STAR KNOB 3/8-16 x 7/8 |
| 82 | P0586082 | LATCH |
| 83 | PN08 | HEX NUT 3/8-16 |
| 84 | P0586084 | DUST PORT |
| 85 | PLW04 | LOCK WASHER 3/8 |
| 86 | P0586086 | SPEICAL MOUNTING BOLT |
| 87 | PN06M | HEX NUT M5-.8 |
| 88 | PW02M | FLAT WASHER 5MM |
| 89 | PS06M | PHLP HD SCR M5-.8 X 20 |
| 90 | P0586090 | PEDESTAL SWITCH ASSEMBLY |
| 90-1 | P0586090-1 | SWITCH BOX |
| 90-2 | P0586090-2 | SWITCH PANEL |
| 90-3 | P0586090-3 | STOP SWITCH XB4-BS542(TE) |
| 90-4 | P0586090-4 | POWER LIGHT XB4-BG21(TE) |
| 90-5 | P0586090-5 | START SWITCH XB4-BA31(TE) |
| 90-6 | PS09M | PHLP HD SCR M5-.8 X 10 |
| 90-7 | P0586090-7 | CONTROL CORD 18AWG X 5C |
| 90-8 | P0586090-8 | PEDESTAL ARM |
| 90-9 | P0586090-9 | RELIEF SB8R-3 |
| 90-10 | P0586090-10 | STRAIN RELIEF 1/2 |
| 90-11 | P0586090-11 | MAGNETIC SWITCH |
| 90-12 | PWRCRD220L | POWER CORD |
| 90-13 | PWRCRD220S | MOTOR CORD |
| 90-14 | P0586090-14 | PLASTIC SWITCH CVR SCREW |
| 91 | PW01M | FLAT WASHER 8MM |
| 92 | PB09M | HEX BOLT M8-1.25 X 20 |
| 93 | P0586093 | MOTOR |
| 93-1 | P0586093-1 | FAN COVER |
| 93-2 | P0586093-2 | FAN |
| REF | PART # | DESCRIPTION |
|---|---|---|
| 93-3 | P0586093-3 | CAPACITOR COVER |
| 93-4 | PC400S | S. CAPACITOR 400M 125V |
| 93-5 | P0586093-5 | JUNCTION BOX |
| 93-6 | P0586093-6 | MOTOR PULLEY |
| 93-7 | PSS15 | SET SCREW 3/8-16 X 3/8 |
| 93-8 | PK12M | KEY 5 X 5 X 30 |
| 94 | PSB03 | CAP SCREW 5/16-18 X 1 |
| 95 | PW07 | FLAT WASHER 5/16 |
| 96 | PLW01 | LOCK WASHER 5/16 |
| 97 | PN02 | HEX NUT 5/16-18 |
| 101 | P0586101 | KNIFE SETTING JIG ASSEMBLY |
| 101-1 | P0586101-1 | KNIFE SETTING JIG ROD |
| 101-2 | P0586101-2 | KNIFE SETTING JIG FOOT |
| 101-3 | PEC10M | E-CLIP 9MM |
| 102 | PAW03M | HEX WRENCH 3MM |
| 103 | PAW04M | HEX WRENCH 4MM |
| 104 | PAW05M | HEX WRENCH 5MM |
| 105 | PWR810 | WRENCH 8 X 10 |
| 106 | PWR1214 | WRENCH 12 X 14 |
| 107 | PVM40 | V-BELT M40 3L400 |
| 108 | PS07 | PHLP HD SCR 1/4-20 x 3/8 |
| 109 | PW06 | FLAT WASHER 1/4 |
| 110 | P0586110 | GRIZZLY LOGO-FLAT METALLIC |
| 111 | P0586111 | CUTTERHEAD GUARD WARNING |
| 112 | PLABEL-14 | ELECTRICITY TRIANGLE |
| 113 | PLABEL-11 | SAFETY GLASSES WARNING |
| 114 | P0586114 | PUSH BLOCKS WARNING |
| 115 | PLABEL-12 | READ MANUAL WARNING |
| 116 | P0586116 | G0586 MODEL NUMBER LABEL |
| 117 | P0586117 | G0586 MACHINE ID LABEL |
| 118 | G8588 | CAST GRIZZLY LOGO PLATE |
| 119 | P0586119 | GREEN TAPE 48 X 2000MM |
WARRANTY AND RETURNS
Grizzly Industrial, Inc. warrants every product it sells for a period of 1 year to the original purchaser from the date of purchase. This warranty does not apply to defects due directly or indirectly to misuse, abuse, negligence, accidents, repairs or alterations or lack of maintenance. This is Grizzly’s sole written warranty and any and all warranties that may be implied by law, including any merchantability or fitness, for any particular purpose, are hereby limited to the duration of this written warranty. We do not warrant or represent that the merchandise complies with the provisions of any law or acts unless the manufacturer so warrants. In no event shall Grizzly’s liability under this warranty exceed the purchase price paid for the product and any legal actions brought against Grizzly shall be tried in the State of Washington, County of Whatcom.
We shall in no event be liable for death, injuries to persons or property or for incidental, contingent, special, or consequential damages arising from the use of our products.
To take advantage of this warranty, contact us by mail or phone and give us all the details. We will then issue you a “Return Number,” which must be clearly posted on the outside as well as the inside of the carton. We will not accept any item back without this number. Proof of purchase must accompany the merchandise.
The manufacturers reserve the right to change specifications at any time because they constantly strive to achieve better quality equipment. We make every effort to ensure that our products meet high quality and durability standards and we hope you never need to use this warranty.
Please feel free to write or call us if you have any questions about the machine or the manual.
Thank you again for your business and continued support. We hope to serve you again soon.
-42- G0586 8" X 75" Deluxe Jointer
Grizzly Industrial, Inc. WARRANTY CARD
Name ___________________________________________________________________________________ Street ___________________________________________________________________________________ City ________________________________________ State __________________________ Zip _________________________ Phone # ___________________________________ Email ______________________________ Invoice # _________________________ Model # ____________________________________ Order # ______________________________ Serial # ______________________________
The following information is given on a voluntary basis. It will be used for marketing purposes to help us develop better products and services. Of course, all information is strictly confidential.
-
How did you learn about us? ____ Advertisement ____ Friend ____ Catalog ____ Card Deck ____ Website ____ Other:
-
Which of the following magazines do you subscribe to? ____ Cabinet Maker ____ Popular Mechanics ____ Today’s Homeowner ____ Family Handyman ____ Popular Science ____ Wood ____ Hand Loader ____ Popular Woodworking ____ Wooden Boat ____ Handy ____ Practical Homeowner ____ Woodshop News ____ Home Shop Machinist ____ Precision Shooter ____ Woodsmith ____ Journal of Light Cont. ____ Projects in Metal ____ Woodwork ____ Live Steam ____ RC Modeler ____ Woodworker West ____ Model Airplane News ____ Rifle ____ Woodworker’s Journal ____ Modeltec ____ Shop Notes ____ Other: ____ Old House Journal ____ Shotgun News
-
What is your annual household income? ____ $20,000-$29,000 ____ $30,000-$39,000 ____ $40,000-$49,000 ____ $50,000-$59,000 ____ $60,000-$69,000 ____ $70,000+
-
What is your age group? ____ 20-29 ____ 30-39 ____ 40-49 ____ 50-59 ____ 60-69 ____ 70+
-
How long have you been a woodworker/metalworker? ____ 0-2 Years ____ 2-8 Years ____ 8-20 Years ____ 20+ Years
-
How many of your machines or tools are Grizzly? ____ 0-2 ____ 3-5 ____ 6-9 ____ 10+
-
Do you think your machine represents a good value? ____ Yes ____ No
-
Would you recommend Grizzly Industrial to a friend? ____ Yes ____ No
-
Would you allow us to use your name as a reference for Grizzly customers in your area? Note: We never use names more than 3 times. ____ Yes ____ No
-
Comments: ___________________________________________________________________________________
CUT ALONG DOTTED LINE

FOLD ALONG DOTTED LINE
Place Stamp Here

GRIZZLY INDUSTRIAL, INC. P.O. BOX 2069 BELLINGHAM, WA 98227-2069
FOLD ALONG DOTTED LINE
Send a Grizzly Catalog to a friend:
Name________________________________________ Street_______________________________________ City_________________State_________Zip_________
TAPE ALONG EDGES--PLEASE DO NOT STAPLE
grizzly.com
TOOL WEBSITE
Buy Direct and Save with Grizzly® – Trusted, Proven and a Great Value!
Visit Our Website Today And Discover Why Grizzly® Is The Industry Leader!
- SECURE ORDERING
- ORDERS SHIPPED WITHIN 24 HOURS
- E-MAIL RESPONSE WITHIN ONE HOUR
-OR-
Call Today For A FREE Full Color Catalog 1-800-523-4777
VISA | MasterCard | DISCOVER NOVUS | AMERICAN EXPRESS