Grizzly
Industrial, Inc.
MODEL G0538
OSCILLATING SPINDLE SANDER
OWNER'S MANUAL

COPYRIGHT © NOVEMBER, 2005 BY GRIZZLY INDUSTRIAL, INC. REVISED AUGUST, 2013 (ST) WARNING: NO PORTION OF THIS MANUAL MAY BE REPRODUCED IN ANY SHAPE OR FORM WITHOUT THE WRITTEN APPROVAL OF GRIZZLY INDUSTRIAL, INC. (FOR MODELS MANUFACTURED SINCE 12/09) #JK7731 PRINTED IN CHINA
WARNING!
This manual provides critical safety instructions on the proper setup, operation, maintenance, and service of this machine/tool. Save this document, refer to it often, and use it to instruct other operators.
Failure to read, understand and follow the instructions in this manual may result in fire or serious personal injury—including amputation, electrocution, or death.
The owner of this machine/tool is solely responsible for its safe use. This responsibility includes but is not limited to proper installation in a safe environment, personnel training and usage authorization, proper inspection and maintenance, manual availability and comprehension, application of safety devices, cutting/sanding/grinding tool integrity, and the usage of personal protective equipment.
The manufacturer will not be held liable for injury or property damage from negligence, improper training, machine modifications or misuse.
WARNING!
Some dust created by power sanding, sawing, grinding, drilling, and other construction activities contains chemicals known to the State of California to cause cancer, birth defects or other reproductive harm. Some examples of these chemicals are:
- Lead from lead-based paints.
- Crystalline silica from bricks, cement and other masonry products.
- Arsenic and chromium from chemically-treated lumber.
Your risk from these exposures varies, depending on how often you do this type of work. To reduce your exposure to these chemicals: Work in a well ventilated area, and work with approved safety equipment, such as those dust masks that are specially designed to filter out microscopic particles.


Table of Contents
-
INTRODUCTION ........ 2
-
Manual Accuracy ........ 2
-
Contact Info ........ 2
-
Machine Data Sheet ........ 3
-
Machine Data Sheet ........ 4
-
Identification ........ 5
-
SECTION 1: SAFETY ........ 6
-
Safety Instructions for Machinery ........ 6
-
SECTION 2: POWER SUPPLY ........ 9
-
Availability ........ 9
-
Full-Load Current Rating ........ 9
-
Circuit Requirements ........ 9
-
Grounding & Plug Requirements ........ 10
-
Extension Cords ........ 10
-
SECTION 3: SET UP ........ 11
-
Needed for Setup ........ 11
-
Unpacking ........ 11
-
Inventory ........ 12
-
Base Attachment ........ 13
-
Mounting ........ 13
-
Dust Collection ........ 13
-
SECTION 4: OPERATIONS ........ 14
-
Switch/Safety Key ........ 14
-
Sleeve Installation ........ 14
-
Sanding ........ 15
-
SECTION 5: ACCESSORIES ........ 16
-
SECTION 6: MAINTENANCE ........ 17
-
Schedule ........ 17
-
Before Each Use ........ 17
-
After Each Use ........ 17
-
Weekly Maintenance ........ 17
-
Monthly Maintenance ........ 17
-
Cleaning ........ 17
-
SECTION 7: SERVICE ........ 18
-
Troubleshooting ........ 18
-
Motor & Electrical ........ 18
-
Sanding Operations ........ 18
-
SECTION 8: WIRING ........ 19
-
Wiring Safety Instructions ........ 19
-
Wiring Diagram ........ 20
-
SECTION 9: PARTS ........ 21
-
Parts Breakdown ........ 21
-
Parts List ........ 22
-
WARRANTY & RETURNS ........ 25
INTRODUCTION
Manual Accuracy
We are proud to offer this manual with your new machine! We've made every effort to be exact with the instructions, specifications, drawings, and photographs of the machine we used when writing this manual. However, sometimes we still make an occasional mistake.
Also, owing to our policy of continuous improvement, your machine may not exactly match the manual. If you find this to be the case, and the difference between the manual and machine leaves you in doubt, check our website for the latest manual update or call technical support for help.
Before calling, find the manufacture date of your machine by looking at the date stamped into the machine ID label (see below). This will help us determine if the manual version you received matches the manufacture date of your machine.

For your convenience, we post all available manuals and manual updates for free on our website at www.grizzly.com. Any updates to your model of machine will be reflected in these documents as soon as they are complete.
Contact Info
We stand behind our machines. If you have any questions or need help, use the information below to contact us. Before contacting, please get the serial number and manufacture date of your machine. This will help us help you faster.
Grizzly Technical Support 1203 Lycoming Mall Circle Muncy, PA 17756 Phone: (570) 546-9663 Email: techsupport@grizzly.com
We want your feedback on this manual. What did you like about it? Where could it be improved? Please take a few minutes to give us feedback.
Grizzly Documentation Manager P.O. Box 2069 Bellingham, WA 98227-2069 Email: manuals@grizzly.com
Machine Description
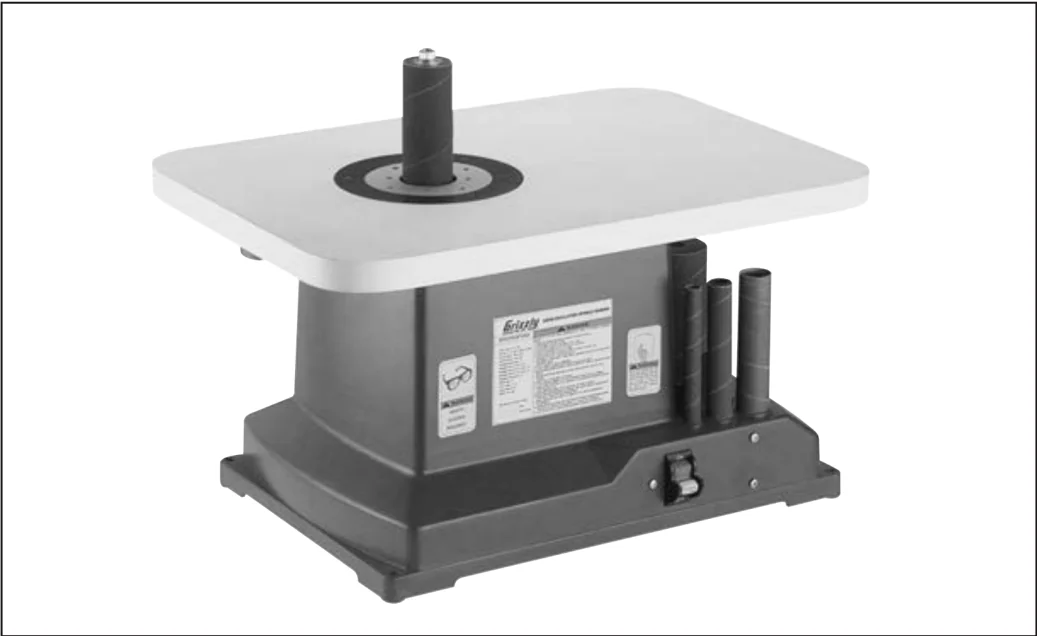
An oscillating spindle sander is used to sand the edges of contoured or irregularly shaped workpieces.
The Model G0538 features a 20" x 14" table that provides a solid platform for supporting workpieces. The 2-1/2" dust collection port can be fitted to a dust collection system to reduce the amount of dust released by the machine. The six sanding sleeves are easily replaceable and available in a variety of sizes and grits.
The sanding drums and sleeves can be stored under the table.
Grizzly
Industrial, Inc.
MACHINE DATA SHEET
Customer Service #: (570) 546-9663 · To Order Call: (800) 523-4777 · Fax #: (800) 438-5901
MODEL G0538 1/3 HP OSCILLATING SPINDLE SANDER
Product Dimensions:
- Weight ........ 34 lbs.
- Width (side-to-side) x Depth (front-to-back) x Height ........ 20 x 14 x 11-1/2 in.
- Footprint (Length x Width) ........ 20 x 14 in.
Shipping Dimensions:
- Type ........ Cardboard Box
- Content ........ Machine
- Weight ........ 36 lbs.
- Length x Width x Height ........ 18 x 23 x 16 in.
Electrical:
- Power Requirement ........ 110V, Single-Phase, 60 Hz
- Prewired Voltage ........ 110V
- Full-Load Current Rating ........ 4A
- Minimum Circuit Size ........ 15A
- Connection Type ........ Cord & Plug
- Power Cord Included ........ Yes
- Power Cord Length ........ 9 ft.
- Power Cord Gauge ........ 18 AWG
- Plug Included ........ Yes
- Included Plug Type ........ 5-15
- Switch Type ........ Paddle Safety Switch w/Removable Key
Motors: Main
- Type ........ Universal
- Horsepower ........ 1/3 HP
- Phase ........ Single-Phase
- Amps ........ 4A
- Speed ........ 1725 RPM
- Power Transfer ........ Direct Drive
- Bearings ........ Sealed & Permanently Lubricated
Main Specifications: Spindle Sander Info
- Sanding Drum Diameters ........ 1/2, 3/4, 1, 1-1/2, 2, 3 in.
- Sanding Drum Length ........ 4-1/2 in.
- Spindle Speed ........ 1725 RPM
- Spindle Oscillation ........ 72 SPM
- Stroke Length ........ 5/8 in.
- Table Length ........ 20 in.
- Table Width ........ 14 in.
- Table Thickness ........ 1 in.
- Table-to-Floor Height ........ 11-3/8 in.
- Spindle Shaft Diameter ........ 1/2 in.
- Number of Table Inserts ........ 6
- Included Sanding Sleeve Grit Size ........ 80, 150

Construction Materials
- Base ........ Plastic
- Table ........ Particle Board with Plastic Laminate
- Frame ........ Plastic
Other Related Info
- Number of Dust Ports ........ 1
- Dust Port Size ........ 2-1/2 in.
Other Specifications:
- Country Of Origin ........ China
- Warranty ........ 1 Year
- Approximate Assembly & Setup Time ........ 30 Minutes
- Serial Number Location ........ ID Label on Front of Machine
- ISO 9001 Factory ........ No
- CSA Certified ........ No
Features: Paddle On/Off Switch with Lock Six 4-1/2 in. Tall Sanding Drums Compact Size for Easy Storage Three 150 gr. Sleeves (3/4", 1-1/2" and 3") Six Table Inserts
-4- Model G0538 (Mfg. Since 12/09)
Identification
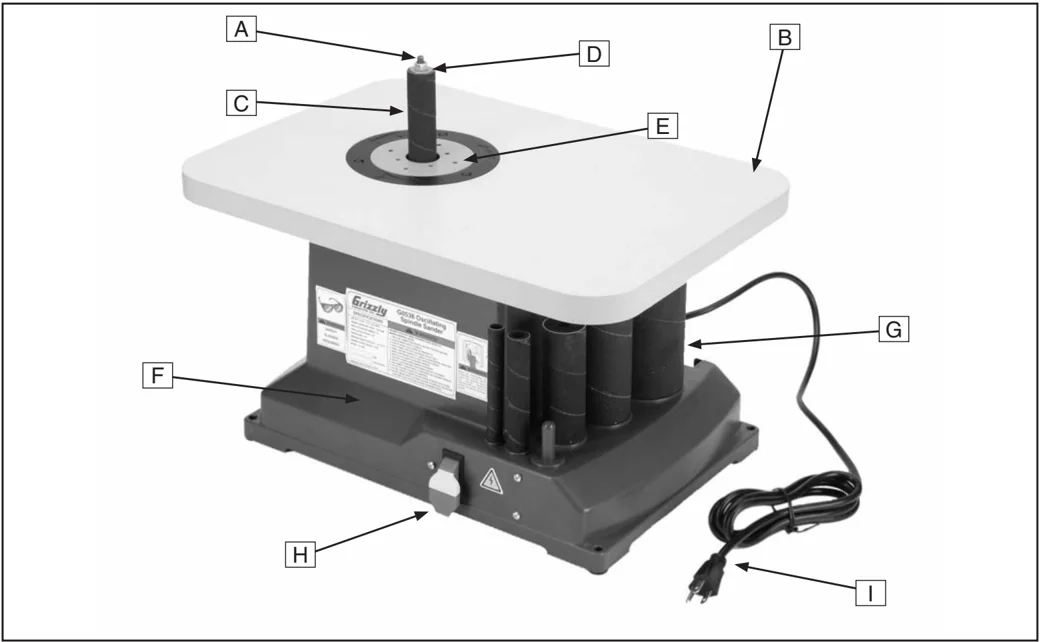
Figure 1. Identification.
A. Spindle B. Table C. Sanding Sleeve D. Spindle Washer E. Throat Plate F. Sander Body G. Accessory Storage Area H. ON/OFF Paddle Switch with Lockout Key I. 5-15 Plug and Power Cable J. 2-1/2" Dust Port (not shown)
WARNING To reduce the risk of serious injury when using this machine, read and understand this entire manual before beginning any operations.

SECTION 1: SAFETY
For Your Own Safety, Read Instruction Manual Before Operating This Machine
The purpose of safety symbols is to attract your attention to possible hazardous conditions. This manual uses a series of symbols and signal words intended to convey the level of importance of the safety messages. The progression of symbols is described below. Remember that safety messages by themselves do not eliminate danger and are not a substitute for proper accident prevention measures. Always use common sense and good judgment.
DANGER Indicates an imminently hazardous situation which, if not avoided, WILL result in death or serious injury.
WARNING Indicates a potentially hazardous situation which, if not avoided, COULD result in death or serious injury.
CAUTION Indicates a potentially hazardous situation which, if not avoided, MAY result in minor or moderate injury. It may also be used to alert against unsafe practices.
NOTICE This symbol is used to alert the user to useful information about proper operation of the machine.
Safety Instructions for Machinery
WARNING
OWNER’S MANUAL. Read and understand this owner’s manual BEFORE using machine.
TRAINED OPERATORS ONLY. Untrained operators have a higher risk of being hurt or killed. Only allow trained/supervised people to use this machine. When machine is not being used, disconnect power, remove switch keys, or lock-out machine to prevent unauthorized use—especially around children. Make workshop kid proof!
DANGEROUS ENVIRONMENTS. Do not use machinery in areas that are wet, cluttered, or have poor lighting. Operating machinery in these areas greatly increases the risk of accidents and injury.
MENTAL ALERTNESS REQUIRED. Full mental alertness is required for safe operation of machinery. Never operate under the influence of drugs or alcohol, when tired, or when distracted.
ELECTRICAL EQUIPMENT INJURY RISKS. You can be shocked, burned, or killed by touching live electrical components or improperly grounded machinery. To reduce this risk, only allow qualified service personnel to do electrical installation or repair work, and always disconnect power before accessing or exposing electrical equipment.
DISCONNECT POWER FIRST. Always disconnect machine from power supply BEFORE making adjustments, changing tooling, or servicing machine. This prevents an injury risk from unintended startup or contact with live electrical components.
EYE PROTECTION. Always wear ANSI-approved safety glasses or a face shield when operating or observing machinery to reduce the risk of eye injury or blindness from flying particles. Everyday eyeglasses are not approved safety glasses.
-6- Model G0538 (Mfg. Since 12/09)

⚠WARNING
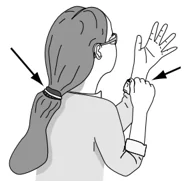
WEARING PROPER APPAREL. Do not wear clothing, apparel or jewelry that can become entangled in moving parts. Always tie back or cover long hair. Wear non-slip footwear to avoid accidental slips, which could cause loss of workpiece control.
HAZARDOUS DUST. Dust created while using machinery may cause cancer, birth defects, or long-term respiratory damage. Be aware of dust hazards associated with each workpiece material, and always wear a NIOSH-approved respirator to reduce your risk.
HEARING PROTECTION. Always wear hearing protection when operating or observing loud machinery. Extended exposure to this noise without hearing protection can cause permanent hearing loss.
REMOVE ADJUSTING TOOLS. Tools left on machinery can become dangerous projectiles upon startup. Never leave chuck keys, wrenches, or any other tools on machine. Always verify removal before starting!
INTENDED USAGE. Only use machine for its intended purpose and never make modifications not approved by Grizzly. Modifying machine or using it differently than intended may result in malfunction or mechanical failure that can lead to serious personal injury or death!
AWKWARD POSITIONS. Keep proper footing and balance at all times when operating machine. Do not overreach! Avoid awkward hand positions that make workpiece control difficult or increase the risk of accidental injury.
CHILDREN & BYSTANDERS. Keep children and bystanders at a safe distance from the work area. Stop using machine if they become a distraction.
GUARDS & COVERS. Guards and covers reduce accidental contact with moving parts or flying debris. Make sure they are properly installed, undamaged, and working correctly.
FORCING MACHINERY. Do not force machine. It will do the job safer and better at the rate for which it was designed.
NEVER STAND ON MACHINE. Serious injury may occur if machine is tipped or if the cutting tool is unintentionally contacted.
STABLE MACHINE. Unexpected movement during operation greatly increases risk of injury or loss of control. Before starting, verify machine is stable and mobile base (if used) is locked.
USE RECOMMENDED ACCESSORIES. Consult this owner's manual or the manufacturer for recommended accessories. Using improper accessories will increase the risk of serious injury.
UNATTENDED OPERATION. To reduce the risk of accidental injury, turn machine OFF and ensure all moving parts completely stop before walking away. Never leave machine running while unattended.
MAINTAIN WITH CARE. Follow all maintenance instructions and lubrication schedules to keep machine in good working condition. A machine that is improperly maintained could malfunction, leading to serious personal injury or death.
CHECK DAMAGED PARTS. Regularly inspect machine for any condition that may affect safe operation. Immediately repair or replace damaged or mis-adjusted parts before operating machine.
MAINTAIN POWER CORDS. When disconnecting cord-connected machines from power, grab and pull the plug—NOT the cord. Pulling the cord may damage the wires inside. Do not handle cord/plug with wet hands. Avoid cord damage by keeping it away from heated surfaces, high traffic areas, harsh chemicals, and wet/damp locations.
EXPERIENCING DIFFICULTIES. If at any time you experience difficulties performing the intended operation, stop using the machine! Contact our Technical Support at (570) 546-9663.

Additional Safety for Spindle Sanders
⚠WARNING
FEED RATE. Never jam a workpiece against the sanding surface. Firmly hold the workpiece and ease it against the spindle using light pressure.
AVOIDING ENTANGLEMENT. Keep loose clothing articles such as sleeves, belts or jewelry items away from the spindle. Never wear gloves when operating the spindle sander.
HAND PLACEMENT. Do not place hands near, or in contact with, sanding surfaces during operation.
WORKPIECE HANDLING. Hold the workpiece with both hands, or use the appropriate jig or miter gauge.
RESPIRATOR USE. Always use a respirator that is approved for wood dust when using this machine. A dust collector is not an adequate substitute.
MAINTENANCE. Perform machine inspections and maintenance promptly as required.
UNATTENDED MACHINE. Never leave the machine running unattended.
SANDING SLEEVES. Worn or damaged sanding sleeves can tear apart and become entangled in the spindle. Replace sanding sleeves promptly as required.
FOREIGN MATERIAL. Always inspect stock for nails, staples, knots, and other imperfections that could be dislodged and thrown from the machine during sanding operations.
DUST COLLECTION. Never operate the sander without an adequate dust collection system in place and running.
DIRECTION. Never sand tapered or pointed stock with the point facing the feed direction.
POWER DISCONNECT. Disconnect the machine from the power source before changing the sanding sleeve.
⚠WARNING
Like all machinery there is potential danger when operating this machine. Accidents are frequently caused by lack of familiarity or failure to pay attention. Use this machine with respect and caution to decrease the risk of operator injury. If normal safety precautions are overlooked or ignored, serious personal injury may occur.
⚠CAUTION
No list of safety guidelines can be complete. Every shop environment is different. Always consider safety first, as it applies to your individual working conditions. Use this and other machinery with caution and respect. Failure to do so could result in serious personal injury, damage to equipment, or poor work results.
-8- Model G0538 (Mfg. Since 12/09)
SECTION 2: POWER SUPPLY
Availability
Before installing the machine, consider the availability and proximity of the required power supply circuit. If an existing circuit does not meet the requirements for this machine, a new circuit must be installed. To minimize the risk of electrocution, fire, or equipment damage, installation work and electrical wiring must be done by an electrician or qualified service personnel in accordance with all applicable codes and standards.
 WARNING
Electrocution, fire, or equipment damage may occur if machine is not correctly grounded and connected to the power supply.
Full-Load Current Rating
The full-load current rating is the amperage a machine draws at 100% of the rated output power. On machines with multiple motors, this is the amperage drawn by the largest motor or sum of all motors and electrical devices that might operate at one time during normal operations.
- Full-Load Current Rating at 110V ........ 4 Amps
The full-load current is not the maximum amount of amps that the machine will draw. If the machine is overloaded, it will draw additional amps beyond the full-load rating.
If the machine is overloaded for a sufficient length of time, damage, overheating, or fire may result—especially if connected to an undersized circuit. To reduce the risk of these hazards, avoid overloading the machine during operation and make sure it is connected to a power supply circuit that meets the requirements in the following section.
Circuit Requirements
This machine is prewired to operate on a 110V power supply circuit that has a verified ground and meets the following requirements:
- Nominal Voltage ........ 110V/120V
- Cycle ........ 60 Hz
- Phase ........ Single-Phase
- Power Supply Circuit ........ 15 Amps
A power supply circuit includes all electrical equipment between the breaker box or fuse panel in the building and the machine. The power supply circuit used for this machine must be sized to safely handle the full-load current drawn from the machine for an extended period of time. (If this machine is connected to a circuit protected by fuses, use a time delay fuse marked D.)
CAUTION For your own safety and protection of property, consult an electrician if you are unsure about wiring practices or electrical codes in your area.
Note: The circuit requirements listed in this manual apply to a dedicated circuit—where only one machine will be running at a time. If this machine will be connected to a shared circuit where multiple machines will be running at the same time, consult a qualified electrician to ensure that the circuit is properly sized for safe operation.
Grounding & Plug Requirements
This machine MUST be grounded. In the event of certain malfunctions or breakdowns, grounding reduces the risk of electric shock by providing a path of least resistance for electric current.
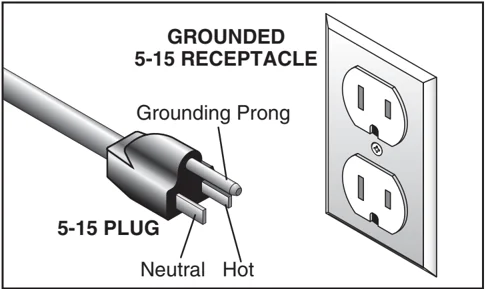
This machine is equipped with a power cord that has an equipment-grounding wire and a grounding plug (similar to the figure below). The plug must only be inserted into a matching receptacle (outlet) that is properly installed and grounded in accordance with all local codes and ordinances.
WARNING
Serious injury could occur if you connect the machine to power before completing the setup process. DO NOT connect to power until instructed later in this manual.

Figure 2. Typical 5-15 plug and receptacle.
CAUTION
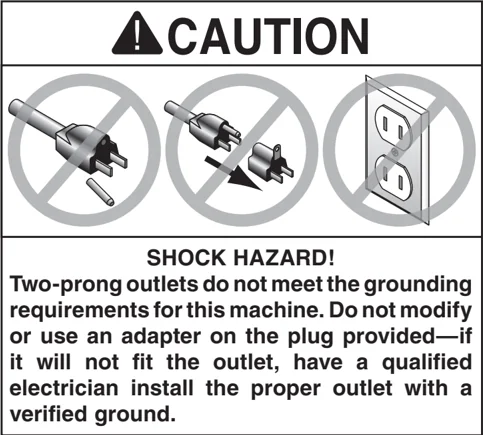
SHOCK HAZARD! Two-prong outlets do not meet the grounding requirements for this machine. Do not modify or use an adapter on the plug provided—if it will not fit the outlet, have a qualified electrician install the proper outlet with a verified ground.
Improper connection of the equipment-grounding wire can result in a risk of electric shock. The wire with green insulation (with or without yellow stripes) is the equipment-grounding wire. If repair or replacement of the power cord or plug is necessary, do not connect the equipment-grounding wire to a live (current carrying) terminal.
Check with a qualified electrician or service personnel if you do not understand these grounding requirements, or if you are in doubt about whether the tool is properly grounded. If you ever notice that a cord or plug is damaged or worn, disconnect it from power, and immediately replace it with a new one.
Extension Cords
We do not recommend using an extension cord with this machine. If you must use an extension cord, only use it if absolutely necessary and only on a temporary basis.
Extension cords cause voltage drop, which may damage electrical components and shorten motor life. Voltage drop increases as the extension cord size gets longer and the gauge size gets smaller (higher gauge numbers indicate smaller sizes).
Any extension cord used with this machine must contain a ground wire, match the required plug and receptacle, and meet the following requirements:
- Minimum Gauge Size ........ 16 AWG
- Maximum Length (Shorter is Better) ........ 50 ft.
-10- Model G0538 (Mfg. Since 12/09)
SECTION 3: SET UP
Needed for Setup
The following are needed to complete the setup process, but are not included with your machine.
| Description | Qty |
|---|---|
| Safety Glasses (for each person) | 1 |
| Dust Collection System | 1 |
| 2-1/2" Dust Hose (length as needed) | 1 |
| 2-1/2" Hose Clamp | 1 |
| Phillips Head Screwdriver | 1 |
Optional Items for Mounting
- Drill with 1/4" bit ........ 1
- Wrench 1/4" ........ 1
Unpacking
Your machine was carefully packaged for safe transportation. Remove the packaging materials from around your machine and inspect it. If you discover any damage, please call us immediately at (570) 546-9663 for advice.
Save the containers and all packing materials for possible inspection by the carrier or its agent. Otherwise, filing a freight claim can be difficult.
When you are completely satisfied with the condition of your shipment, inventory the contents.


Inventory
The following is a list of items shipped with your machine. Before beginning setup, lay these items out and inventory them.
If any non-proprietary parts are missing (e.g. a nut or a washer), we will gladly replace them; or for the sake of expediency, replacements can be obtained at your local hardware store.
Inventory (Figure 3)
- A. Sander Unit ........ 1
- B. Sander Unit Base Plate ........ 1
- C. Sanding Sleeve and Drum 3" ........ 1
- D. Sanding Sleeve and Drum 2" ........ 1
- E. Sanding Sleeve and Drum 1-1/2" ........ 1
- F. Sanding Sleeve and Drum 3/4" ........ 1
- G. Sanding Sleeve 1/2" ........ 1
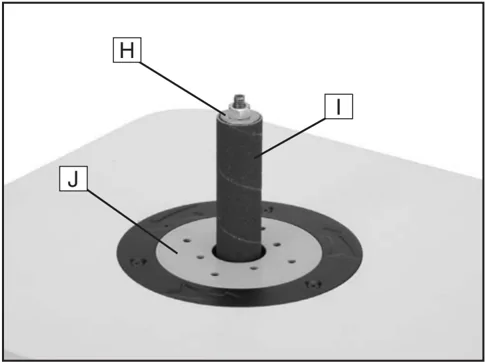
Pre-Installed Components (Figure 4)
- H. Spindle Washer 7/8" ........ 1
- I. Sanding Sleeve and Drum 1" ........ 1
- J. Throat Plate 1⁵₁₆" ........ 1
Hardware Bag 1
- Wrench 9/₁₆" ........ 2
- Spindle Washer 1-13/16" ........ 1
- Spindle Washer 5/₈" ........ 1
- Tap Screw M4-0.7 x 12 ........ 4
Hardware Bag 2
- Throat Plate 13/16" ........ 1
- Throat Plate □1/16" ........ 1
- Throat Plate 1-13/16" ........ 1
- Throat Plate 2-9/16" ........ 1
- Throat Plate 3-5/16" ........ 1
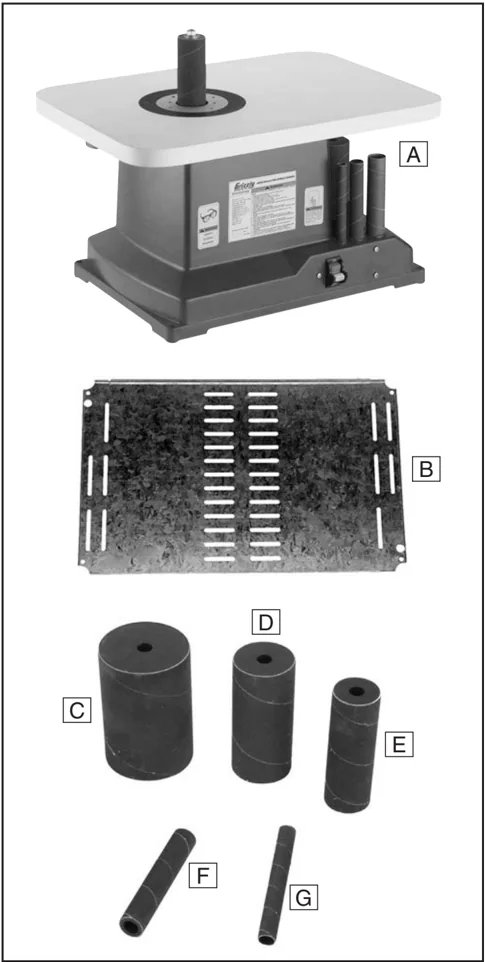
Figure 3. Inventory.
Figure 4. Pre-Installed Components.
NOTICE
If you cannot find an item on this list, carefully check around/inside the machine and packaging materials. Often, these items get lost in packaging materials while unpacking or they are pre-installed at the factory.
-12- Model G0538 (Mfg. Since 12/09)
Base Attachment
The metal base plate needs to be attached to the spindle sander before use.
Components and Hardware Needed: Qty
- Tap Screw M4-0.7 x 12 ........ 4
- Sander Base Plate ........ 1
To attach the sander base plate:
-
Examine the inside of the sander body and remove any loose packing material found.
Note: Loose packing material inside the sander body during operation is an imminent fire hazard.
-
Attach the base plate to the underside of the sander with the included M4-0.7 x 12 tap screws.
Mounting
We strongly recommend mounting the spindle sander to a mounting board or workbench before being used.
Components and Hardware Needed: Qty
- Hex Bolts 1/4"-20 (length varies) ........ 4
- Hex Nuts 1/4"-20 ........ 4
- Flat Washers 1/4" ........ 8
- Lock Washers 1/4" ........ 4
To secure the spindle sander to a benchtop or mounting board:
-
Place the spindle sander on a workbench or mounting board no smaller than 24"W x 18"D.
-
Using the 1/4" holes in the sander body as a template, drill holes through the mounting board or benchtop as appropriate.
-
Secure the spindle sander to the benchtop or mounting board with 1/4" hex bolts, washers, lock washers, and hex nuts as shown in Figure 5.
 Figure 5. Mounting the spindle sander.
Dust Collection
To connect a dust collection hose:
-
Fit the 2-1/2" dust hose over the dust port shown in Figure 6, and secure in place with a hose clamp.
-
Tug the hose to ensure it does not come off.
 Figure 6. Dust port.
CAUTION
DO NOT operate the Model G0538 without an adequate dust collection system. This sander creates substantial amounts of wood dust while operating. Failure to use a dust collection system can result in respiratory illness.
SECTION 4: OPERATIONS
Switch/Safety Key
To disable the switch, remove the lockout key (Figure 7) from the paddle switch.
Figure 7. Removing key to disable switch.
Sleeve Installation
The G0538 Oscillating Spindle Sander comes with six different-sized sanding drums and sleeves. Always refer to the table below when determining the appropriate throat plate, sanding drum, and spindle washer size for a particular sleeve.
| Sanding Sleeve Diameter | Sanding Drum Diameter | Throat Plate Inside Diameter | Spindle Washer Size |
|---|---|---|---|
| 1/2" | N/A | 11/16" | 5/8" |
| 3/4" | 3/4" | 15/16" | 7/8" |
| 1" | 1" | 13/16" | 7/8" |
| □□/□" | □□/□" | □□□/□□" | 7/8" |
| 2" | 2" | □□/□□" | □□□/□□" |
| 3" | 3" | □□/□□" | □□□/□□" |
-14-
Model G0538 (Mfg. Since 12/09)

To install or replace a sanding sleeve:
- Hold the spindle hex nut with one of the included 9/16" wrenches.
- Hold the flats of the spindle using the small slot in the second 9/16" wrench, as shown in Figure 8, and loosen the hex nut with counterclockwise turns so that it can be removed by hand.
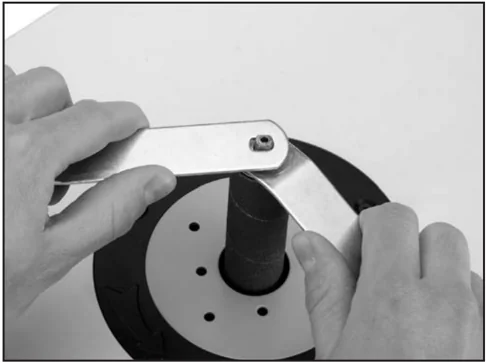
Figure 8. Loosening the spindle hex nut.
- Remove the hex nut, upper spindle washer, sanding sleeve, sanding drum, and throat plate. Lift and remove the throat plate using the shaft of a small screwdriver.
- Clean the throat plate and lower spindle washer areas as necessary.
- Replace the lower spindle washer.
- Install the throat plate that will provide the smallest possible clearance between the sanding sleeve and the throat plate opening.
- Install the desired rubber sanding drum on the spindle shaft, and install the matching sanding sleeve on the drum as shown in Figure 9.
- Hand-fasten the sanding drum with the appropriate spindle washer and the hex hut.
- Tighten the hex nut further as outlined in Step 1 until the rubber sanding drum places slight pressure on the sanding sleeve. DO NOT overtighten the hex nut.
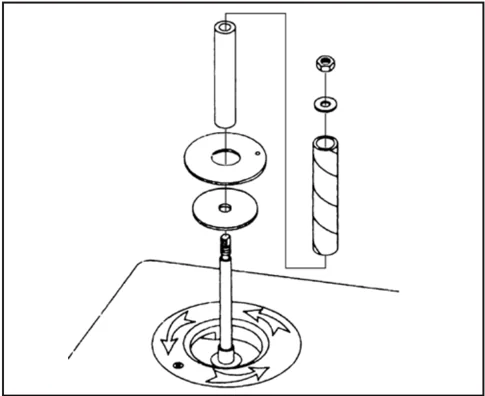
Figure 9. Sleeve installation order.
Sanding
To sand a workpiece:
- Ensure that the spindle hex nut is secured tightly and that the work area is free of obstructions and obstacles.
- Turn on the spindle sander and allow it to reach full speed.
- Using both hands, guide the workpiece against the sanding sleeve in a right-to-left direction, as shown in Figure 10. DO NOT force the workpiece against the sanding sleeve.
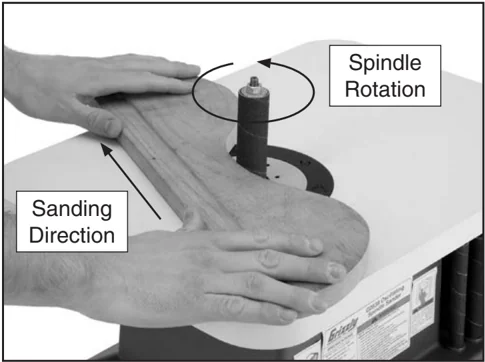
Figure 10. Sanding.
SECTION 5: ACCESSORIES
WARNING
Some aftermarket accessories can be installed on this machine that could cause it to function improperly, increasing the risk of serious personal injury. To minimize this risk, only install accessories recommended for this machine by Grizzly.
NOTICE
Refer to the newest copy of the Grizzly Catalog for other accessories available for this machine.
Call 1-800-523-4777 To Order
PRO-STIK® Belt Cleaners
G1511—Large (1-1/2" x 1-1/2" x 8-1/2")
G1512—Small (2" x 2" x 12")
H1446—1-3/8" x 4-1/4"
H1447—1-3/8" x 8-1/2"
These crepe-rubber Belt Cleaners quickly remove gum and grit from belts and discs without damage. Extend the life of your belts or discs with this innovative natural cleaner.
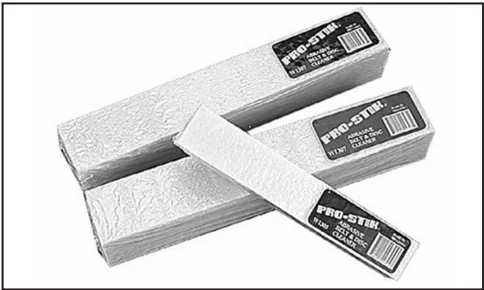
Figure 11. PRO-STIK® Belt Cleaners.
H5430-H5459 Sanding Sleeves
Grizzly stocks a wide variety of aluminum oxide sanding sleeves of varying sizes and grits. All our 4-1/2" long sanding sleeves are available in 60 to 150 grit and from 1/2" to 3" in diameter, and come in packs of three.
| MODEL | SIZE | GRIT |
|---|---|---|
| H5430 | 1/2" x 4-1/2" | 60 |
| H5431 | 1/2" x 4-1/2" | 80 |
| H5432 | 1/2" x 4-1/2" | 100 |
| H5433 | 1/2" x 4-1/2" | 120 |
| H5434 | 1/2" x 4-1/2" | 150 |
| H5435 | 3/4" x 4-1/2" | 60 |
| H5436 | 3/4" x 4-1/2" | 80 |
| H5437 | 3/4" x 4-1/2" | 100 |
| H5438 | 3/4" x 4-1/2" | 120 |
| H5439 | 3/4" x 4-1/2" | 150 |
| H5440 | 1" x 4-1/2" | 60 |
| H5441 | 1" x 4-1/2" | 80 |
| H5442 | 1" x 4-1/2" | 100 |
| H5443 | 1" x 4-1/2" | 120 |
| H5444 | 1" x 4-1/2" | 150 |
| H5445 | 1-1/2" x 4-1/2" | 60 |
| H5446 | 1-1/2" x 4-1/2" | 80 |
| H5447 | 1-1/2" x 4-1/2" | 100 |
| H5448 | 1-1/2" x 4-1/2" | 120 |
| H5449 | 1-1/2" x 4-1/2" | 150 |
| H5450 | 2" x 4-1/2" | 60 |
| H5451 | 2" x 4-1/2" | 80 |
| H5452 | 2" x 4-1/2" | 100 |
| H5453 | 2" x 4-1/2" | 120 |
| H5454 | 2" x 4-1/2" | 150 |
| H5455 | 3" x 4-1/2" | 60 |
| H5456 | 3" x 4-1/2" | 80 |
| H5457 | 3" x 4-1/2" | 100 |
| H5458 | 3" x 4-1/2" | 120 |
| H5459 | 3" x 4-1/2" | 150 |
-16-
Model G0538 (Mfg. Since 12/09)
SECTION 6: MAINTENANCE
 是一幅描绘了插头、插座和感叹号的图片)
⚠WARNING
Disconnect power from the machine when performing any maintenance, assembly or adjustments. Failure to do this may result in serious personal injury.
Schedule
For optimum performance from your machine, follow this maintenance schedule and refer to any specific instructions given in this section.
Before Each Use
- Ensure mounting bolts are secure.
- Inspect sanding drums or sleeves for wear damage.
- check for worn or damaged wires.
- Check for any other unsafe condition that could hamper operation of this machine or cause potential injury.
After Each Use
- Turn OFF sander.
- Clean up any sawdust or particle residue from the machine.
Weekly Maintenance
- Thoroughly clean the spindle area and beneath the rotation mark plate as outlined on this page.
Monthly Maintenance
- Clean/vacuum dust buildup from inside the sander body and off the motor.
Cleaning
Cleaning the Model G0538 is relatively easy. Follow the Sleeve Installation instructions on Page 15, taking special care to clean every area thoroughly. However, sawdust and other particles can also work their way under the rotation mark plate.
To clean under the rotation mark plate:
- Follow Steps 1-4 of the Sleeve Installation instructions on Page 15.
- Remove the three Phillips head screws and lift out the plate, as shown in Figure 12.
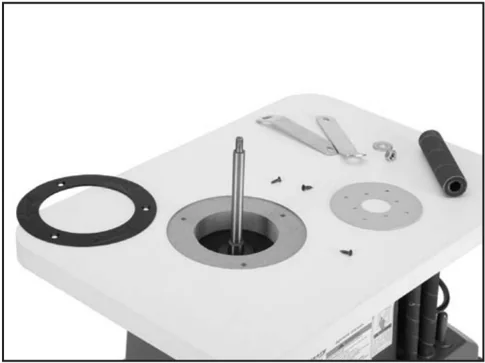
Figure 12. Rotation mark plate area.
- Wipe or vacuum out any dust or particles that have accumulated in the rotation mark plate area.
- Reattach the rotation mark plate with the three Phillips head screws.
- Follow Steps 5-9 of the instructions on Page 15 to complete the sleeve installation process.

SECTION 7: SERVICE
Review the troubleshooting and procedures in this section if a problem develops with your machine. If you need replacement parts or additional help with a procedure, call our Technical Support at (570) 546-9663.
Note: Please gather the serial number and manufacture date of your machine before calling.
Troubleshooting
Motor & Electrical
| Symptom | Possible Cause | Possible Solution |
|---|---|---|
| Motor will not start. | 1. Low voltage.2. Open circuit in motor or loose connections. | 1. Check power line voltage and correct if necessary.2. Inspect all motor connections for loose or open connections. |
| Motor will not start; fuses or circuit breakers blow. | 1. Short circuit in line cord or plug.2. Short circuit in motor or loose connections.3. Incorrect fuses or circuit breakers in power line. | 1. Inspect cord and plug for damaged insulation or shorted wires.2. Inspect all motor connections for loose or shorted terminals or worn insulation.3. Install correct fuses or circuit breakers. |
| Motor overheats. | 1. Motor overloaded. | 1. Reduce load on motor. |
| Motor stalls (resulting in blown fuses or tripped circuit). | 1. Motor overloaded.2. Short circuit in motor or loose connections.3. Low voltage.4. Incorrect fuses or circuit breakers in power line. | 1. Reduce load on motor.2. Inspect connections on motor for loose or shorted terminals or worn insulation.3. Check power line voltage and correct if necessary.4. Install correct fuses or circuit breakers. |
| Machine slows when operating. | 1. Workpiece pressure is too great. | 1. Reduce workpiece pressure on spindle. |
| Machine vibrates excessively. | 1. Machine not secured to workbench.2. Incorrect motor mounting. | 1. Secure machine to workbench.2. Check/adjust motor mounting. |
Sanding Operations
| Symptom | Possible Cause | Possible Solution |
|---|---|---|
| Deep sanding grooves or scars in workpiece. | 1. Sanding sleeve too coarse for the desired finish.2. Workpiece sanded across the grain.3. Too much sanding force on workpiece. | 1. Use a finer grit sanding sleeve.2. Sand with the grain.3. Reduce pressure on workpiece while sanding. |
| Grains rub off the sanding sleeve. | 1. Sanding sleeve has been stored in an incorrect environment.2. Sanding sleeve has been folded or smashed. | 1. Store sanding sleeve away from extremely dry or hot temperatures.2. Store sanding sleeves separately and not folded or flat. |
| Sanding surfaces clog quickly or burn. | 1. Too much pressure against sleeve.2. Sanding softwood. | 1. Reduce pressure on workpiece while sanding.2. Use different stock. Or, accept the characteristics of the stock and plan on cleaning/replacing belts frequently. |
| Burn marks on workpiece. | 1. Using too fine of sanding grit.2. Using too much pressure.3. Work held still for too long. | 1. Use a coarser grit sanding sleeve.2. Reduce pressure on workpiece while sanding.3. Do not keep workpiece in one place for too long. |
-18-
Model G0538 (Mfg. Since 12/09)
SECTION 8: WIRING
These pages are current at the time of printing. However, in the spirit of improvement, we may make changes to the electrical systems of future machines. Compare the manufacture date of your machine to the one stated in this manual, and study this section carefully.
If there are differences between your machine and what is shown in this section, call Technical Support at (570) 546-9663 for assistance BEFORE making any changes to the wiring on your machine. An updated wiring diagram may be available. Note: Please gather the serial number and manufacture date of your machine before calling. This information can be found on the main machine label.
WARNING
Wiring Safety Instructions
SHOCK HAZARD. Working on wiring that is connected to a power source is extremely dangerous. Touching electrified parts will result in personal injury including but not limited to severe burns, electrocution, or death. Disconnect the power from the machine before servicing electrical components!
MODIFICATIONS. Modifying the wiring beyond what is shown in the diagram may lead to unpredictable results, including serious injury or fire. This includes the installation of unapproved aftermarket parts.
WIRE CONNECTIONS. All connections must be tight to prevent wires from loosening during machine operation. Double-check all wires disconnected or connected during any wiring task to ensure tight connections.
CIRCUIT REQUIREMENTS. You MUST follow the requirements at the beginning of this manual when connecting your machine to a power source.
WIRE/COMPONENT DAMAGE. Damaged wires or components increase the risk of serious personal injury, fire, or machine damage. If you notice that any wires or components are damaged while performing a wiring task, replace those wires or components.
MOTOR WIRING. The motor wiring shown in these diagrams is current at the time of printing but may not match your machine. If you find this to be the case, use the wiring diagram inside the motor junction box.
CAPACITORS/INVERTERS. Some capacitors and power inverters store an electrical charge for up to 10 minutes after being disconnected from the power source. To reduce the risk of being shocked, wait at least this long before working on capacitors.
EXPERIENCING DIFFICULTIES. If you are experiencing difficulties understanding the information included in this section, contact our Technical Support at (570) 546-9663.
NOTICE
The photos and diagrams included in this section are best viewed in color. You can view these pages in color at www.grizzly.com.
COLOR KEY
| BLACK | BLUE | YELLOW | LIGHT BLUE |
|---|---|---|---|
| Bk | Bl | Yl | Lb |
| WHITE | BROWN | YELLOW GREEN | BLUE WHITE |
|---|---|---|---|
| Wt | Br | Yg | Bw |
| GREEN | GRAY | PURPLE | TURQUOISE |
|---|---|---|---|
| Gn | Gy | Pu | Tu |
| RED | ORANGE | PINK |
|---|---|---|
| Rd | Or | Pk |

Wiring Diagram
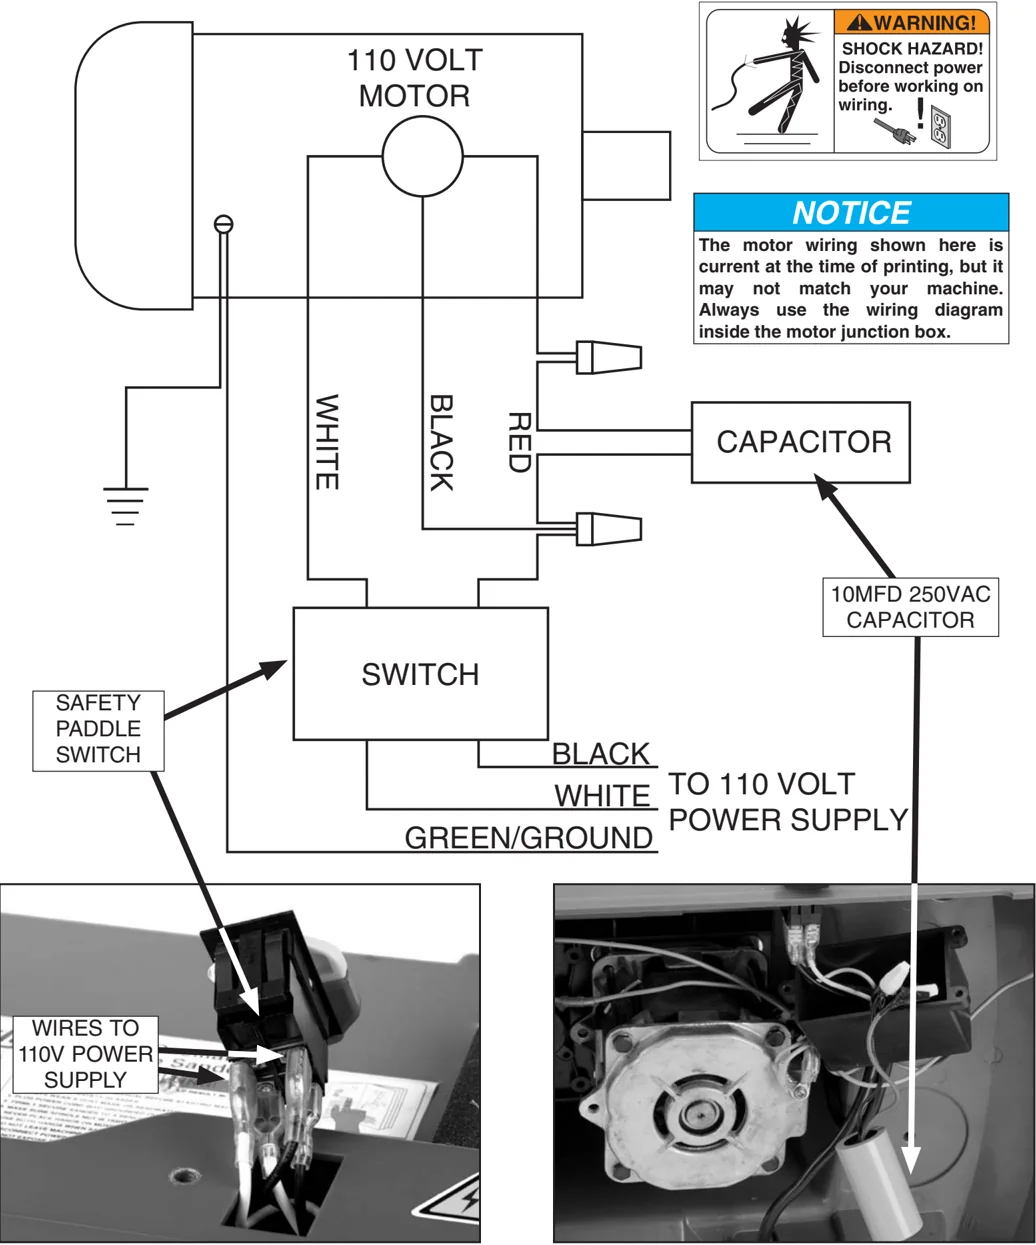
WARNING! SHOCK HAZARD! Disconnect power before working on wiring.
NOTICE The motor wiring shown here is current at the time of printing, but it may not match your machine. Always use the wiring diagram inside the motor junction box.
110 VOLT MOTOR
WHITE BLACK RED
CAPACITOR
10MFD 250VAC CAPACITOR
SWITCH
SAFETY PADDLE SWITCH
BLACK WHITE GREEN/GROUND
TO 110 VOLT POWER SUPPLY
WIRES TO 110V POWER SUPPLY
-20- STOP READ ELECTRICAL SAFETY ON PAGE 19!
Model G0538 (Mfg. Since 12/09)

SECTION 9: PARTS
Parts Breakdown
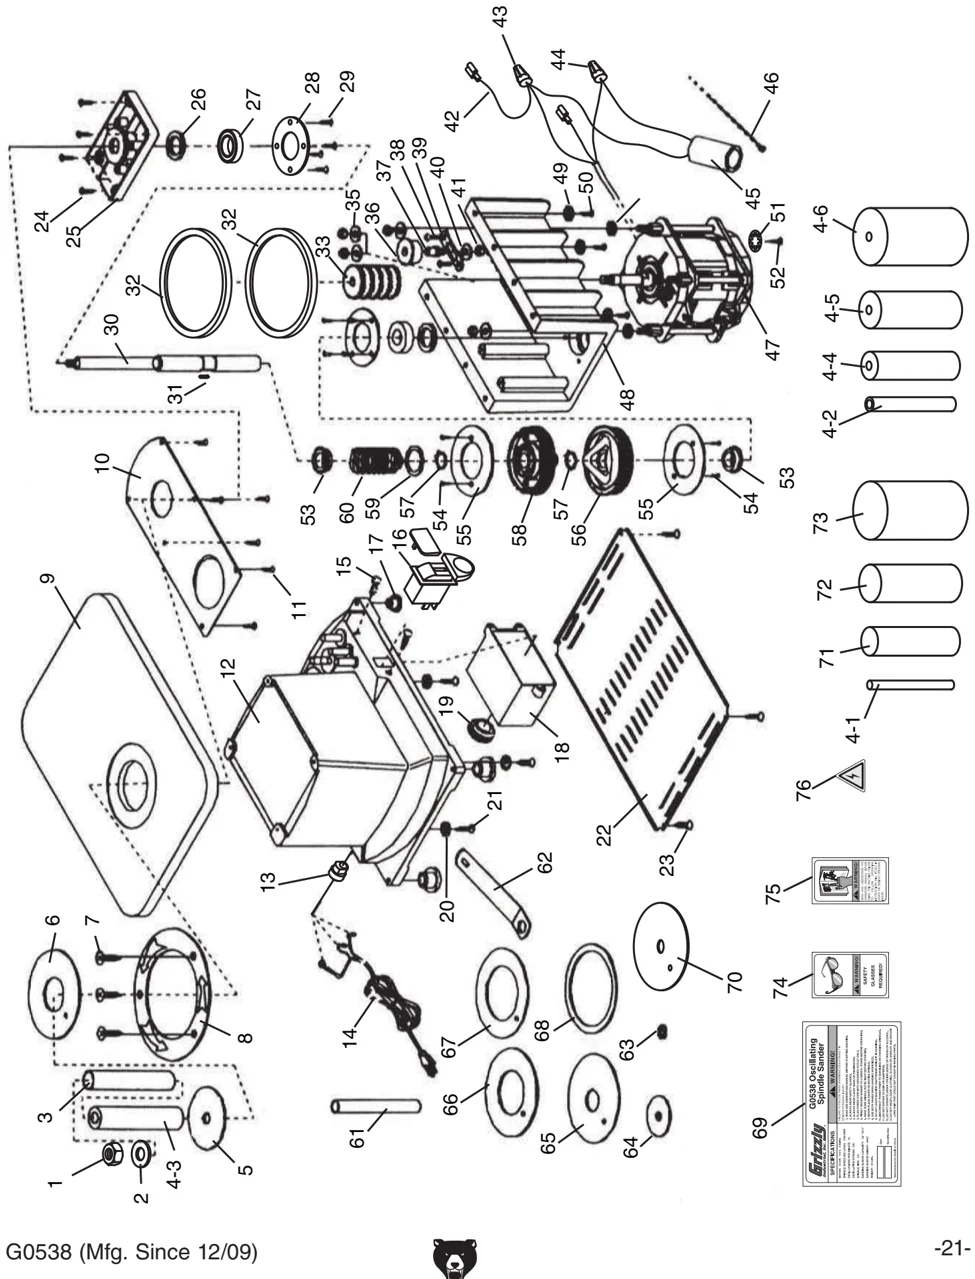
Parts List
| REF | PART # | DESCRIPTION |
|---|---|---|
| 1 | P0538001 | HEX NUT M8-1.25 THIN - 1/4" THICK |
| 2 | P0538002 | SPINDLE WASHER 8 X 24 X 2 |
| 3 | P0538003 | SANDING SLEEVE 1" X 4-1/2" |
| 4-1 | P0538004-1 | SANDING SLEEVE 1/2" X 4-1/2" |
| 4-2 | P0538004-2 | SANDING DRUM 3/4" X 4-1/2" |
| 4-3 | P0538004-3 | SANDING DRUM 1" X 4-1/2" |
| 4-4 | P0538004-4 | SANDING DRUM 1-1/2" X 4-1/2" |
| 4-5 | P0538004-5 | SANDING DRUM 2" X 4-1/2" |
| 4-6 | P0538004-6 | SANDING DRUM 3" X 4-1/2" |
| 5 | P0538005 | SPINDLE WASHER 13 X 72 X 2 |
| 6 | P0538006 | THROAT PLATE 1-5/16" X 4" |
| 7 | P0538007 | SELF TAP SCR ST3.5 X 12 |
| 8 | P0538008 | ROTATION MARK PLATE |
| 9 | P0538009 | DISC TABLE |
| 10 | P0538010 | DUST HOUSING 2 1/2" |
| 11 | PHTEK5M | TAP SCREW M4 X 12 |
| 12 | P0538012 | BASE |
| 13 | P0538013 | STRAIN RELIEF |
| 14 | P0538014 | POWER CORD W/ 5-15 PLUG |
| 15 | PHTEK6M | TAP SCREW M4 X 16 |
| 16 | PSW06 | PADDLE SWITCH 110/220V WITH KEY |
| 17 | P0538017 | FOOT PAD |
| 18 | P0538018 | SWITCH HOUSING |
| 19 | P0538019 | CABLE BUSHING |
| 20 | PW03M | FLAT WASHER 6MM |
| 21 | PHTEK17M | TAP SCREW M5 X 20 |
| 22 | P0538022 | BASE PLATE |
| 23 | PHTEK5M | TAP SCREW M4 X 12 |
| 24 | PHTEK6M | TAP SCREW M4 X 16 |
| 25 | P0538025 | BEARING HOUSING |
| 26 | P0538026 | OILLESS FELT |
| 27 | P6203-2RS | BALL BEARING 6203 2-RS |
| 28 | P0538028 | BEARING COVER PLATE |
| 29 | PHTEK6M | TAP SCREW M4 X 16 |
| 30 | P0538030 | TRAILING AXLE |
| 31 | PK19M | KEY 5 X 5 X 14 |
| 32 | P0538032 | SYNCHRONOUS BELT |
| 33 | P0538033 | DRIVING PULLEY |
| 34 | PN01M | HEX NUT M6-1 |
| 35 | PW01M | FLAT WASHER 8MM |
| 36 | P0538036 | BRACING WHEEL SUB-ASSEMBLY |
| REF | PART # | DESCRIPTION |
|---|---|---|
| 37 | P0538037 | BRACING WHEEL AXLE |
| 38 | PHTEK20M | TAP SCREW M5 X 14 |
| 39 | P0538039 | BRACING WHEEL BASE |
| 40 | PW03M | FLAT WASHER 6MM |
| 41 | PN01M | HEX NUT M6-1 |
| 42 | P0538042 | CONNECTING WIRE |
| 43 | PWRN01 | WIRE NUT |
| 44 | PWRN01 | WIRE NUT |
| 45 | P0538045 | CAPACITOR 10MFD 250VAC |
| 46 | P0538046 | TAPE |
| 47 | P0538047 | MOTOR |
| 48 | P0538048 | STAND |
| 49 | PW03M | FLAT WASHER 6MM |
| 50 | P0538050 | TAP SCREW M5.5 X 22 |
| 51 | P0538051 | INT TOOTH WASHER 7/32" |
| 52 | PS09M | PHLP HD SCR M5-.8 X 10 |
| 53 | P0538053 | BUSHING |
| 54 | PHTEK19M | TAP SCREW M5 X 16 |
| 55 | P0538055 | DAMPER |
| 56 | P0538056 | DIFFERENTIAL GEAR |
| 57 | P0538057 | CHECK RING |
| 58 | P0538058 | DRIVE GEAR |
| 59 | P0538059 | BUSHING |
| 60 | P0538060 | COMPRESSION SPRING 2 X 28 X 55 |
| 61 | P0538061 | SANDING SLEEVE 3/4" X 4-1/2" |
| 62 | P0538062 | SLOTTED WRENCH 13MM |
| 63 | P0538063 | SPINDLE WASHER 8 X 16 X 2 |
| 64 | P0538064 | SPINDLE WASHER 10 X 46 X 2 |
| 65 | P0538065 | THROAT PLATE 1-1/16" X 4" |
| 66 | P0538066 | THROAT PLATE 1-13/16" X 4" |
| 67 | P0538067 | THROAT PLATE 2-5/16" X 4" |
| 68 | P0538068 | THROAT PLATE 3-5/16" X 4" |
| 69 | P0538069 | MACHINE ID LABEL |
| 70 | P0538070 | THROAT PLATE 13/16" X 4" |
| 71 | P0538071 | SANDING SLEEVE 1-1/2" X 4-1/2" |
| 72 | P0538072 | SANDING SLEEVE 2" X 4-1/2" |
| 73 | P0538073 | SANDING SLEEVE 3" X 4-1/2" |
| 74 | PLABEL-11 | SAFETY GLASSES 2" X 3-5/16" |
| 75 | PLABEL-12 | READ MANUAL 2" X 3-5/16" |
| 76 | PLABEL-14 | ELECTRICITY LABEL |
WARNING
Safety labels help reduce the risk of serious injury caused by machine hazards. If any label comes off or becomes unreadable, the owner of this machine MUST replace it in the original location before resuming operations. For replacements, contact (800) 523-4777 or www.grizzly.com.
-22-
Model G0538 (Mfg. Since 12/09)
Grizzly Industrial, Inc. WARRANTY CARD
Name ___________________________________________________________
Street __________________________________________________________
City __________________________ State _______________ Zip _______________
Phone # ______________________ Email ________________________________
Model # ______________________ Order # _____________________________ Serial # __________________
The following information is given on a voluntary basis. It will be used for marketing purposes to help us develop better products and services. Of course, all information is strictly confidential.
-
How did you learn about us?
- _____ Advertisement
- _____ Friend
- _____ Catalog
- _____ Card Deck
- _____ Website
- _____ Other: _______________
-
Which of the following magazines do you subscribe to?
- _____ Cabinetmaker & FDM
- _____ Family Handyman
- _____ Hand Loader
- _____ Handy
- _____ Home Shop Machinist
- _____ Journal of Light Cont.
- _____ Live Steam
- _____ Model Airplane News
- _____ Old House Journal
- _____ Popular Mechanics
- _____ Popular Science
- _____ Popular Woodworking
- _____ Precision Shooter
- _____ Projects in Metal
- _____ RC Modeler
- _____ Rifle
- _____ Shop Notes
- _____ Shotgun News
- _____ Today’s Homeowner
- _____ Wood
- _____ Wooden Boat
- _____ Woodshop News
- _____ Woodsmith
- _____ Woodwork
- _____ Woodworker West
- _____ Woodworker’s Journal
- _____ Other: _______________
-
What is your annual household income?
- _____ $20,000-$29,000
- _____ $30,000-$39,000
- _____ $40,000-$49,000
- _____ $50,000-$59,000
- _____ $60,000-$69,000
- _____ $70,000+
-
What is your age group?
- _____ 20-29
- _____ 30-39
- _____ 40-49
- _____ 50-59
- _____ 60-69
- _____ 70+
-
How long have you been a woodworker/metalworker?
- _____ 0-2 Years
- _____ 2-8 Years
- _____ 8-20 Years
- _____ 20+ Years
-
How many of your machines or tools are Grizzly?
- _____ 0-2
- _____ 3-5
- _____ 6-9
- _____ 10+
-
Do you think your machine represents a good value?
- _____ Yes
- _____ No
-
Would you recommend Grizzly Industrial to a friend?
- _____ Yes
- _____ No
-
Would you allow us to use your name as a reference for Grizzly customers in your area?
- Note: We never use names more than 3 times.
- _____ Yes
- _____ No
-
Comments:
Model G0538 (Mfg. Since 12/09) -23-

FOLD ALONG DOTTED LINE
Place Stamp Here

GRIZZLY INDUSTRIAL, INC. P.O. BOX 2069 BELLINGHAM, WA 98227-2069
FOLD ALONG DOTTED LINE
Send a Grizzly Catalog to a friend:
Name________________________________________ Street______________________________________ City________________State_____Zip_________
TAPE ALONG EDGES--PLEASE DO NOT STAPLE
WARRANTY & RETURNS
Grizzly Industrial, Inc. warrants every product it sells for a period of 1 year to the original purchaser from the date of purchase. This warranty does not apply to defects due directly or indirectly to misuse, abuse, negligence, accidents, repairs or alterations or lack of maintenance. This is Grizzly's sole written warranty and any and all warranties that may be implied by law, including any merchantability or fitness, for any particular purpose, are hereby limited to the duration of this written warranty. We do not warrant or represent that the merchandise complies with the provisions of any law or acts unless the manufacturer so warrants. In no event shall Grizzly's liability under this warranty exceed the purchase price paid for the product and any legal actions brought against Grizzly shall be tried in the State of Washington, County of Whatcom.
We shall in no event be liable for death, injuries to persons or property or for incidental, contingent, special, or consequential damages arising from the use of our products.
To take advantage of this warranty, contact us by mail or phone and give us all the details. We will then issue you a "Return Number," which must be clearly posted on the outside as well as the inside of the carton. We will not accept any item back without this number. Proof of purchase must accompany the merchandise.
The manufacturers reserve the right to change specifications at any time because they constantly strive to achieve better quality equipment. We make every effort to ensure that our products meet high quality and durability standards and we hope you never need to use this warranty.
Please feel free to write or call us if you have any questions about the machine or the manual.
Thank you again for your business and continued support. We hope to serve you again soon.
grizzly.com® TOOL WEBSITE
Buy Direct and Save with Grizzly® – Trusted, Proven and a Great Value!
Since 1983
Visit Our Website Today For Current Specials!
ORDER 24 HOURS A DAY! 1-800-523-4777
VISA MasterCard DISCOVER NOVUS AMERICAN EXPRESS