Grizzly
Industrial, Inc.
MODEL G0500/G1018/G1018HW
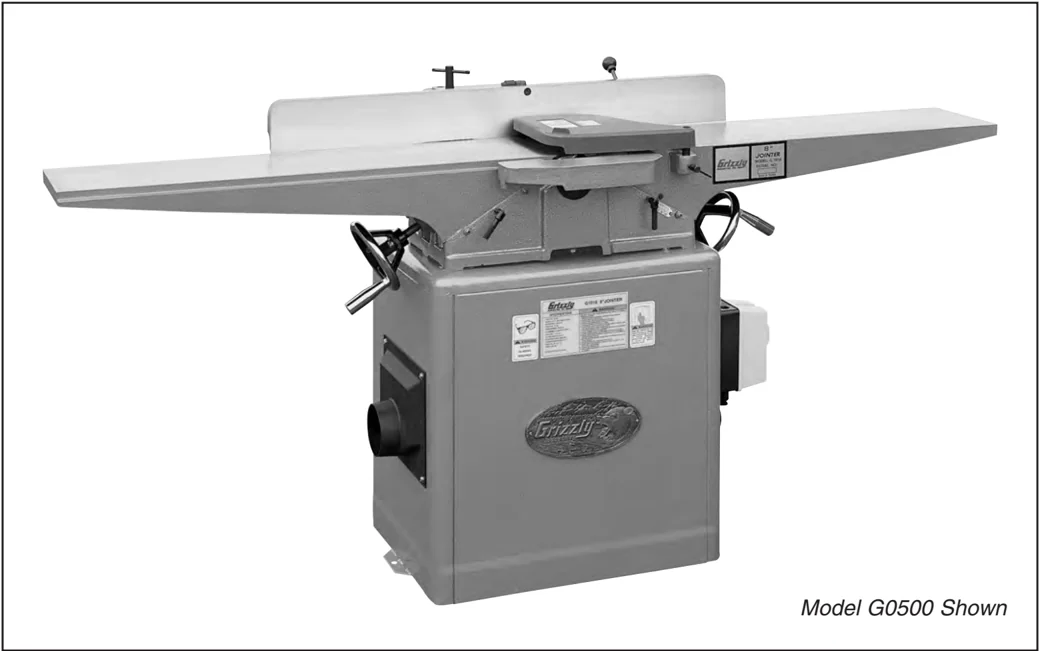
8" JOINTER
OWNER'S MANUAL

Model G0500 Shown
COPYRIGHT © JANUARY, 2003 BY GRIZZLY INDUSTRIAL, INC., REVISED OCTOBER, 2013 (ST) WARNING: NO PORTION OF THIS MANUAL MAY BE REPRODUCED IN ANY SHAPE OR FORM WITHOUT THE WRITTEN APPROVAL OF GRIZZLY INDUSTRIAL, INC. #TR4986 PRINTED IN TAIWAN
WARNING!
This manual provides critical safety instructions on the proper setup, operation, maintenance, and service of this machine/tool. Save this document, refer to it often, and use it to instruct other operators.
Failure to read, understand and follow the instructions in this manual may result in fire or serious personal injury—including amputation, electrocution, or death.
The owner of this machine/tool is solely responsible for its safe use. This responsibility includes but is not limited to proper installation in a safe environment, personnel training and usage authorization, proper inspection and maintenance, manual availability and comprehension, application of safety devices, cutting/sanding/grinding tool integrity, and the usage of personal protective equipment.
The manufacturer will not be held liable for injury or property damage from negligence, improper training, machine modifications or misuse.
WARNING!
Some dust created by power sanding, sawing, grinding, drilling, and other construction activities contains chemicals known to the State of California to cause cancer, birth defects or other reproductive harm. Some examples of these chemicals are:
• Lead from lead-based paints. • Crystalline silica from bricks, cement and other masonry products. • Arsenic and chromium from chemically-treated lumber.
Your risk from these exposures varies, depending on how often you do this type of work. To reduce your exposure to these chemicals: Work in a well ventilated area, and work with approved safety equipment, such as those dust masks that are specially designed to filter out microscopic particles.


TABLE OF CONTENTS
| SECTION | TOPIC | PAGE |
|---|---|---|
| 1. | SAFETY | 3 |
| Safety Instructions For Power Tools | 3-4 | |
| Additional Safety Instructions For Jointers | 5 | |
| 2. | INTRODUCTION | 6 |
| 3. | CIRCUIT REQUIREMENTS | 7 |
| 220V Operation | 7 | |
| 110V Operation | 8 | |
| Grounding | 9 | |
| Extension Cords | 9 | |
| 4. | IDENTIFICATION | 10-11 |
| Common Terms and Definitions | 11 | |
| 5. | SETUP | 12 |
| Unpacking | 12 | |
| G0500 Inventory | 12 | |
| G1018 Inventory | 13 | |
| G1018HW Inventory | 13 | |
| Hardware Recognition Chart | 14 | |
| Clean Up | 15 | |
| Site Considerations | 15 | |
| Beginning Assembly | 16 | |
| Switch Installation | 16-17 | |
| Wiring Connection | 17 | |
| Jointer Stand | 18 | |
| V-Belt | 18-19 | |
| Stand Cover | 19 | |
| Fence to Jointer | 20 | |
| G0500/G1018HW Handwheel Installation | 20 | |
| G1018 Table Lever Installation | 21 | |
| Knife Setting Gauge | 21 | |
| Knife Inspection | 22 | |
| Table Alignment | 22-23 | |
| G1018 Table Stops | 24 | |
| Cutterhead Guard | 25 | |
| Fence Stops | 26-27 | |
| Plug Installation | 27 | |
| Test Run | 27 | |
| 6. | OPERATIONS | 28 |
| Stock Inspection & Requirements | 28-29 | |
| Squaring Stock | 29 | |
| Surface Planing | 30 | |
| Edge Jointing | 31 | |
| Bevel Cutting | 32 | |
| Rabbet Cutting | 33 |
- MAINTENANCE ........ 34
- General ........ 34
- Table ........ 34
- Lubrication ........ 34
- V-Belt ........ 34
- Knife Condition ........ 34
- Maintenance Log ........ 35
- SERVICE ADJUSTMENTS ........ 36
- About Service ........ 36
- Setting Knives ........ 36-37
- Adjusting Gibs ........ 37-38
- Adjusting V-Belt ........ 38-39
- Replacing V-Belt ........ 39
- Service Log ........ 40
- REFERENCE INFO ........ 41
- Troubleshooting Guide ........ 42-43
- G0500/G1018/G1018HW Wiring Diagram ........ 44
- G0500 Machine Data ........ 45
- G0500 Parts Breakdown and Parts List ........ 46-51
- G1018 Machine Data ........ 52
- G1018 Parts Breakdown and Parts List ........ 53-58
- G1018HW Machine Data ........ 59
- G1018HW Parts Breakdown and Parts List ........ 60-65
- Warranty Information ........ 66-67
SECTION 1: SAFETY
⚠WARNING
For Your Own Safety Read Instruction Manual Before Operating This Equipment
The purpose of safety symbols is to attract your attention to possible hazardous conditions. This manual uses a series of symbols and signal words which are intended to convey the level of importance of the safety messages. The progression of symbols is described below. Remember that safety messages by themselves do not eliminate danger and are not a substitute for proper accident prevention measures.
⚠DANGER Indicates an imminently hazardous situation which, if not avoided, WILL result in death or serious injury.
⚠WARNING Indicates a potentially hazardous situation which, if not avoided, COULD result in death or serious injury.
⚠CAUTION Indicates a potentially hazardous situation which, if not avoided, MAY result in minor or moderate injury. It may also be used to alert against unsafe practices.
NOTICE This symbol is used to alert the user to useful information about proper operation of the equipment.
⚠WARNING
Safety Instructions For Power Tools
- KEEP GUARDS IN PLACE and in working order.
- REMOVE ADJUSTING KEYS AND WRENCHES. Form habit of checking to see that keys and adjusting wrenches are removed from tool before turning on.
- KEEP WORK AREA CLEAN. Cluttered areas and benches invite accidents.
- NEVER USE IN DANGEROUS ENVIRONMENT. Do not use power tools in damp or wet locations, or where any flammable or noxious fumes may exist. Keep work area well lighted.
- KEEP CHILDREN AND VISITORS AWAY. All children and visitors should be kept at a safe distance from work area.
- MAKE WORKSHOP CHILD PROOF with padlocks, master switches, or by removing starter keys.
- NEVER FORCE TOOL. It will do the job better and safer at the rate for which it was designed.
- USE RIGHT TOOL. Do not force tool or attachment to do a job for which it was not designed.
G0500/G1018/G1018HW 8" Jointers -3-


WARNING
Safety Instructions For Power Tools
- USE PROPER EXTENSION CORD. Make sure your extension cord is in good condition. Conductor size should be in accordance with the chart below. The amperage rating should be listed on the motor or tool nameplate. An undersized cord will cause a drop in line voltage resulting in loss of power and overheating. Your extension cord must also contain a ground wire and plug pin. Always repair or replace extension cords if they become damaged.
Minimum Gauge for Extension Cords
| AMP RATING | LENGTH | ||
|---|---|---|---|
| 25ft | 50ft | 100ft | |
| 0-6 | 16 | 16 | 16 |
| 7-10 | 16 | 16 | 14 |
| 11-12 | 16 | 16 | 14 |
| 13-16 | 14 | 12 | 12 |
| 17-20 | 12 | 12 | 10 |
| 21-30 | 10 | 10 | No |
-
WEAR PROPER APPAREL. Do not wear loose clothing, gloves, neckties, rings, bracelets, or other jewelry which may get caught in moving parts. Non-slip footwear is recommended. Wear protective hair covering to contain long hair.
-
ALWAYS USE SAFETY GLASSES. Also use face or dust mask if cutting operation is dusty. Everyday eyeglasses only have impact resistant lenses, they are NOT safety glasses.
-
SECURE WORK. Use clamps or a vise to hold work when practical. It’s safer than using your hand and frees both hands to operate tool.
-
DO NOT OVER-REACH. Keep proper footing and balance at all times.
-
MAINTAIN TOOLS WITH CARE. Keep tools sharp and clean for best and safest performance. Follow instructions for lubricating and changing accessories.
-
USE RECOMMENDED ACCESSORIES. Consult the owner’s manual for recommended accessories. The use of improper accessories may cause risk of injury.
-
REDUCE THE RISK OF UNINTENTIONAL STARTING. On machines with magnetic contact starting switches there is a risk of starting if the machine is bumped or jarred. Always disconnect from power source before adjusting or servicing. Make sure switch is in OFF position before reconnecting.
-
CHECK DAMAGED PARTS. Before further use of the tool, a guard or other part that is damaged should be carefully checked to determine that it will operate properly and perform its intended function. Check for alignment of moving parts, binding of moving parts, breakage of parts, mounting, and any other conditions that may affect its operation. A guard or other part that is damaged should be properly repaired or replaced.
-
NEVER LEAVE TOOL RUNNING UNATTENDED. TURN POWER OFF. Do not leave tool until it comes to a complete stop.
-
NEVER OPERATE A MACHINE WHEN TIRED, OR UNDER THE INFLUENCE OF DRUGS OR ALCOHOL. Full mental alertness is required at all times when running a machine.
-
NEVER ALLOW UNSUPERVISED OR UNTRAINED PERSONNEL TO OPERATE THE MACHINE. Make sure any instructions you give in regards to machine operation are approved, correct, safe, and clearly understood.
-
IF AT ANY TIME YOU ARE EXPERIENCING DIFFICULTIES performing the intended operation, stop using the machine! Then contact our service department or ask a qualified expert how the operation should be performed.
⚠WARNING
Additional Safety Instructions For Jointers
- JOINTING SAFETY BEGINS with your lumber. Inspect your stock carefully before you feed it over the cutterhead. If you have any doubts about the stability or structural integrity of your stock, DO NOT JOINT IT!
- MAINTAIN PROPER RELATIONSHIP of the outfeed table and the cutterhead knife path.
- ALWAYS USE PUSH BLOCKS whenever surface planing. Never place your hands directly over the cutterhead.
- SUPPORT THE WORKPIECE adequately at all times during operation, maintain control over the work at all times.
- WHEN JOINTING, do not stand directly at the end of either table. Position yourself just to the side of the infeed table to avoid injury from possible kickbacks.
- NEVER MAKE ANY SINGLE CUT DEEPER THAN 1/8".
- NEVER JOINT A BOARD that has loose knots. All defects should be cut out of the board before it is planed or jointed.
- NEVER JOINT end grain.
- JOINT WITH THE GRAIN. Jointing against the grain is dangerous and could produce chatter or excessive chip out.
- WITH THE EXCEPTION OF RABBETING, all operations must be performed with the guard in place. After rabbeting, be sure to replace the guard.
- NEVER BACK THE WORK toward the infeed table.
- HABITS – GOOD AND BAD – are hard to break. Develop good habits in your shop and safety will become second-nature to you.
- “KICKBACK” is when the workpiece is thrown off the jointer table by the force of the cutterhead. Always use pushblocks and safety glasses to reduce the likelihood of injury from “kickback.” If you do not understand what kickback is, or how it occurs, DO NOT operate this machine.
- BE AWARE THAT CERTAIN WOODS MAY CAUSE AN ALLERGIC REACTION in people and animals, especially when exposed to fine dust. Make sure you know what type of wood dust you will be exposed to and always wear an approved respirator.
⚠CAUTION
No list of safety guidelines can be complete. Every shop environment is different. Always consider safety first, as it applies to your individual working conditions. Use this and other machinery with caution and respect. Failure to do so could result in serious personal injury, damage to equipment or poor work results.
⚠WARNING
Like all power tools, there is danger associated with the Grizzly 8" Jointers. Accidents are frequently caused by lack of familiarity or failure to pay attention. Use this tool with respect and caution to lessen the possibility of operator injury. If normal safety precautions are overlooked or ignored, serious personal injury may occur.
G0500/G1018/G1018HW 8" Jointers -5-

SECTION 2: INTRODUCTION
WARNING Read the manual before assembly and operation. Serious personal injury may result if safety or operational information is not understood or followed.
We are proud to offer the Model G0500/G1018/G1018HW. These 8" jointers are part of a growing Grizzly family of fine woodworking machinery. When used according to the guidelines set forth in this manual, you can expect years of trouble-free, enjoyable operation and proof of Grizzly's commitment to customer satisfaction.
The main differences in the three models are shown in the chart below. All three machines are built with rugged steel cabinets and precision ground cast-iron tables and fence assemblies. For more complete information about each machine, see Section 9: Reference Info.
We are pleased to provide this manual with the Model G0500/G1018/G1018HW. It was written to guide you through assembly, review safety considerations, and cover general operating procedures. It represents our effort to produce the best documentation possible.
If you have any comments regarding this manual, please write to us at the address below:
Grizzly Industrial, Inc. c/o Technical Documentation P.O. Box 2069 Bellingham, WA 98227-2069
Most importantly, we stand behind our machines. If you have any service questions or parts requests, please call or write us at the location listed below.
Grizzly Industrial, Inc. 1203 Lycoming Mall Circle Muncy, PA 17756 Phone: (570) 546-9663 Fax: (800) 438-5901 E-Mail: techsupport@grizzly.com Web Site: http://www.grizzly.com
The specifications, drawings, and photographs illustrated in this manual represent the Model G0500/G1018/G1018HW as supplied when the manual was prepared. However, owing to Grizzly's policy of continuous improvement, changes may be made at any time with no obligation on the part of Grizzly. For your convenience, we always keep current Grizzly manuals available on our website at www.grizzly.com. Any updates to your machine will be reflected in these manuals as soon as they are complete. Visit our site often to check for the latest updates to this manual!
\begin{tabular}{|l|c|c|c|} \hline Description & G0500 & G1018 & G1018HW \ \hline Motor & 2 HP & 1-1/2 HP & 1-1/2 HP \ \hline Cutterhead & 4 Knife & 3 Knife & 3 Knife \ \hline Table Size & 75" & 65" & 65" \ \hline Table Adjustment & Handwheels & Table Levers & Handwheels \ \hline \end{tabular}
SECTION 3: CIRCUIT REQUIREMENTS
220V Operation
Amperage Draw
The Model G0500/G1018/G1018HW motors are prewired at 220V and will draw the following load:
- G0500 ........ 12 amps
- G1018 ........ 9 amps
- G1018HW ........ 9 amps
Plug Type
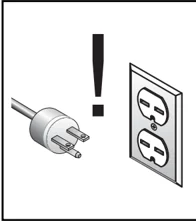
The cord set enclosed does not have a plug as the style of plug you require will depend upon the type of service you currently have or plan to install. We recommend using the following plugs for your machine on a dedicated circuit only (see Figure 1 for an example):
- G0500 ........ 6-15 or L6-15
- G1018 ........ 6-15 or L6-15
- G1018HW ........ 6-15 or L6-15
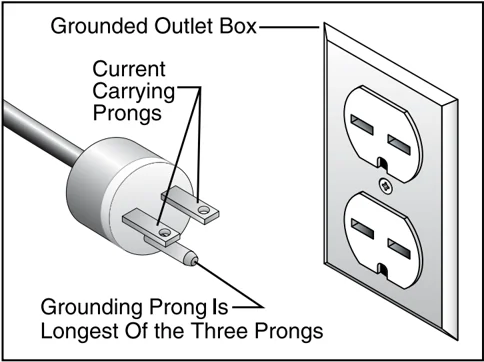
Figure 1. 6-15 plug and outlet.
Circuit Breaker Requirements
We recommend that the circuit you use your machine on should be dedicated. Because the machine motors are different sizes, please use the following guidelines when choosing a circuit breaker for your machine (circuit breakers rated any higher are not adequate to protect the circuit):
- G0500 ........ 15 amp
- G1018 ........ 10 amp
- G1018HW ........ 10 amp
Your Circuit Capacity
Always check to see if the wires in your circuit are capable of handling the amperage load from your machine. If you are unsure, consult a qualified electrician.
If you operate your jointer on any circuit that is already close to its capacity, it might blow a fuse or trip a circuit breaker. However, if an unusual load does not exist and a power failure still occurs, contact a qualified electrician or our Service Department.
WARNING
DO NOT connect your machine to the power source until you have completed the assembly process and have been instructed to do so in this manual. Otherwise, serious personal injury could occur.
G0500/G1018/G1018HW 8" Jointers -7-

110V Operation
NOTICE
The Model G0500/G1018/G1018HW is prewired for 220V operation. If you plan to rewire your machine for 110V, you must use a different switch. Consult a licensed electrician before attempting to rewire your machine!
110V Amperage Draw
The Model G0500/G1018/G1018HW motors can be rewired for 110V if you use a different switch. If you rewire your machine for 110V, the motors will draw the following load:
- G0500 ........ 24 amp
- G1018 ........ 18 amp
- G1018HW ........ 18 amp
Plug Type
The cord set enclosed does not have a plug as the style of plug you require will depend upon the type of service you currently have or plan to install. We recommend using the following plugs for your machine on a dedicated circuit only (see Figures 2 & 3 for examples):
- G0500 ........ 5-30 or L5-30
- G1018 ........ 5-20 or L5-20
- G1018HW ........ 5-20 or L5-20
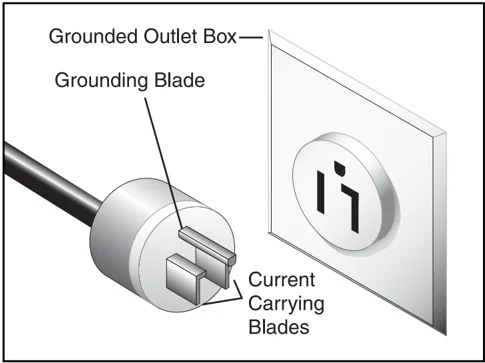
Figure 2. 5-30 plug and outlet.
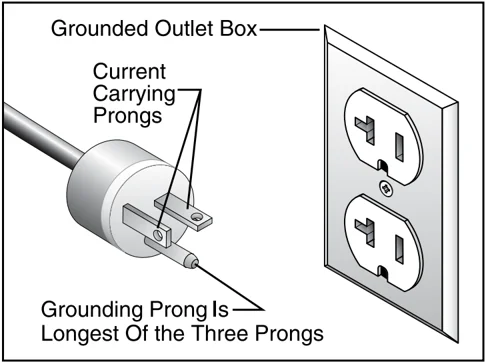
Figure 3. 5-20 plug and outlet.
110V Circuit Breaker Requirements
Use the following guidelines when choosing a circuit breaker (circuit breakers rated any higher are not adequate to protect the circuit):
- G0500 ........ 25 amp
- G1018 ........ 20 amp
- G1018HW ........ 20 amp
Your Circuit Capacity
Always check to see if the wires in your circuit are capable of handling the amperage load from your machine. If you are unsure, consult a qualified electrician.
If you operate your jointer on any circuit that is already close to its capacity, it might blow a fuse or trip a circuit breaker. However, if an unusual load does not exist and a power failure still occurs, contact a qualified electrician or our Service Department.
WARNING
DO NOT connect your machine to the power source until you have completed the assembly process and have been instructed to do so in this manual. Otherwise, serious personal injury could occur.

Grounding
In the event of an electrical short, grounding reduces the risk of electric shock by providing a path of least resistance to disperse electric current. This tool is equipped with a power cord that has an equipment-grounding prong. The outlet must be properly installed and grounded in accordance with all local codes and ordinances.
- =img_in_table_box_inset_image_inset_chart_inset_chart_inset_chart_inset_chart_inset_chart_inset_chart_inset_chart_inset_chart_inset_chart_inset_chart_inset_chart_inset_chart_inset_chart_inset_chart_inset_chart_inset_chart_inset_chart_inset_chart_inset_chart_inset_chart_inset_chart_inset_chart_inset_chart_inset_chart_inset_chart_inset_chart_inset_chart_inset_chart_inset_chart_inset_chart_inset_chart_inset_chart ........
⚠ WARNING
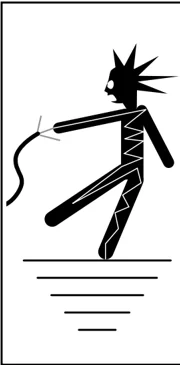
Verify that any existing electrical outlet and circuit you use is actually grounded. If not, it will be necessary to run a separate 12 A.W.G. copper grounding wire from the outlet to a known ground. If not grounded properly, serious personal injury could occur.
- =img_in_chart_box_inset_chart_inset_chart_inset_chart_inset_chart_inset_chart_inset_chart_inset_chart_inset_chart_inset_chart_inset_chart_inset_chart_inset_chart_inset_chart_inset_chart_inset_chart_inset_chart_inset_chart_inset_chart_inset_chart ........
⚠ CAUTION
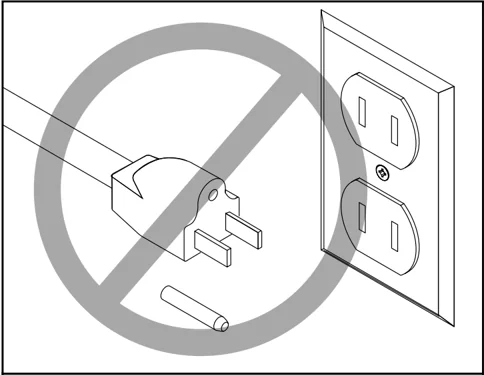
This machine must have a ground prong in the plug to help ensure that it is grounded. DO NOT remove ground prong from plug to fit into a two-pronged outlet! If the plug will not fit the outlet, have the proper outlet installed by a qualified electrician.
Extension Cords
220V Operation
We do not recommend the use of extension cords on 220V equipment. Instead, arrange the placement of your equipment and the installed wiring to eliminate the need for extension cords.
If you find it absolutely necessary to use an extension cord at 220V with your Grizzly 8" Jointer:
- Make sure the cord is rated for Standard Service (grade S) or better.
- The extension cord must also contain a ground wire and plug pin.
- Use at least a 16 gauge cord if the cord is 50 feet long or less.
- Use at least a 14 gauge cord if the cord is between 51-100 feet.
110V Operation
If you find it necessary to use an extension cord at 110V with your Grizzly 8" jointer:
- Make sure the cord is rated Standard Service (grade S) or better.
- The extension cord must also contain a ground wire and plug pin.
- Use at least a 10 gauge cord if the cord is 50 feet long or less.
- DO NOT use a cord longer that 50 feet!

SECTION 4: IDENTIFICATION
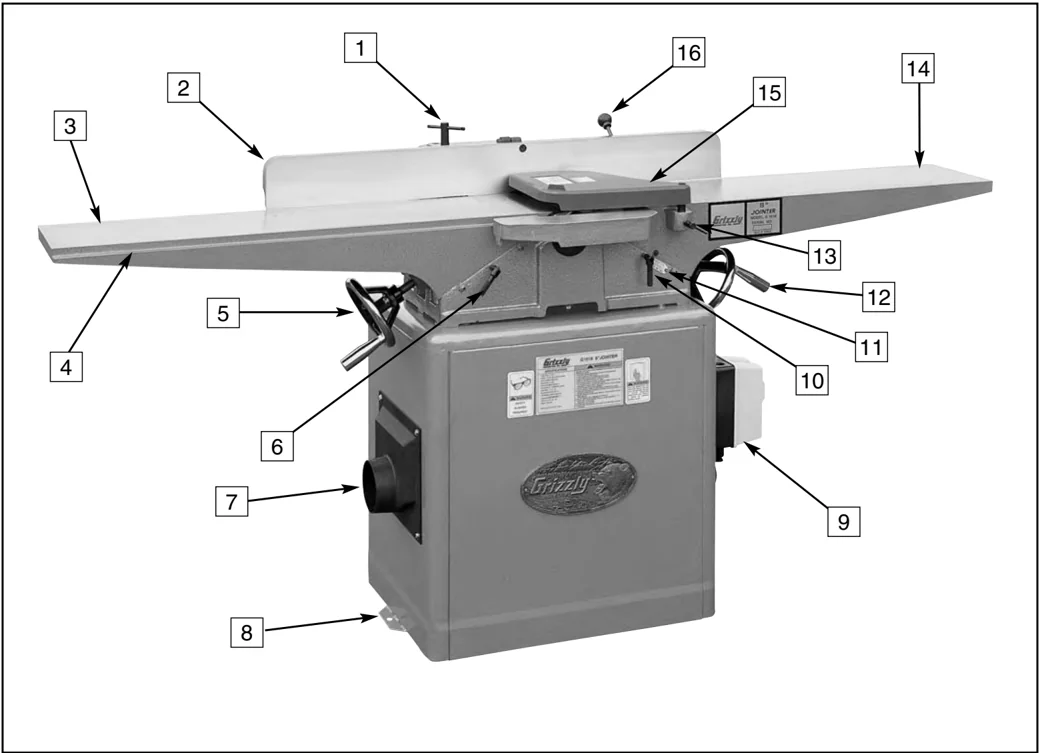
Figure 4. The following is a list of controls and components on the Model G0500/G1018/G1018HW. Please take time to become familiar with each item and its location. These items will be used throughout the manual and knowing them is essential to understanding the instructions and terminology used in this manual.
- Fence Lock
- Fence
- Outfeed Table
- Rabbeting Edge
- Outfeed Handwheel
- Outfeed Table Lock
- Dust Port (optional for G1018/G1018HW)
- Stand Mounting Hole
- ON/OFF Switch
- Infeed Table Lock
- Depth Scale
- Infeed Table Handwheel
- Cutterhead Guard Shaft Lock
- Infeed Table
- Cutterhead Guard
- Fence Tilt Handle
-10- G0500/G1018/G1018HW 8" Jointers
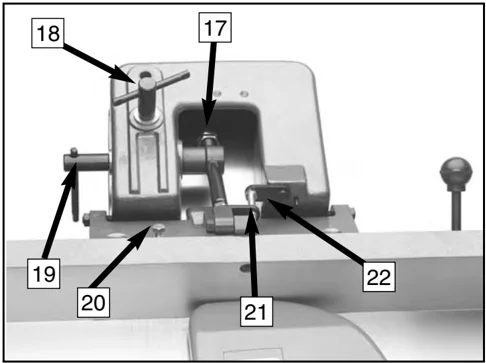
Figure 5. Fence controls.
- 45˚L Stop Nut
- Fence Lock
- Fence Tilt Lock
- 45˚R Stop Bolt
- 90˚ Stop Bolt
- 90˚ Stop Tab
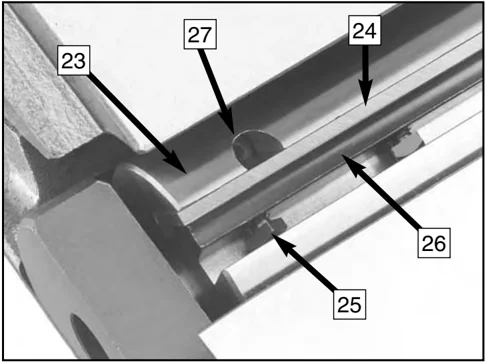
Figure 6. Cutterhead details.
- Cutterhead
- Cutterhead Knife
- Gib Bolt
- Gib
- Jack Screw Access Hole
Common Terms and Definitions
Infeed Table: The infeed table is the table where the cutting operation begins. When facing the front of the jointer, it is on the right-hand side. The wood travels right to left; from the infeed table, across the cutterhead, and onto the out-feed table.
Outfeed Table: The outfeed table is the table where the cutting operation ends. When facing the front of the jointer, it is on the left-hand side.
Cutterhead: The cutterhead is the cylindrical assembly that holds each of the jointer knives. It spins on a horizontal axis between the infeed and outfeed table, and is covered by the cut- terhead guard.
Fence: The jointer fence is the adjustable cast iron surface that the wood stock runs along when jointing and surface planing. The fence is adjustable from 45°-90° to the infeed and out- feed tables.
Adjustment Levers and Handwheels: Controls the height of the infeed and outfeed tables.
Table Lock Handles: The threaded handles that must be loosened before the height of the tables can be adjusted. They are then tight- ened after the height is properly set.
Rabbet Cut: A rabbet cut is a groove cut along the long edge of the wood stock, usually used for making simple joints. The cutterhead guard must be removed for this operation, so great care is needed for safe operation.
Surface Planing: Surface planing is running the face of the wood stock over the jointer. This provides one flat side that is ready to be run through a dedicated planing machine.
Edge Jointing: Edge jointing is running the long edge of the wood stock over the jointer. This provides one flat edge that is ready to be run against the table saw rip fence or edge glued.
Cutterhead Guard: The metal guard that covers the cutterhead and automatically moves out of the way during operation, then automatically moves back into place after the operation.
G0500/G1018/G1018HW 8" Jointers -11-
SECTION 5: SET UP
Unpacking
The Grizzly 8" Jointers are shipped from the manufacturer in a carefully packed crate and a cardboard box. If you discover the machine is damaged after you've signed for delivery, and the truck and driver are gone, you will need to file a freight claim with the carrier. Save the containers and all packing materials for possible inspection by the carrier or its agent. Without the packing materials, filing a freight claim can be difficult. If you need assistance determining whether you need to file a freight claim, or with the procedure to file one, please contact our Customer Service.
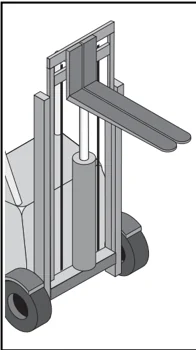
WARNING The 8" Jointer is a heavy machine at approximately 460 lbs. shipping weight. DO NOT move the machine by yourself – you will need assistance and power equipment. Serious personal injury may occur if safe moving methods are not followed.

CAUTION Some metal parts may have sharp edges on them after they are formed. Please examine the edges of all metal parts before handling them. Failure to do so could result in injury.
When you are completely satisfied with the condition of your shipment, you should inventory its parts.
-12-
G0500 Inventory
- Jointer Assembly w/Fence ........ 1
- Infeed Extension ........ 1
- Outfeed Extension ........ 1
- V-Belt M52 ........ 2
- Handwheel ........ 2
- Handle ........ 2
- Dust Port 4" ........ 1
- Hardware Bag #1
- —Combo Wrench 8/10MM ........ 1
- —Combo Wrench 12/14MM ........ 1
- —Allen Wrench 3MM ........ 1
- —Allen Wrench 4MM ........ 1
- —Allen Wrench 5MM ........ 1
- —Phillips Head Screw 1/4"-20 X 1/2" ........ 4
- —Flat Washer 1/4" ........ 4
- —E-Clip ........ 4
- —Jig Feet ........ 2
- —Jig Rod ........ 1
- Hardware Bag #2
- —Lock Washers 3/8" ........ 3
- —Hex Bolt 5/16"-18 x 1" ........ 4
- —Flat Washer 5/16" ........ 4
- —Special Mounting Bolts ........ 3
- Cutterhead Guard ........ 1
- Push Block ........ 2
- Stand Assembly w/Motor ........ 1
- Stand Door Assembly w/ Knob ........ 1
- Strain Relief ........ 1
- Phillips Head Screw #10-24 x 1-1/4" ........ 2
- Flat Washers #10 ........ 2
- Hex Nuts #10-24 ........ 2
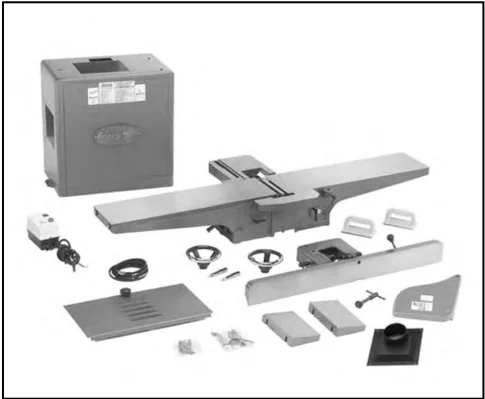
Figure 7. G0500 Inventory.


G1018 Inventory
- Jointer Assembly w/Fence ……………………1
- V-Belt M52……………………………………2
- Table Lever ……………………………………2
- Hardware Bag #1 —Combo Wrench 8/10MM ……………………1 —Combo Wrench 12/14MM …………………1 —Allen Wrench 3MM ………………………1 —Allen Wrench 4MM ………………………1 —Allen Wrench 5MM ………………………1 —E-Clip ………………………………………4 —Jig Feet ……………………………………2 —Jig Rod………………………………………1
- Hardware Bag #2 —Lock Washers 3/8" ………………………3 —Special Mounting Bolts …………………3
- Cutterhead Guard …………………………1
- Push Block……………………………………2
- Stand Assembly w/Motor…………………1
- Stand Door Assembly w/Knob……………1
- Strain Relief…………………………………2
- Phillips Head Screw #10-24 x 1-1/4" ………2
- Flat Washers #10 …………………………2
- Hex Nuts #10-24 …………………………2
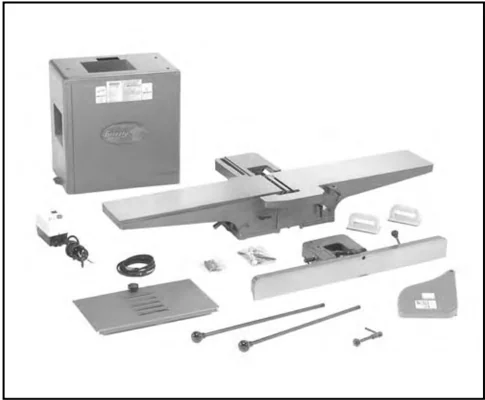
Figure 8. G1018 Inventory.
G1018HW Inventory
- Jointer Assembly w/Fence ……………………1
- V-Belt M52……………………………………2
- Handwheel……………………………………2
- Handle …………………………………………2
- Hardware Bag #1 —Combo Wrench 8/10MM ……………………1 —Combo Wrench 12/14MM …………………1 —Allen Wrench 3MM ………………………1 —Allen Wrench 4MM ………………………1 —Allen Wrench 5MM ………………………1 —E-Clip ………………………………………4 —Jig Feet ……………………………………2 —Jig Rod………………………………………1
- Hardware Bag #2 —Lock Washers 3/8" ………………………3 —Special Mounting Bolts …………………3
- Cutterhead Guard …………………………1
- Push Block……………………………………2
- Stand Assembly w/Motor…………………1
- Stand Door Assembly w/Knob……………1
- Strain Relief…………………………………2
- Phillips Head Screw #10-24 x 1-1/4" ………2
- Flat Washers #10 …………………………2
- Hex Nuts #10-24 …………………………2
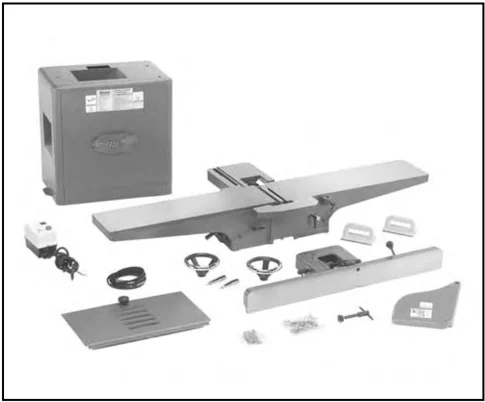
Figure 9. G1018HW Inventory.


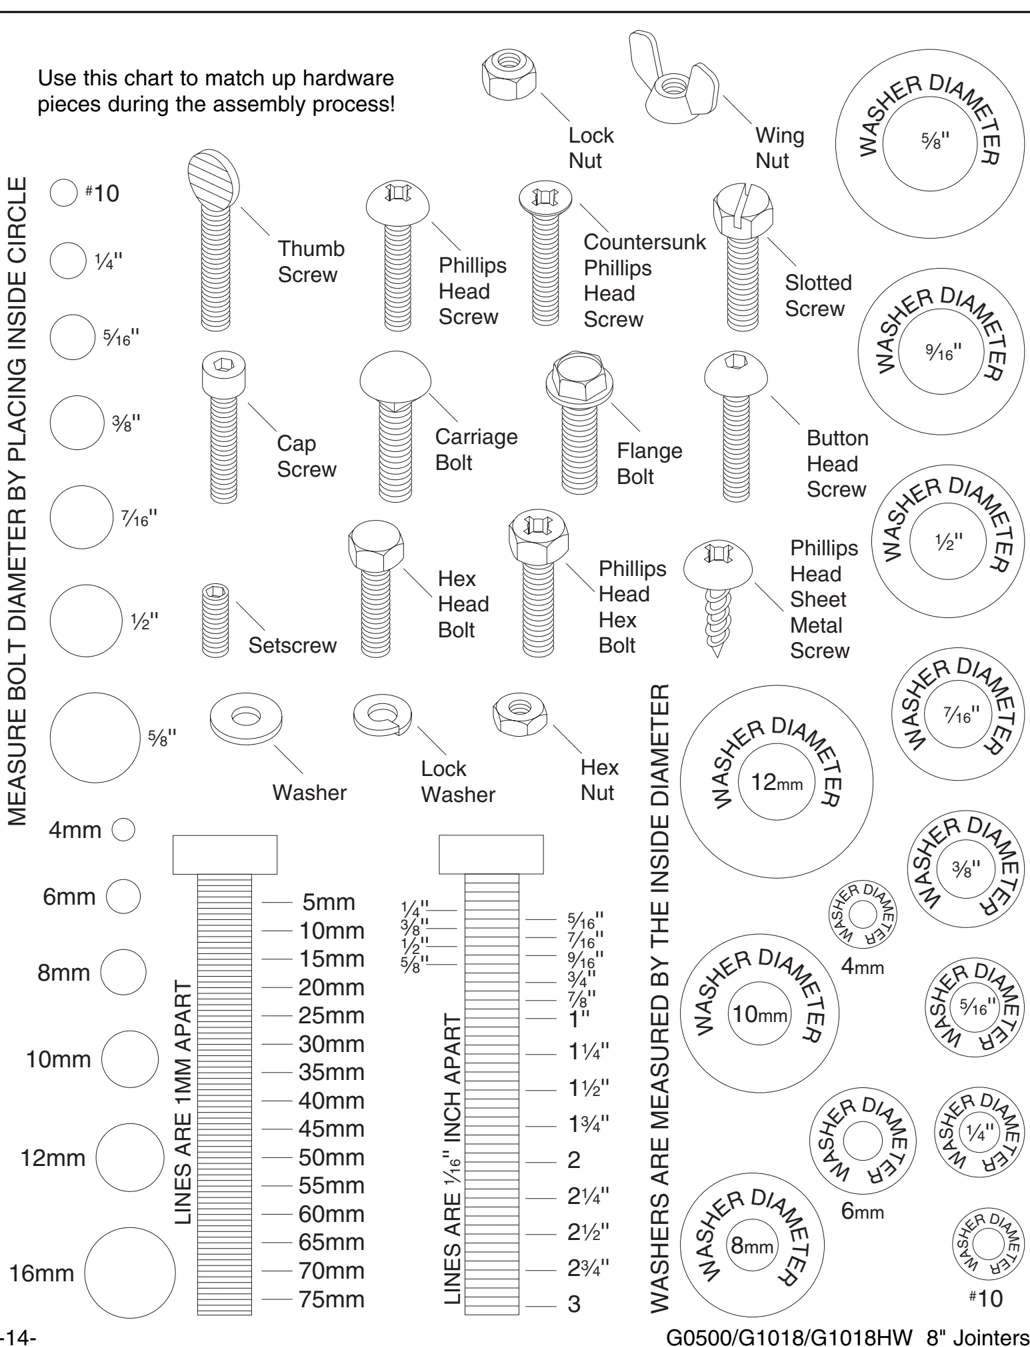
Hardware Recognition Chart
Use this chart to match up hardware pieces during the assembly process!
Clean Up
The unpainted surfaces are coated with a waxy oil to protect them from corrosion during shipment. Remove this protective coating with a solvent cleaner or citrus-based degreaser such as Grizzly’s G7895 Degreaser. To clean thoroughly, some parts may need to be removed. For optimum performance from your machine, make sure you clean all moving parts or sliding contact surfaces that are coated. Avoid chlorine-based solvents as they may damage painted surfaces should they come in contact.
To access all surfaces, remove the fence lock nut and handle (see Figure 10), and remove the fence from the jointer unit.
 Figure 10. Jointer fence lock nut (the handle is attached directly underneath nut).
WARNING Do not use gasoline or other petroleum-based solvents to clean with. They have low flash points which make them extremely flammable. A risk of explosion and burning exists if these products are used.
WARNING Do not smoke while using solvents. A risk of explosion or fire exists and may result in serious personal injury.
Site Considerations
FLOOR AND WORKBENCH LOAD
Your Model G0500/G1018/G1018HW represents a medium weight load. Most commercial or garage shop floors should be sufficient to carry the weight. Before moving the jointer onto a residential floor, inspect it carefully to determine that it will be sufficient to carry the load of the machine, the device for moving it and its operators. If you question the strength of your floor, you should consider having it inspected for possible reinforcement.
WORKING CLEARANCES
Working clearances can be thought of as the distances between machines and obstacles that allow safe operation of every machine without limitation. Consider existing and anticipated machine needs, size of material to be processed through each machine, and space for auxiliary stands and/or work tables. Also consider the relative position of each machine to one another for efficient material handling.
LIGHTING AND OUTLETS
Lighting should be bright enough to eliminate shadow and prevent eye strain. Electrical circuits should be dedicated or large enough to handle amperage requirements. Outlets should be located near each machine so power or extension cords are clear of high-traffic areas. Observe local electrical codes for proper installation of new lighting, outlets, or circuits.
 CAUTION
Make your shop “child safe.” Ensure that your workplace is inaccessible to youngsters by closing and locking all entrances when you are away. Never allow visitors in your shop when assembling, adjusting or operating equipment.
G0500/G1018/G1018HW 8" Jointers -15-

Beginning Assembly
This section will cover the minimum assembly and adjustment instructions needed to begin operation. For best results, complete the assembly in the order provided in this manual and then read the remaining portion of the manual before attempting any type of operations.
Safety must come first! Read and follow these instructions before beginning assembly:
WARNING Wear safety glasses during the entire assembly process. Failure to comply may result in serious personal injury.
WARNING Disconnect power to the machine when performing all assembly steps. Failure to do this may result in serious personal injury.
CAUTION Some metal parts may have sharp edges on them after they are formed. Please examine the edges of all metal parts before handling them. Failure to do so could result in injury.
Most of your 8" Jointer has been assembled at the factory, but some parts must be assembled or installed after delivery.
TOOLS REQUIRED: You will need a high quality square, a Phillips screwdriver, a long straight-edge, 10mm, 12mm and 14mm open-end wrenches, and a 3mm Allen wrench.
-16-
Switch Installation
To install the switch:
- Locate the #10-24 x 1-1/2" Phillips head screws that are included in the hardware bag with the switch.
- Remove the switch cover by unthreading the two plastic screws from the front of the switch.
- Position the switch over the holes and secure it to the stand with the #10-24 x 1-1/2" Phillips head screws, as shown Figure 11.
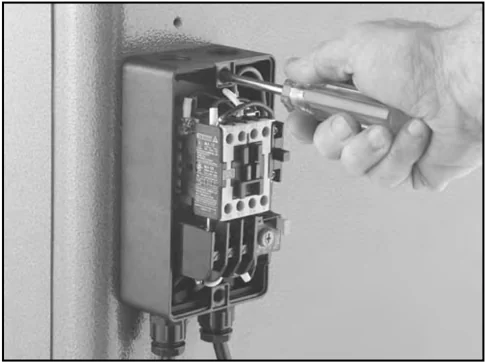
Figure 11. Fastening switch to stand.
- Place the cover back on the switch and secure it to the switch body with the two plastic screws.
- Locate the shortest length cord (motor cord) and close a grommet around the wire, so the larger end of the grommet is toward the switch.
- Thread the motor cord through the access hole in the stand, which is located just below the switch.



- Snap fit the grommet into the opening as shown in Figure 12. Make sure there is enough slack in the wire between the switch and the grommet before snapping the grommet into position.
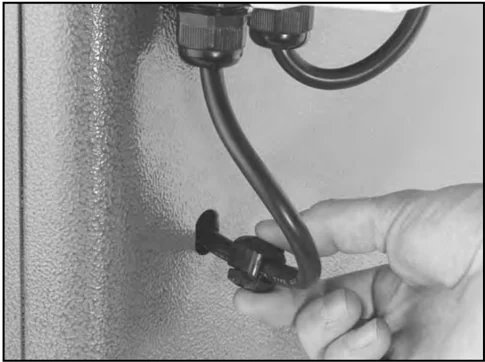
Figure 12. Installing grommet.
Wiring Connection
To connect the motor cord to the motor:
- Remove three of the four motor mounting bolts and swing the motor toward the rear stand opening, as shown in Figure 13.
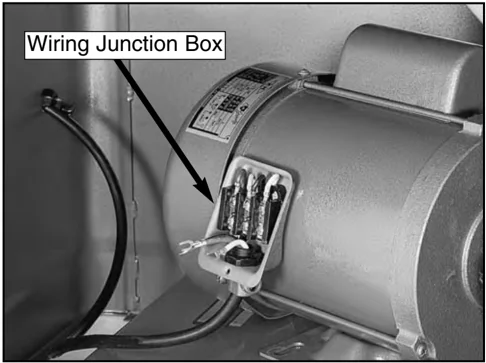
Figure 13. Motor positioned for easy access.
-
Remove the cover from the wiring junction box.
-
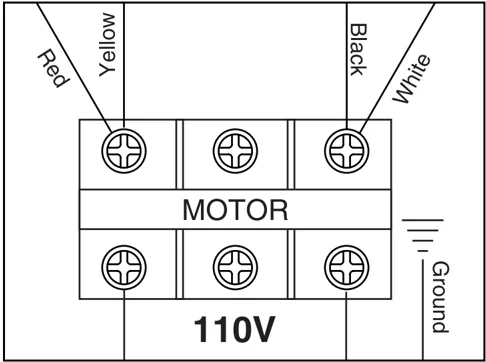
Make the motor connections in accordance with the wiring schematics that are located on the motor label or those shown below in Figure 14 or Figure 15, depending on which voltage you decide to use.
NOTICE If you plan to rewire your machine for 110V, you must use a different switch!

Figure 14. 110V motor wiring schematic.
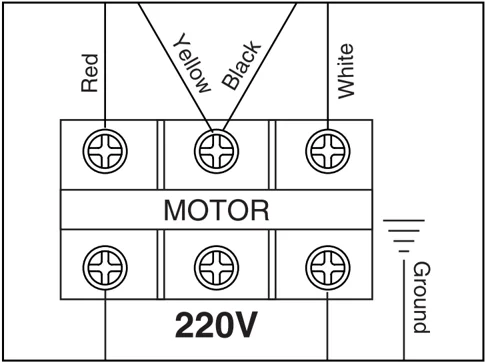
Figure 15. 220V motor wiring schematic.
-
Make sure the wiring connections are secure, then replace the wiring junction box cover.
-
Swing the motor back into position and replace the motor mounting bolts, but leave them finger tight for now.

Jointer to Stand
If you will be placing the jointer on a mobile base, set the stand on the mobile base before installing the jointer unit onto the stand.
If you will be bolting the stand to the floor, position the stand in its proper location and secure it to the floor, using fasteners through the mounting flanges shown in Figure 16, before installing the jointer unit on the stand.
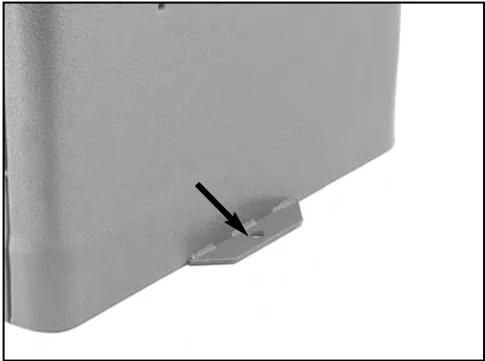
Figure 16. Jointer stand floor mounting flanges.
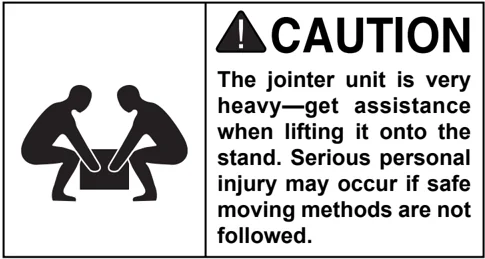
CAUTION
The jointer unit is very heavy—get assistance when lifting it onto the stand. Serious personal injury may occur if safe moving methods are not followed.
To mount the jointer to the stand:
- Lift the main unit onto the stand and position the cutterhead pulley over the pulley slot in the top of the stand.
- Carefully align the mounting holes in the stand (shown in Figure 17) with the threaded holes in the base of the jointer.
- Secure the jointer to the stand using the (3) 3/8"-16 x 3/4" hex bolts and 3/8" flat washers provided. Be sure not to over-tighten!
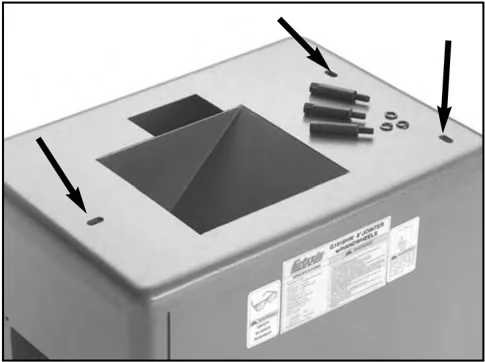
Figure 17. Jointer unit mounting holes.
V-Belt
To install the V-belt:
- Open the stand cover to access the motor adjustment bolts.
- Loosen the motor adjustment bolts shown in Figure 18, and slide the motor up until you can attach the V-belts to the pulleys.
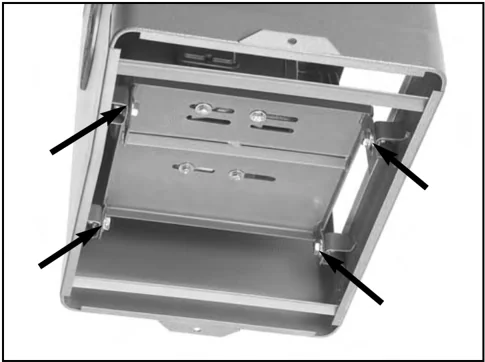
Figure 18. Motor adjustment bolts (shown underneath stand for clarity).
- Allow the weight of the motor to rest against the V-belts.
-18- G0500/G1018/G1018HW 8" Jointers

- Loosen the motor mount bolts shown in Figure 19.
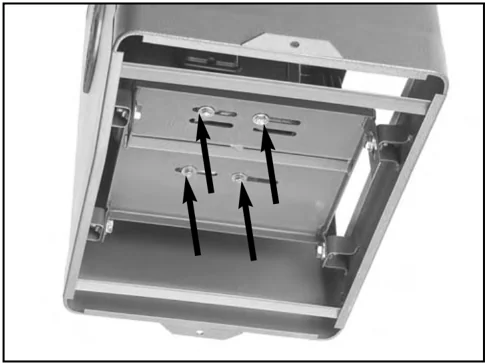
Figure 19. Motor mount bolts (shown underneath stand for clarity).
-
Move the motor on the mounting plate to align the motor and cutterhead pulleys with each other (See Figure 20). Visually confirm the pulley alignment from above (for the best accuracy use a straightedge for alignment confirmation).
-
Tighten the motor mount bolts.
-
If necessary, the pulley alignment can be fine tuned by loosening the motor pulley setscrews and moving the pulley in or out as necessary.
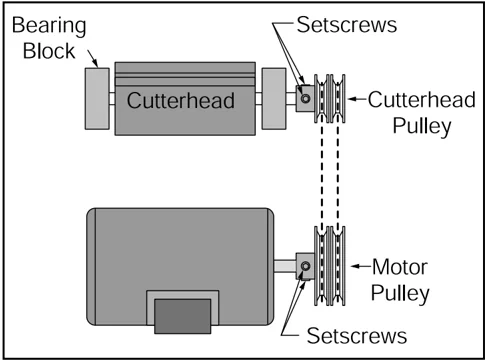
Figure 20. Pulley and V-belt alignment.
-
Place firm tension on the motor and tighten the motor adjustment bolts. Note—Only use your hands to place tension on the motor. DO NOT use a pry bar or any other device to place added leverage on the motor.
-
Check the V-belts for proper tension by lightly squeezing both sides together. If the belts can be easily squeezed together more than 1/2" on each side, increase the tension. If the pulley seems tight enough, continue with the assembly process. (You can always go back and make adjustments after the initial operation of the jointer.
Stand Cover
To install the stand cover:
-
Place the inset edge of the stand cover against the bottom edge of the stand opening.
-
Close the stand cover against the stand as shown in Figure 21, and turn the knob to secure the stand cover to the stand.
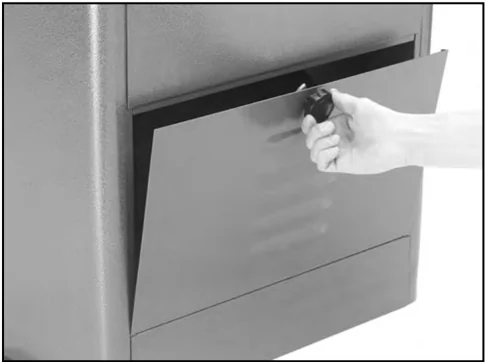
Figure 21. Closing stand cover.


Fence to Jointer
To install the fence on the jointer unit:
-
Place the fence on the jointer unit as it was before you removed it for clean up. Make sure the key on the fence support lines up with the keyway on the fence.
-
Install the fence lock the opposite way that you removed it before clean up, with the handle on top and the tabs of the nut facing up as shown in Figure 22.
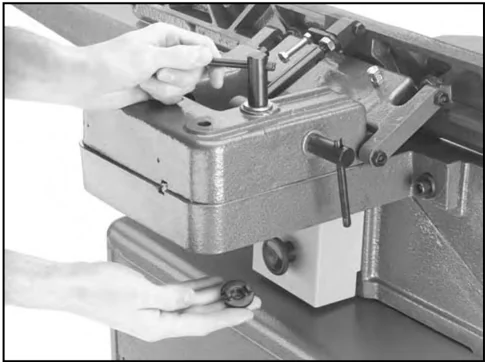
Figure 22. Installing fence lock with the tabs on the nut facing up.
- Lock the fence in place by tightening the fence lock.
NOTICE
The fence can easily scratch the table while you are adjusting the fence position. To avoid scratches, loosen the fence lock enough to permit an easy adjustment and always use care when moving the fence.
G0500/G1018HW Handwheel Installation
To install the handwheels on the Model G0500/G1018HW:
- Remove the screw and washer from the end of the leadscrew under each table, as shown in Figure 23.
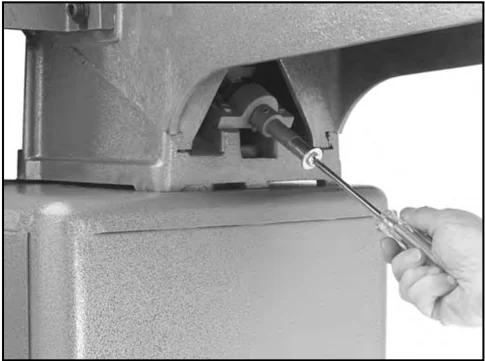
Figure 23. Removing screw from leadscrew.
-
On each leadscrew, install a handwheel, and secure it with the phillips head screw and washer that you removed in step 1.
-
Install a handle into each handwheel, as shown in Figure 24.
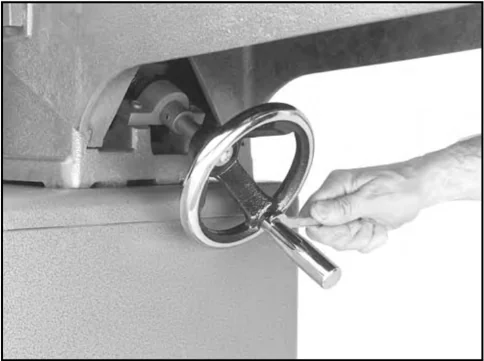
Figure 24. Installing handle into handwheel.
G1018 Table
Lever Installation
To install the table levers on the Model G1018HW:
- Thread a table lever into the adjustment block below each table, as shown in Figure 25.
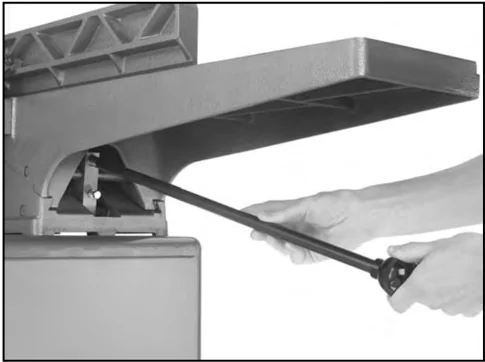
Figure 25. Installing table lever into adjustment block.
Knife Setting Gauge
To assemble the knife setting gauge:
-
Insert the steel rod through the hole in each adjuster arm until the notches for the E-clips extend past the adjustment arms on both sides.
-
Attach the E-clips to the notches to lock adjustment arms onto the steel rod. The adjustment arms are symmetrical, so the placement is not a concern. See Figure 26.
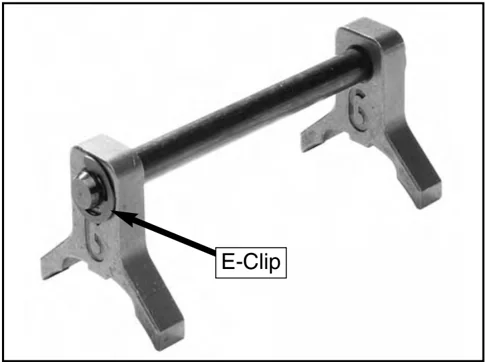
Figure 26. Assembled knife setting gauge.
G0500/G1018/G1018HW 8" Jointers -21-


Knife Inspection
The knives were set to their proper height at the factory, but we recommend that you inspect them to ensure proper operation and table setup.
To inspect the knife height:
- Make sure that the power has not been connected to the machine at this point in the setup process!
- Remove the belt guard shown in Figure 27.
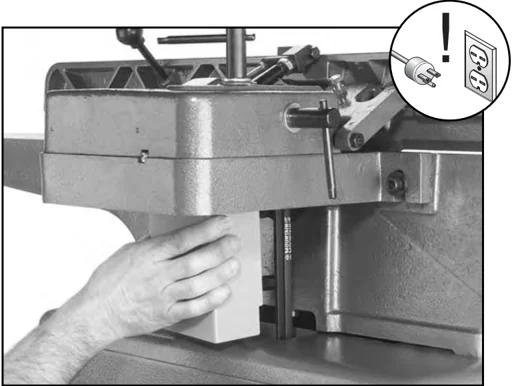
Figure 27. Removing belt guard.
- Using the cutterhead pulley, rotate the cutterhead to make one of the knives accessible to the knife jig. Lower the tables if it is necessary to make more room.
- Place the jig over the knife as illustrated in Figure 28.
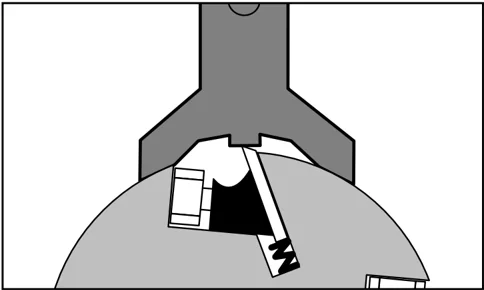
Figure 28. Jig placement on cutterhead.
-22-
- Make sure that the middle pad of the jig is barely touching the knife and that the pads on the ends of the jig are resting firmly on the cutterhead.
- Repeat step 5 on all knives. If you find that any knives are out of adjustment, correct them as discussed in Section 7: Service Adjustments.
Table Alignment
Both tables can be adjusted by unlocking the table locks (see Figure 29) and rotating the handwheels. To accurately joint or plane a piece of stock, both tables must be aligned correctly, beginning with the outfeed table.
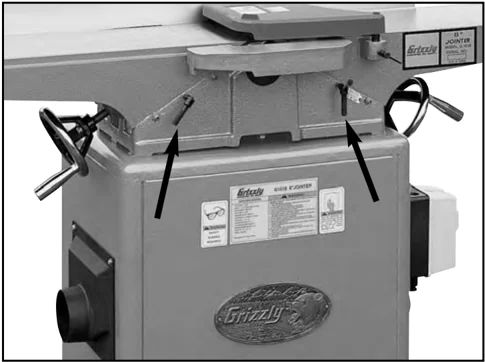
Figure 29. Jointer.
To align the outfeed table:
- Remove the belt guard so you can rotate the cutterhead safely.
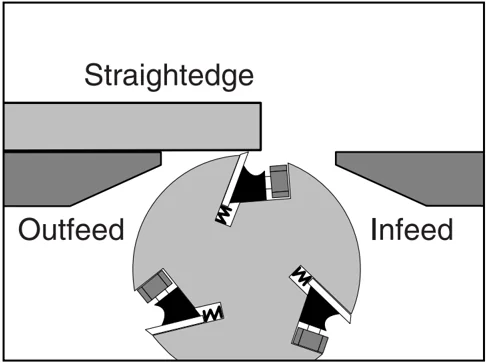
- Rotate the cutterhead so that one of the knives is at top dead center. Note—A knife is at top dead center when it is at its highest point during the rotation. See Figure 30 for an illustration of a knife at top dead center.

 Figure 30. Cutterhead knife at top-dead-center.
-
Place a straightedge across the outfeed table, so the end of the straightedge is directly over the knife.
-
If the outfeed table is set correctly, the straightedge will lay across the table and barely touch the knife when it is at top dead center (see illustration in Figure 31). Verify that the outfeed table height reflects this condition.
-
If the outfeed table needs to be adjusted, release the outfeed table lock and adjust the height by rotating the handwheel that is located below the table.
-
When you have the outfeed table properly adjusted, lock the table height in place.
To adjust the infeed table:
-
Make sure the outfeed table is adjusted as previously described.
-
Place a straightedge half way on the outfeed table and halfway over the infeed table.
-
Release the infeed table lock and adjust the infeed table flush with the outfeed table as illustrated in Figure 32. The infeed table should be exactly the same height as the outfeed table.
-
Lock the infeed table in place.
-
Set the pointer shown in Figure 33 to 0 on the depth indicator scale.
 Figure 32. Infeed table even with outfeed table.
 Figure 33. Pointer set to 0.
G0500/G1018/G1018HW 8" Jointers -23-

G1018 Table Stops
The Model G1018 has table stop bolts (see Figure 34) that can be set to repeatedly bring the table back to 0 on the depth indicator scale. These table stop bolts are located directly under both table adjustment levers. If you do not have the Model G1018, skip these instructions.
 Figure 34. Model G1018 table stop bolt (only one side shown).
To set the Model G1018 outfeed table stop bolt:
- Make sure the outfeed table has been adjusted as previously described.
- Loosen the jam nut on the stop bolt, shown in Figure 34.
- Turn the stop bolt clockwise until it makes contact with the table base behind the adjustment block.
- Loosen the table lock and move the table down, then move it up until it stops. Make certain the table returns to its correct height by verifying that the outfeed table is even with one of the knife blades at top dead center.
- Adjust and check as necessary, then tighten the jam nut on the stop bolt when the table will return to its correct position.
- Lock the table in place.
To set the Model G1018 infeed table stop bolt:
- Make sure that the infeed table has been adjusted and that the pointer on the depth indicator scale has been calibrated as previously described.
- Loosen the jam nut on the stop bolt.
- Turn the stop bolt clockwise until it makes contact with the table base behind the adjustment block.
- Loosen the table lock and move the table down, then return it to the 0 setting. Make certain the table returns to the 0 point while using the stop bolt.
- Adjust and check as necessary, then tighten the jam nut on the stop bolt when the table will return to its correct position.
- Lock the table in place.

Cutterhead Guard
To install the cutterhead guard:
- Locate the spring tang on the cutterhead guard that is shown in Figure 35.
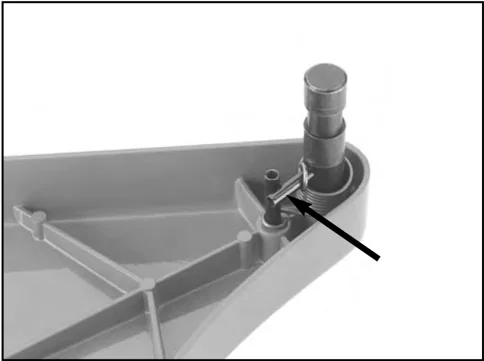
Figure 35. Spring tang on cutterhead guard.
- Rotate the spring tang approximately half of a turn.
- Keep tension on the spring tang and install the shaft into the shaft housing on the front of the infeed table as shown in Figure 36.
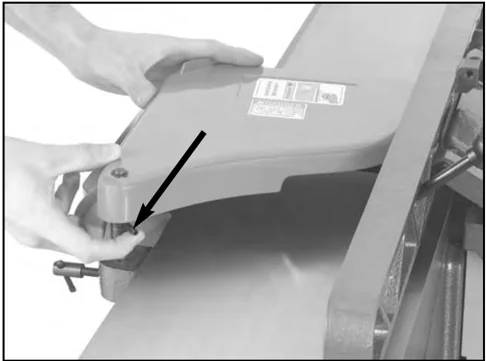
Figure 36. Installing cutterhead guard while holding spring tang.
- Lower the shaft into the shaft housing far enough that the spring tang will rest against the edge of the infeed table when released, as shown in Figure 37.
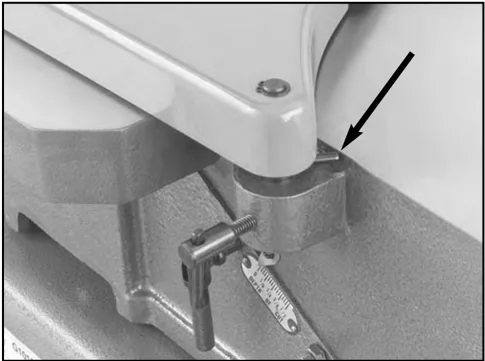
Figure 37. Spring tang against infeed table.
- Tighten the lock at the front of the housing.
- Test the cutterhead guard by moving it toward the front of the jointer and then letting it go. The guard should return back to its original position against the fence and over the cutterhead, or as shown in Figure 38. This operation is extremely important for operator safety!
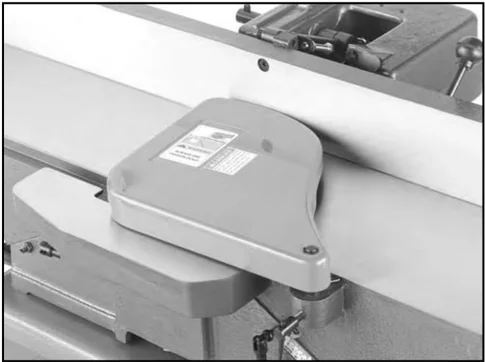
Figure 38. Cutterhead guard properly positioned over cutterhead and against fence.
- If the guard drags across either table, release the lock at the shaft housing and move the guard up a little.
G0500/G1018/G1018HW 8" Jointers -25-
Fence Stops
The Grizzly 8" Jointers have three fence stops at 45° R, 90°, and 45°L (see Figure 39). It is important to check and adjust these stops to ensure proper operation and quality results.
 Fence Tilt Lock
Tilt Handle
45°L Stop Nut
90° Stop Tab
90° Stop Bolt
45°R Stop Nut
Figure 39. Fence stops, controls & components.
To check and adjust the 45° R fence stop:
- Loosen the fence tilt lock handle.
- Rotate the 90° stop tab out of the way and ease the fence back with the tilt handle, until it comes to rest on the 45° R stop bolt.
- Use a bevel gauge that is set to 135°, and place it on the table so the angled portion is against the fence as shown in Figure 40.
 Figure 40. Checking the fence at 45°R with a bevel gauge.
- Check the current position of the fence. If it fits the angle of the bevel gauge, the fence is already set correctly. If it does not, then the fence needs to be adjusted.
- Loosen the jam nut on the 45°R fence stop bolt.
- Adjust the 45°R fence stop bolt until the fence angle matches the bevel gauge.
- Tighten the jam nut on the 45°R stop bolt to secure it in place. The 45°R fence stop should now be correctly adjusted.
To check and adjust the 90° fence stop:
- Loosen the fence tilt lock handle.
- Place a 90° square on the table and against the fence as shown in Figure 41.
 Figure 41. Checking the fence with a 90° square.
- Check the current position of the fence. If it fits the 90° square, the fence is already set correctly. If it does not, then the fence needs to be adjusted.
- Loosen the jam nut on the 90° stop bolt.
- Adjust the 90° stop bolt until the fence angle matches the 90° square.
- Tighten the jam nut on the 90° stop bolt to secure it in place. The 90° stop bolt should now be correctly adjusted.
To check and adjust the 45°L fence stop:
- Loosen the fence tilt lock handle.
- Using the tilt handle, slowly tilt the fence toward the front of the jointer until it stops.
- Set your bevel gauge to 45°, and place it on the table so the angled portion is against the fence as shown in Figure 42.
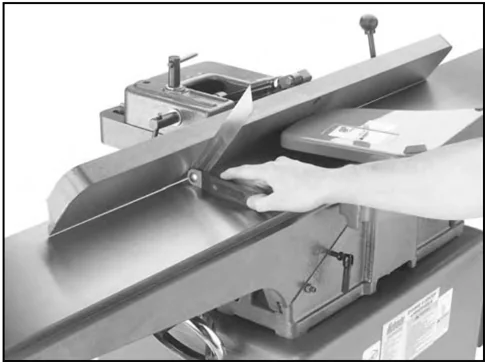
Figure 42. Checking the fence at 45° L with a 45° square.
- Check the current position of the fence. If it fits the angle of the bevel gauge, the fence is already set correctly. If it does not, then the fence needs to be adjusted.
- Loosen the jam nut on the 45°L fence stop nut.
- Adjust the 45°L stop nut until the fence angle matches the bevel gauge.
- Tighten the jam nut against the 45° L stop nut to secure it in place. The 45°L fence stop should now be correctly adjusted.
Plug Installation
To install a plug on your power cord:
- Refer to Section 3: Circuit Requirements to determine the correct plug and receptacle for your particular setup.
- Have the plug and receptacle installed by a licensed electrician.
Test Run
Once assembly is complete, you are ready to test run the machine.
WARNING
DO NOT attempt to investigate or adjust the machine while it is running. Wait until the machine is turned off, unplugged and all working parts have come to a complete stop before you do anything! Otherwise serious personal injury may occur.
Connect the power to the power supply. Press the START button. Make sure that your finger is poised on the STOP button, just in case there is a problem. The jointer should run smoothly, with little or no vibration or rubbing noises. Strange or unnatural noises should be investigated and corrected before operating the machine further.
If the jointer seems to be running correctly, let it run for a short time to ensure that the moving parts are working properly with no excessive vibration. If any problem develops, correct it before attempting to use the machine.
If you cannot locate the source of unusual noises, feel free to contact our service department for help.
G0500/G1018/G1018HW 8" Jointers -27-


