SECTION 6: OPERATIONS
General
WARNING
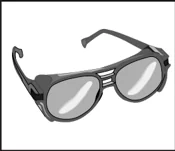
Damage to your eyes, lungs, and ears could result from failure to wear safety glasses, a respirator, and hearing protection while sanding with this machine.
WARNING
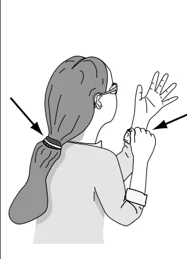
Loose hair and clothing could get caught in machinery and cause serious personal injury. Keep loose clothing rolled up and long hair tied up and away from machinery.

WARNING
Keep the blade guard in the down position at all times. Failure to do this could result in serious personal injury or death.
Blade Selection
Rip blade features:
- Best for cutting with the grain of the workpiece.
- 20-40 teeth.
- Flat-top ground tooth profile.
- Large gullets for large chip removal.
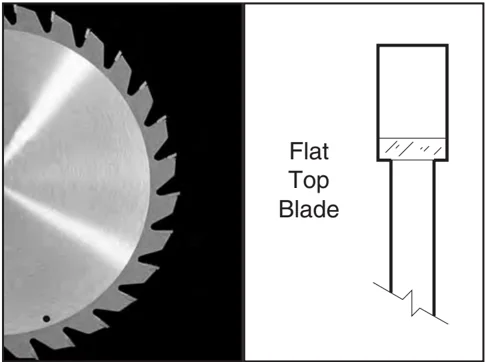
Figure 39. Rip blade.
Crosscut blade features:
- Best for cutting across the grain of the workpiece.
- 60-80 teeth.
- Alternate top bevel tooth profile.
- Small hook angle and a shallow gullet.
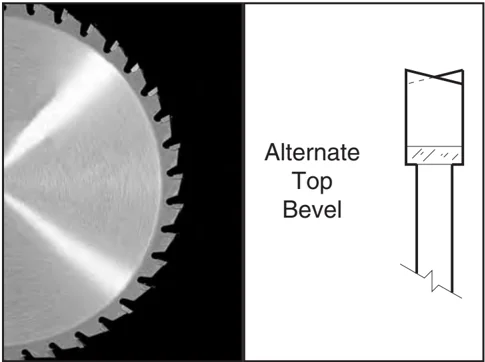
Figure 40. Crosscutting blade.
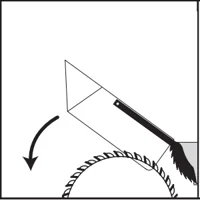
Combination blade features:
- Adequate for cutting both with and across the grain.
- 40-50 teeth.
- Alternate top bevel and flat, or alternate top bevel and raker tooth profile.
- Teeth are arranged in groups of five.
- Gullets are small and shallow within the groups of five teeth, similar to a cross-cut blade; then large and deep between each group of five, like a ripping blade.
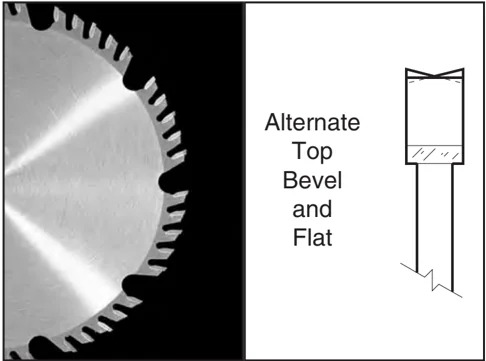
Figure 41. Combination blade.
Laminate blade features:
- Best for cutting plywood or veneer.
- 40-80 teeth.
- Triple chip tooth profile.
- Very shallow gullet.
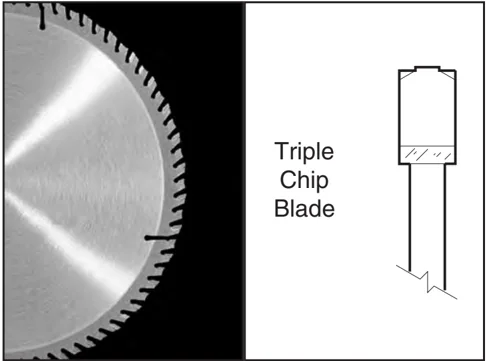
Figure 42. Laminate blade.
Dado Blades:
There are two types of dado blades: stacked and wobble.
- Stacked Dado Blade: These dedicated dado cutting blade sets consist of up to 8 individual blades. Multiple cutters are "stacked" between two outside blades. The width of the dado is determined by the combination of cutters that are “stacked” together. The dado is cut in a single pass leaving a smooth and square channel in the face of the workpiece. Stacked dado blades are the most expensive option, but are worth considering if your projects require a lot of visible dado cuts. A stacked dado blade is shown in Figure 43.
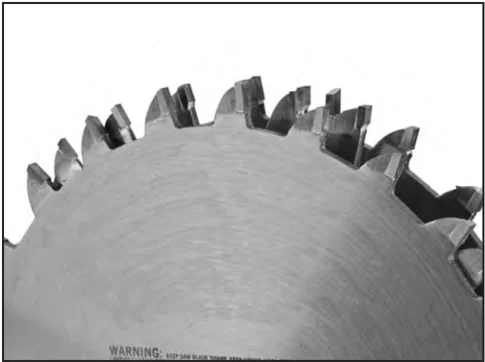
Figure 43. Stacked dado blade.
- Wobble Dado Blade: Also a dedicated dado blade, a wobble blade usually consists of a single blade that is tilted on the arbor shaft while it is spinning. The channel is cut in the face of the workpiece as the blade passes through its pre-adjusted width of travel. Wobble blades are an inexpensive option when visibly pleasing channels are not a concern.
Note: This section on blade selection is by no means comprehensive. Always follow the saw blade manufacturer's recommendations to ensure safe and efficient operation of your table saw.

Non-Through and Through Cuts
Non-Through Cuts
A non-through cut is a sawing operation where the blade does not protrude above the top face of the wood stock. Non-through cuts require the removal of the blade guard and splitter. Dado cuts, rabbet cuts, and resawing are the only non-through cuts that can be performed with this table saw.
Through Cuts
A through cut is a sawing operation in which the workpiece is completely sawn through. Ripping, crosscutting, miter cuts, and angled cuts are all through cutting operations.
Both through and non-through cuts have a risk of kickback. Kickback is an event in which the workpiece is propelled back towards the operator at a high rate of speed. Non-through cuts have a higher risk of injury from kickback because the splitter and blade guard must be removed. Always remember to re-install the blade guard and splitter after performing a non-through cut.
Read, understand, and follow the instructions and safety precautions for each type of cut to reduce the risk of injury.
Safety precautions and instructions for each type of cut are located on the following pages:
Ripping: On this page.
Crosscutting: Page 33
Miter Cuts: Page 34
Blade Tilt/Bevel Cuts: Page 34
Dado Cutting: Page 35
Rabbet Cutting: Page 37
Resawing: Page 39
Ripping
Ripping means cutting with the grain of the workpiece. In other materials such as MDF or plywood, ripping simply means cutting lengthwise.
!WARNING Serious injury can be caused by kickback. Kickback is a high-speed expulsion of stock from the tablesaw toward an operator. The operator or bystanders may be struck by flying stock, or the operator’s hands can be pulled into the blade during the kickback.
To make a rip cut:
- Review Preventing Kickback on Page 6 and take the necessary precautions to prevent kickback.
- Joint one long edge of the workpiece on a jointer.
- UNPLUG THE TABLE SAW!
- Set the fence to the desired width of cut on the scale.
- Adjust the blade height so the highest saw tooth protrudes approximately 1/4" above the workpiece.
- Set up safety devices such as featherboards or other anti-kickback devices.
- Rotate the blade to make sure it does not come into contact with any of the safety devices.
Continued on next page
-32- G0444/G0444Z 10" Table Saw

-
Plug the saw into the power source, turn it ON, and allow it to reach full speed.
-
The jointed edge of the workpiece must slide against the fence during the cutting operation.
-
Using a push stick, feed the workpiece through the saw blade, as shown in Figure 44, until the workpiece is completely past the saw blade.
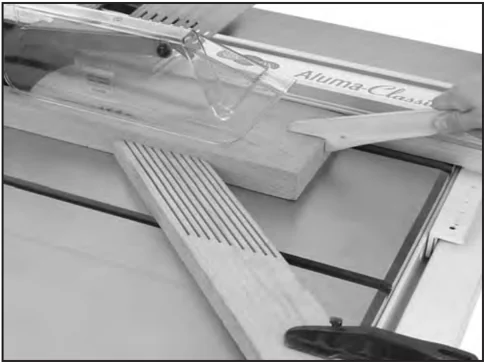
Figure 44. Ripping operation.
WARNING
Turn OFF the saw and allow the blade to come to a complete stop before removing the cut-off piece. Failure to follow this warning could result in serious personal injury.
Crosscutting
Crosscutting is cutting across the grain of the workpiece. In MDF or particleboard, crosscutting is cutting across the width of the workpiece.
To make a crosscut using the miter gauge:
-
UNPLUG THE TABLE SAW!
-
Remove the rip fence and position the miter gauge, adjusted to 90°, in a miter slot.
-
Adjust the blade height so the teeth protrude approximately 1/4" above the workpiece.
-
Slide the miter gauge near the blade and adjust the workpiece so the blade will cut on the waste side of the line.
-
Plug in the tablesaw, turn it ON, and allow it to reach full speed.
-
Hold the workpiece firmly against the face of the miter gauge and ease it into the blade as shown in Figure 45.
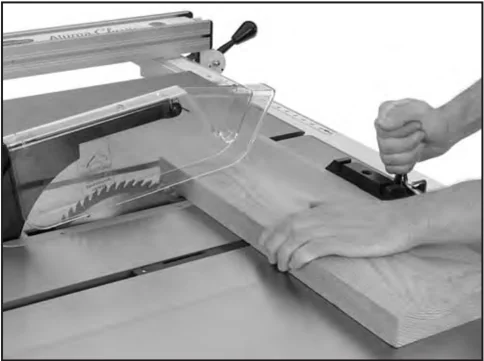
Figure 45. Crosscutting operation.
WARNING
Turn OFF the saw and allow the blade to come to a complete stop before removing the cut-off piece. Failure to follow this warning could result in serious personal injury
Miter Cuts
A miter is an angled crosscut. Miters are usually cut in the same manner as crosscuts, using the miter gauge and a predetermined mark on the workpiece.
To perform a miter cut:
- UNPLUG THE TABLE SAW!
- Determine the angle of your cut. If the angle needs to be super accurate, use a protractor to set the miter gauge to the blade.
- Place the face of the miter gauge against the edge of the workpiece and the bar across the face of the workpiece. Use the bar as a guide to mark your cut as shown in Figure 46.
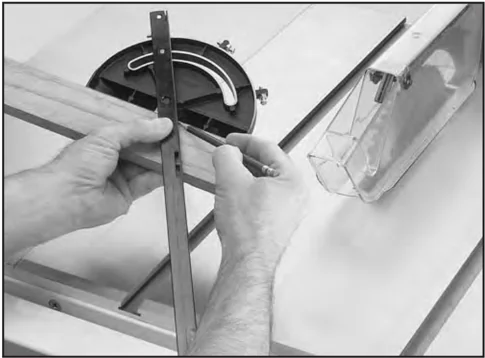
Figure 46. Marking miter line.
- Place the miter gauge back into the slot and hold the workpiece firm against the miter gauge body. Slide the miter gauge near the blade and adjust the workpiece so the blade will cut on the waste side of the line.
- Proceed to make the cut in the same manner as described in the Crosscutting instructions.
Blade Tilt/Bevel Cuts
When the positive stops are properly adjusted, the blade tilt handwheel allows the operator to tilt the blade to the right, anywhere between 0° and 45°. This is used most often when cutting bevels, compound miters or chamfers. Figure 47 shows an example of the blade when tilted to 45°.
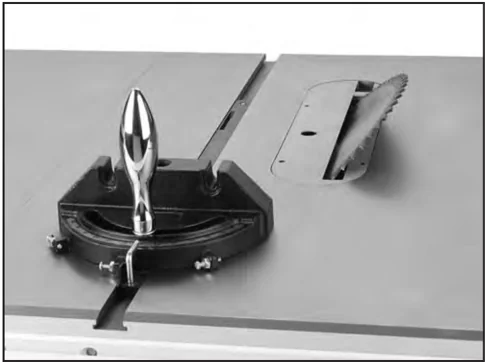
Figure 47. Blade tilted to 45° (guard removed for clarity).
-34- G0444/G0444Z 10" Table Saw

Dado Cutting
Commonly used in furniture joinery, a dado is a straight channel cut in the face of the workpiece. Dadoes can be cut using either a dedicated dado blade or a standard saw blade.
WARNING Dado operations present very real hazards requiring proper procedures to avoid serious injury. The chance of kickback is always greater when dado blades are used so extra care must be taken. Any movement of the workpiece away from the fence will cause kickback. Be certain that stock is flat and straight. Failure to follow these warnings could result in serious personal injury.
WARNING Never perform a through cut operation with a dado blade. A dado blade was designed to make non-through cuts only. Failure to follow this warning could result in serious personal injury.
To use a stacked or wobble dado blade:
- UNPLUG THE TABLE SAW!
- Read warning labels concerning dado cutting on this page and kickback hazards on Page 6 before going further.
- Remove the table insert, the blade guard, and the saw blade. (The blade guard MUST be reinstalled after dado cutting is complete.)
- Attach and adjust the dado blade system as recommended in the dado blade manufacturer's instructions.
- Install the dado table insert.
- Raise the dado blade up to the desired depth of cut (depth of dado channel desired).
- If dadoing along the long length of the workpiece, adjust the distance between the fence and the inside edge of the blade as shown in Figure 48.
 Fence
Workpiece
Dado Blade
X
Figure 48. Stacked or wobble dado cut.
G0444/G0444Z 10" Table Saw -35-
-
Reconnect the saw to the power source.
-
With one finger ready to push the STOP button, turn the saw ON. The blade should run smooth with no vibrations or wobbling.
-
When the blade has reached full speed, perform a test cut with a scrap piece of wood.
-
If the cut is satisfactory, repeat the cut with the actual workpiece.
Using a standard saw blade:
-
Mark the width of the dado cut on the workpiece. Note: Include marks on the edge of the workpiece so the cut path can be aligned when the workpiece is lying on the table.
-
Raise the blade to the desired depth of cut (depth of dado channel desired).
-
Align the blade to cut one of the dado sides as shown in Figure 49.
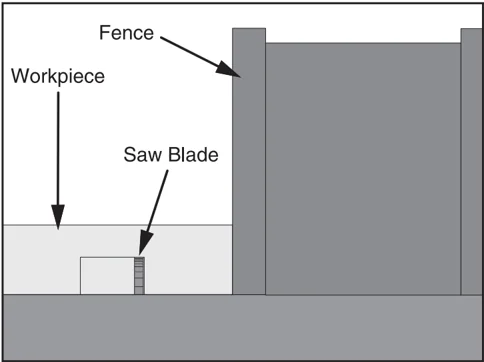
Figure 49. Single-blade dado first cut.
-
Turn on the saw and allow the blade to reach full speed.
-
Perform the cutting operation.
-
Re-adjust the fence so the blade is aligned with the other edge of the intended dado channel (Figure 50). Note: Be sure to keep the cuts within your marks; otherwise, the dado will be too big.
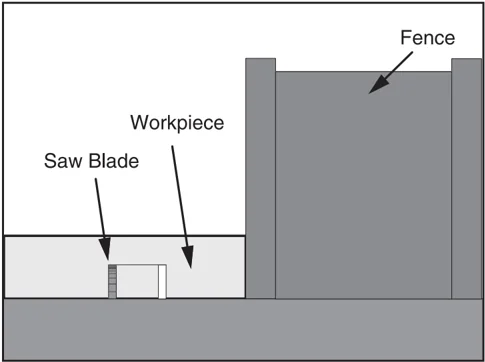
Figure 50. Single-blade dado second cut.
-
Continue making cuts toward the center of the dado with your subsequent cuts until the dado is complete.
-
Replace the blade guard!
WARNING You MUST replace the blade guard after dadoing is complete. Failure to follow this warning could result in serious personal injury.
-36- G0444/G0444Z 10" Table Saw

Rabbet Cutting
Commonly used in furniture joinery, a rabbet is a L-shaped groove cut in the edge of the workpiece. Rabbets can be cut with either a dado blade or a standard saw blade.
To attach a sacrificial fence:
Rabbet cutting on the edge of the workpiece requires the use of a sacrificial fence attachment (Figure 51). The sacrificial fence can be made from a piece of wood that is as long as the metal fence and 3/4" thick. Once the sacrificial fence has been cut, attach it to the metal fence with screws or clamps, making sure they are all secure and tight.
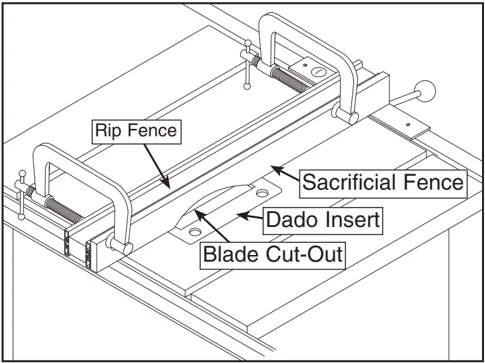
Figure 51. Sacrificial fence.
CAUTION
Always use push sticks, featherboards, push paddles and other safety accessories whenever possible to increase safety and control during operations which require that the blade guard and splitter must be removed from the saw. ALWAYS replace the blade guard after dadoing is complete.
WARNING
Rabbet operations present very real hazards requiring proper procedures to avoid serious injury. The chance of kickback is always greater, so extra care must be taken. Any movement of the workpiece away from the fence will cause kickback. Be certain that stock is flat and straight. Failure to follow these warnings could result in serious personal injury.
Cutting rabbets with the dado blade:
- UNPLUG THE TABLE SAW!
- Read warning labels concerning rabbet cutting on this page and kickback hazards on Page 6 before going further.
- Adjust the saw blade to the maximum height needed for the rabbeting operation.
- Adjust the fence and align the workpiece to perform the cutting operation as shown in Figure 52.
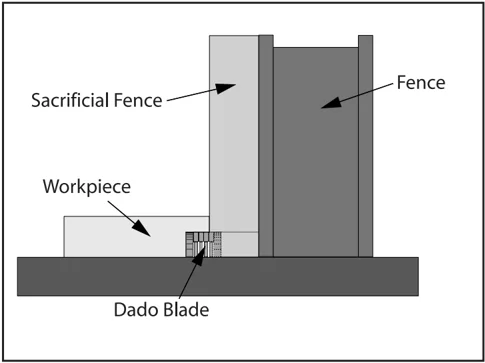
Figure 52. Rabbet cutting.
- Reconnect the saw to the power source and turn the saw ON.
- When the blade has reached full speed, perform a test cut with a scrap piece of wood.
- If the cut is satisfactory, repeat the cut with the final workpiece.
Cutting rabbets with the standard blade:
Note: Cutting rabbets with a standard saw blade DOES NOT require the use of a sacrificial fence.
- Clearly mark the width of the rabbet cut on the workpiece. Note: Include marks on the edge of the workpiece to clearly identify the intended cut while it is laying flat on the saw table.
- Raise the blade up to the desired depth of cut (depth of rabbet channel desired).
- Adjust the fence so the blade is aligned with the inside of your rabbet channel as shown in Figure 53.
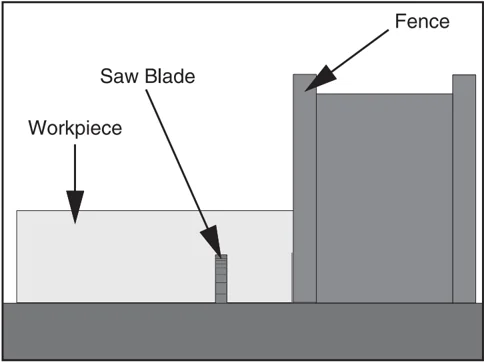
Figure 53. Rabbet cutting.
- Turn the saw ON.
- When the blade has reached full speed, perform a test cut with a scrap piece of wood.
- If the cut is satisfactory, repeat the cut with the final workpiece.
- Rotate the workpiece as shown in Figure 54.
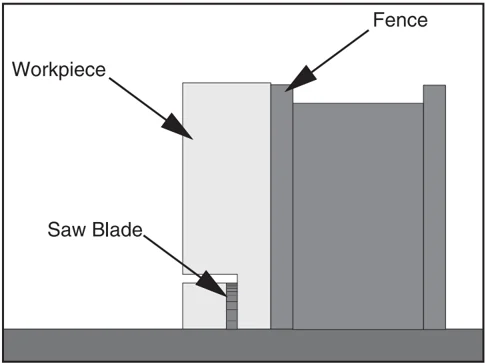
Figure 54. Second cut to create a rabbetting.
- Perform the second cut to complete the rabbet.
- Replace the blade guard!
!WARNING
You MUST replace the blade guard after rabbet cutting is complete. Failure to follow this warning could result in serious personal injury.
-38- G0444/G0444Z 10" Table Saw

Resawing
!WARNING Resawing on a table saw increases the chances of kickback. Serious injury can be caused by kickback. Kickback is a high-speed expulsion of stock from the table-saw toward an operator. The operator or bystanders may be struck by flying stock, or the operator's hands can be pulled into the blade during the kickback.
!WARNING Resawing operations require proper procedures to avoid serious injury. Extra care must be taken to prevent kickback when resawing. Any tilting or movement of the workpiece away from the fence will cause kickback. Be certain that stock is flat and straight. Failure to follow these warnings could result in serious personal injury.
Resawing is the process of cutting a thick piece of stock into one or more thinner pieces. Bandsaws are ideal for resawing and the process is fairly easy and safe. A table saw is not intended for resawing and the process is difficult and extremely dangerous. Resawing on the table saw often binds the blade, causing kickback. The risk of kickback increases relative to the depth of a cut. Kickback is extra dangerous when resawing on a table saw because the anti-kickback devices and blade guard must be removed, leaving no protection between your hands and the saw blade. Kickback can pull the operator's hands into the blade, or the operator or bystanders may be hit by flying stock. DO NOT resaw on a table saw without using a resaw barrier. DO NOT resaw on a table saw without wearing a full face shield.
The following instructions describe how to build a resaw barrier, add an auxiliary fence to your standard fence, and safely perform resawing operations.
Note: This table saw can only resaw wood that is less than 6" tall.
Resaw Barrier
The resaw barrier shown in Figure 55 holds the workpiece vertical, keeps the workpiece aligned with the fence, and keeps your hands away from the blade.
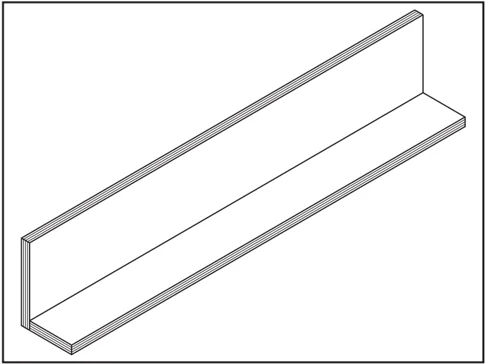
Figure 55. Resawing barrier.
Components Needed for the Resaw Barrier:
- Hardwood or Plywood 3/4" x 5-1/2" x 27" ........ 1
- Hardwood or Plywood 3/4" x 3" x 27" ........ 1
- Wood Screws 2" ........ 8
- Wood Glue ........ As Needed
Tools Needed for the Resaw Barrier:
- Table Saw ........ 1
- Jointer and Planer ........ Recommended
- Clamps ........ 2 Minimum
- Drill and Drill Bits ........ 1
To build the resaw barrier:
-
Cut two boards to 3/4" x 5-1/2" x 27" and 3/4" x 3" x 27". If you are using hardwood, cut the boards oversize, then joint and plane the boards to the correct size to make sure the boards are square and flat.
Note: Only use furniture grade plywood or kiln dried hardwood to prevent warping.
-
Pre-drill and countersink 8 holes approximately 3/8" from the bottom of the 5-1/2" tall board.
G0444/G0444Z 10" Table Saw -39-
- Glue the end of the 3" board, then clamp the boards at a 90° angle with the larger board in the vertical position as shown in Figure 56.
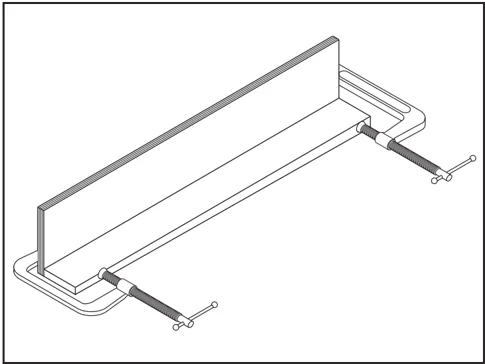
Figure 56. Clamping the resawing barrier.
- Secure the joint with the wood screws.
Auxiliary Fence
The auxiliary fence is necessary if you are resawing wood that is more than 3" tall. It should be no less than 1/2" shorter than the board to be resawn.
Components Needed for the Auxiliary Fence:
Hardwood or Plywood 3/4" x ?" x 27" …………………… 1
Flat Head Screws 1/4-20" x 1" …………………………… 8
Hex Nuts 1/4-20" …………………………………………… 8
Tools Needed for the Resaw Barrier:
Table Saw ………………………………………………… 1
Jointer and Planer ………………… Recommended
Clamps …………………………………………………… 2 Minimum
Drill and Drill Bits ……………………………………… 1
To build the auxiliary fence:
- Cut a 3/4" thick board 27" long, and cut a height no less than 1/2" shorter than the board to be resawn. If you are using hardwood, cut the board oversize, then joint and plane the board to the correct size to make sure the board is square and flat.
Note: Only use furniture grade plywood or kiln dried hardwood to prevent warping.
-
Pre-drill and countersink 8 holes 1-1/4" from the bottom of the board.3. Pull an end cap off of the standard fence, then slide the hex nuts into the T-slot and replace the end cap.
-
Thread the flat head screws through the auxiliary fence and into the hex nuts in the standard fence, and tighten securely as shown in Figure 57.
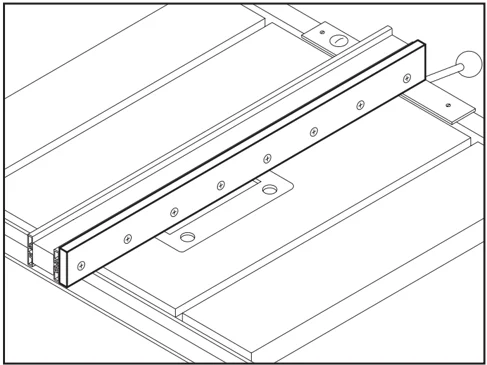
Figure 57. Auxiliary fence.
Resawing Operations
The table saw motor is pushed to its limits when resawing. If the motor starts to bog down, slow down your feed rate. Motor overloading and blade wear can be reduced by using a ripping blade. Ripping blades have between 8 and 30 teeth to clear the sawdust quickly.
Components Needed for Resawing:
Zero Clearance Insert…………………………………… 1
Ripping Blade 10"……………………………………… 1
Clamps ………………………………………………… 2
Shop Made Auxiliary Fence ………………………… 1
Shop Made Resaw Barrier …………………………… 1
WARNING
You may experience kickback during this procedure. Stand to the side of the blade and wear a full face shield to prevent injury when resawing.

To perform resawing operations:
-
UNPLUG THE TABLE SAW!
-
Remove the standard table insert and the blade guard/splitter. Install a ripping blade and a zero clearance insert. Then lower the blade below the table surface.
-
Attach the auxiliary fence to the standard fence and set it to the desired width.
Note: Account for blade kerf, the rough cut made by the blade, and the inaccuracy of the fence scale when the auxiliary fence is installed when figuring out the correct width.
-
Place the workpiece against the fence and slide the resaw barrier against the workpiece. Now clamp the resaw barrier to the top of the table saw (see Figure 58).
-
Slide the workpiece over the blade to make sure it moves smoothly.
-
Raise the blade approximately an inch, or close to half the height of the workpiece (Figure 58), whichever is less.
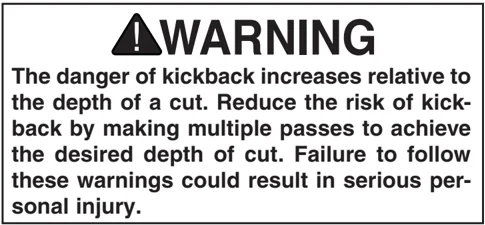
WARNING The danger of kickback increases relative to the depth of a cut. Reduce the risk of kickback by making multiple passes to achieve the desired depth of cut. Failure to follow these warnings could result in serious personal injury.
CAUTION Always use push sticks or push paddles to increase safety and control during operations which require that the blade guard and splitter must be removed from the saw. ALWAYS replace the blade guard after resawing is complete.
-
Plug in the table saw, turn it ON, and use a push stick to feed the workpiece through the blade using a slow, steady feedrate.
-
Flip the workpiece end for end, keeping the same side against the fence, and run the workpiece through the blade.
-
Repeat Steps 6–8 until the blade is close to half of the height of the board to be resawn. The ideal completed resaw cut will leave an 1/8" connection when the resawing is complete as shown in Figure 58. Leaving an 1/8" connection will reduce the risk of kickback.
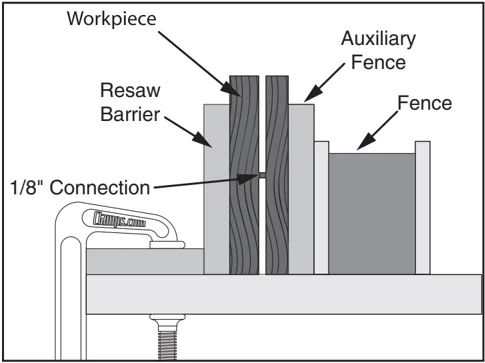
Figure 58. Ideal completed resaw cut.
-
Turn OFF the table saw, then separate the parts of the workpiece and hand plane the remaining ridge.
-
When finished resawing, remove the resaw barrier and re-install the blade guard/splitter.


SECTION 7: MAINTENANCE
! figure WARNING Always disconnect power to the machine before performing maintenance. Failure to do this may result in serious personal injury.
Cleaning
Clean the Model G0444/G0444Z according to the schedule below to ensure maximum performance. Note: The following maintenance schedule assumes the saw is being used every day.
Daily:
- Wipe down the table surface and grooves with a rust preventive such as SLIPIT® (Grizzly items G5562 & G5563).
- Clean the pitch and resin from the saw blade with OxiSolv® Blade & Bit Cleaner (Grizzly item G1955).
Weekly:
- Clean the motor housing with compressed air.
- Wipe down the fence rails with a dry silicon lubricant such as Spraway® Silicon Lubricant (Grizzly item G2545).
Lubrication
Lubricate the areas indicated below every 12 months.
- Blade angling trunnions. These should be lubricated with 6 or 7 drops of light machine oil.
- Blade height trunnion. This should also be lubricated with 6 or 7 drops of light machine oil.
- The 2 worm gears should be lubricated with an automotive wheel bearing grease.
These points can be reached from the back of the machine. Check all adjustments after lubricating.
Miscellaneous
Always be aware of the condition of your machine. Routinely check the condition of the following items and repair or replace as necessary:
- Mounting bolts
- Power switch
- Saw blade
- Blade guard



V-Belts
To ensure optimum power transmission from the motor to the blade, the V-belt must be in good condition (free from cracks, fraying and wear). Check the V-belt at least every 3 months; more often if the saw is used daily.
Bearings
The bearings are sealed and pre-lubricated and require no lubrication during their usable life. However, your saw components will operate at their best if the bearing surfaces are kept clean.
G0444/G0444Z 10" Table Saw -43-
Maintenance Log
| Date | Approximate Hours Of Use | Maintenance Performed |
|---|---|---|
-44- G0444/G0444Z 10" Table Saw