Before returning this product call
1-800-4-DEWALT
IF YOU SHOULD EXPERIENCE A PROBLEM WITH YOUR DEWALT PURCHASE,
CALL 1-800-4 DEWALT
IN MOST CASES, A DEWALT REPRESENTATIVE CAN RESOLVE YOUR PROBLEM OVER THE PHONE.
IF YOU HAVE A SUGGESTION OR COMMENT, GIVE US A CALL.
YOUR FEEDBACK IS VITAL TO THE SUCCESS OF DEWALT’S QUALITY IMPROVEMENT PROGRAM.
Questions? See us on the World Wide Web at www.dewalt.com
INSTRUCTION MANUAL
GUIDE D’UTILISATION
MANUAL DE INSTRUCCIONES
INSTRUCTIVO DE OPERACIÓN, CENTROS DE SERVICIO Y PÓLIZA DE GARANTÍA. ADVERTENCIA: LÉASE ESTE INSTRUCTIVO ANTES DE USAR EL PRODUCTO.
DW703 (120 Volt) 10" Compound Miter Saw
Scie à Inglets 254 mm (10 po)
Sierra de ángulo compuesto 254 mm (10")
Table of Contents
-
DOUBLE INSULATION/POLARIZED PLUG INSTRUCTIONS ........ 1
-
SAFETY INSTRUCTIONS FOR ALL TOOLS ........ 1
-
ADDITIONAL SAFETY RULES ........ 1
-
ELECTRICAL CONNECTION ........ 2
-
UNPACKING YOUR SAW ........ 2
-
FAMILIARIZATION ........ 2
-
SPECIFICATIONS ........ 2
-
OPTIONAL ACCESSORIES ........ 3
-
STABILIZER ........ 4
-
ACCESSORIES ........ 4
-
BENCH MOUNTING ........ 4
-
INSTALLING A NEW SAW BLADE ........ 5
-
TRANSPORTING THE SAW ........ 6
-
ADJUSTMENTS ........ 6
-
MITER SCALE ADJUSTMENT ........ 6
-
MITER POINTER ADJUSTMENT ........ 6
-
BEVEL SQUARE TO TABLE ........ 6
-
BEVEL POINTER ........ 7
-
BEVEL STOP ........ 7
-
FENCE ADJUSTMENT ........ 7
-
GUARD ACTUATION AND VISIBILITY ........ 7
-
AUTOMATIC ELECTRIC BRAKE ........ 8
-
BRUSHES ........ 8
-
OPERATION ........ 8
-
SWITCH ........ 8
-
CUTTING WITH YOUR SAW ........ 8
-
CROSSCUTS ........ 8
-
BEVEL CUTS ........ 8
-
QUALITY OF CUT ........ 8
-
BODY AND HAND POSITION ........ 8
-
CLAMPING THE WORKPIECE ........ 9
-
SUPPORT FOR LONG PIECES ........ 9 CUTTING PICTURE FRAMES, SHADOW BOXES
-
AND OTHER FOUR SIDED PROJECTS ........ 9
-
CUTTING TRIM MOLDING AND OTHER FRAMES ........ 9
-
CUTTING COMPOUND MITERS ........ 9
-
MITER SCALE ........ 9
-
VERNIER SCALE ........ 9
-
WHEN MITERING TO THE RIGHT ........ 10
-
WHEN MITERING TO THE LEFT ........ 10
-
CUTTING BASE MOLDING ........ 10
-
COMPOUND MITER CUT REFERENCE CHART ........ 11
-
CUTTING CROWN MOLDING ........ 12
-
SPECIAL CUTS ........ 13
-
MAINTENANCE ........ 13
-
REPAIRS ........ 13
-
WARRANTY ........ 13
-
TROUBLESHOOTING GUIDE ........ 14
a
IF YOU HAVE ANY QUESTIONS OR COMMENTS ABOUT THIS OR ANY DeWALT TOOL, CALL US TOLL FREE AT: 1-800-4-DeWALT (1-800-433-9258)
Important Safety Instructions ⚠ WARNING: When using electric tools, basic safety precautions should always be followed to reduce risk of fire, electric shock, and personal injury, including the following:
READ ALL INSTRUCTIONS
Double Insulation Double insulated tools are constructed throughout with two separate layers of electrical insulation or one double thickness of insulation between you and the tool's electrical system. Tools built with this insulation system are not intended to be grounded. As a result, your tool is equipped with a two prong plug which permits you to use extension cords without concern for maintaining a ground connection.
NOTE: Double insulation does not take the place of normal safety precautions when operating this tool. The insulation system is for added protection against injury resulting from a possible electrical insulation failure within the tool.
⚠ CAUTION: WHEN SERVICING, USE ONLY IDENTICAL REPLACEMENT PARTS. Repair or replace damaged cords.
Polarized Plugs Polarized plugs (one blade is wider than the other) are used on equipment to reduce the risk of electric shock. When provided, this plug will fit in the polarized outlet only one way. If the plug does not fit fully in the outlet, reverse the plug. If it still does not fit, contact a qualified electrician to install the proper outlet. Do not change the plug in any way.
Safety Instructions For All Tools
-
KEEP GUARD IN PLACE and in working order.
-
REMOVE ADJUSTING KEYS AND WRENCHES. Form habit of checking to see that keys and adjusting wrenches are removed from spindle before turning tool on.
-
KEEP WORK AREA CLEAN. Cluttered areas and benches invite accidents.
-
DON'T USE IN DANGEROUS ENVIRONMENT. Don't use power tools in damp or wet locations, or expose them to rain. Keep work area well lighted.
-
KEEP CHILDREN AWAY. All visitors should be kept at a safe distance from work area.
-
MAKE WORKSHOP KID PROOF with padlocks, master switches, or by removing starter keys.
-
DON'T FORCE TOOL. It will do the job better and be safer at the rate for which it was designed.
-
USE RIGHT TOOL. Don't force tool or attachment to do a job for which it was not designed.
-
WEAR PROPER APPAREL. No loose clothing, gloves, neckties, rings, bracelets, or other jewelry to get caught in moving parts. Nonslip footwear is recommended. Wear protective hair covering to contain long hair.
-
ALWAYS WEAR SAFETY GLASSES. Also use face or dust mask if cutting operation is dusty. Everyday eyeglasses have only impact resistant lenses, they are NOT safety glasses.
-
SECURE WORK. Use clamps or vise when you cannot secure the workpiece on the table and against the fence by hand or when your hand will be dangerously close to the blade (within 6").
-
DON'T OVERREACH. Keep proper footing and balance at all times.
-
MAINTAIN TOOLS WITH CARE. Keep tools sharp and clean for best and safest performance. Follow instructions for lubricating and changing accessories.
-
DISCONNECT TOOLS before servicing; when changing accessories such as blades, bits, cutters, etc.
-
REDUCE THE RISK OF UNINTENTIONAL STARTING. Make sure switch is in OFF position before plugging in.
-
USE RECOMMENDED ACCESSORIES. Consult the instruction manual for recommended accessories. The use of improper accessories may cause risk of injury to persons.
-
NEVER STAND ON TOOL. Serious injury could occur if the tool is tipped or if the cutting tool is unintentionally contacted.
-
CHECK DAMAGED PARTS. Before further use of the tool, a guard or other part that is damaged should be carefully checked to determine that it will operate properly and perform its intended function—check for alignment of moving parts, binding of moving parts, breakage of parts, mounting and any other conditions that may affect its operation. A guard or other part that is damaged should be properly repaired or replaced. Do not use tool if switch does not turn it on and off.
-
NEVER LEAVE TOOL RUNNING UNATTENDED. TURN POWER OFF. Don't leave tool until it comes to a complete stop.
-
DO NOT OPERATE ELECTRIC TOOLS NEAR FLAMMABLE LIQUIDS OR IN GASEOUS OR EXPLOSIVE ATMOSPHERES. Motors in these tools may spark and ignite fumes.
-
EXTENSION CORDS. Make sure your extension cord is in good condition. When using an extension cord, be sure to use one heavy enough to carry the current your product will draw. An undersized cord will cause a drop in line voltage resulting in loss of power and overheating. The following table shows the correct size to use depending on cord length and nameplate ampere rating. If in doubt, use the next heavier gage. The smaller the gage number, the heavier the cord.
Minimum Gage for Cord Sets
\begin{tabular}{lcccc} \multicolumn{1}{c}{} & \multicolumn{4}{c}{Total Length of Cord in Feet} \ \cline{2-5} Volts & 0-25 & 26-50 & 51-100 & 101-150 \ 120V & 0-25 & 26-50 & 51-100 & 101-150 \ 240V & 0-50 & 51-100 & 101-200 & 201-300 \ \end{tabular}
Ampere Rating
\begin{tabular}{lllll} \multicolumn{1}{c}{More} & \multicolumn{1}{c}{Not more} & \multicolumn{3}{c}{AWG} \ \cline{3-5} Than & Than & \multicolumn{3}{c}{} \ 0 - 6 & 18 & 16 & 16 & 14 \ 6 - 10 & 18 & 16 & 14 & 12 \ 10 - 12 & 16 & 16 & 14 & 12 \ 12 - 16 & 14 & 12 & Not Recommended & \ \end{tabular}
Additional Safety Rules For Miter Saws ⚠ CAUTION: FAILURE TO HEED THESE WARNINGS MAY RESULT IN PERSONAL INJURY AND SERIOUS DAMAGE TO THE SAW.
- DO - Protect electric supply line with at least a 15 ampere time-delay fuse or a circuit breaker.
- DO - Make certain the blade rotates in the correct direction and that the teeth at the bottom of the blade are pointing to the rear of the miter saw.
- DO - Be sure all clamp handles are tight before starting any operation.
- DO - Be sure all blade and clamp washers are clean and recessed sides of collars are against blade. Tighten arbor screw securely.
- DO - Keep saw blade sharp.
- DO - Keep motor air slots free of chips and dirt.
- DO - Use blade guards at all times.
- DO - Keep hands out of path of saw blade.
- DO - Shut off power, disconnect cord from power source and wait for saw blade to stop before servicing or adjusting tool.
- DO - Support long work with an outboard tool rest.
- DO NOT - Attempt to operate on anything but designated voltage.
- DO NOT - Operate unless all clamp handles are tight.
- DO NOT - Use blades larger or smaller than those which are recommended.
- DO NOT - Wedge anything against fan to hold motor shaft.
- DO NOT - Force cutting action. (Stalling or partial stalling of motor can cause major damage. Allow motor to reach full speed before cutting.)
- DO NOT - Cut ferrous metals (Those with any iron or steel content) or any masonry.
- DO NOT - Use abrasive wheels. The excessive heat and abrasive particles generated by them will damage the saw.
- DO NOT - Allow anyone to stand behind saw.
- DO NOT - Apply lubricants to the blade when it's running.
- DO NOT - Place either hand in the blade area when the saw is connected to the power source.
- DO NOT - Use blades rated less than 5500 R.P.M.
- DO NOT - Cut small pieces without clamping. Keep hands 6" or more from blade.
- DO NOT - Operate saw without guards in place.
- DO NOT - Perform any operation freehand.
- DO NOT - Reach around or behind saw blade.
- DO NOT - Place hands closer than 6 inches from the saw blade.
- DO NOT - Reach underneath the saw unless it is turned off and unplugged. The saw blade is exposed on the underside of the saw.
- DO NOT - Move either hand from saw or workpiece or raise arm until blade has stopped.
- DO NOT - Use without Kerf Plate or when kerf slot is wider than 7/16".
- DO NOT - Use lubricants or cleaners (particularly spray or aerosol) in the vicinity of the plastic guard. The polycarbonate material used in the guard is subject to attack by certain chemicals.
⚠ CAUTION: Do not connect unit to electrical power source until complete instructions are read and understood.
⚠ CAUTION: Wear appropriate personal hearing protection during use. Under some conditions and duration of use, noise from this product may contribute to hearing loss.
⚠ WARNING: Some dust created by power sanding, sawing, grinding, drilling, and other construction activities contains chemicals known to cause cancer, birth defects or other reproductive harm. Some examples of these chemicals are:
- lead from lead-based paints,
- crystalline silica from bricks and cement and other masonry products, and
- arsenic and chromium from chemically-treated lumber (CCA).
Your risk from these exposures varies, depending on how often you do this type of work. To reduce your exposure to these chemicals: work in a well ventilated area, and work with approved safety equipment, such as those dust masks that are specially designed to filter out microscopic particles.
- Avoid prolonged contact with dust from power sanding, sawing, grinding, drilling, and other construction activities. Wear protective clothing and wash exposed areas with soap and water. Allowing dust to get into your mouth, eyes, or lay on the skin may promote absorption of harmful chemicals.
⚠ WARNING: Use of this tool can generate and/or disburse dust, which may cause serious and permanent respiratory or other injury. Always use NIOSH/OSHA approved respiratory protection appropriate for the dust exposure. Direct particles away from face and body. For your convenience and safety, the following warning labels are on your miter saw.
ON MOTOR HOUSING:
⚠ WARNING: FOR YOUR OWN SAFETY, READ INSTRUCTION MANUAL BEFORE OPERATING SAW.
WHEN SERVICING, USE ONLY IDENTICAL REPLACEMENT PARTS.
ALWAYS WEAR EYE PROTECTION.
DO NOT EXPOSE TO RAIN OR USE IN DAMP LOCATIONS.
ON MOVING FENCE:
ALWAYS ADJUST FENCE PROPERLY BEFORE USE. Clamp small pieces before cutting. See manual.
ON GUARD:
⚠ DANGER – KEEP AWAY FROM BLADE.
ON UPPER GUARD:
PROPERLY SECURE BRACKET WITH BOTH SCREWS BEFORE USE.
ON DETENT PLATE: (2 PLACES)
ALWAYS TIGHTEN ADJUSTMENT KNOBS BEFORE USE.
KEEP HANDS 6" FROM PATH OF SAW BLADE. NEVER PERFORM ANY OPERATION FREEHAND. NEVER CROSS ARMS IN FRONT OF BLADE. THINK! YOU CAN PREVENT ACCIDENTS. DO NOT OPERATE SAW WITHOUT GUARDS IN PLACE.
NEVER REACH IN BACK OF SAW BLADE. TURN OFF TOOL, KEEP SAW HEAD DOWN AND WAIT FOR SAW BLADE TO STOP BEFORE MOVING HANDS, WORKPIECE OR CHANGING SETTINGS. UNPLUG TOOL BEFORE CHANGING BLADE, MOVING OR SERVICING UNIT.

Electrical Connection
Be sure your power supply agrees with the nameplate marking. 120 volts, AC means that your saw will operate on alternating current only. A voltage decrease of 10 percent or more will cause a loss of power and overheating. All DEWALT tools are factory tested. If this tool does not operate, check the power supply.
Unpacking Your Saw
Check the contents of your miter saw carton to make sure that you have received all parts. In addition to this instruction manual, the carton should contain:
- One No. DW703 miter saw with blade.
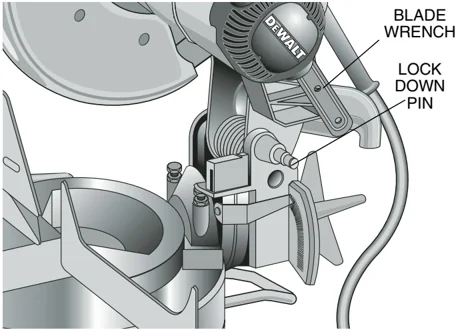
- One blade wrench in wrench pocket shown in Figure 4.
- One No. DW7053 Dust Bag.
Familiarization
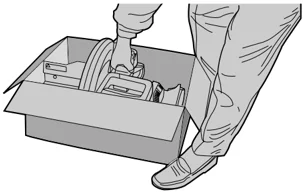
Your miter saw is fully assembled in the carton. Open the box and lift the saw out by the convenient carrying handle, as shown in Figure 1. Place the saw on a smooth, flat surface such as a workbench or strong table.
FIG. 1
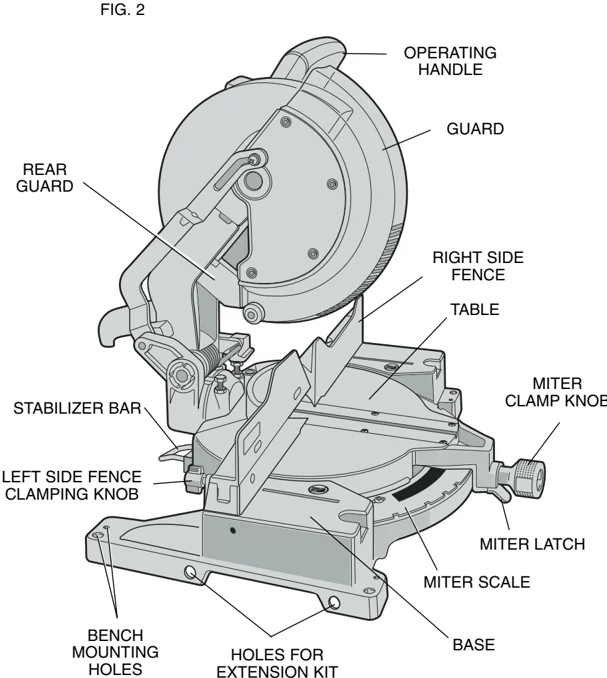
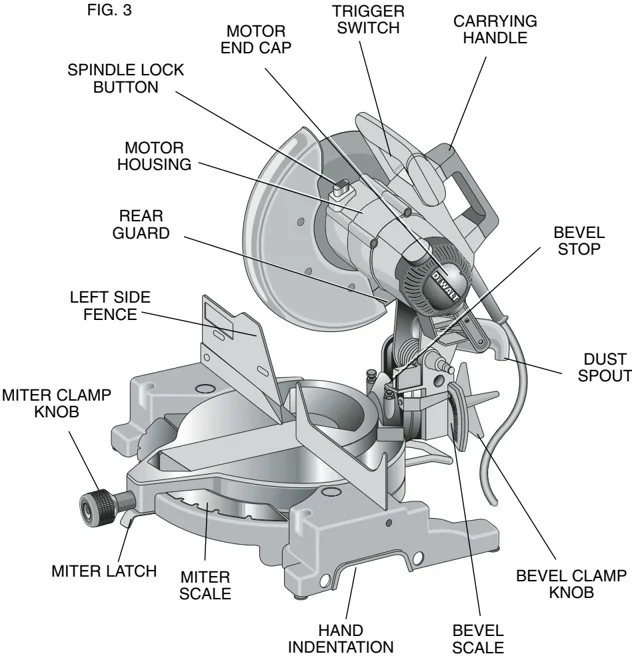
Examine Figures 2 and 3 to become familiar with the saw and its various parts. The section on adjustments will refer to these terms and you must know what and where the parts are.
Press down lightly on the operating handle and pull out the lock down pin, as shown in Figure 4. Gently release the downward pressure and allow the arm to rise to its full height. Use the lock down pin when carrying the saw from one place to another. Always use the carrying handle to transport the saw or the hand indentations shown in Figure 3.
Specifications
CAPACITY OF CUT 50 degree miter left and right 48 degree bevel left: 3 degree right 0 degree miter Max. Height 3.5" Result Width 3.5" Max. Width 6.1" Result Height 1.25" 45 degree miter Max. Height 3.5" Result Width 2.4" Max. Width 4.2" Result Height 1.25"
45 degree bevel Max. Height 2.3" Result Width 3.5" Max. Width 6.1" Result Height .75" 31.62 degree miter and 33.85 bevel Max. Width 5.25" Result Height .9"
DRIVE 120 Volt Motor 2200 Watts 15 Amp Motor 5000 RPM Cut Helical Gears with Roller and Ball Bearings Carbide Blade Automatic Electric Brake
Optional Accessories
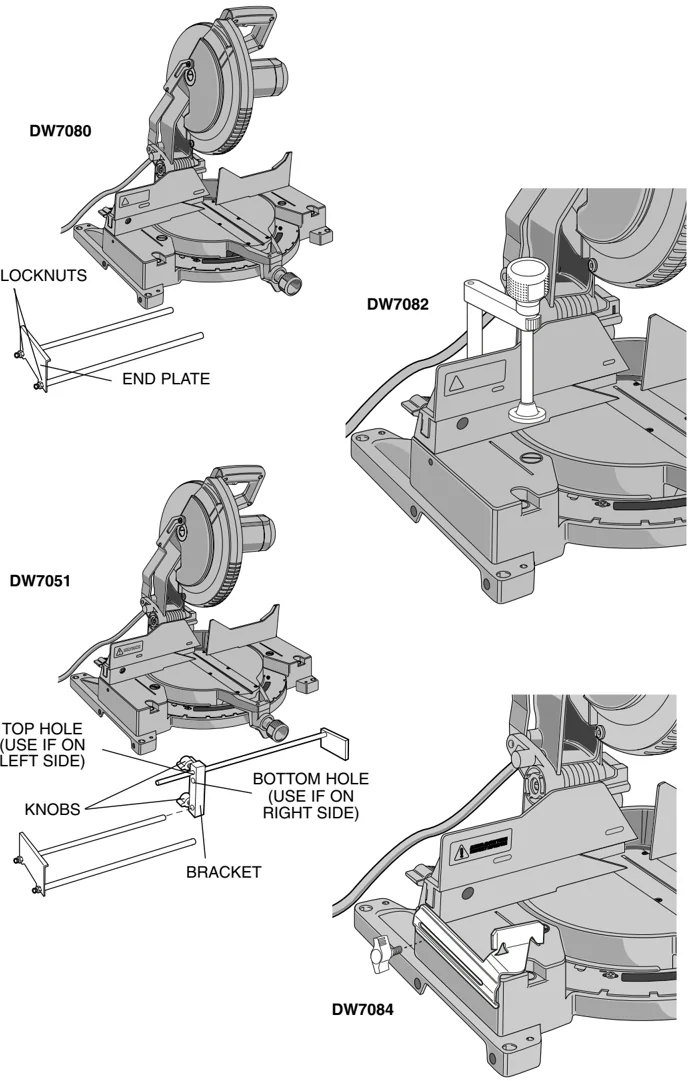
The following accessories, designed for your saw, may be helpful. In some cases, other locally obtained work supports, length stops, clamps, etc., may be more appropriate. Use care in selecting and using accessories. Extension, Work Support: DW7080 Used to support long overhanging workpieces, the work support is user assembled. Your saw table is designed to accept two work supports; one on each side. Adjustable Length Stop: DW7051 Requires the use of one work support. It is used to make repetitive cuts of the same length from 0 to 42". Clamp: DW7082 Used for firmly clamping workpiece to the saw fence for precision cutting. Crown Molding Fence: DW7084 Used for precision cutting of crown molding. Miter Saw Work Station: DW730 Workstation provides fast, easy set up for material support and accurate measuring system.
SAW BLADES: ALWAYS USE 10" SAW BLADES WITH 5/8" (16mm) ARBOR HOLES. SPEED RATING MUST BE AT LEAST 5500 RPM.
\begin{tabular}{lllll} \textbf{DEWALT} & \textbf{NO. OF} & \textbf{BLADE} & \textbf{APPLICATION} & \textbf{TYPE OF CUT} \ \textbf{BLADE} & \textbf{TEETH} & \textbf{DESC.} & & \ \textbf{RANGE} & & & & \ Series 20 & 40 & Thin Kerf & Gen. Purpose & Smooth, \ Construction & & Yellow Rim & (Trim, Decking, & Splinter Free \ & & Coating & Framing) & \ Series 20 & 60 & Thin Kerf & Fine Trim & Very Smooth, \ Construction & & Yellow Rim & Molding & Splinter Free \ & & Coating & & \ Series 40 & 40 & Laser Cut Body & Gen. Purpose & Smooth, \ Woodworking & & Large Carbide & (Trim, Decking, & Splinter Free \ & & Teeth & Framing) & \ Series 40 & 60 & Laser Cut Body & Fine Trim, & Very Smooth, \ Woodworking & & Large Carbide & Molding & Splinter Free \ & & Teeth & & \ Series 40 & 80 & Laser Cut Body & Fine Trim & Ultra Smooth, \ Woodworking & & Large Carbide & Molding & Splinter Free \ & & Teeth & Decorative & \ & & & Hardwood & \ & & & & Plywood & \ Series 40 & 80 & Laser Cut Body & Melamines, & Ultra Smooth \ Woodworking & & Large Carbide & Veneers, & Chip/Splinter \ & & Teeth, Special & Laminates & Free \ & & Tooth Geometry & & \ \end{tabular}
English
DW7080 LOCKNUTS END PLATE DW7082 DW7051 TOP HOLE (USE IF ON LEFT SIDE) KNOBS BRACKET BOTTOM HOLE (USE IF ON RIGHT SIDE) DW7084
3
Series 40 60 Laser Cut Body Plastics, Corian® Very Smooth Woodworking Special Tooth and other solid Chip Free Geometry surface materials
Series 40 80 Laser Cut Body Non-ferrous metals Very Smooth Woodworking Special Tooth (aluminum, copper, Burr Free Geometry brass, etc.)
Stabilizer
Your saw includes a stabilizer (Fig.2). This must be in place and in contact with the work surface at all times while using your saw. This stabilizer is factory installed and needs no adjustment.
Accessories
Recommended accessories for use with your tool are available at extra cost from your local retailer or authorized service center.
CAUTION: The use of any non-recommended accessory such as dado sets, molding cutters, or abrasive wheels may be hazardous.
If you need assistance in locating any accessory, please contact DEWALT Industrial Tool Co., 701 East Joppa Road, Baltimore, MD 21286 or call 1-800-4-DEWALT (1-800-433-9258).
Bench Mounting
Holes are provided in all four feet to facilitate bench mounting, as shown in Figure 2. (Two different sized holes are provided to accommodate different sizes of screws. Use either hole, it is not necessary to use both.) Always mount your saw firmly to prevent movement. To enhance the tool’s portability, it can be mounted to a piece of 1/2" or thicker plywood which can then be clamped to your work support or moved to other job sites and reclamped.
NOTE: If you elect to mount your saw to a piece of plywood, make sure that the mounting screws don’t protrude from the bottom of the wood. The plywood must sit flush on the work support. When clamping the saw to any work surface, clamp only on the clamping bosses where the mounting screw holes are located. Clamping at any other point will surely interfere with the proper operation of the saw.
CAUTION: To prevent binding and inaccurate cuts, be sure the mounting surface is not warped or otherwise uneven. If the saw rocks on the surface place a thin piece of material under one saw foot until the saw sits firmly on the mounting surface.
BLADE WRENCH LOCK DOWN PIN
IMPORTANT SAFETY INSTRUCTIONS
Changing or Installing a New Saw Blade (Fig. 5, 6)
⚠ CAUTION:
- Never depress the spindle lock button while the blade is under power or coasting.
- Do not cut ferrous metal (containing iron or steel) or masonry or fiber cement product with this miter saw.
Removing the Blade
- Unplug the saw.
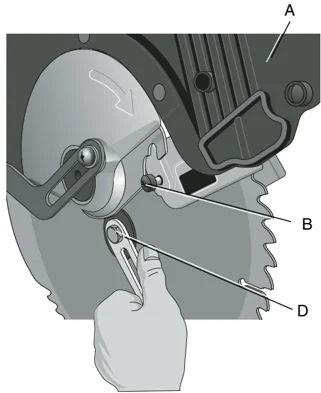
- Raise the arm to the upper position and raise the lower guard (A) as far as possible.
- Loosen, but do not remove guard bracket screw (B) until the bracket can be raised far enough to access the blade screw. Lower guard will remain raised due to the position of the guard bracket screw.
- Depress the spindle lock button (Fig. 3) while carefully rotating the saw blade by hand until the lock engages.
- Keeping the button depressed, use the other hand and the wrench provided (D) to loosen the blade screw. (Turn clockwise, left-hand threads)
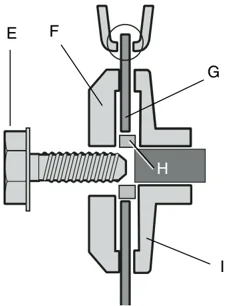
- Remove the blade screw (E), outer clamp washer (F), and blade (G). The 1" (25.4mm) blade adapter (H), if used, and the inner clamp washer (I), may be left on the spindle.
NOTE: For blades with a blade hole of 5/8" (15.88mm), the 1" (25.4mm) blade adapter is not used.
Installing a Blade
- Unplug the saw.
- With the arm raised, the lower guard held open and the pivot plate raised, place the blade on the spindle, onto the blade adapter [if using a blade with a 1" (25.4mm) diameter blade hole] and against the inner clamp washer with the teeth at the bottom of the blade pointing toward the back of the saw.
- Assemble the outer clamp washer onto the spindle.
- Install the blade screw and, engaging the spindle lock, tighten the screw firmly with wrench provided. (Turn counterclockwise, left-hand threads)
NOTE: When using blades with a 5/8" (15.88mm) diameter blade hole, the blade adapter will not be used and should be stored in a safe place for future use. 5. Return the guard bracket to its original position and firmly tighten the guard bracket screw to hold bracket in place.
⚠ WARNING:
- The guard bracket must be returned to its original position and the screw tightened before activating the saw.
FIG. 7
L K M J
FIG. 8
FIG. 9
ADJUSTMENT SCREW (three of these) MITER LATCH MITER SCALE MITER CLAMP KNOB
Transporting the Saw
TURN OFF AND UNPLUG THE MITER SAW BEFORE ATTEMPTING TO MOVE IT OR MAKE ANY ADJUSTMENTS WHAT-SO-EVER!
In order to conveniently carry the miter saw from place to place, a carrying handle has been included on the top of the saw arm, as shown in Figure 3. To transport the saw, lower the arm and depress the lock down pin shown in Figure 4.
Adjustments
PERFORM ALL ADJUSTMENTS WITH THE MITER SAW UNPLUGGED
NOTE: Your miter saw is fully and accurately adjusted at the factory at the time of manufacture. If readjustment due to shipping and handling or any other reason is required, follow the steps below to adjust your saw.
Once made, these adjustments should remain accurate. Take a little time now to follow these directions carefully to maintain the accuracy of which your saw is capable.
MITER SCALE ADJUSTMENT
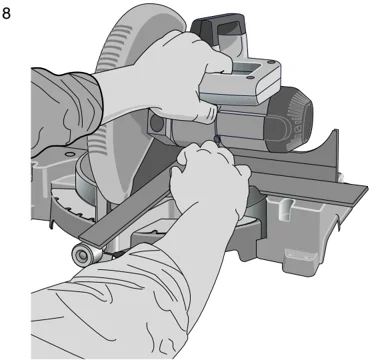
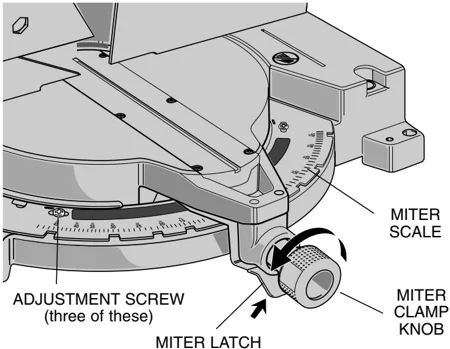
Place a square against the saw’s fence and blade, as shown in Figure 8. (Do not touch the tips of the blade teeth with the square. To do so will cause an inaccurate measurement.) Loosen the miter clamp knob (see Fig. 9) and swing the miter arm until the miter latch locks it at the 0° miter position. Do not tighten the clamp knob. If the saw blade is not exactly perpendicular to the fence, loosen the three screws that hold the miter scale to the base (shown in Fig. 9) and move the scale/miter arm assembly left or right until the blade is perpendicular to the fence, as measured with the square. Retighten the three screws. Pay no attention to the reading of the miter pointer at this point.
MITER POINTER ADJUSTMENT
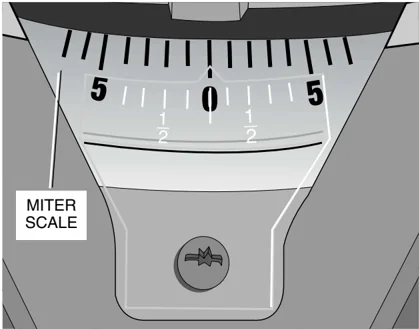
Loosen the miter clamp knob and squeeze the miter latch to move the miter arm to the zero position, as shown in Figure 9. With the miter clamp knob loose allow the miter latch to snap into place as you rotate the miter arm past zero. Observe the pointer and miter scale through the viewing opening shown in Figure 10. If the pointer does not indicate exactly zero, loosen the pointer screw, adjust the pointer to 0° and retighten.
BEVEL SQUARE TO TABLE
To align the blade square to the rotary table, lock the arm in the down position. Place a square against the blade taking care to not have the square on top of a tooth, as shown in Figure 11B. Loosen the Bevel Clamp Knob so that you can move the Bevel Arm. Move the Bevel Arm as neces-
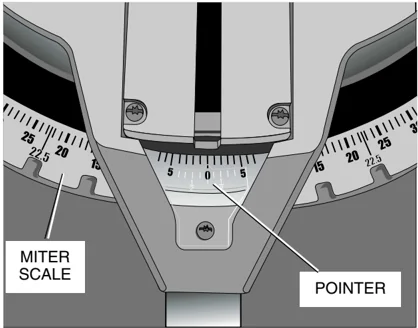
FIG. 10
MITER SCALE
POINTER
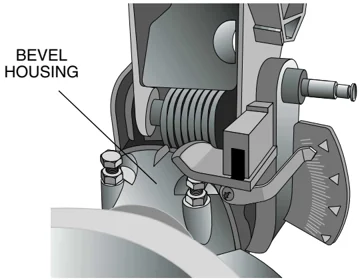
FIG. 11A
BEVEL HOUSING
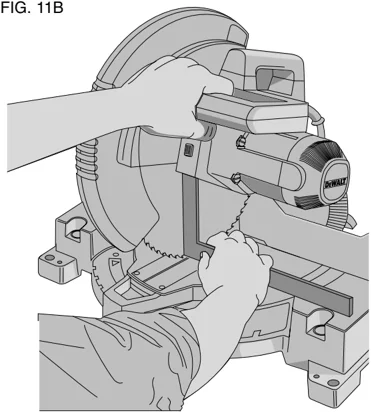
FIG. 11B
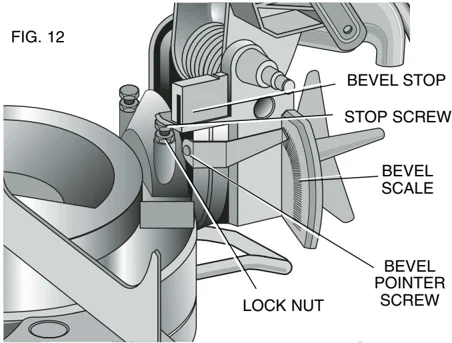
FIG. 12
BEVEL STOP
STOP SCREW
BEVEL SCALE
BEVEL POINTER SCREW
LOCK NUT
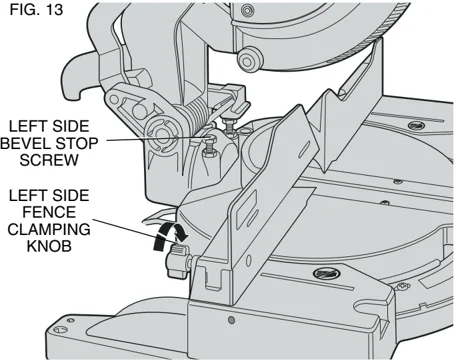
FIG. 13
LEFT SIDE BEVEL STOP SCREW
LEFT SIDE FENCE CLAMPING KNOB
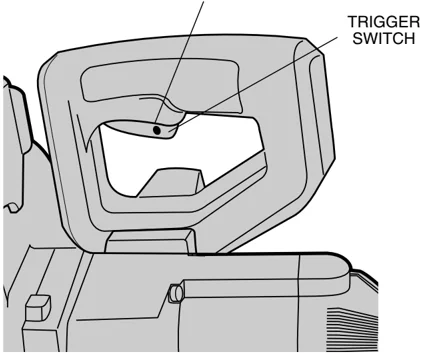
HOLE FOR PADLOCK
TRIGGER SWITCH
sary so that the blade is at zero degrees bevel to the table. If the Bevel Arm needs adjustment, loosen the lock nut on the right side Bevel Stop as shown in Figure 12, and adjust the stop screw as necessary. Hold the stop screw in place and tighten the lock nut.
BEVEL POINTER If the bevel pointer does not indicate zero, loosen the screw that holds it in place and move the pointer as necessary. SUGGESTION: For accuracy, set the top edge so that it aligns with zero.
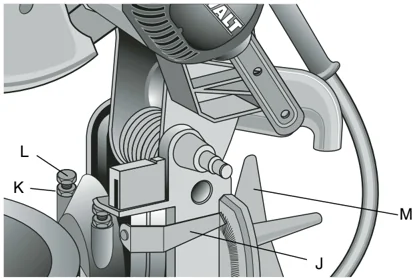
BEVEL STOP To set the 45 degree bevel stop shown in Figure 7, first loosen the left side fence clamping knob and slide the left side fence as far as it will go to the left. Move the arm to the left until it stops on the left bevel stop screw. If the bevel pointer (J) does not indicate exactly 45 degrees, loosen the left side bevel stop lock nut (K) and turn the screw (L) downwards. Move the arm to the left and tighten the bevel clamp knob (M) firmly when the bevel pointer indicates exactly 45 degrees. Adjust the left side bevel stop screw upwards until it firmly touches the bevel stop. Retighten the nut while holding the screw from turning. To achieve 3 degree right bevel or 48 degree left bevel, the stop screws must be adjusted to allow the arm to move to the desired location. The bevel stops will need readjustment to the zero and 45 degree positions after cuts are made.
FENCE ADJUSTMENT Turn Off and Unplug the Miter Saw To bevel UP TO 48 degrees left, the left side of the fence can be adjusted to the left to provide clearance. To adjust the fence, loosen the knob shown in Figure 13 and slide the fence to the left. Make a dry run with the saw turned off and check for clearance. Adjust the fence to be as close to the blade as practical to provide maximum workpiece support, without interfering with arm up and down movement. Tighten knob securely. When the bevel operations are complete, don't forget to relocate the fence to the right.
GUARD ACTUATION AND VISIBILITY The blade guard on your saw has been designed to automatically raise when the arm is brought down and to lower over the blade when the arm is raised. The guard can be raised by hand when installing or removing saw blades or for inspection of the saw. NEVER RAISE THE BLADE GUARD MANUALLY UNLESS THE SAW IS TURNED OFF. NOTE: Certain special cuts will require that you manually raise the guard. See section on cutting base molding up to 3-1/2" high (page 10). The front section of the guard is louvered for visibility while cutting. Although the louvers dramatically reduce flying debris, they are openings in the guard and safety glasses should be worn at all times when viewing through the louvers.
FIG. 15
 PROPER HAND POSITION
FIG. 15A
 IMPROPER HAND POSITION
 PROPER HAND POSITION
 IMPROPER HAND POSITION
7
AUTOMATIC ELECTRIC BRAKE
Your saw is equipped with an automatic electric blade brake which stops the saw blade within 5 seconds of trigger release. This is not adjustable.
On occasion, there may be a delay after trigger release to brake engagement. On rare occasions, the brake may not engage at all and the blade will coast to a stop.
If a delay or “skipping” occurs, turn the saw on and off 4 or 5 times. If the condition persists, have the tool serviced by an authorized DEWALT service center.
Always be sure the blade has stopped before removing it from the kerf. The brake is not a substitute for guards or for ensuring your own safety by giving the saw your complete attention.
Brushes
DISCONNECT PLUG FROM POWER SUPPLY
Inspect carbon brushes regularly by unplugging tool, removing the motor end cap, (Figure 3) removing the brush cap and withdrawing the brush assembly. Keep brushes clean and sliding freely in their guides. Always replace a used brush in the same orientation in the holder as it was prior to its removal. Use only identical DEWALT brushes. Use of the correct grade of brush is essential for proper operation of electric brake. New brush assemblies are available at DEWALT service centers. The tool should be allowed to “run in” (run at no load) for 10 minutes before use to seat new brushes. The electric brake may be erratic in operation until the brushes are properly seated (worn in).
While “running in” DO NOT TIE, TAPE, OR OTHERWISE LOCK THE TRIGGER SWITCH ON. HOLD BY HAND ONLY.
Operation
Plug the saw into any household 60 Hz power source. Refer to the nameplate for voltage. Be sure the cord will not interfere with your work.
SWITCH
To turn the saw on, depress the trigger switch shown in Figure 14. To turn the tool off, release the switch. There is no provision for locking the switch on, but a hole is provided in the trigger for insertion of a padlock to lock the saw off.
CUTTING WITH YOUR SAW
NOTE: Although this saw will cut wood and many non-ferrous materials, we will limit our discussion to the cutting of wood only. The same guidelines apply to the other materials. DO NOT CUT FERROUS (IRON AND STEEL) MATERIALS OR MASONRY WITH THIS SAW. Do not use any abrasive blades.
CROSSCUTS
Cutting of multiple pieces is not recommended but can be done safely by ensuring that each piece is held firmly against the table and fence. A crosscut is made by cutting wood across the grain at any angle. A straight crosscut is made with the miter arm at the zero degree position. Set the miter arm at zero, hold the wood on the table and firmly against the fence. Turn on the saw by squeezing the trigger switch shown in Figure 14.
When the saw comes up to speed (about 1 second) lower the arm smoothly and slowly to cut through the wood. Let the blade come to a full stop before raising arm.
Miter crosscuts are made with the miter arm at some angle other than zero. This angle is often 45 degrees for making corners, but can be set anywhere from zero to 50 degrees left or right. After selecting the desired miter angle, be sure to tighten the miter clamp knob. Make the cut as described above.
BEVEL CUTS
A bevel cut is a crosscut made with the saw blade at a bevel to the wood. In order to set the bevel, loosen the bevel clamp knob and move the saw to the left as desired. (It is necessary to move the left side of the fence to allow clearance). Once the desired bevel angle has been set, tighten the bevel clamp knob firmly.
Bevel angles can be set from 3 degrees right to 48 degrees left and can be cut with the miter arm set between zero and 50 degrees right or left. Ensure the fence has been adjusted properly. When cutting left bevel, or right miter compound cuts, it will be necessary to remove the adjustable fence.
QUALITY OF CUT
The smoothness of any cut depends on a number of variables. Things like material being cut, blade type, blade sharpness and rate of cut all contribute to the quality of the cut.
When smoothest cuts are desired for molding and other precision work, a sharp (60 - 80 tooth carbide) blade and a slower, even cutting rate will produce the desired results. Ensure that material does not creep while cutting. Clamp it securely in place. Always let the blade come to a full stop before raising arm.
If small fibers of wood still split out at the rear of the workpiece, apply a piece of masking tape on the wood where the cut will be made. Saw through the tape and carefully remove tape when the cut is finished.
For varied cutting applications, refer to the list of recommended saw blades for your saw and select the one that best fits your needs. (Page 3)
BODY AND HAND POSITION (FIG. 15)
Proper positioning of your body and hands when operating the miter saw will make cutting easier, more accurate and safer. Never place hands near cutting area. Place hands no closer than 6" from the blade. Hold the workpiece tightly to the table and the fence when cutting. Keep hands in position until the trigger has been released and the blade has completely stopped. ALWAYS MAKE DRY RUNS
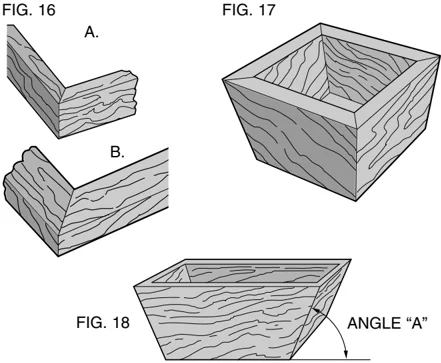
FIG. 16 A. B.
FIG. 17
FIG. 18 ANGLE “A”
MITER SCALE
8
(UNPOWERED) BEFORE FINISH CUTS SO THAT YOU CAN CHECK THE PATH OF THE BLADE. DO NOT CROSS HANDS, AS SHOWN IN FIGURE 15A.
Keep both feet firmly on the floor and maintain proper balance. As you move the miter arm left and right, follow it and stand slightly to the side of the saw blade. Sight through the guard louvers when following a pencil line.
CLAMPING THE WORKPIECE Turn Off and Unplug Saw
If you cannot secure the workpiece on the table and against the fence by hand, (irregular shape, etc.) or your hand would be less than 6" from the blade, a clamp or other fixture should be used.
For best results use the DW7082 clamp made for use with your saw. It is available through your local retailer or DEWALT service center at extra cost.
Other aids such as spring clamps, bar clamps or C-clamps may be appropriate for certain sizes and shapes of material. Use care in selecting and placing these clamps. Take time to make a dry run before making the cut. The left fence will slide from side to side to aid in clamping.
SUPPORT FOR LONG PIECES Turn Off and Unplug Saw ALWAYS SUPPORT LONG PIECES
Support long workpieces using any convenient means such as sawhorses or similar devices to keep the ends from dropping. For best results, use the DW7080 extension work support to extend the table width of your saw. Also available to help hold long workpieces is the DW730 Miter Saw Workstation, available for purchase at your dealer.
CUTTING PICTURE FRAMES, SHADOW BOXES AND OTHER FOUR SIDED PROJECTS
To best understand how to make the items listed here, we suggest that you try a few simple projects using scrap wood until you develop a "FEEL" for your saw.
Your saw is the perfect tool for mitering corners like the one shown in Figure 16. Sketch A in Figure 16 shows a joint made by using the bevel adjustment to bevel the edges of the two boards at 45 degrees each to produce a 90 degree corner. For this joint the miter arm was locked in the zero position and the bevel adjustment was locked at 45 degrees. The wood was positioned with the broad flat side against the table and the narrow edge against the fence. The cut could also be made by mitering right and left with the broad surface against the fence.
CUTTING TRIM MOLDING AND OTHER FRAMES
Sketch B in Figure 16 shows a joint made by setting the miter arm at 45 degrees to miter the two boards to form a 90 degree corner. To make this type of joint, set the bevel adjustment to zero and the miter arm to 45 degrees. Once again, position the wood with the broad flat side on the table and the narrow edge against the fence.
FIG. V1
 CENTER MARK ON VERNIER SCALE ALIGNS WITH DESIRED WHOLE ANGLE ON MITER SCALE (24° RIGHT MITER)
FIG. V2
 1/4° VERNIER MARK ALIGNS WITH CLOSEST WHOLE DEGREE MARK ON MITER SCALE (24 1/4° RIGHT MITER)
FIG. 21
The two sketches in Figure 16 are for four sided objects only.
As the number of sides changes, so do the miter and bevel angles. The chart below gives the proper angles for a variety of shapes. The chart assumes that all sides are of equal length. For a shape that is not shown in the chart, use the following formula. 180 degrees divided by the number of sides equals the miter or bevel angle.
- EXAMPLES -
\begin{tabular}{ll} NO. SIDES & ANGLE MITER OR BEVEL \ 4 & 45° \ 5 & 36° \ 6 & 30° \ 7 & 25.7° \ 8 & 22.5° \ 9 & 20° \ 10 & 18° \ \end{tabular}
CUTTING COMPOUND MITERS
A compound miter is a cut made using a miter angle and a bevel angle at the same time. This is the type of cut used to make frames or boxes with slanting sides like the one shown in Figure 17.
NOTE: If the cutting angle varies from cut to cut, check that the bevel clamp knob and the miter lock knob are securely tightened. These knobs must be tightened after making any changes in bevel or miter.
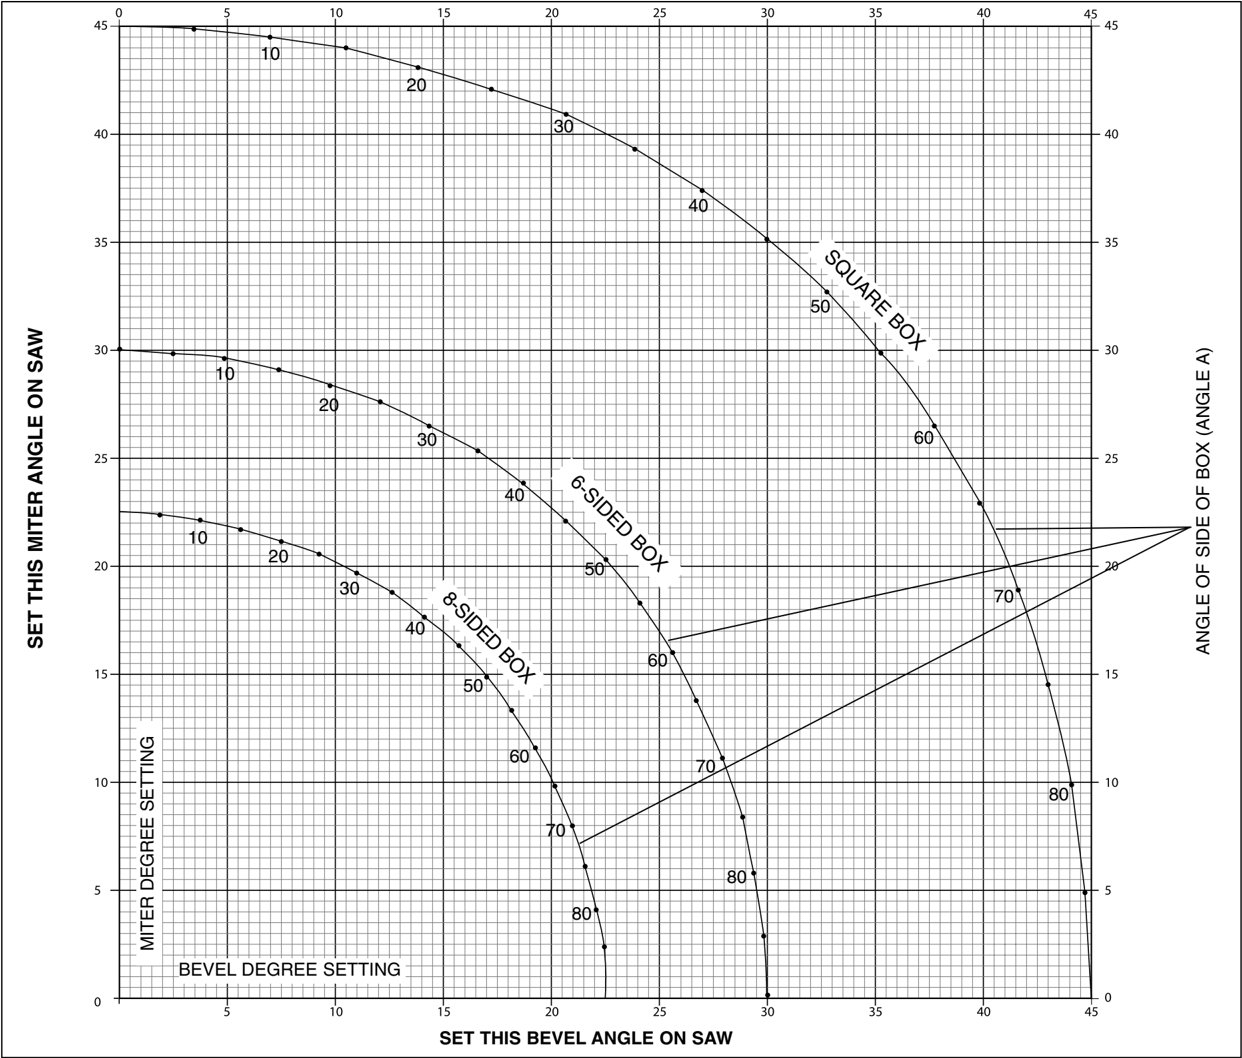
The chart shown on page 12 will assist you in selecting the proper bevel and miter settings for common compound miter cuts. To use the chart, select the desired angle "A" (Figure 18) of your project and locate that angle on the appropriate arc in the chart. From that point follow the chart straight down to find the correct bevel angle and straight across to find the correct miter angle.
Set your saw to the prescribed angles and make a few trial cuts. Practice fitting the cut pieces together until you develop a feel for this procedure and feel comfortable with it.
Example: To make a 4 sided box with 26° exterior angles (Angle A, Figure 18), use the upper right arc. Find 26° on the arc scale. Follow the horizontal intersecting line to either side to get miter angle setting on saw (42°). Likewise, follow the vertical intersecting line to the top or bottom to get the bevel angle setting on the saw (18°). Always try cuts on a few scrap pieces of wood to verify settings on saw.
MITER SCALE
The scale is used when calculating angles. To calculate the proper miter angle, divide 180 degrees by the number of sides of the box or frame. Refer to the chart on page 9 for some examples.
VERNIER SCALE (FIG. V1, V2)
Your saw is equipped with a vernier scale for added precision. The vernier scale allows you to accurately set miter
angles to the nearest 1/4 degree (15 minutes). To use the vernier scale follow the steps listed below. (As an example, let's assume that the angle you want to miter is 24-1/4 degrees right).
- Turn off miter saw.
- Set the miter angle to the nearest whole degree desired by aligning the center mark in the vernier scale, shown in figure V1, with the whole degree number etched in the miter scale. Examine Figure V1 closely; the setting shown is 24 degrees right miter.
- To set the additional 1/4 degree, squeeze the miter arm lock and carefully move the arm to the RIGHT until the 1/4 degree vernier mark aligns with the CLOSEST degree mark on the miter scale. In our example, the closest degree mark on the miter scale happens to be 25 degrees. Figure V2 shows a setting of 24-1/4 degrees right miter.
For settings that require partial degrees (1/4, 1/2, 3/4 degrees) align the desired vernier mark with the CLOSEST degree mark on the miter scale, as described above. (The plastic vernier plate is inscribed with marks for 1/4, 1/2, 3/4 and 1 degrees. Only the 1/2 degree is numerically labeled.)
WHEN MITERING TO THE RIGHT To increase the miter angle when mitering to the right, move the arm to align the appropriate vernier mark with the closest mark on the miter scale to the right. To decrease the miter angle when mitering to the right, move the arm to align the appropriate vernier mark with the closest mark on the miter scale to the left.
WHEN MITERING TO THE LEFT To increase the miter angle when mitering to the left, move the arm to align the appropriate vernier mark with the closest mark on the miter scale to the left. To decrease the miter angle when mitering to the left, move the arm to align the appropriate vernier mark with the closest mark on the miter scale to the right.
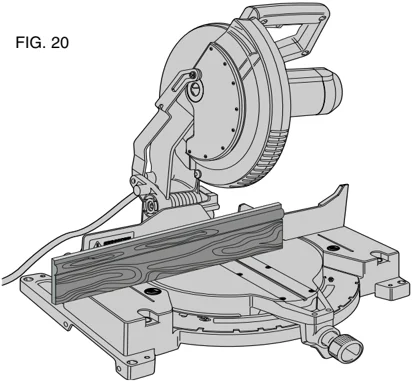
CUTTING BASE MOLDING ALWAYS MAKE A DRY RUN WITHOUT POWER BEFORE MAKING ANY CUTS. Straight 90 degree cuts : Position the wood against the fence as shown in Figure 20. Turn on the saw, allow the blade to reach full speed and lower the arm smoothly through the cut.
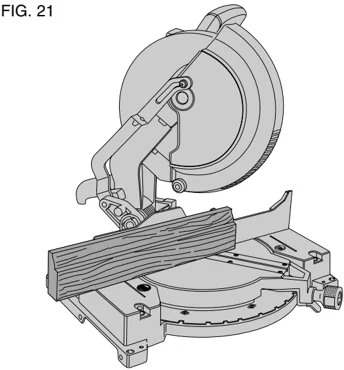
CUTTING BASE MOLDING UP TO 3-1/2" HIGH VERTICALLY AGAINST THE FENCE Position molding as shown in Figure 21. All cuts are made with the back of the molding against the fence and bottom of the molding against the base. INSIDE CORNER: Left side
- Miter left 45°
- Save left side of cut
FIG. 22
Right side
- Miter Right 45°
- Save right side of cut OUTSIDE CORNER: Left side
- Miter right at 45°
- Save left side of cut Right side
- Miter left at 45°
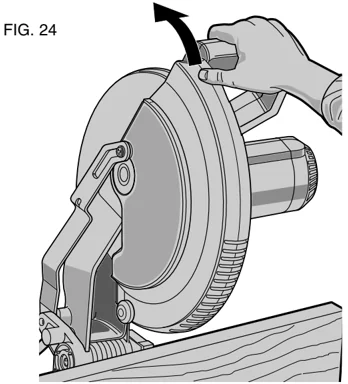
- Save right side of cut Material up to 3.5" (3-1/2)" can be cut as described above. For wider boards [up to 4.25" (4-1/4")] several minor concessions must be made. When cutting a board between 3.5" (3-1/2") and 4.25" (4-1/4") in width the roller on the tip of the guard could hang up on the workpiece. If this occurs, simply place your right thumb on the upper side of the guard and roll the guard up just enough to clear the workpiece, as shown in Figure 24. Once you have cleared the workpiece, you can release the guard and it will continue to open as the cut progresses.
FIG. 23
When mitering to the right side of a base molding wider than 3.5" (3-1/2") standing vertically against the fence as in Figure 21, the saw can only cut through the board up to 1 inch from the end of the board. Trying to cut more than an inch will cause the saw's gear case to interfere with the workpiece. If you want to cut base molding between 3-1/2" and 4-1/4" wide vertically follow the directions below. CUTTING 3-1/2" – 4-1/4" BASE MOLDING VERTICALLY AGAINST THE FENCE • Position molding as shown in Figure 21. • All cuts made with the back of the molding against the fence INSIDE CORNER: Left side
- Position molding with bottom of molding against the base of the saw
- Miter left 45°
- Save left side of cut Right side
- Position molding with top of the molding resting on the base of the saw
- Miter left 45°
- Save left side of cut OUTSIDE CORNER: Left side
- Position molding with bottom of molding against the base of the saw
- Miter right 45°
- Save left side of cut NOTE: If the cut must be made somewhere other than 1" from the end of the molding: cut off the molding at
10
TABLE 1: COMPOUND MITER CUT
(POSITION WOOD WITH BROAD FLAT SIDE ON THE TABLE AND THE NARROW EDGE AGAINST THE FENCE)
11
90° approx. 1" longer than your final length then make the miter cut as described above.
Right side
- Position molding with bottom of the molding against the base of the saw
- Miter left 45°
- Save the right side of cut
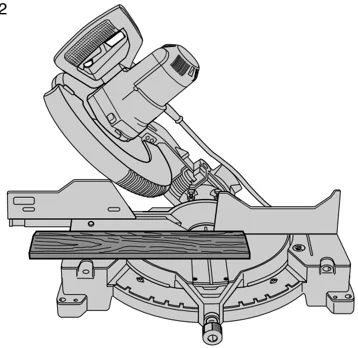
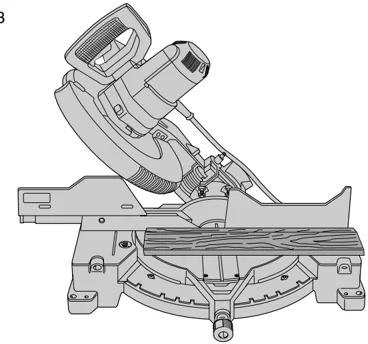
A third method of making the cut necessary is to make a zero degree miter, 45 degree bevel cut. Your saw can cut a bevel 6.1" wide.
CUTTING BASE MOLDING LAYING FLAT AND USING THE BEVEL FEATURE
- All cuts made with the saw set at 45° bevel and 0 miter
- All cuts made with back of molding laying flat on the saw as shown in figures 22 and 23.
- Move the left side fence out of the path of the blade before attempting any of the following cuts.
INSIDE CORNER: Left side
- Position molding with top of molding against the fence
- Save left side of cut
Right side
- Position molding with bottom of the molding against the fence
- Save left side of cut
OUTSIDE CORNER: Left side
- Position molding with bottom of the molding against the fence
- Save right side of cut
Right side
- Position molding with top of molding against the fence
- Save right side of cut
CUTTING CROWN MOLDING Your miter saw is better suited to the task of cutting crown molding than any tool made. In order to fit properly, crown molding must be compound mitered with extreme accuracy. The two flat surfaces on a given piece of crown molding are at angles that, when added together, equal exactly 90 degrees. Most, but not all, crown molding has a top rear angle (the section that fits flat against the ceiling) of 52 degrees and a bottom rear angle (the part that fits flat against the wall) of 38 degrees. Your miter saw has special pre-set miter latch points at 31.62 degrees left and right for cutting crown molding at the proper angle. There is also a mark on the Bevel scale at 33.85 degrees. The chart below gives the proper settings for cutting crown molding. (The numbers for the miter and bevel settings are very precise and are not easy to accurately set on your saw.) Since most rooms do not have angles of precisely 90 degrees, you will have to fine tune your settings anyway.
PRETESTING WITH SCRAP MATERIAL IS EXTREMELY IMPORTANT!
INSTRUCTIONS FOR CUTTING CROWN MOLDING LAYING FLAT AND USING THE COMPOUND FEATURES
- Move the left side fence out of the path of the blade before attempting any of the following cuts.
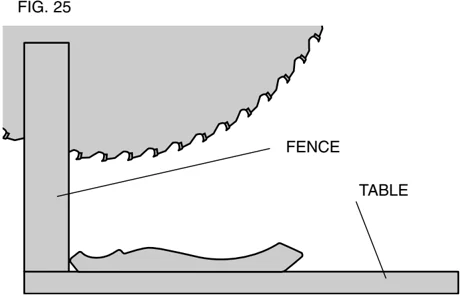
- Molding laying with broad back surface down flat on saw table (Fig. 25).
- The settings below are for all Standard (U.S.) crown molding with 52° and 38° angles.
\begin{tabular}{ll} \textbf{BEVEL SETTING} & \textbf{TYPE OF CUT} \ 33.85° & LEFT SIDE, INSIDE CORNER: \ & 1. Top of molding against fence \ & 2. Miter table set right 31.62° \ & 3. Save left end of cut \ 33.85° & RIGHT SIDE, INSIDE CORNER: \ & 1. Bottom of molding against fence \ & 2. Miter table set left 31.62° \ & 3. Save left end of cut \ 33.85° & LEFT SIDE, OUTSIDE CORNER: \ & 1. Bottom of molding against fence \ & 2. Miter table set left 31.62° \ & 3. Save right end of cut \ \end{tabular}
33.85° RIGHT SIDE, OUTSIDE CORNER:
- Top of molding against fence
- Miter table set right 31.62°
- Save right end of cut
When setting bevel and miter angles for all compound miters, remember that: The angles presented for crown moldings are very precise and difficult to set exactly. Since they can easily shift slightly and very few rooms have exactly square corners, all settings should be tested on scrap molding.
PRETESTING WITH SCRAP MATERIAL IS EXTREMELY IMPORTANT!
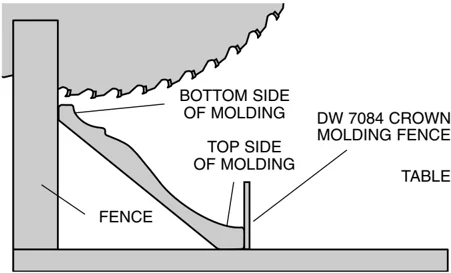
ALTERNATIVE METHOD FOR CUTTING CROWN MOLDING Place the molding on the table at an angle between the fence and the saw table, as shown in Figure 25A. Use of the crown molding fence accessory (DW7084) is highly recommended because of its degree of accuracy and convenience. The crown molding fence accessory is available at extra cost from your local dealer.
The advantage to cutting crown molding using this method is that no bevel cut is required. Minute changes in the miter angle can be made without affecting the bevel angle. This way, when corners other than 90 degrees are encountered, the saw can be quickly and easily adjusted for them. Use the crown molding fence accessory (DW7084) to maintain the angle at which the molding will be on the wall.
INSTRUCTIONS FOR CUTTING CROWN MOLDING ANGLED BETWEEN THE FENCE AND BASE OF THE SAW FOR ALL CUTS:
- Angle the molding so the bottom of the molding (part which goes against the wall when installed) is against the fence and the top of the molding is resting on the base of the saw, as shown in Figure 25A.
- The angled "flats" on the back of the molding must rest squarely on the fence and base of the saw.
INSIDE CORNER: Left side
- Miter right at 45°
- Save the right side of cut Right side
- Miter left at 45°
- Save left side of cut
OUTSIDE CORNER: Left side
- Miter left at 45°
- Save right side of cut Right side
- Miter right at 45°
- Save left side of cut
FIG. 28
FENCE
 RIGHT
FIG. 29
WRONG
Special Cuts NEVER MAKE ANY CUT UNLESS THE MATERIAL IS SECURED ON THE TABLE AND AGAINST THE FENCE.
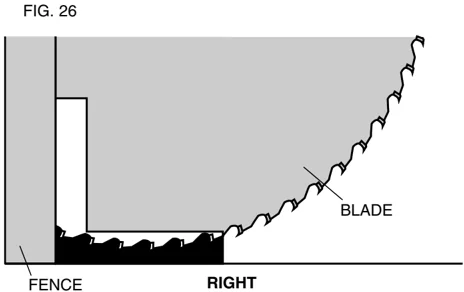
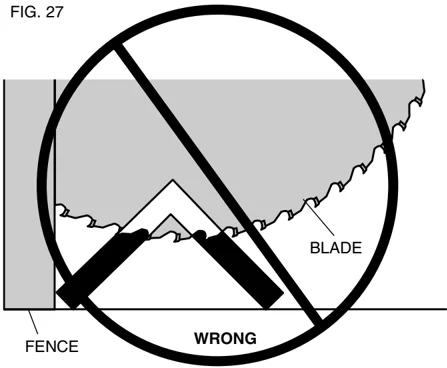
Aluminum Cutting: Certain workpieces, due to their size, shape or surface finish, may require the use of a clamp or fixture to prevent movement during the cut. Position the material so that you will be cutting the thinnest cross section, as shown in Figure 26. Figure 27 illustrates the wrong way to cut these extrusions. Use a stick wax cutting lubricant when cutting aluminum. Apply the stick wax directly to the saw blade before cutting. Never apply stick wax to a moving blade. The wax, available at most hardware stores and industrial mill supply houses, provides proper lubrication and keeps chips from adhering to the blade.
Be sure to properly secure workpiece. Refer to page 3 for correct saw blade.
Bowed Material: When cutting bowed material always position it as shown in Figure 28 and never like that shown in Figure 29. Positioning the material incorrectly will cause it to pinch the blade near the completion of the cut.
Cutting Plastic Pipe or Other Round Material Plastic pipe can be easily cut with your saw. It should be cut just like wood and CLAMPED OR HELD FIRMLY TO THE FENCE TO KEEP IT FROM ROLLING. This is extremely important when making angle cuts.
Cutting Large Material Occasionally you will encounter a piece of wood a little too large to fit beneath the blade guard. A little extra height can be gained by rolling the guard up out of the way, as shown in Figure 24. Avoid doing this as much as possible, but if need be, the saw will operate properly and make the bigger cut. NEVER TIE, TAPE, OR OTHERWISE HOLD THE GUARD OPEN WHEN OPERATING THIS SAW.
Maintenance
- All bearings are sealed. They are lubricated for life and need no further maintenance.
- Periodically clean all dust and wood chips from around AND UNDER the base and the rotary table. Even though slots are provided to allow debris to pass through, some dust will accumulate.
- The brushes are designed to give you several years of use. If they ever need replacement follow the instructions on page 6 or return the tool to the nearest service center for repair. A list of service center locations is packed with your tool.
Repairs To assure product SAFETY and RELIABILITY, repairs, maintenance and adjustment (including brush inspection and replacement) should be performed by authorized service centers or other qualified service organizations, always using identical replacement parts.
Three Year Limited Warranty DEWALT will repair, without charge, any defects due to faulty materials or workmanship for three years from the date of purchase. This warranty does not cover part failure due to normal wear or tool abuse. For further detail of warranty coverage and warranty repair information, visit www.dewalt.com or call 1-800-4-DEWALT (1-800-433-9258). This warranty does not apply to accessories or damage caused where repairs have been made or attempted by others. This warranty gives you specific legal rights and you may have other rights which vary in certain states or provinces.
13
In addition to the warranty, DEWALT tools are covered by our:
1 YEAR FREE SERVICE
DEWALT will maintain the tool and replace worn parts caused by normal use, for free, any time during the first year after purchase.
90 DAY MONEY BACK GUARANTEE
If you are not completely satisfied with the performance of your DEWALT Power Tool, Laser, or Nailer for any reason, you can return it within 90 days from the date of purchase with a receipt for a full refund – no questions asked.
RECONDITIONED PRODUCT: Reconditioned product is covered under the 1 Year Free Service Warranty. The 90 Day Money Back Guarantee and the Three Year Limited Warranty do not apply to reconditioned product.
FREE WARNING LABEL REPLACEMENT: If your warning labels become illegible or are missing, call 1-800-4-DEWALT for a free replacement.
Troubleshooting Guide
BE SURE TO FOLLOW SAFETY RULES AND INSTRUCTIONS
TROUBLE! SAW WILL NOT START
WHAT’S WRONG?
- Saw not plugged in
- Fuse blown or circuit breaker tripped
- Cord damaged
- Brushes worn out
WHAT TO DO...
- Plug in saw
- Replace fuse or reset circuit breaker
- Have cord replaced by authorized service center
- Have brushes replaced by authorized service center or replace them yourself as instructed on page 8
TROUBLE! SAW MAKES UNSATISFACTORY CUTS
WHAT’S WRONG?
- Dull blade
- Blade mounted backwards
- Gum or pitch on blade
- Incorrect blade for work being done
WHAT TO DO...
- Replace blade, see page 5
- Turn blade around, see page 5
- Remove blade and clean with turpentine and coarse steel wool or household oven cleaner
- Change the blade type, see page 5
TROUBLE! BLADE DOES NOT COME UP TO SPEED
WHAT’S WRONG?
- Extension cord too light or too long
- Low house current
WHAT TO DO...
- Replace with adequate size cord, see page 1
- Contact your electric company
TROUBLE! MACHINE VIBRATES EXCESSIVELY
WHAT’S WRONG?
- Saw not mounted securely to stand or work bench
- Stand or bench on uneven floor
- Damaged saw blade
WHAT TO DO...
- Tighten all mounting hardware, see page 4
- Reposition on flat level surface, see page 4
- Replace blade, see page 5
TROUBLE! DOES NOT MAKE ACCURATE MITER CUTS
WHAT’S WRONG?
- Miter scale not adjusted correctly
- Blade is not square to fence
- Blade is not perpendicular to table
- Workpiece moving
WHAT TO DO...
- Check and adjust, see page 6
- Check and adjust, see page 6
- Check and adjust fence, see page 6
- Clamp workpiece securely to fence
TROUBLE! MATERIAL PINCHES BLADE
WHAT’S WRONG?
- Cutting bowed material
WHAT TO DO...
- Position bowed material as shown on page 13
DEWALT Industrial Tool Co., 701 East Joppa Road, Baltimore, MD 21286 (FEB05) Form No. 630180-00 DW703 Copyright @ 2000, 2003, 2004, 2005 DeWALT The following are trademarks for one or more DEWALT power tools: the yellow and black color scheme; the “D” shaped air intake grill; the array of pyramids on the handgrip; the kit box configuration; and the array of lozenge-shaped humps on the surface of the tool.