DEWALT.
Instruction Manual Guide D’utilisation Manual de instrucciones
DW621
Plunge 2 HP Router Toupie plongeante de 2HP Rebajadora de columnas de 2 HP
www.DeWALT.com
If you have questions or comments, contact us. Pour toute question ou tout commentaire, nous contacter. Si tiene dudas o comentarios, contáctenos.
1-800-4-DeWALT


| English (original instructions) | 1 |
|---|---|
| Français (traduction de la notice d'instructions originale) | 9 |
| Español (traducido de las instrucciones originales) | 18 |
Definitions: Safety Alert Symbols and Words
This instruction manual uses the following safety alert symbols and words to alert you to hazardous situations and your risk of personal injury or property damage.
DANGER: Indicates an imminently hazardous situation which, if not avoided, will result in death or serious injury.
WARNING: Indicates a potentially hazardous situation which, if not avoided, could result in death or serious injury.
CAUTION: Indicates a potentially hazardous situation which, if not avoided, may result in minor or moderate injury.
(Used without word) Indicates a safety related message.
NOTICE: Indicates a practice not related to personal injury which, if not avoided, may result in property damage.
Fig. A
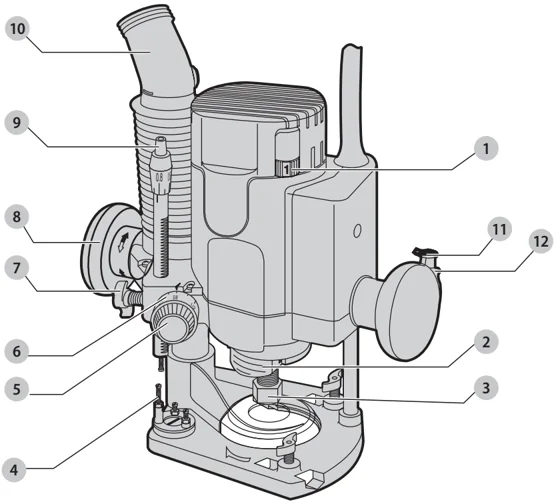
1 Speed control dial 2 Spindle lock 3 Collet nut 4 Revolver depth stop 5 Height adjustment knob 6 Quick adjuster 7 Depth stop locking bolt 8 Plunge lock handle 9 Fine adjustment knob 10 Dust extraction hose adapter 11 Thumb lock 12 Trigger
WARNING! Read all safety warnings and all instructions. Failure to follow the warnings and instructions may result in electric shock, fire and/or serious injury.
WARNING: To reduce the risk of injury, read the instruction manual.
If you have any questions or comments about this or any DEWALT tool, call us toll free at: 1-800-4-DEWALT (1-800-433-9258).
1
GENERAL POWER TOOL SAFETY WARNINGS
WARNING: Read all safety warnings, instructions, illustrations and specifications provided with this power tool. Failure to follow all instructions listed below may result in electric shock, fire and/or serious injury.
SAVE ALL WARNINGS AND INSTRUCTIONS FOR FUTURE REFERENCE.
The term “power tool” in the warnings refers to your mains-operated (corded) power tool or battery-operated (cordless) power tool.
1) Work Area Safety
a) Keep work area clean and well lit. Cluttered or dark areas invite accidents. b) Do not operate power tools in explosive atmospheres, such as in the presence of flammable liquids, gases or dust. Power tools create sparks which may ignite the dust or fumes. c) Keep children and bystanders away while operating a power tool. Distractions can cause you to lose control.
2) Electrical Safety
a) Power tool plugs must match the outlet. Never modify the plug in any way. Do not use any adapter plugs with earthed (grounded) power tools. Unmodified plugs and matching outlets will reduce risk of electric shock. b) Avoid body contact with earthed or grounded surfaces, such as pipes, radiators, ranges and refrigerators. There is an increased risk of electric shock if your body is earthed or grounded. c) Do not expose power tools to rain or wet conditions. Water entering a power tool will increase the risk of electric shock. d) Do not abuse the cord. Never use the cord for carrying, pulling or unplugging the power tool. Keep cord away from heat, oil, sharp edges or moving parts. Damaged or entangled cords increase the risk of electric shock. e) When operating a power tool outdoors, use an extension cord suitable for outdoor use. Use of a cord suitable for outdoor use reduces the risk of electric shock. f) If operating a power tool in a damp location is unavoidable, use a ground fault circuit interrupter (GFCI) protected supply. Use of a GFCI reduces the risk of electric shock.
3) Personal Safety
a) Stay alert, watch what you are doing and use common sense when operating a power tool. Do not use a power tool while you are tired or under the influence of drugs, alcohol or medication. A moment of inattention while operating power tools may result in serious personal injury. b) Use personal protective equipment. Always wear eye protection. Protective equipment such as dust mask, non-skid safety shoes, hard hat, or hearing protection used for appropriate conditions will reduce personal injuries. c) Prevent unintentional starting. Ensure the switch is in the off-position before connecting to power source and/or battery pack, picking up or carrying the tool. Carrying power tools with your finger on the switch or energizing power tools that have the switch on invites accidents. d) Remove any adjusting key or wrench before turning the power tool on. A wrench or a key left attached to a rotating part of the power tool may result in personal injury. e) Do not overreach. Keep proper footing and balance at all times. This enables better control of the power tool in unexpected situations. f) Dress properly. Do not wear loose clothing or jewelry. Keep your hair, clothing and gloves away from moving parts. Loose clothes, jewelry or long hair can be caught in moving parts. g) If devices are provided for the connection of dust extraction and collection facilities, ensure these are connected and properly used. Use of dust collection can reduce dust-related hazards. h) Do not let familiarity gained from frequent use of tools allow you to become complacent and ignore tool safety principles. A careless action can cause severe injury within a fraction of a second.
4) Power Tool Use and Care
a) Do not force the power tool. Use the correct power tool for your application. The correct power tool will do the job better and safer at the rate for which it was designed. b) Do not use the power tool if the switch does not turn it on and off. Any power tool that cannot be controlled with the switch is dangerous and must be repaired. c) Disconnect the plug from the power source and/ or remove the battery pack, if detachable, from the power tool before making any adjustments, changing accessories, or storing power tools. Such preventive safety measures reduce the risk of starting the power tool accidentally. d) Store idle power tools out of the reach of children and do not allow persons unfamiliar with the power tool or these instructions to operate the power tool. Power tools are dangerous in the hands of untrained users. e) Maintain power tools and accessories. Check for misalignment or binding of moving parts, breakage of parts and any other condition that may affect the power tool’s operation. If damaged, have the power tool repaired before use. Many accidents are caused by poorly maintained power tools. f) Keep cutting tools sharp and clean. Properly maintained cutting tools with sharp cutting edges are less likely to bind and are easier to control.
2
g) Use the power tool, accessories and tool bits etc. in accordance with these instructions, taking into account the working conditions and the work to be performed. Use of the power tool for operations different from those intended could result in a hazardous situation.
h) Keep handles and grasping surfaces dry, clean and free from oil and grease. Slippery handles and grasping surfaces do not allow for safe handling and control of the tool in unexpected situations.
5) Service a) Have your power tool serviced by a qualified repair person using only identical replacement parts. This will ensure that the safety of the power tool is maintained.
Additional Safety Rules for Routers
- Hold power tool by insulated gripping surfaces because the cutter may contact its own cord. Cutting a "live" wire may make exposed metal parts of the power tool "live" and shock the operator.
- Use clamps or another practical way to secure and support the workpiece to a stable platform. Holding the work by your hand or against the body leaves it unstable and may lead to loss of control.
- Metal cutting with router: If using router for metal cutting, clean out tool often. Metal dust and chips often accumulate on interior surfaces and could create a risk of serious injury, electrical shock or death.
- Never run the motor unit separate from the base. The motor is not designed to be handheld.
- Keep handles dry, clean and free from oil and grease. This will enable better control of the tool.
- Maintain a firm grip with both hands on the tool to resist starting torque. Maintain a firm grip on the tool at all times while operating.
- USE SHARP CUTTERS. Dull cutters may cause the router to swerve or stall under pressure.
- Keep hands away from cutting area above and below the base. Never reach under the workpiece for any reason. Keep the router base firmly in contact with the workpiece when cutting.
- Never touch the bit immediately after use. It may be extremely hot.
- Be sure that the motor has stopped completely before you lay the router down. If the bit is still spinning when the tool is laid down, it could cause injury or damage.
- Be sure that the router bit is clear of the workpiece before starting the motor. If the bit is in contact with the workpiece when the motor starts, it could make the router jump, causing damage or injury.
- Always follow the bit manufacturer's speed recommendations as some bit designs require specific speeds for safety or performance. If you are unsure of the proper speed or are experiencing any type of problem, contact the bit manufacturer.
- Do not use router bits with a diameter in excess of 2–3/8" (60 mm) in this tool.
- Do not hand-hold the router in an upside-down or horizontal position. The motor can separate from the base if not properly attached according to the instructions.
- Before starting the motor, check to see that the cord will not snag or impede the routing operation.
- Before starting the motor, clear the work area of all foreign objects.
- Keep cutting pressure constant. Do not overload motor.
- Provide clearance under workpiece for bit when through-cutting.
- Do not press spindle lock button while the motor is running. Doing so can damage the spindle lock.
- Always make sure the work surface is free from nails and other foreign objects. Cutting into a nail can cause the bit and the tool to jump.
Additional Safety Information ⚠️ WARNING: ALWAYS use safety glasses. Everyday eyeglasses are NOT safety glasses. Also use face or dust mask if cutting operation is dusty. ALWAYS WEAR CERTIFIED SAFETY EQUIPMENT:
- ANSI Z87.1 eye protection (CAN/CSA Z94.3),
- ANSI S12.6 (S3.19) hearing protection,
- NIOSH/OSHA/MSHA respiratory protection.
⚠️ WARNING: Some dust created by power sanding, sawing, grinding, drilling, and other construction activities contains chemicals known to the State of California to cause cancer, birth defects or other reproductive harm. Some examples of these chemicals are:
- lead from lead-based paints,
- crystalline silica from bricks and cement and other masonry products, and
- arsenic and chromium from chemically-treated lumber.
Your risk from these exposures varies, depending on how often you do this type of work. To reduce your exposure to these chemicals: work in a well ventilated area, and work with approved safety equipment, such as those dust masks that are specially designed to filter out microscopic particles.
- Avoid prolonged contact with dust from power sanding, sawing, grinding, drilling, and other construction activities. Wear protective clothing and wash exposed areas with soap and water. Allowing dust to get into your mouth, eyes, or lay on the skin may promote absorption of harmful chemicals.
⚠️ WARNING: Use of this tool can generate and/or disperse dust, which may cause serious and permanent respiratory or other injury. Always use NIOSH/OSHA approved respiratory protection appropriate for the dust exposure. Direct particles away from face and body.
⚠️ WARNING: Always wear proper personal hearing protection that conforms to ANSI S12.6 (S3.19)
3
during use. Under some conditions and duration of use, noise from this product may contribute to hearing loss.
- Air vents often cover moving parts and should be avoided. Loose clothes, jewelry or long hair can be caught in moving parts.
- An extension cord must have adequate wire size (AWG or American Wire Gauge) for safety. The smaller the gauge number of the wire, the greater the capacity of the cable, that is, 16 gauge has more capacity than 18 gauge. An undersized cord will cause a drop in line voltage resulting in loss of power and overheating. When using more than one extension to make up the total length, be sure each individual extension contains at least the minimum wire size. The following table shows the correct size to use depending on cord length and nameplate ampere rating. If in doubt, use the next heavier gauge. The lower the gauge number, the heavier the cord.
Minimum Gauge for Cord Sets
\begin{tabular}{|c|c|c|c|c|} \hline \textbf{Volts} & \multicolumn{4}{c|}{\textbf{Total Length of Cord in Feet (meters)}} \ \hline 120 V & 25 (7.6) & 50 (15.2) & 100 (30.5) & 150 (45.7) \ \hline 240 V & 50 (15.2) & 100 (30.5) & 200 (61.0) & 300 (91.4) \ \hline \end{tabular}
\begin{tabular}{|c|c|c|c|c|c|} \hline \multicolumn{2}{|c|}{\textbf{Ampere Rating}} & \multicolumn{4}{c|}{\textbf{American Wire Gauge}} \ \cline{1-2} \textbf{More Than} & \textbf{Not More Than} & & & & \ \hline 0 & 6 & 18 & 16 & 16 & 14 \ \hline 6 & 10 & 18 & 16 & 14 & 12 \ \hline 10 & 12 & 16 & 16 & 14 & 12 \ \hline 12 & 16 & 14 & 12 & Not Recommended & \ \hline \end{tabular}
The label on your tool may include the following symbols. The symbols and their definitions are as follows:
- V ........ volts
- Hz ........ hertz
- min ........ minutes
- --- or DC ........ direct current
- Ⓢ ........ Class I Construction (grounded)
- ./min ........ per minute
- BPM ........ beats per minute
- IPM ........ impacts per minute
- RPM ........ revolutions per minute
- sfpm ........ surface feet per minute
- SPM ........ strokes per minute
- A ........ amperes
- W ........ watts
- ~ or AC ........ alternating current
- ~ or AC/DC ........ alternating or direct current
- □ ........ Class II Construction (double insulated)
- $n_0$ ........ no load speed
- $n$ ........ rated speed
- ........ earthing terminal
- ........ safety alert symbol
- △ ........ visible radiation
- 🥼 ........ wear respiratory protection
- 👁 ........ wear eye protection
- 🎧 ........ wear hearing protection
- 📖 ........ read all documentation
SAVE THESE INSTRUCTIONS FOR FUTURE USE
Motor
Be sure your power supply agrees with the nameplate marking. Voltage decrease of more than 10% will cause loss of power and overheating. DEWALT tools are factory tested; if this tool does not operate, check power supply.
COMPONENTS (FIG. A)
⚠ WARNING: Never modify the power tool or any part of it. Damage or personal injury could result. Refer to Figure A at the beginning of this manual for a complete list of components.
Intended Use
This heavy-duty router is designed for professional routing applications. DO NOT use under wet conditions or in presence of flammable liquids or gases. This is a professional power tool. DO NOT let children come into contact with the tool. Supervision is required when inexperienced operators use this tool.
ASSEMBLY AND ADJUSTMENTS
⚠ WARNING: To reduce the risk of serious personal injury, turn unit off and disconnect it from power source before making any adjustments or removing/installing attachments or accessories. An accidental start-up can cause injury.
Bit Installation and Removal (Fig. B, C)
NOTE: Always snap the collet firmly into the collet nut, (past the retainer spring) before installing a bit.
Use the supplied wrench and the spindle lock 2 as necessary to loosen (counterclockwise) the collet nut 3.
FIG. B
 Insert the round shank of the desired router bit into the loosened collet as far as it will go and then pull it out about 1/16" (1.5 mm). Hold the spindle shaft by depressing the spindle lock button, while firmly tightening the collet nut with the wrench provided to prevent the bit from slipping. Your router has a unique locking system for retaining the bit. When removing a bit, the collet nut must be loosened with the wrench. The collet nut will turn approximately 3/4 of a turn and then become tight again. At this point the bit can't be removed. Using the same procedure, loosen the nut a second time. This lifts the collet and makes it easy to remove the bit.
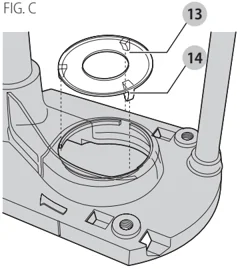
NOTE: Your router is equipped with a clear plastic cap 13 over the cutting area. This cap assists with dust extraction. When installing a router bit over 1–1/8" (28 mm) in
diameter, ensure the plastic cap is removed or positioned above the cutting portion of the bit (Fig. C).
To remove the cap, push it from the bottom of the router. To re-install the cap, align the tabs 14 and snap it into place.
FIG. C
Collets (Fig. B)
WARNING: Projectile hazard. Only use bits with shanks that match the installed collet. Smaller shank bits will not be secure and could become loose during operation.
CAUTION: Never tighten the collet without first installing a router bit in it. Tightening an empty collet, even by hand, can damage the collet.
This tool comes with both 1/4" (6.35 mm) and 1/2" (12.7 mm) collets. To change collet sizes, unscrew the collet assembly, as described above. The collet and the collet nut are connected. Do not attempt to remove the collet from the collet nut.
Controls (Fig. D)
Electronic Speed Control Dial
The speed of your router is variable. Use the electronic speed control dial 1 to produce uniform cutting results in wood, plastics and aluminum. Use the lower settings (1–3) for large diameter cutters and the higher settings for small diameter cutters. See Table A for more information.
Your router is equipped with constant speed cutting—as you load the router, the selected cutting speed does not slow down during normal use. The electronic control governs the motor and gives you a consistent finish to your work. Only under very heavy loading will the speed of the unit fall below the governed speed.
To set the router speed (from 8000 rpm to 24000 rpm) rotate the speed control wheel shown in Figure D. The higher the number the higher the speed. Consult the table below to help select the proper speed for your application.
TABLE A: SPEED SELECTION CHART
| DIAL SETTING | APPROX. RPM |
|---|---|
| 1 | 8000 |
| 2 | 10500 |
| 3 | 13500 |
| 4 | 16500 |
| 5 | 19000 |
| 6 | 22000 |
| 7 | 24000 |
The speeds in this chart are approximate and are for reference only. Your router may not exactly produce the speed listed for the dial setting.
WARNING: Always follow the bit manufacturer’s speed recommendations as some bit designs require specific speeds for safety or performance.
If you are unsure of the proper speed or are experiencing any type of problem, contact the bit manufacturer.
WARNING: Do not operate tools rated “AC only” on a DC supply. Loss of speed control may result, causing tool damage and possible hazard to the operator.
WARNING: If the speed control ceases to operate, or is intermittent, stop using the tool immediately. Take it to a DEWALT factory or authorized service facility for repair.
NOTICE: The router is equipped with electronics to monitor and maintain the speed of the tool while cutting. In low and medium speed operation, the speed control prevents the motor speed from decreasing. If you expect to hear a speed change and continue to load the motor, you could damage the motor by overheating. Reduce the depth of cut and/or slow the feed rate to prevent tool damage.
Adjusting the Depth of Cut
Quick Adjustment Using Rack and Pinion Height Adjustment (Fig. C, E)
- It may be necessary to remove the plastic cap 13 before making adjustments.
- Unlock the plunge lock handle 8.
- Lower the router carriage until the cutter is in contact with the workpiece.
- Tighten the plunge lock handle by turning it clockwise.
- Turn the height adjustment knob 5 counterclockwise until it hits the revolver depth stop 4.
- Set the quick adjuster 6 to zero, by turning the inner ring knob clockwise.
- Adjust the depth of cut by rotating the height adjust knob 5 clockwise to the desired depth of cut. The adjustment range is indicated by the arrow.
- Tighten the plunge limiter by turning the depth stop bolt 7 clockwise.
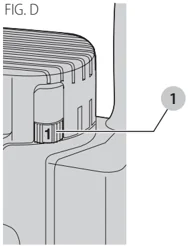
FIG. E
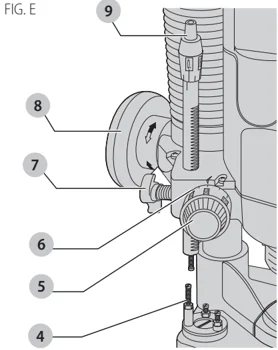
Triple Depth Adjustment Using the Revolver Depth Stop (Fig. E)
WARNING: Do not change the revolver depth stop while the router is running. This will place your hands too near the cutter head.
The revolver depth stop can be used to set three different depths. This is useful for deep cuts, performed in steps.
- Place a depth template between the depth stop and the revolver depth stop 4 to adjust the exact cutting depth.
- If required, set all three screws.
Fine Adjustment (Fig. E) Use the fine adjuster when not using a depth template, or if the depth of cut needs readjustment.
- Adjust the depth of cut as described above.
- Set the fine adjustment knob 9 to zero using the inner ring. Hold the top portion while setting the lower ring to zero.
- Rotate the fine adjustment knob 9 to the required position. Graduations are on the top of the fine adjustment knob.
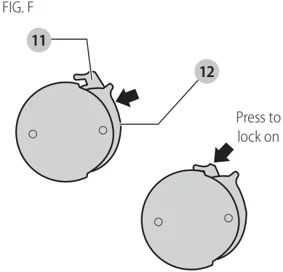
Lock-On/Lock-Off Switch (Fig. F) The lock-on/lock-off switch is located in the handle on the right side. The router is normally locked-off. To start the router, press the thumb lock 11 and squeeze the trigger 12. To lock the switch on, squeeze the trigger, press the thumb lock forward and release the trigger. To turn the router off, release the switch. If the tool is locked-on, press the trigger again and release the switch. NOTE: Loosen the plunge lock handle 8 and allow the router carriage to return to its rest position before switching off.
FIG. F
OPERATION
WARNING: To reduce the risk of serious personal injury, turn unit off and disconnect it from power source before making any adjustments or removing/installing attachments or accessories. An accidental start-up can cause injury.
CAUTION: Before connecting tool to power source, check to see that the switch is in the "OFF" position. An accidental start-up can cause injury.
CAUTION: Turn the router on before plunging the cutter head into the workpiece.
After setting the cutting depth as described, locate the router such that the bit is directly over the place you will be cutting. With the router running, lower the unit smoothly down into the workpiece. (DO NOT JAM THE ROUTER DOWN). When the tool reaches the pre-set depth, tighten the plunge lock. When you have finished routing, loosen the plunge lock and let the spring lift the router directly out of the workpiece.
NOTE: Always feed the router opposite to the direction in which the cutter is rotating.
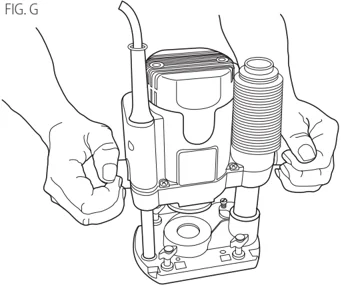
Proper Hand Position (Fig. G)
WARNING: To reduce the risk of serious personal injury, ALWAYS use proper hand position as shown.
WARNING: To reduce the risk of serious personal injury, ALWAYS hold securely in anticipation of a sudden reaction.
Proper hand position requires one hand on each plunge lock handle.
6
FIG. G
Direction of Feed (Fig. H, I)
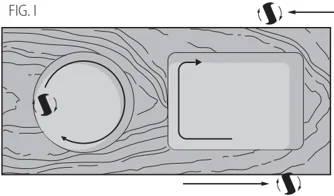
Figures H and I show proper direction of feed for some typical cuts.
Mold the outside edge of a piece of stock by:
a. mold the end grain, left to right,
b. do the straight grain side moving left to right,
c. finish the other end grain side and
d. do the remaining straight grain edge
FIG. H
 The direction of feed is important in router usage. Be sure the cutter is rotating into the stock by moving left to right on outside edges and clockwise on inside cuts.
WARNING: Avoid climb-cutting (cutting in direction opposite than shown in Figure I). Climb-cutting increases the chance for loss of control resulting in possible injury. When climb-cutting is required (backing around a corner), exercise extreme caution to maintain control of router. Make smaller cuts and remove minimal material with each pass.
FIG. I

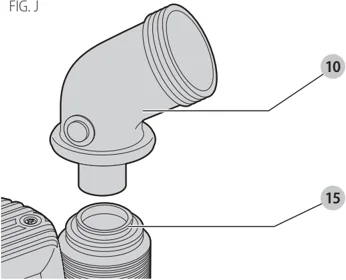
Dust Collection and Extraction (Fig. J)
To set the router for dust extraction
- If required, insert the dust extraction hose adapter 10 into the dust extraction port 15.
- Slip the end of any standard vacuum cleaner tube into the hose adapter.
- When using dust extraction, be sure that the vacuum cleaner is out of the way and secure so that it will not tip over or interfere with the router or workpiece. The vacuum hose and power cord must also be positioned so that they don't interfere with the router or workpiece. If the vacuum cleaner or vacuum hose cannot be positioned properly, it should be removed.
- Turn on vacuum cleaner before router.
- Empty the vacuum cleaner as necessary.
FIG. J
 NOTE: The router comes with a clear plastic removable guard over the cutting area. Do not attempt to plunge cut through the plastic guard. The guard is used to assist the dust collection.
Your router includes a dust extraction cap. Be sure it is in place over the dust extraction port if you are not using a vacuum.
 NOTE: The router comes with a clear plastic removable guard over the cutting area. Do not attempt to plunge cut through the plastic guard. The guard is used to assist the dust collection.
Your router includes a dust extraction cap. Be sure it is in place over the dust extraction port if you are not using a vacuum.
MAINTENANCE
WARNING: To reduce the risk of serious personal injury, turn unit off and disconnect it from power source before making any adjustments or removing/installing attachments or accessories. An accidental start-up can cause injury.
Cleaning
WARNING: Blow dirt and dust out of all air vents with clean, dry air at least once a week. To minimize the risk of eye injury, always wear ANSI Z87.1 approved eye protection when performing this. WARNING: Never use solvents or other harsh chemicals for cleaning the non-metallic parts of the tool. These chemicals may weaken the plastic materials used in these parts. Use a cloth dampened only with water and mild soap. Never let any liquid get inside the tool; never immerse any part of the tool into a liquid.
7
ENGLISH
Use only a DRY cloth to wipe the plunge rods. These rods require no lubrication. Lubricants attract dust, reducing the performance of your tool.
Accessories
WARNING: Since accessories, other than those offered by DEWALT, have not been tested with this product, use of such accessories with this tool could be hazardous. To reduce the risk of injury, only DEWALT recommended accessories should be used with this product.
Recommended accessories for use with your tool are available at extra cost from your local dealer or authorized service center. If you need assistance in locating any accessory, please contact DEWALT Industrial Tool Co., 701 East Joppa Road, Towson, MD 21286, call 1-800-4-DEWALT (1-800-433-9258) or visit our website: www.dewalt.com.
Repairs
WARNING: To assure product SAFETY and RELIABILITY, repairs, maintenance and adjustment (including brush inspection and replacement, when applicable) should be performed by a DeWALT factory service center or a DeWALT authorized service center. Always use identical replacement parts.
Register Online
Thank you for your purchase. Register your product now for:
- WARRANTY SERVICE: Registering your product will help you obtain more efficient warranty service in case there is a problem with your product.
- CONFIRMATION OF OWNERSHIP: In case of an insurance loss, such as fire, flood or theft, your registration of ownership will serve as your proof of purchase.
- FOR YOUR SAFETY: Registering your product will allow us to contact you in the unlikely event a safety notification is required under the Federal Consumer Safety Act.
Register online at www.dewalt.com/register.
Three Year Limited Warranty
DeWALT will repair, without charge, any defects due to faulty materials or workmanship for three years from the date of purchase. This warranty does not cover part failure due to normal wear or tool abuse. For further detail of warranty coverage and warranty repair information, visit www.dewalt.com or call 1-800-4-DEWALT (1-800-433-9258). This warranty does not apply to accessories or damage caused where repairs have been made or attempted by others. THIS LIMITED WARRANTY IS GIVEN IN LIEU OF ALL OTHERS, INCLUDING THE IMPLIED WARRANTY OF MERCHANTABILITY AND FITNESS FOR A PARTICULAR PURPOSE, AND EXCLUDES ALL INCIDENTAL OR CONSEQUENTIAL DAMAGES. Some states do not allow limitations on how long an implied warranty lasts or the exclusion or limitation of incidental or consequential damages, so these limitations may not apply to you. This warranty gives you specific legal rights and you may have other rights which vary in certain states or provinces. In addition to the warranty, DeWALT tools are covered by our:
1 YEAR FREE SERVICE
DeWALT will maintain the tool and replace worn parts caused by normal use, for free, any time during the first year after purchase.
90 DAY MONEY BACK GUARANTEE
If you are not completely satisfied with the performance of your DEWALT Power Tool, Laser, or Nailer for any reason, you can return it within 90 days from the date of purchase with a receipt for a full refund – no questions asked.
LATIN AMERICA: This warranty does not apply to products sold in Latin America. For products sold in Latin America, see country specific warranty information contained in the packaging, call the local company or see website for warranty information.
FREE WARNING LABEL REPLACEMENT: If your warning labels become illegible or are missing, call 1-800-4-DEWALT (1-800-433-9258) for a free replacement.
8
DEWALT Industrial Tool Co., 701 East Joppa Road, Towson, MD 21286 (OCT21) Part No. NA123657 DW621, Copyright © 1996, 2014, 2017, 2021 DEWALT The following are trademarks for one or more DEWALT power tools: the yellow and black color scheme, the “D” shaped air intake grill, the array of pyramids on the handgrip, the kit box configuration, and the array of lozenge-shaped humps on the surface of the tool.