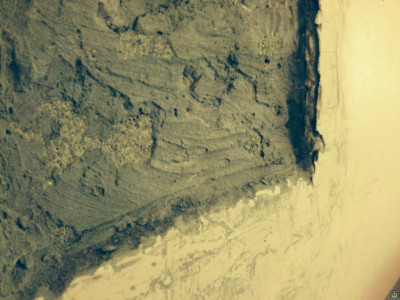
It's from an old ac wall unit. The previous home owners removed it and just filled the entire hole from one side to the other with concrete. I'm only concerned with the interior for now. The concrete wasn't even put in with any care, it buldges out a good half inch and is just a horrible mess. I was trying to chip it down a bit to then plaster and paint it but I ended up chipping off so much that now I have a hole almost an inch deep in some places. It seems like too big a hole for me to fill with just patching compound. I don't think I can fit any wood and I don't know how I'd adhere a peice of drywall. I'm going to try to include pictures. Any advice would be greatly appreciated. [IMG]
If it is completely below the desired surface height, you are half way home. Get some Type S/Stucco mix from HD and a small container of link (acrylic bonding compound) Paint the hole with link and fill it with the stucco mix. Trowel it out the best you can and strike it off with a straight edge, along the wall. That should get you a surface flat enough to plaster.
It might even be worthwhile painting the whole wall with link before you plaster so you could just go ahead and get a jug.
"Sergio B" wrote in message news:b300$543c8df3$cf3aab60$ snipped-for-privacy@news.flashnewsgroups.com
Get a bucket of drywall SETTING compound and use that to fair off the area. Since it is a sizeable area, you will probably have to do it in stages, filling the deepest first, letting that set, them filling more, letting that set etc. Once you get the entire area to 1/8" or so, slather it on and strike off with something that will span the area.
Unlike type "S" mortar, thinset or any other cementatious material, the drywall compound is sandable so it is entirely possible to effect a perfect repair over a largish area. I have done so more than once
Before starting, it is useful - but not required - to "key" along the the perimeter or part of it. By "key" I mean to chisel out a bit so that the back is wider than the front. Like a dovetail. That creates a mechanical bond as well as a chemical one. Some people paint on a layer of white glue, letting it dry before plastering, to increase bonding. . It is important that you use setting compound rather than drying. The drying type is premixed and hardens because water evaporates from it...add water and it melts again. Setting compound is a powder to which you add water; the water starts a chemical reaction which hardens the compound; once hardened, it won't melt if you wet it. It won't melt because it has become plaster of paris. I suggest using the DW compound because it is a fraction of the cost of buying something labled "Plaster of Paris".
Setting compound comes in various types depending upon how long it takes to set up...20 minute, 40 minute, etc. Get one that is long enough to do what you need to do - including mixing time - but not so long that you have to sit around waiting. Mix only enough for the current need.
From the pic, I can't even tell what the rest of the wall looks like and what the desired end result needs to be. But from what I can see, the above approach sounds reasonable.
I was unable to view the picture you provided in your link, so I'll explain how I'd go about doing this repair based on what I envision this concrete to be like:
I would drill holes through the concrete with a rotary hammer and then cut between the holes with a RemGrit blade in a reciprocating saw. If you drill 4 holes in the block, cut between the bottom two holes first.
'Disston Tools'
formatting link
That will allow you to remove the concrete from the wall.
Once you have the concrete out, frame the hole with the same size lumber as was used to build the exterior wall on your house. ie: 2X4's or
2X6's.
Fasten 1/2 inch plywood to the outside of the framed hole and cover with some sheet metal (taped or caulked along the top edge to prevent rain water from getting in) for the time being.
Install insulation and vapour barrier on the inside and cut a piece of drywall to fit over the hole. Staple the vapour barrier to the framing and secure the drywall to the framing with drywall screws.
That's how any contractor you were to hire would go about fixing this problem.
I had to scroll to the right to see the wall and the hole together.
I agree with either the idea of using Type S Stucco or Mason Mix Type S masonry mortar from Home Depot, or setting type joint compund, or both (cement first, then the setting type compound).
HomeOwnersHub website is not affiliated with any of the manufacturers or service providers discussed here.
All logos and trade names are the property of their respective owners.